
Инициализация и форматирование диска iSCSI
Подключенный iSCSI диск необходимо подготовить к работе (инициализировать и отформатировать).
10. В разделе «Администрирование» откройте вкладку «Управление компьютером».
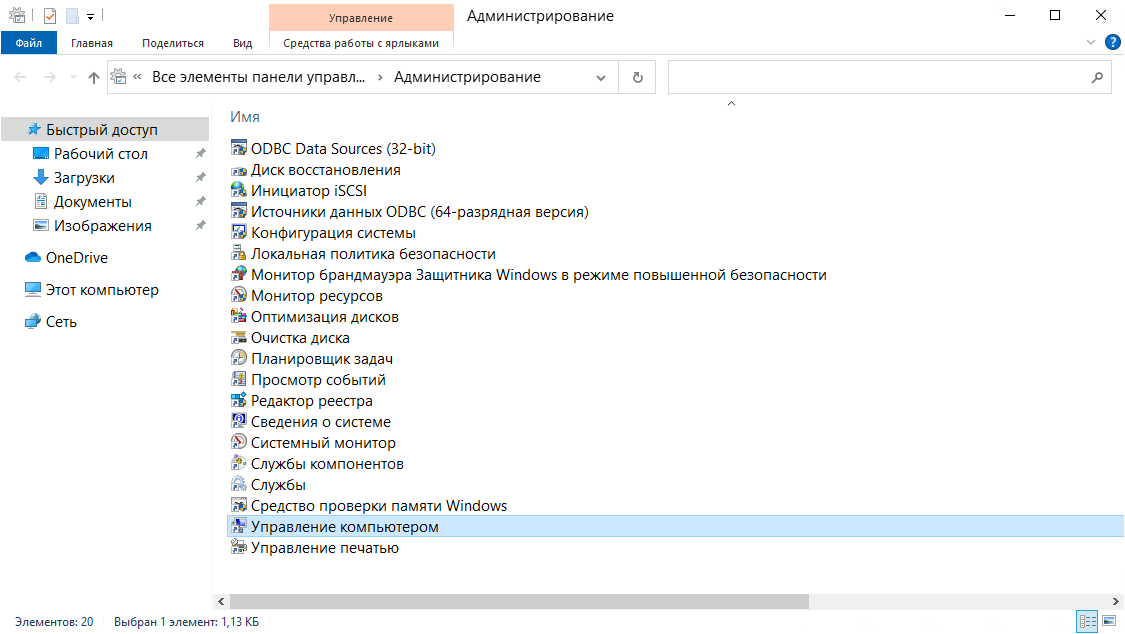
11. Перейдите в раздел «Управление дисками».
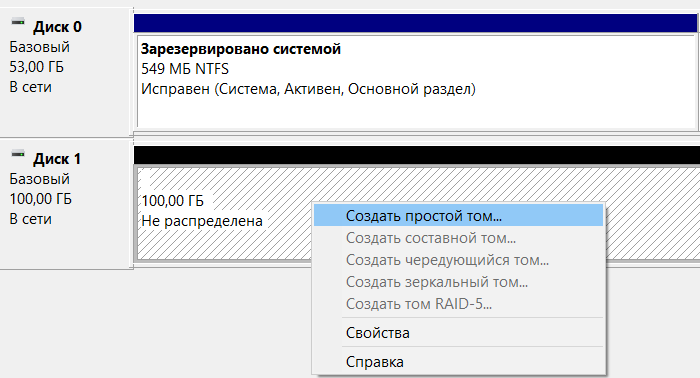
12. Убедитесь, что ваш диск отображается, его состояние – «Вне сети».

13. Выберите из контекстного меню пункт «В сети».
14. Выполните инициализацию диска.
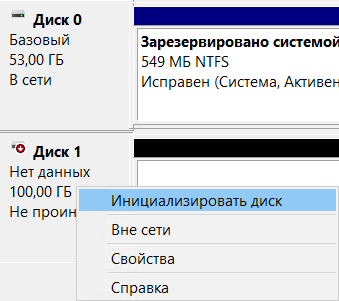
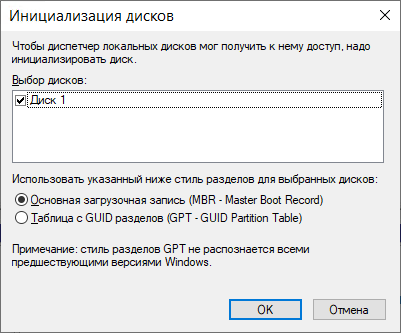
15. Проверьте, что статус диска изменился на «В сети», но на нём отсутствуют разделы и файловая система.

16. Из контекстного меню на не размеченном диске выберите «Создать простой том».
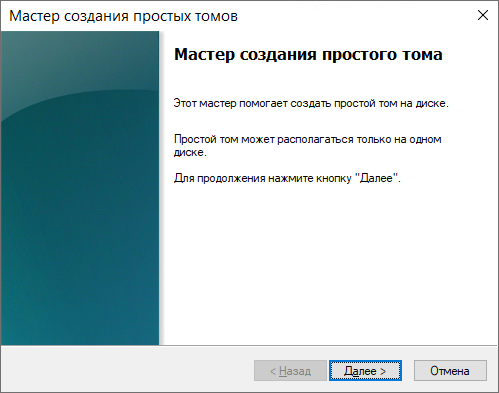
17. После открытия «Мастера создания простого тома» нажмите кнопку «Далее».
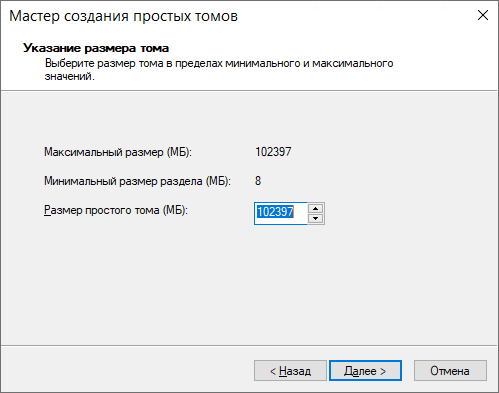
18. Укажите в соответствующем поле размер раздела, или оставьте без изменений значение «по умолчанию» (если необходимо использовать весь диск под один раздел).
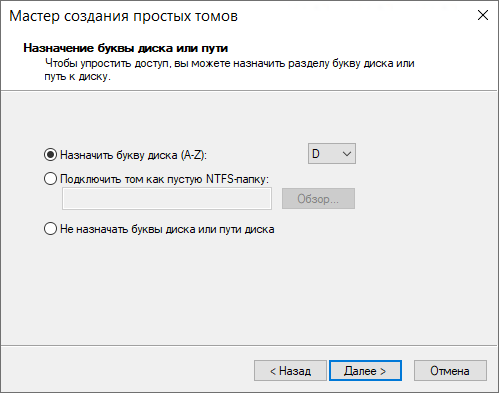
19. Назначьте букву диска для нового раздела.
20. Выберите тип файловой системы и метку тома.
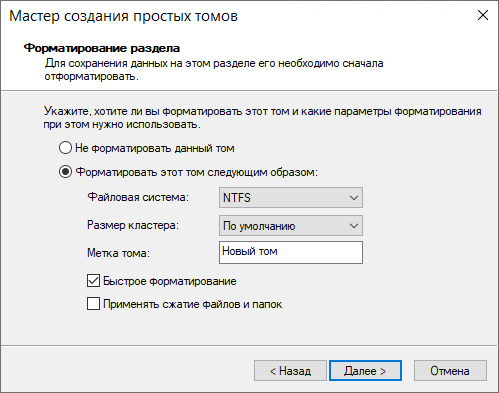
21. Нажмите кнопку «Готово» и убедитесь в завершении форматирования тома.
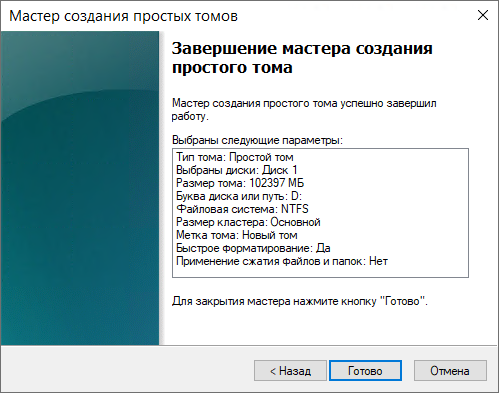
22. Проверьте, что новый том находится в состоянии «Исправен».

23. Убедитесь, что новый том отображается среди дисков в «Проводнике».
Сервер alice 10.0.32.201[]
apt-get update
apt-get install drbd8-utils -y
modprobe drbd
После установки отредактируем файл конфигурации на сервере alice, закомментировав или удалив все имеющиеся в файле строки и внеся свои
сохраняем копию оригинального конфигурационного файла
cp /etc/drbd.conf /etc/drbd.conf.orig
очищаем конфигурационный файл от содержимого
echo ""> /etc/drbd.conf
nano /etc/drbd.conf
global      { usage-count yes;    }
common      { syncer { rate 1G; } }
resource r0 { protocol C;
                         startup  { become-primary-on both;   }
                         net      { allow-two-primaries;      }
                         on alice { device    /dev/drbd0;
                                    disk      /dev/sdb;
                                    address   10.0.32.201:7789;
                                    meta-disk internal;       }
                         on  bob  { device    /dev/drbd0;
                                    disk      /dev/sdb;
                                    address   10.0.32.202:7789;
                                    meta-disk internal;       }
            }
Создаем массив
drbdadm create-md r0
Запускаем службу
/etc/init.d/drbd start
Установка и настройка инициатора iSCSI на Windows Server
Следующим шагом является подключение к виртуальному диску iSCSI, который вы создали со второго сервера (инициатора). Откройте панель управления и запустите инициатор iSCSI (или запустите
iscsicpl.exe
).
В консоли управления службами (
services.msc
), задайте тип автоматического запуска для службы Microsoft iSCSI Initiator Service или используйте следующую команду:
Перейдите на вкладку Обнаружение, нажмите Обнаружение портала и введите IP-адрес первого сервера (целевого iSCSI). Чтобы направить трафик хранилища через определенный сетевой интерфейс, нажмите Дополнительно и измените значения по умолчанию в раскрывающихся списках на следующие: Локальный адаптер —> Microsoft iSCSI Initiator, IP-адрес инициатора —> 172.17.244.8.
Чтобы подключиться к хранилищу iSCSI, откройте TCP-порты 860 и 3260 в брандмауэре Windows.
Затем перейдите на вкладку Targets, и вы увидите там новое подключение. Чтобы включить его, нажмите Подключить -> Дополнительно, выберите нужные значения в раскрывающихся списках, установите флажок Включить вход по протоколу CHAP и введите имя пользователя и 12-значный пароль.
Затем инициализируйте диск iSCSI, который изначально находится в автономном состоянии. Для этого выберите Онлайн, а затем Инициализировать диск в контекстном меню нового диска в консоли управления дисками. Создайте один или несколько разделов на новом диске и назначьте им буквы и метки дисков. Отформатируйте тома в NTFS.
Чтобы быстро инициализировать и отформатировать новый диск, вы можете использовать следующую однострочную команду PowerShell (см. пример в статье об управлении дисками и разделами с помощью PowerShell):
Примечание. Диски iSCSI не поддерживают ReFS.
Теперь вы можете использовать виртуальный диск, подключенный по iSCSI с другого сервера, как обычный локальный диск.
Такой виртуальный диск iSCSI можно использовать в Windows Server для создания виртуального RAM-диска в памяти.
Вы также можете подключить диск iSCSI на узле-инициаторе с помощью PowerShell. Чтобы получить целевой IQN, используйте
Get-iSCSITarget
командлет.
Чтобы подключиться к цели iSCSI, выполните следующую команду:
При использовании дополнительной проверки подлинности CHAP укажите учетные данные для проверки подлинности с помощью следующей команды:
Если вы хотите обеспечить высокую доступность и балансировку нагрузки для ваших дисков iSCSI, вы можете использовать несколько резервных сетевых компонентов (сетевые адаптеры, сетевые коммутаторы) и модуль MPIO.
Настройка цели iSCSI
Затем вам нужно будет создать устройство LUN (логический номер устройства) на вашем сервере iSCSI. LUN — это внутренние устройства хранения, к которым инициатор будет подключаться и использовать позже.
Вы можете сделать это, создав файл конфигурации в каталоге /etc/tgt/conf.d:
nano /etc/tgt/conf.d/iscsi.conf
Добавьте следующие строки:
<target iqn.2019-11.example.com:lun1>
     # Provided device as an iSCSI target
     backing-store /dev/sdb1
     initiator-address 192.168.0.102
    incominguser iscsi-user password
     outgoinguser iscsi-target secretpass
</target>
Сохраните и закройте файл, когда закончите. Затем перезапустите службу TGT, чтобы применить изменения конфигурации:
systemctl restart tgt
Вот краткое объяснение каждого параметра:
target : это имя конкретной цели.
backing-store : этот параметр указывает диск для хранения, который будет использоваться инициатором.
адрес инициатора: это IP-адрес инициатора.
incominguser : это входящее имя пользователя/пароль для защиты LUN.
outgoinguser : исходящие имя пользователя/пароль для взаимной аутентификации CHAP.
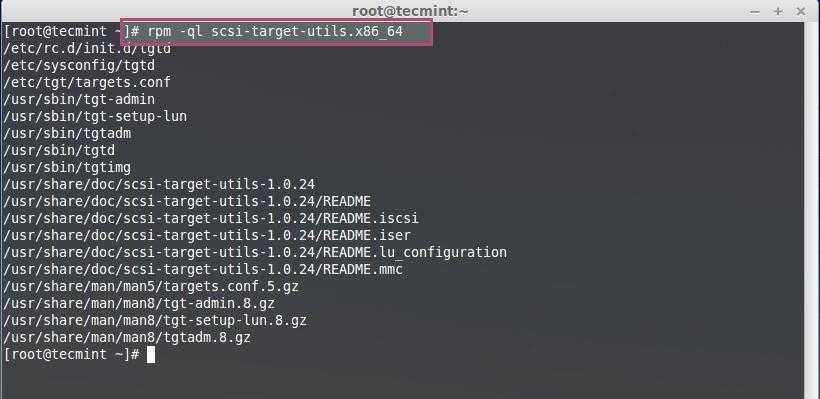
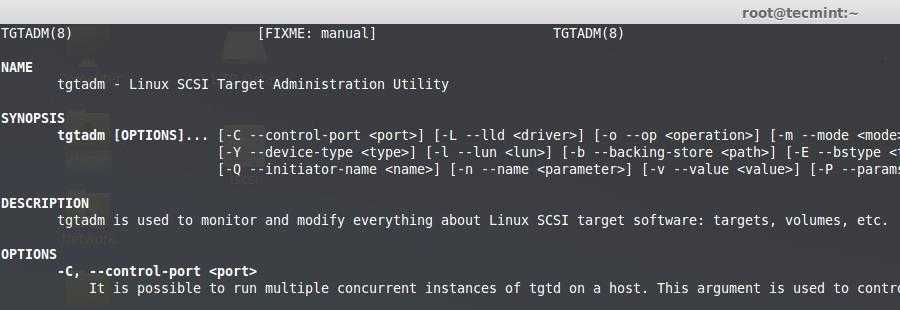
После перезапуска службы TGT проверьте целевой сервер iSCSI с помощью следующей команды:
tgtadm --mode target --op show
Вы должны увидеть, что цель iSCSI становится доступной:
Target 1: iqn.2019-11.example.com:lun1
    System information:
        Driver: iscsi
        State: ready
    I_T nexus information:
    LUN information:
        LUN: 0
            Type: controller
            SCSI ID: IET     00010000
            SCSI SN: beaf10
            Size: 0 MB, Block size: 1
            Online: Yes
            Removable media: No
            Prevent removal: No
            Readonly: No
            SWP: No
            Thin-provisioning: No
            Backing store type: null
            Backing store path: None
            Backing store flags:
        LUN: 1
            Type: disk
            SCSI ID: IET     00010001
            SCSI SN: beaf11
            Size: 2146 MB, Block size: 512
            Online: Yes
            Removable media: No
            Prevent removal: No
            Readonly: No
            SWP: No
            Thin-provisioning: No
            Backing store type: rdwr
            Backing store path: /dev/sdb1
            Backing store flags:
    Account information:
        iscsi-user
        iscsi-target (outgoing)
    ACL information:
        192.168.0.102
iSCSI target
Debian
# apt install istgt

# cp /usr/share/doc/istgt/examples/istgt.conf.gz /etc/istgt/
# gunzip /etc/istgt/istgt.conf.gz

debian11#cp /usr/share/doc/istgt/examples/istgt.conf /etc/istgt/

# cd /etc/istgt/
# cat istgt.conf
...

...
   Portal DA1 192.168.X.15:3260
...

...
   Netmask 192.168.X.0/24
...

...
#   LUN0 Storage /disk2/filedisk 100MB
#   LUN0 Storage /dev/drbd0 Auto
...
# service istgt start
Ubuntu
root@server:~# apt-get install iscsitarget

root@server:~# init 6

root@server:~# cat /etc/iet/ietd.conf
Target iqn.2016-12.un.corpX.gate:san1.filedisk
  Lun 0 Path=/disk2/filedisk,Type=fileio
root@server:~# cat /etc/default/iscsitarget
...
ISCSITARGET_ENABLE=true
...
root@server:~# service iscsitarget start

root@server:~# netstat -apn | grep ietd
Creating Target Portal Group (TPG)
A default Target Portal Group (TPG) is created when you create a new IQN. A network portal is an IP address:port pair. An iSCSI target is accessed by remote systems through the network portal. The default portal of 0.0.0.0:3260 allows the iSCSI server to listen on all IPv4 addresses on port 3260. You can delete the default portal and configure portals as needed. Both IPv4 and IPv6 addresses are supported.
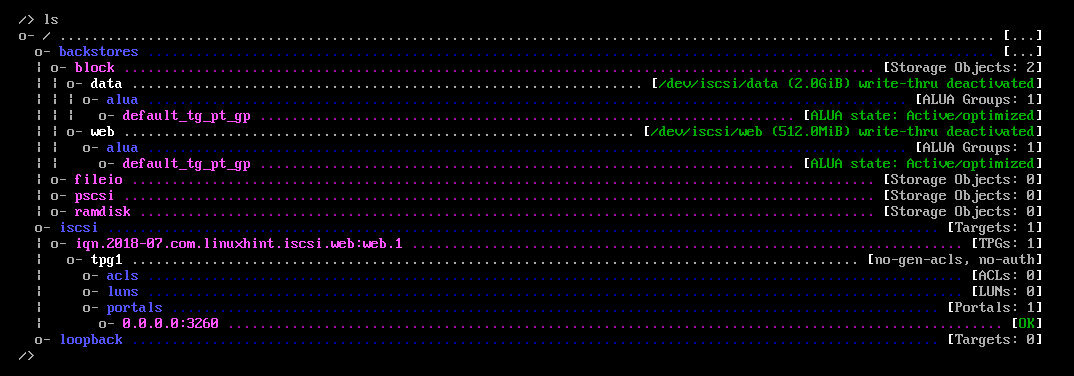
1. As you can see in the command below the default TGP is already created.
/> cd /iscsi/iqn.2003-01.org.linux-iscsi.geeklab.x8664:sn.81b9fd11a721/tpg1/portals/
/iscsi/iqn.20.../tpg1/portals> ls
2. To allow remote systems to access an iSCSI target on port 3260, either disable the firewalld service on the iSCSI server or configure firewalld to trust the 3260/tcp port. The following example uses firewall-cmd to open the 3260/tcp port for the firewalld service.
# firewall-cmd --permanent --add-port=3260/tcp
If you include the –permanent option when adding a port, use the firewall-cmd command to reload the configuration.
# firewall-cmd –reload
Install iSCSI Target
Steps for Install iSCSI Target
- Open Add roles and features Wizard
- Select installation type
- Select destination server
- Select server roles
- Select features
- Confirm installation selections
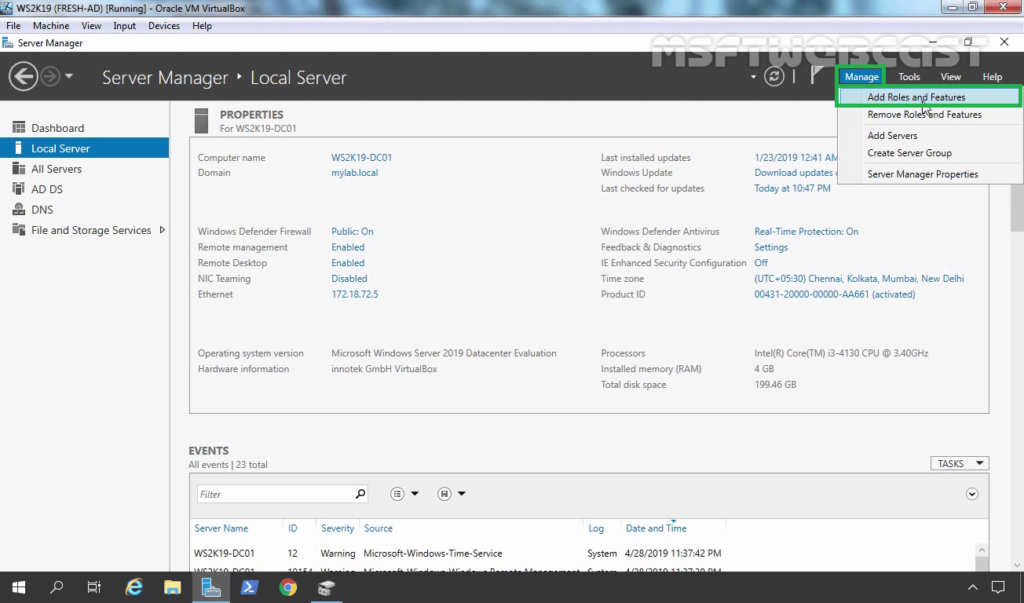
1. Open Add roles and features Wizard
Open the Server Manager dashboard and click Add roles and features.
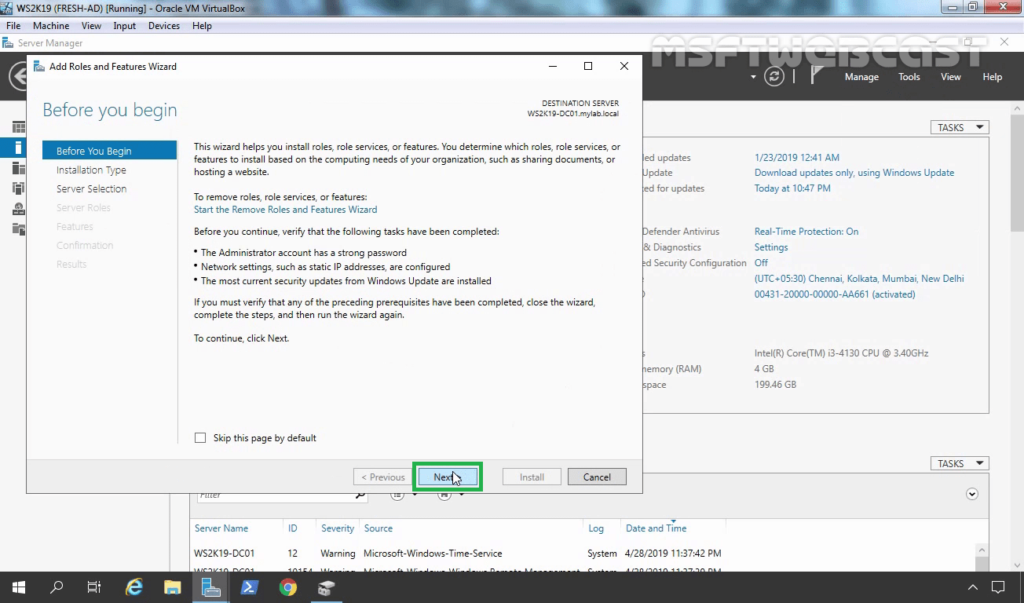
Before you begin, click Next.
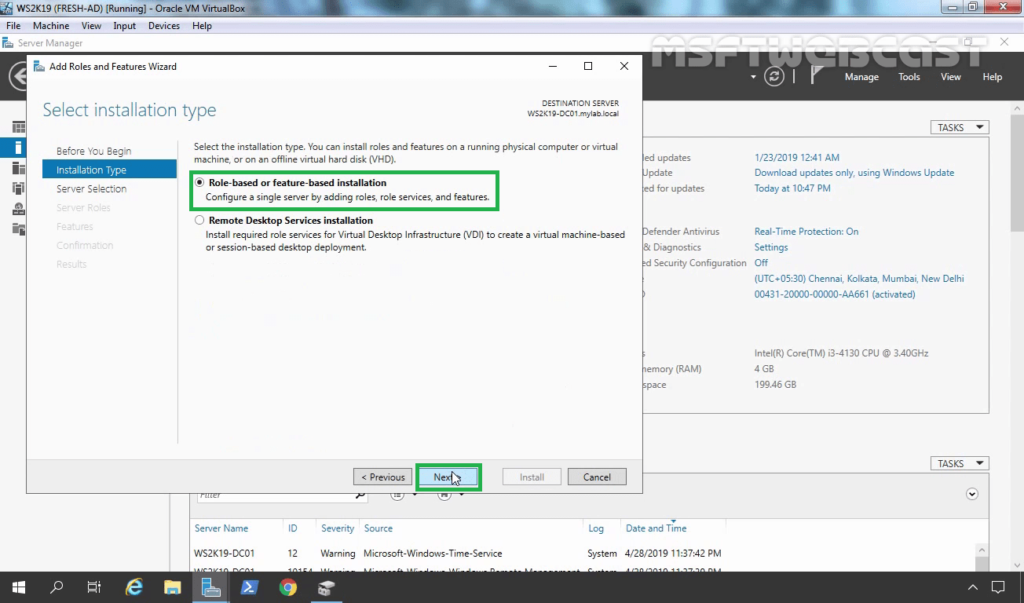
2. Select installation type
Select Role-based or feature-based installation and click on Next.
3. Select destination server
Select a Host to which you’d like to add services and click Next.
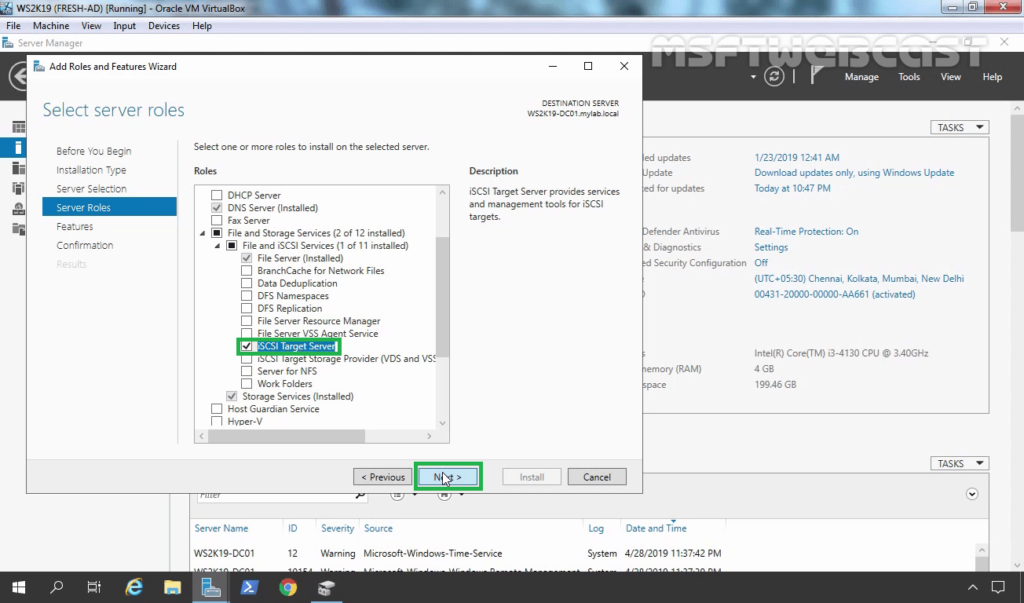
4. Select server roles
Choose the iSCSI Target Server box from the server roles page.
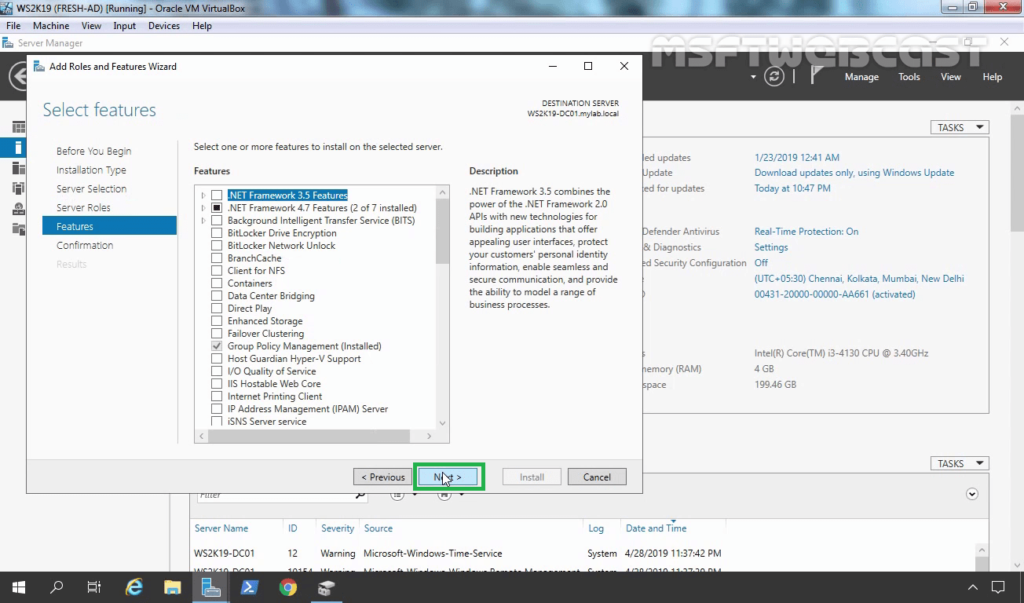
5. Select features
On the Select features console, just click Next because we do not require any extra features at the moment.
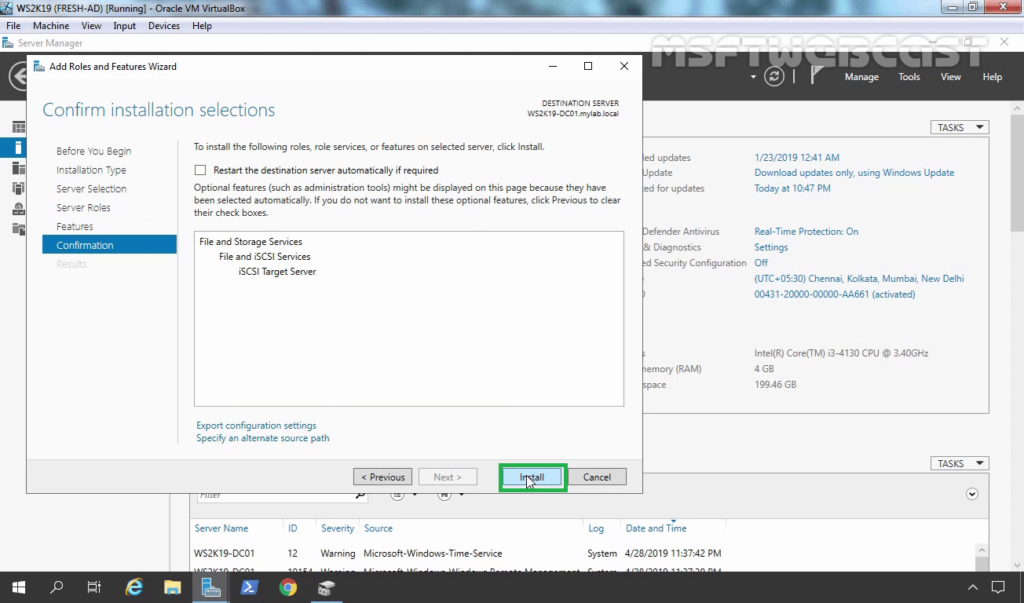
6. Confirm installation selections
Confirm installation selections and click on Install to start the installation process.
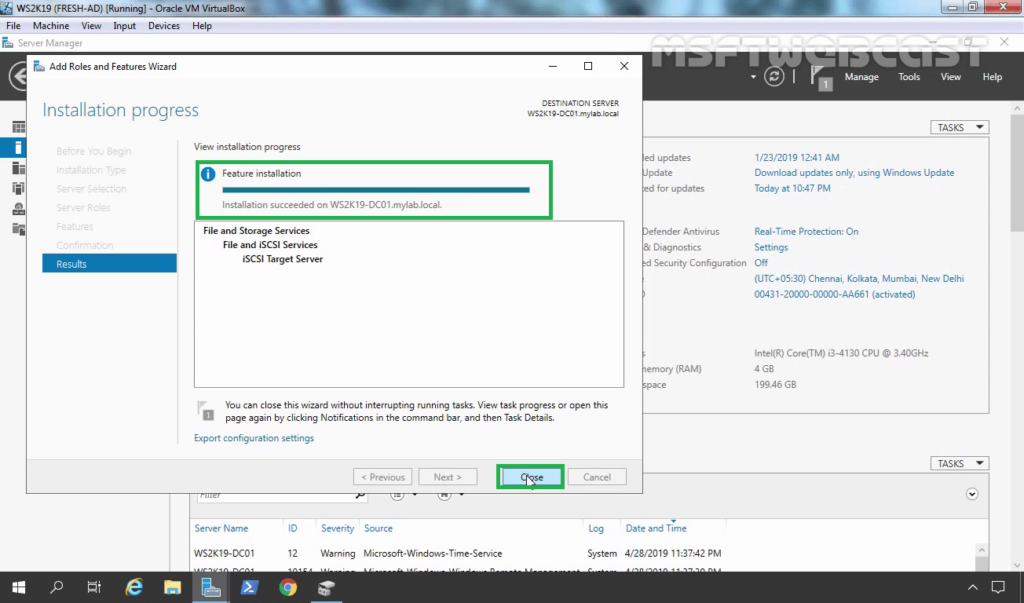
After finishing the installation, click Close.
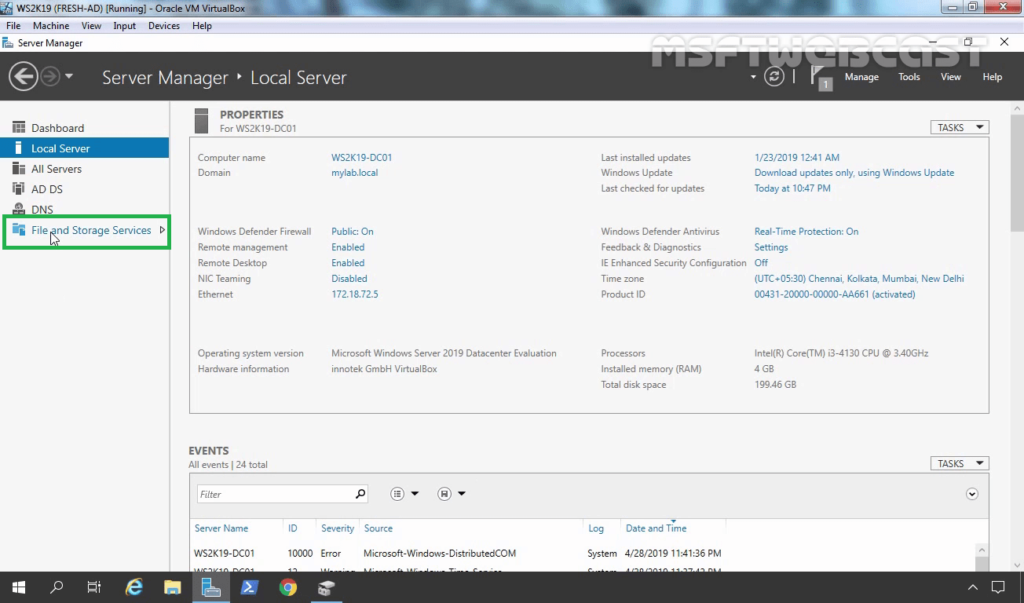
Configure iSCSI Target on Windows Server 2019:
After installing the iSCSI Target server role on Windows Server 2019, our next step is to configure it. We will use the File and Storage Services console to create iSCSI Target.


9. On the Server Manager Console, click on File and Storage Services.
10. Click on iSCSI and then click on To create an iSCSI virtual disk link to start the new iSCSI virtual disk wizard.

11. Select the location to store the iSCSI virtual disk. In our case, we will select the second hard disk with drive letter “S:”.
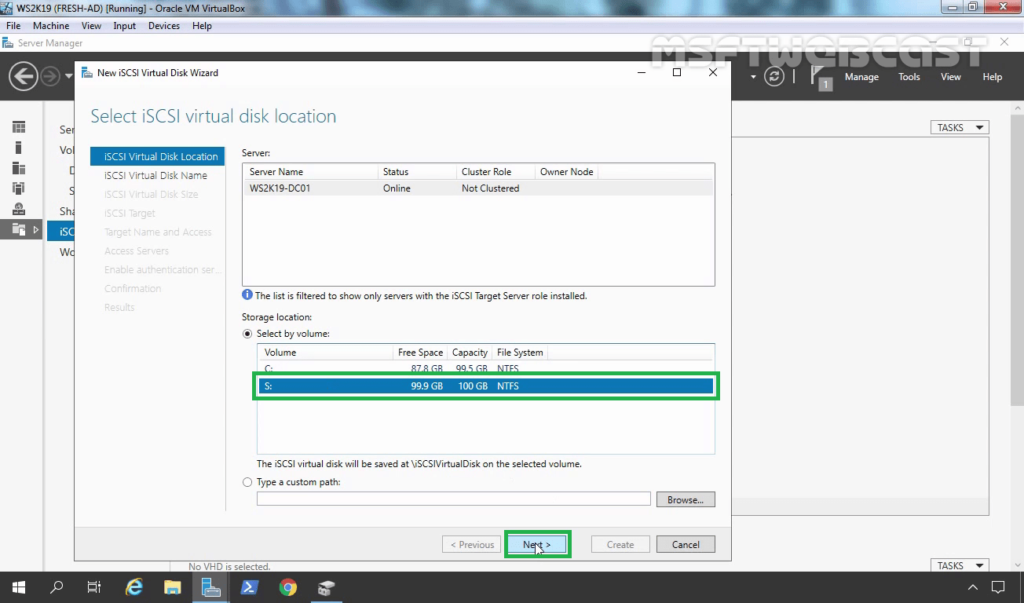
12. Specify the iSCSI virtual disk name and description (optional). Click Next to continue. (Path will be S:\iSCSIVirtualDisks\<virtual-disk-name.vhdx)
13. Specify the size of the iSCSI virtual disk. Choose the disk type as per your requirement. You have three options to choose from:
- Fixed Size
- Dynamically Expanding
- Differencing
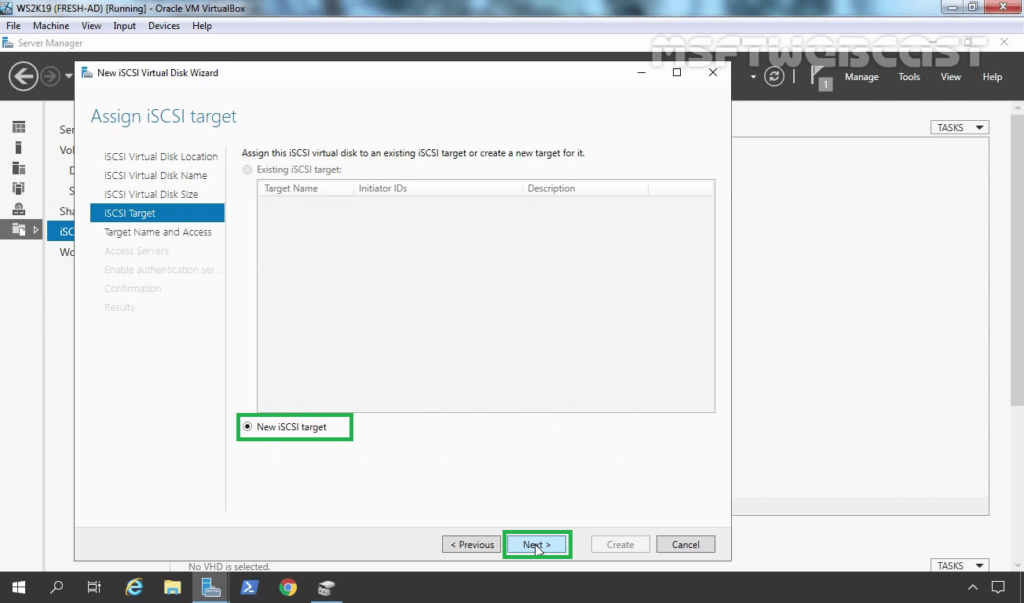
14. To create a new iSCSI target, click the New iSCSI target and click Next. If you have defined the iSCSI target earlier, you can select the target from the existing target list.
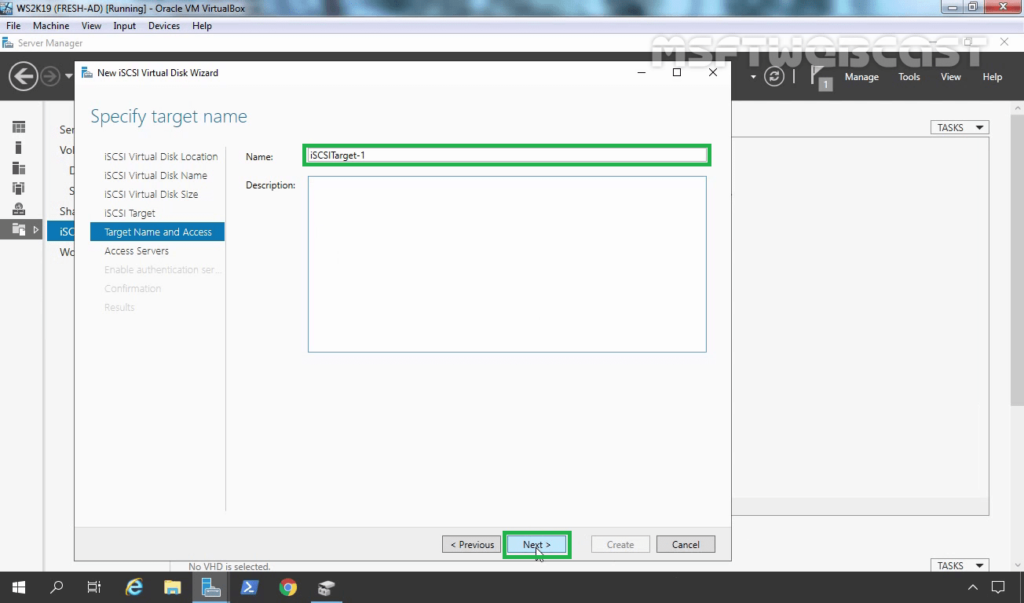
15. If you chose the New iSCSI target, on the Target Name and Access page, type the name of the target. Click Next.
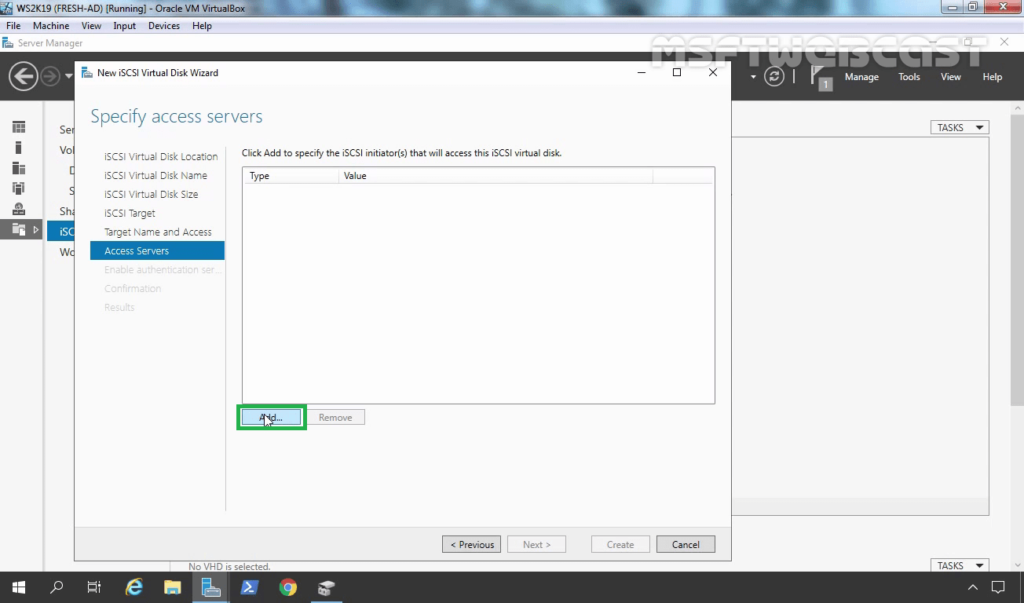
16. Choose the Access Server to specify the details about iSCSI Initiator, who will be accessing the iSCSI virtual disk. Click Add.
17. In the Select a method to identify the initiator dialog box, select Enter a value for the selected type radio button. From the type list, select IQN and type iSCSI qualified name (IQN) of iSCSI Initiator.
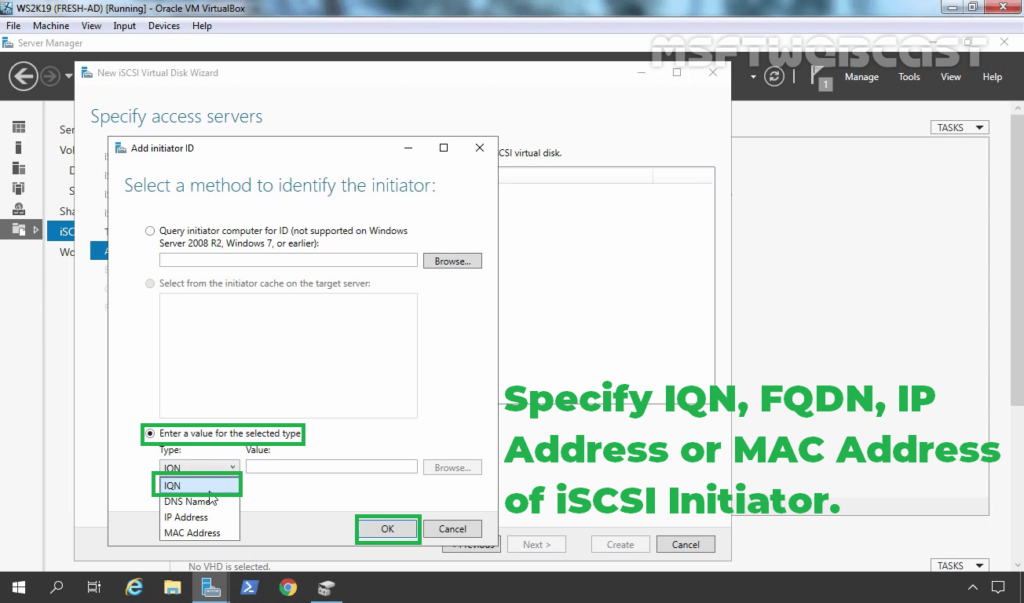
You can find the IQN in the iSCSI initiator properties window. You can also specify the IP address, FQDN or MAC Address of the iSCSI initiator.
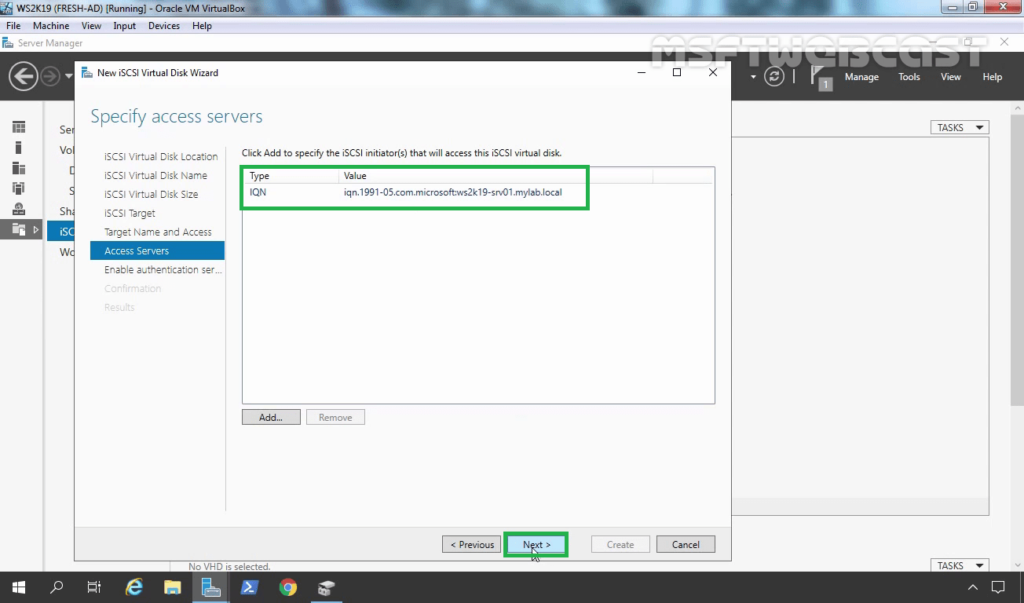
18. On the Specify access server’s page, click Next.
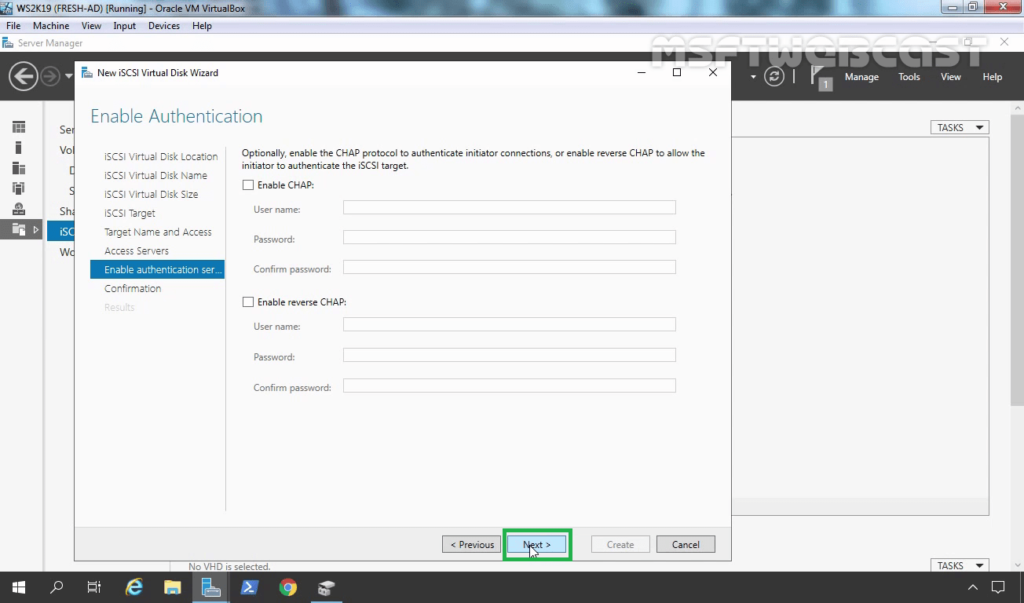
19. Click Next, as we don’t want to enable CHAP authentication for iSCSI Target.
20. Review the selection. Click create and wait for it to finish.

21. When all progress bars indicate completed, click Close to exit the wizard and complete the configuration.
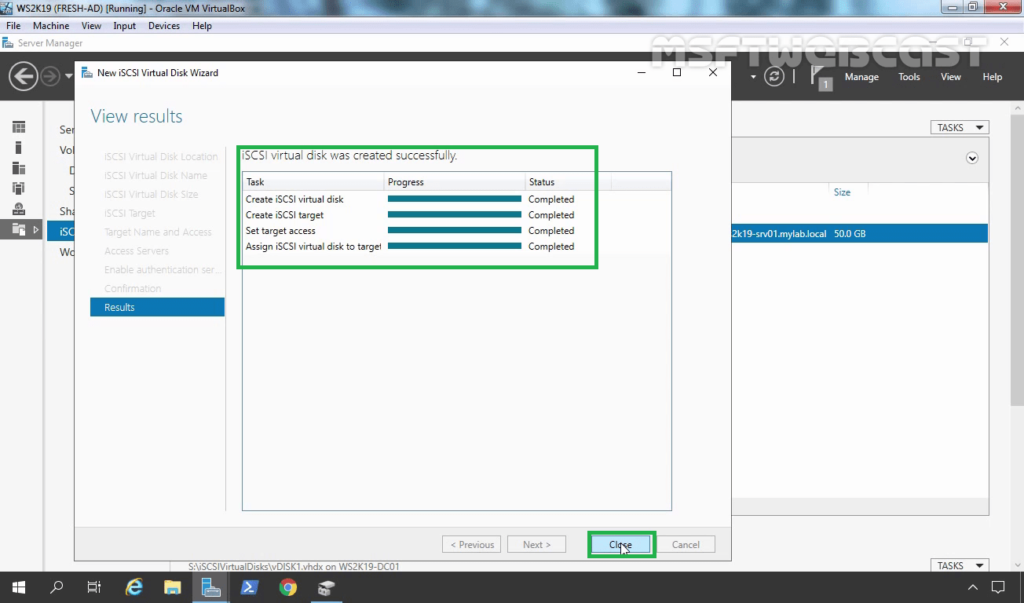
22. We can see the iSCSI virtual disk created in the server manager.
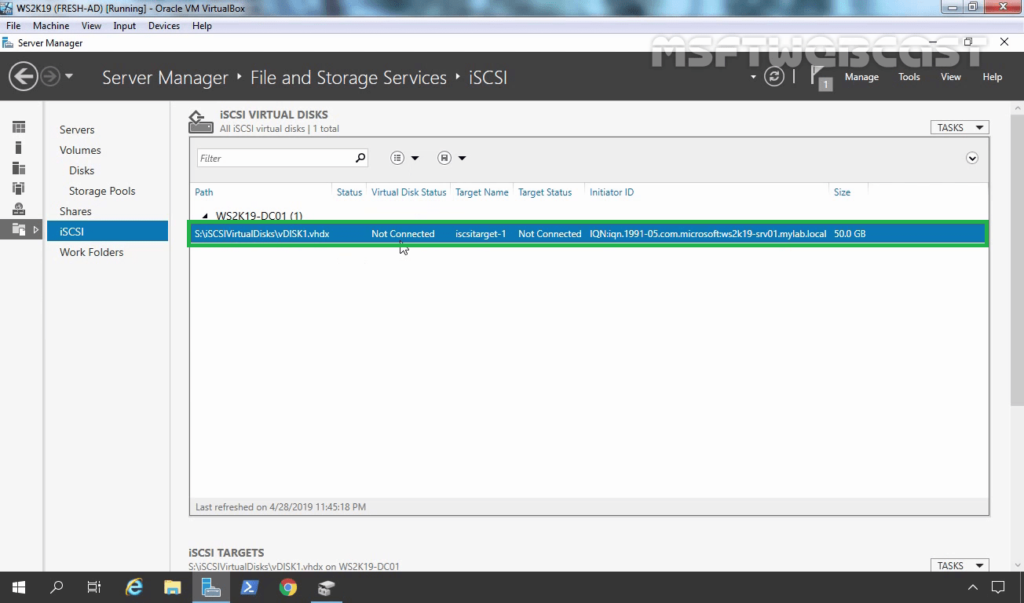
Now we have successfully installed and configured an iSCSI target Server role and created an iSCSI target virtual disk on Windows Server 2019.
In the next post, we will learn the steps to configure iSCSI initiator in Windows Server 2019 to connect iSCSI Target storage.
Thank you for reading.
How to Set Up an iSCSI Target on TrueNAS
We will look at how to set up an iSCSI Target on TrueNAS Scale below, but as mentioned above, it will be extremely similar on TrueNAS Core.
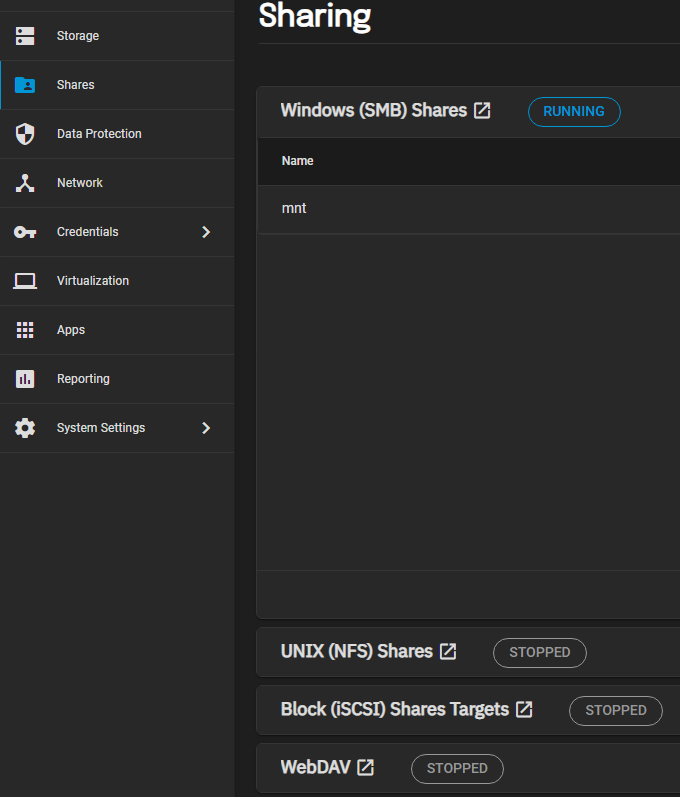
1. Log in to TrueNAS, then select Shares, and Block (iSCSI) Shares Targets.
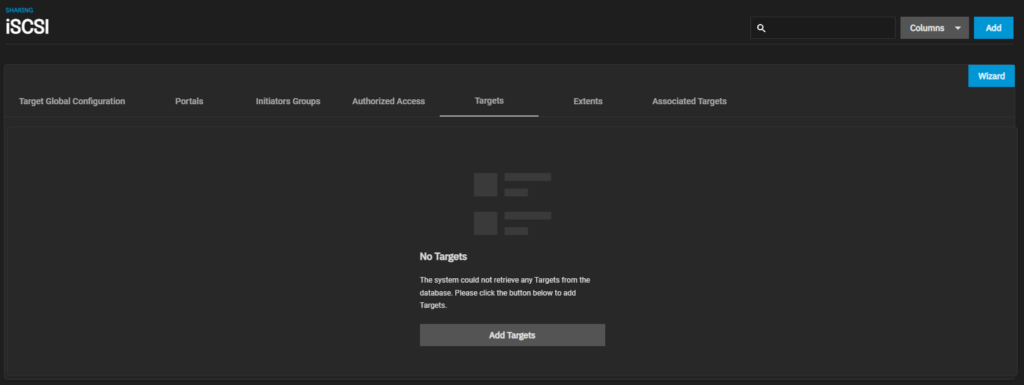
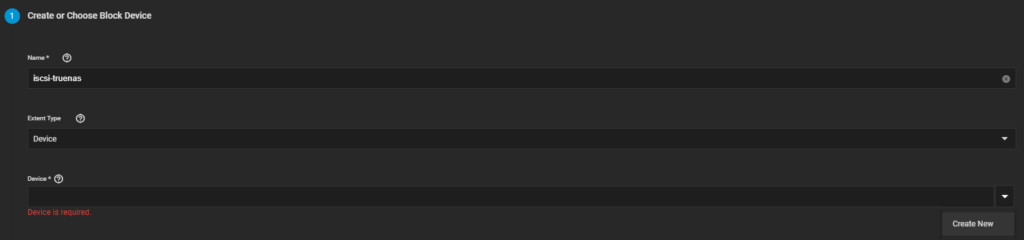
2. In the iSCSI section, select Wizard.
3. There are two required fields that must be configured – name and device. Set the Name to whatever you’d like, then select a Device (if you already created one). If you didn’t already create one, select the Create New button in the dropdown menu.
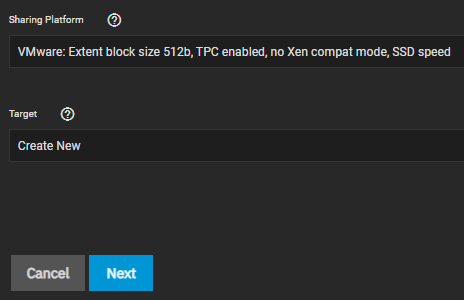
4. After selecting a Device, select the Sharing Platform, then select Next.
NOTE: The Sharing Platform will be dependent on the initiators that will be connecting.
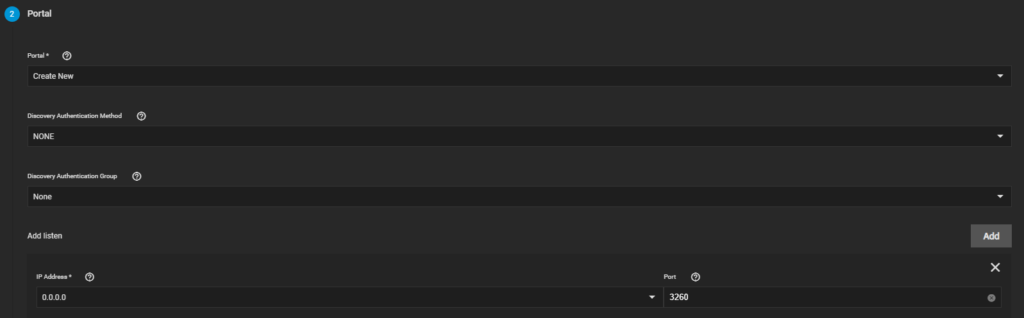
5. Select a Portal or Create New if you don’t have one that exists. This is also the location where you can specify if you’d like to use CHAP Authentication. The final setting that must be configured is the Listen section.
If you have a specific IPv4 Address that you’d like to listen on, you can add it here. However, if you’d like to listen on all interfaces, you can set it as 0.0.0.0. After the settings have been configured, select Next.
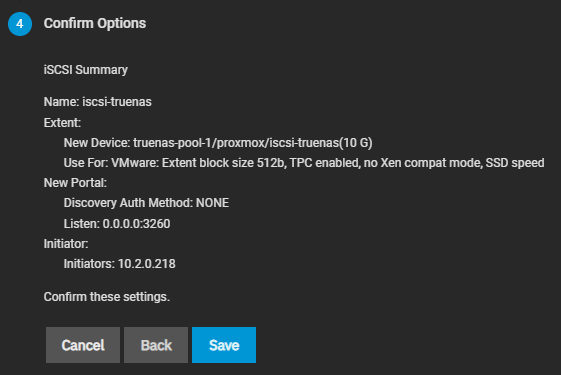
6. You can define specific initiators here by IP address or hostname. If you’d like all initiators to be able to connect, leave these fields blank, then select Next.
7. Finally, confirm the settings, then select Save. After everything is saved, the iSCSI target will be created!
iSCSI Service on TrueNAS
After everything has been configured for the iSCSI share, we need to start the iSCSI service.
1. Select System Settings, then Services.
2. Start the iSCSI Service, then select the Start Automatically checkbox so this service starts automatically.
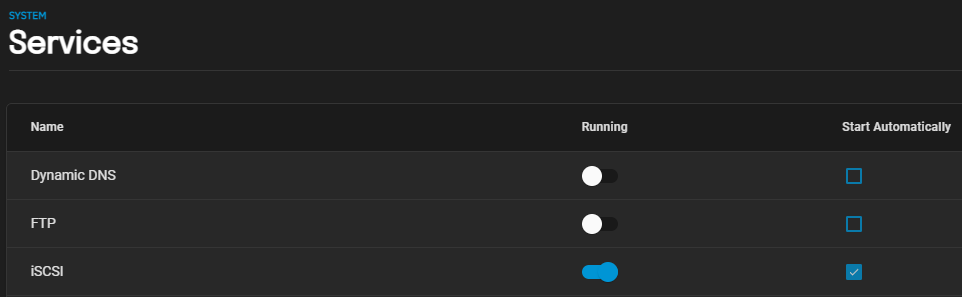
3. After the service is started, if you attempt to connect from an iSCSI Initiator, you should be able to connect!
iSCSI initiator
Debian/Ubuntu
nodeN# apt install open-iscsi

nodeN#
iscsiadm -m discovery -t sendtargets -p node3:3260
iscsiadm -m discovery -t sendtargets -p node4:3260
iscsiadm -m discovery -t sendtargets -p node5:3260

nodeN# iscsiadm -m node

nodeN#
iscsiadm -m node --targetname "virtual-ceph-test-pool1-rbd1:iscsi" --portal "node3:3260" --login
iscsiadm -m node --targetname "virtual-ceph-test-pool1-rbd1:iscsi" --portal "node4:3260" --login
iscsiadm -m node --targetname "virtual-ceph-test-pool1-rbd1:iscsi" --portal "node5:3260" --login

nodeN# iscsiadm -m session

nodeN# lsblk
Сервис multipath
nodeN# cat /etc/iscsi/iscsid.conf
...
node.startup = automatic
...
Не всегда срабатывает после перезагрузки, можно добавить как здесь: Bug 864036 — iSCSI session are not restored after reboot
# cat /etc/rc.local
#!/bin/sh

iscsiadm -m node -l
nodeN# chmod +x /etc/rc.local

nodeN# init 6

nodeN# lsblk
iscsiadm -m node --targetname "virtual-ceph-test-pool1-rbd1:iscsi" --portal "node3:3260" -o delete
iscsiadm -m node --targetname "virtual-ceph-test-pool1-rbd1:iscsi" --portal "node4:3260" -o delete
iscsiadm -m node --targetname "virtual-ceph-test-pool1-rbd1:iscsi" --portal "node5:3260" -o delete
Windows
Подключение к целевому iSCSI-устройству
Нажмите кнопку Пуск, введите iSCSI в поле Начать поиск, а затем в области Программы щелкните Инициатор iSCSI.
На странице Контроль учетных записей пользователей нажмите кнопку Продолжить.
При первом запуске инициатора iSCSI откроется окно с сообщением о том, что служба инициатора iSCSI не запущена. Для нормальной работы необходимо запустить службу инициатора iSCSI. Нажмите кнопку Да, чтобы запустить службу. Откроется диалоговое окно Свойства инициатора iSCSI, и отобразится вкладка Целевые объекты.
Вариант 1: На вкладке Целевые объекты укажите имя или IP-адрес целевого устройства в поле Быстрое подключение и нажмите кнопку Быстрое подключение. Откроется диалоговое окно Быстрое подключение.
Вариант 2: На вкладке “Обнаружение” добавьте кнопкой “Обнаружить портал…” все пути к iSCSI target
Если в целевом портале доступно несколько целевых объектов, отобразится их список. Выберите необходимое целевое устройство и нажмите кнопку Подключить.
При необходимости, включите поддержку многопутевых накопителей.
Setting up the ACL
Access Control Lists (ACLs) restrict access to LUNs from remote systems. You can create an ACL for each initiator to enforce authentication when the initiator connects to the target. This allows you to give a specific initiator exclusive access to a specific target.
2. Before you can create an ACL, you will have to find out the initiator name from your client (iscsi-initiator). Use the command below on the client to get the initiator name.
# cat /etc/iscsi/initiatorname.iscsi
InitiatorName=iqn.1994-05.com.redhat:aabb51a64012
2. The following example uses the create command to create an ACL for an initiator. From the targetcli shell, begin by using the cd command to change to the acls directory within the [target/TGP] hierarchy. Use the initiator name you just obtained from the command above.
/> cd /iscsi/iqn.2003-01.org.linux-iscsi.geeklab.x8664:sn.81b9fd11a721/tpg1/acls
/iscsi/iqn.20...721/tpg1/acls> create iqn.1994-05.com.redhat:aabb51a64012
Created Node ACL for iqn.1994-05.com.redhat:aabb51a64012
3. Verify the new ACL you have just setup.
Step 3: Create the high availability iSCSI Target Server role service
To ensure transparent failover, create the iSCSI Target Server role service on a cluster.
To create the iSCSI Target Server role service on a cluster
-
Open Failover Cluster Manager.
-
Right-click Roles, and then click Configure Role. The High Availability Wizard, Select Service or Application page appears.
-
Select iSCSI Target Server. The Client Access Point page appears.
-
Type the service or application name and the IP address for the iSCSI Target Server high-availability instance.
-
Select the Networks Address check box, and then click Next. The Select Storage page appears.
Note
Each time that you assign storage to the cluster nodes, by default, the disks are offline. You need to manually bring them online. To bring the disks online, leave the High Availability Wizard open (you will return to it shortly) and open the Disk Management tool.
-
In the Disk Management tool, right-click the disks to bring them online.
-
After bringing the disks online, you need to put them in the storage. Open the Failover Cluster Manager. From the Actions pane, click Storage, and then click Add Disk.
-
-
Return to the High Availability Wizard, select the check box for this storage volume, and then click Next. The Confirmation page appears.
-
Return to the Failover Cluster Manager and verify that the storage volume was created successfully.
Note
To manage iSCSI Target Server on a cluster, you need to use Server Manager or Windows PowerShell cmdlets.
Install iSCSI Target Server on Windows Server 2019:
Sign in to Windows Server 2019 with an administrator account and open Server Manager Console to install the iSCSI target server role.
1. Click on Manage and select Add Role and Features.
2. On the Before you begin page, click Next.
3. Select Role-based or feature-based installation and click Next.
4. Select a server from the server pool on which you want to install the iSCSI Target role service, click Next.

5. On select server roles page, expand File and Storage Services, expand File and iSCSI Services. Select the iSCSI Target Server checkbox. Click Next.
6. On select features, click Next.
7. Click Install and complete the installation process.
8. Click Close to finish the installation.
Поддержка Multi-Path.
Технология multi-path – это создание более одного соединения между клиентом и сервером для обеспечения бесперебойной работы сервиса при возникновении проблем с одним из соединений. Если в сервисе iSCSI Storage сконфигурирован более чем один iSCSI портал, то сервис может работать по технологии multi-path, устанавливая соединения со всеми порталами.
Технология multi-path может работать в нескольких режимах. Единственным поддерживаемым режимом в iSСSI Storage является режим Fail Over, при котором работает постоянно только одно соединение, а второе включается только при отключении первого.
Подключение по технологии multi-path возможно на платформе Windows начиная с версии Windows-2016 и на платформе Linux.
Подключение iSCSI дисков c поддержкой Multi-Path на Windows 2016
-
Используя приложение Server Manager, установите компонент .
-
Включите поддержку multi-path для устройств iSCSI:\
Далее откройте -> , перейдите во вкладку , выберите , нажмите и перезагрузите систему.
- После перезагрузки установите режим для всех подключаемых устройств.\
Откройте окно командной строки и запустить команду . Проверьте, что установился режим Fail Over, запустив команду .
- Затем точно следуйте инструкции для подключения iSCSI-дисков для Windows 10, только в диалоговом окне перед нажатием необходимо указать .
Создание iSCSI таргета на linux с помощью targetcli
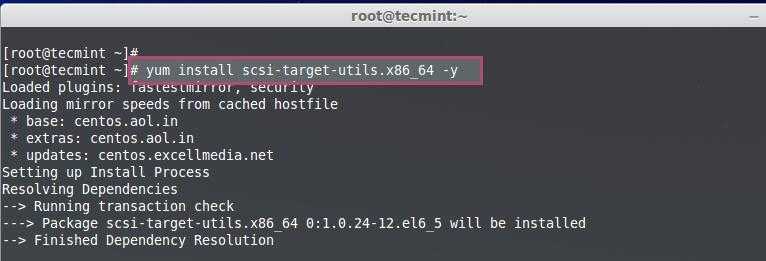
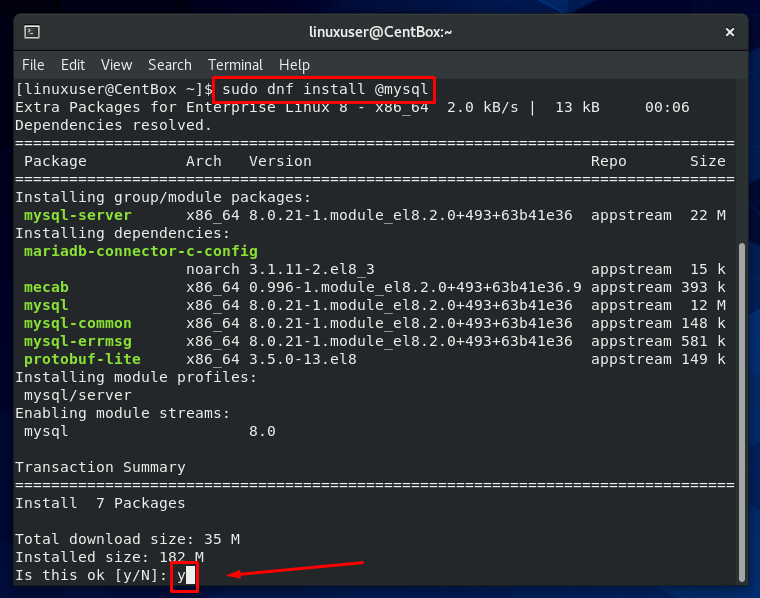
- Для начала необходимо установить targetcli
yum install targetcli
- Сделать доступным демона (службу) target и запустить его
systemctl enable target
systemctl start target
- Открыть targetcli и посмотреть иерархию, в виде которой представлен таргет, почитать помощь. Помощь можно вызывать в любом разделе внутри targetcli, везде будут свои команды.
targetcli ls help
- Создать блочное устройство в бэксторе. В первом случае создано устройство на основе непосредственно жесткого диска, затем добавлено устройство на основе LVM, что гораздо удобнее в эксплуатации.
/backstores/block create storage01 /dev/sdb
/backstores/block create storage02 /dev/vg01/lv01
ls
- Создать iSCSI таргет
/iscsi create ls
Внутри iscsi можно видеть структуру. Первый элемент – имя таргета. Ниже по иерархии tpg1 расшифровывается как Target Portal Group – список IP-адресов и TCP портов, которые будет слушать этот таргет. Дальше идут acl – список адресов, с которых можно будет подключиться к таргету, luns – список лунов, portals – список IP-адресов и портов, которые будет слушать таргет.
- Перейти в иерархии targetcli на уровень tpg1 и установить параметры авторизации
cd
-- используя стрелки для навигации по иерархии, переместиться на уровень tpg1 --
set parameter AuthMethod=None
set attribute authentication=0
- Указать iqn имя инициатора, который будет иметь право подключаться к таргету.
acls/ create iqn.1991-05.com.microsoft:hypervisor
В случае, если инициатором будет другой компьютер под управлением Linux, то для получения имени инициатора необходимо прочитать файл /etc/iscsi/initiatorname.iscsi. В этом же файле можно и изменить имя iSCSI инициатора. Для получения имени iSCSI инициатора под Windows необходимо открыть Панель управления -> Администрирование -> iSCSI инициатор. В окне с настройками иницатора выбрать последнюю вкладку Конфигурация. Прочитать поле имя инициатора.
- Создать LUN на основе объекта хранилища в бэксторе
luns/ create /backstores/block/storage02
- Указать IP-адрес, который будет слушать таргет. Проще говоря адрес на сетевом интерфейсе самого сервера. Можно выполнить команду без указания IP-адреса, в этом случае таргет будет принимать подключения на любом сетевом интерфейсе
portals/ create 192.168.10.5
- Сохранить конфигурацию, хотя по умолчанию она сохраняется автоматически при выходе из targetcli
cd / ls saveconfig
На этом таргет готов к использованию. Остается только подключиться инициатором к таргету и использовать LUN как локальный жесткий диск.
Create new IQN
1. The following example uses the create command to create an IQN (iSCSI Qualified Name) with a target. Use the create command without any arguments to create an iSCSI target by using a default target name. By default, the target is identified by an “iqn” identifier. This is an iSCSI Qualified Name (IQN), which uniquely identifies a target.
/>/> cd /iscsi
/iscsi> create
Created target iqn.2003-01.org.linux-iscsi.geeklab.x8664:sn.81b9fd11a721.
Created TPG 1.
Global pref auto_add_default_portal=true
Created default portal listening on all IPs (0.0.0.0), port 3260.
/iscsi>
2. Verify the newly create IQN using ls command under /iscsi directory.
Setup Windows 8 iSCSI Initiator in 3 minutes
The first step of installing the Windows 8 iSCSI initiator can be done in a few different ways. To make this easy, from the Windows 8 Metro interface, type iSCSI and under Settings find the iSCSI Initiator Setup.
Windows 8 – Settings iSCSI Initiator Set Up
When you do this, you will see a dialog box pop-up. It will ask you to confirm that you want the iSCSI service to run in Windows 8. Click yes here.
Windows 8 – Confirm you want iSCSI to start
Next, you are brought to the Windows 8 iSCSI Initiator Properties menu. Here you can use a DNS name for the iSCSI target server or IP address and click Quick Connect. You will be prompted with a relevant iSCSI IQN list. You can login if necessary and connect from here.
Connect to Synology iSCSI Target with Windows 8
These were IQNs setup for other purposes on the Synology DS1812+. Needless to say, if you can use Windows 8 iSCSI quick connect it is very easy. Taking a quick look at the Synology DS1812+, we can see that the Windows 8 workstation is connected to the iSCSI target.
Connected to Synology iSCSI Target with Windows 8
This particular iSCSI target we did not yet turn on CHAPS authentication. Had we done that, it would have been a matter of entering the username and password. Since this is the quick guide, we are going to assume that if you setup security on the target, you will select the same setting on the Windows 8 iSCSI initiator.
Next, you should see the really long string of text under Volumes and Devices. Try clicking Auto Configure if you don’t. The Windows 8 iSCSI initiator is fairly good at setting this all up for you easily.
Configure Volume with Windows 8 iSCSI Initiator
So far we have worked exclusively with the Windows 8 iSCSI initiator. Now we need to move into Windows 8 disk management and get the volume usable. You can hit the Windows 8 Metro start menu and use search to get directly to Disk Management.
Format Drives Using Windows 8 Disk Management
Upon entry, you will be asked to initialize the disk presented by the Windows 8 iSCSI initiator.
Initialize Disk from Microsoft Windows 8 iSCSI Initiator
Format MBR or GPT as you need. Standard steps like naming the iSCSI volume and assigning a drive letter are also needed. When you are done you will see something like this:
Format drive from Windows 8 iSCSI Initiator
So that’s all there is to it. There is now a volume that looks like a standard drive in Windows 8. This volume physically sits in the Synology DS1812+ and is connected to the server only via a gigabit Ethernet link. RAID 6 protected storage without needing to physically attach drives to the system. The easy to setup Windows 8 iSCSI initiator makes this possible. As you can tell, this is for Hyper-V. Last week we showed how to install Windows 8 Hyper-V so expect more along those lines soon.
Install iSCSI Target on Windows Server 2022
We will begin by installing the iSCSI Target on Windows Server 2022. To achieve this, you can use any of the two options below:
- GUI
- PowerShell
Method 1: Install iSCSI Target on Windows Server 2022 using GUI
To install the iSCSI Target on Windows Server 2022 using GUI, launch the server manager and click Add roles and features
Select role-based or feature-based installation
Select the destination server:
In the features tab, select the iSCSI Target then, Add Features button.
Once the installation is complete, close and proceed to the configuration.
Method 2: Install iSCSI Target on Windows Server 2022 using PowerShell
You can also install the iSCSI Target on your Windows Server 2022 using PowerShell. First, launch PowerShell with admin privileges then run the below command:
Sample Output:
Install the Target Server
This guide uses Debian, but the steps are similar for any Linux distribution that supports Open-iSCSI.
-
Deploy a new Debian 11 server as the Target.
-
Create a block storage subscription and attach it to the Target server.
-
SSH to the Target server as root.
-
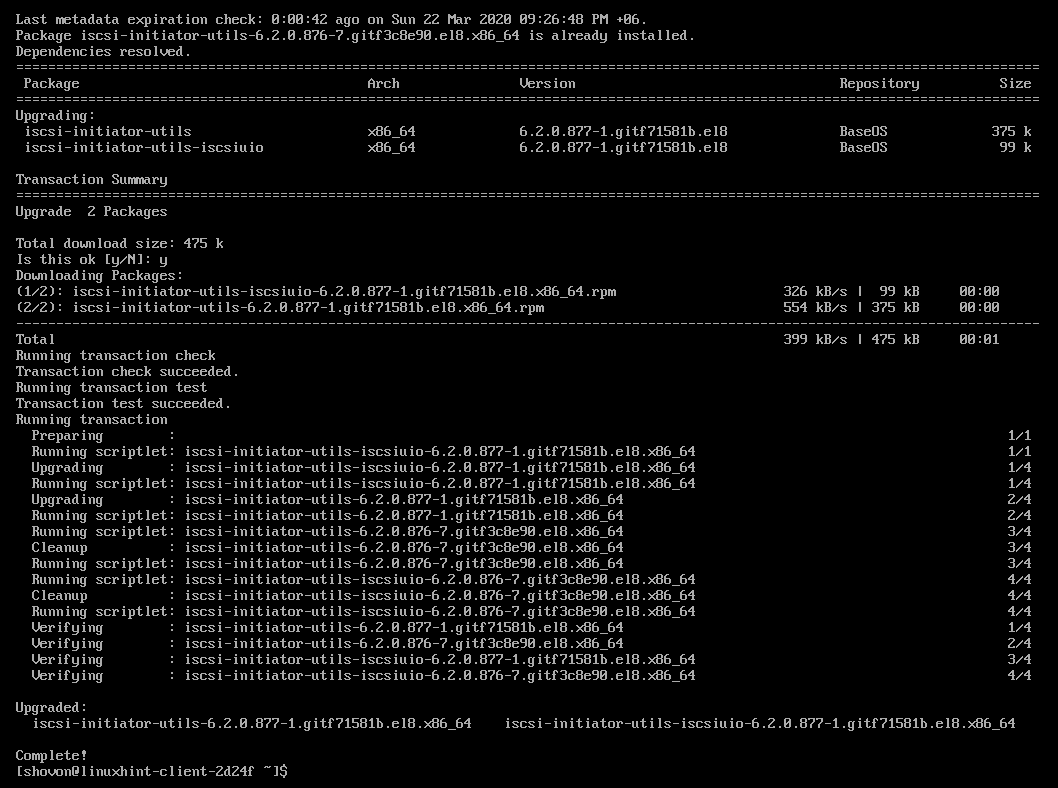
Install and
-
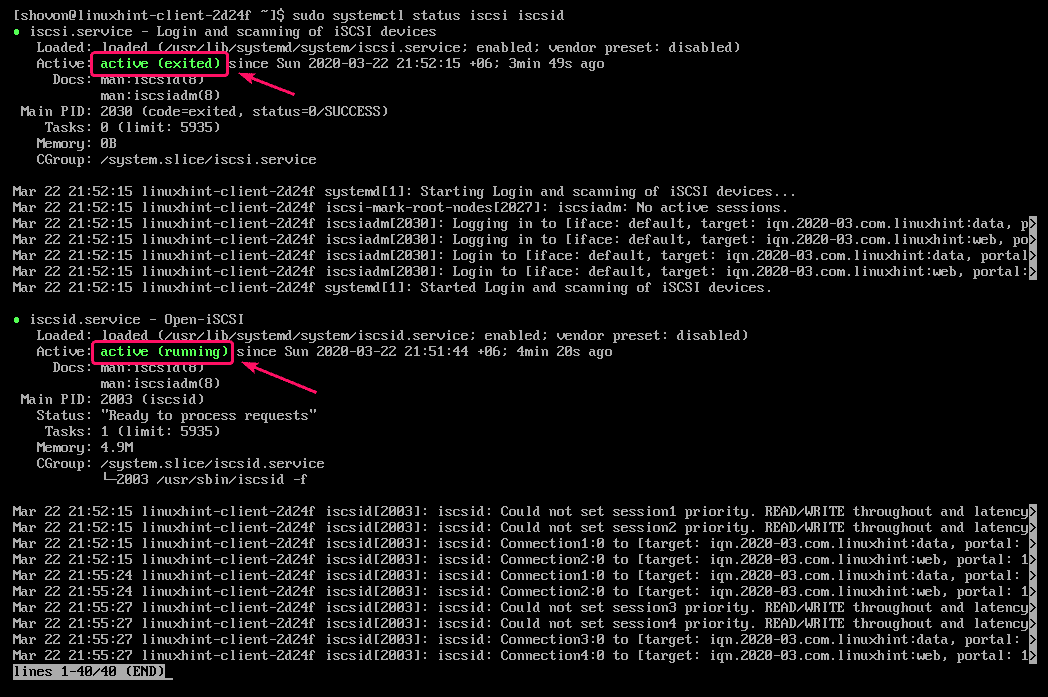
Enable the iSCSI daemon and start it.
-
Run to enter the command line interface for iSCSI configuration. The prompt changes to after the command is run.
-
Navigate to the Block Storage backstore.
-
For each mounted Block Storage volume, create a backstore. Here is an example that creates one backstore for a subscription at , named .
-
Create the Target IQN. The IQN name format is . The domain is reversed as a convention, so a domain of is expressed as . The target name can be whatever you want it to be. This example uses .
-
Create a LUN mapping to the block device.
-
Set the ACLs to enable bi-directional CHAP authentication.
- The Initiator name can be whatever you want it to be. This guide uses as the example name.
- You should use strong, randomly-generated usernames and passwords. This guide uses weak names and passwords as examples only.
The example Initiator username is and the password is . The example Target username is and the password is .
-
Change to the root directory, save your configuration, and then exit.
-
Enable the service. This step is required to reload the configuration when the Target server restarts.
-
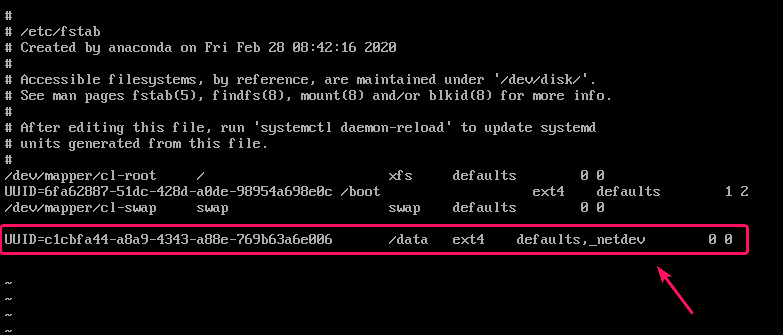
Verify the iSCSI service is listening on port 3260 with the following command. IP address 0.0.0.0 means the service is listening on all interfaces.
-
Configure the firewall to open port 3260 to the Initiator. Debian 11 uses as its default firewall. Substitute the Initiator’s IP address for 10.10.10.123 used in this example. We strongly recommend you only enable a private network interface that is connected to a Vultr VPC.
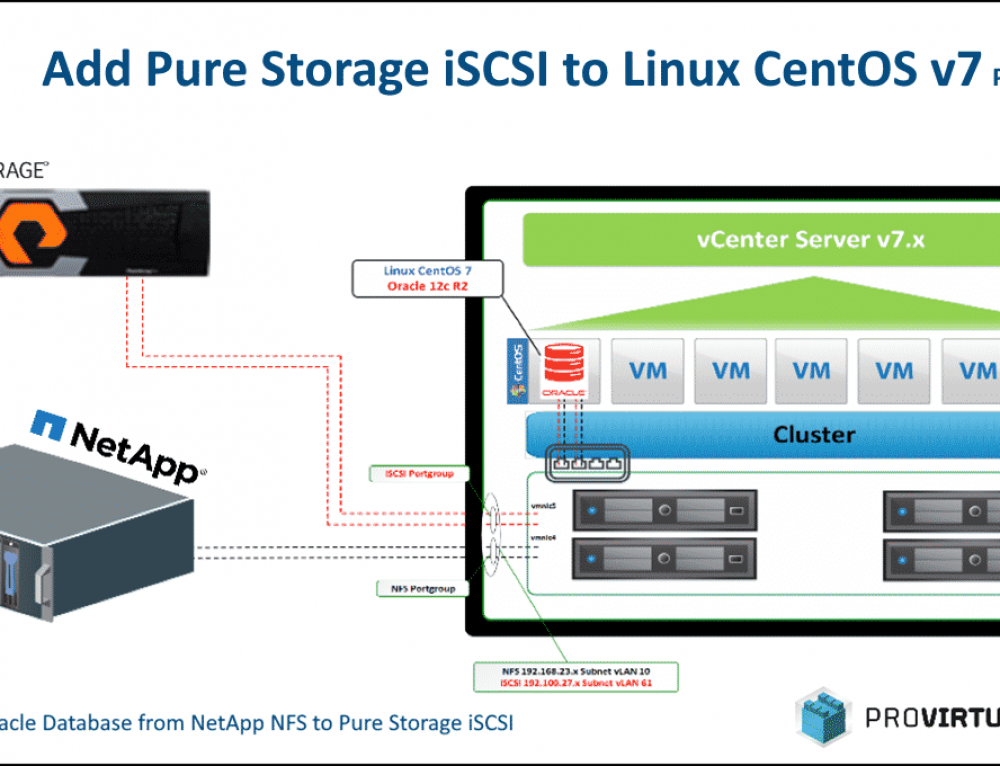
Add iSCSI disk and configure it as datastore#
We’re coming to the very end of the configuration – everything has been configured and the last step is to create a datastore on the iSCSI disk.
Click on storage pane and choose Adapters and click on Configure iSCSI, on the new windows choose to enable iSCSI, and type in the dynamic address field type in the IP of Windows machine, confirm.
After that head on to Datastores tab and choose Add Datastore to create new VMFS datastore, point it to the Windows datastore and create your datastore.
That’s it, you can use newly created datastore as it was the locally attached disk.
ESXi adding iSCSI disk and creating datastore
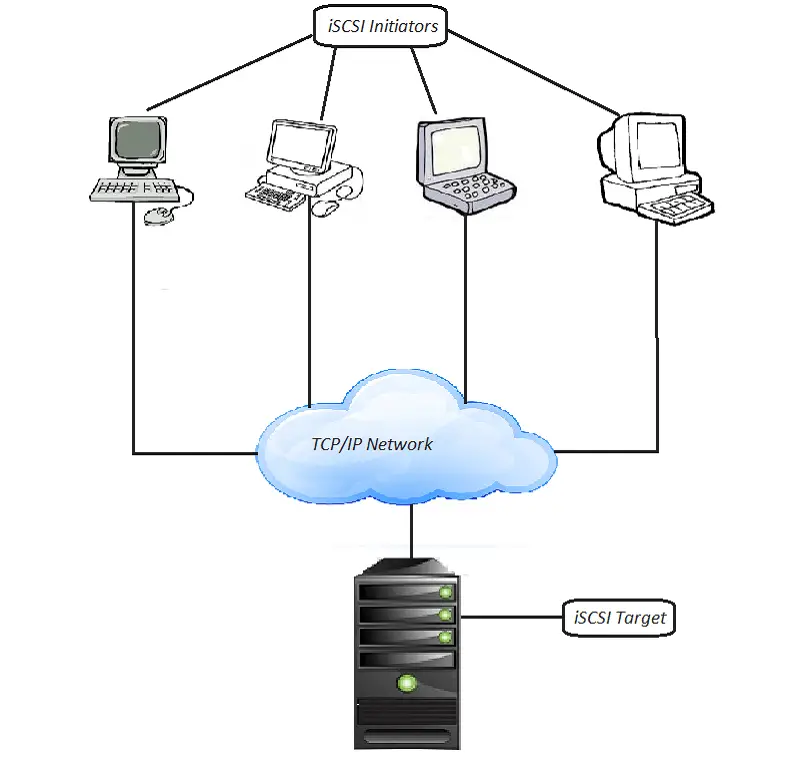
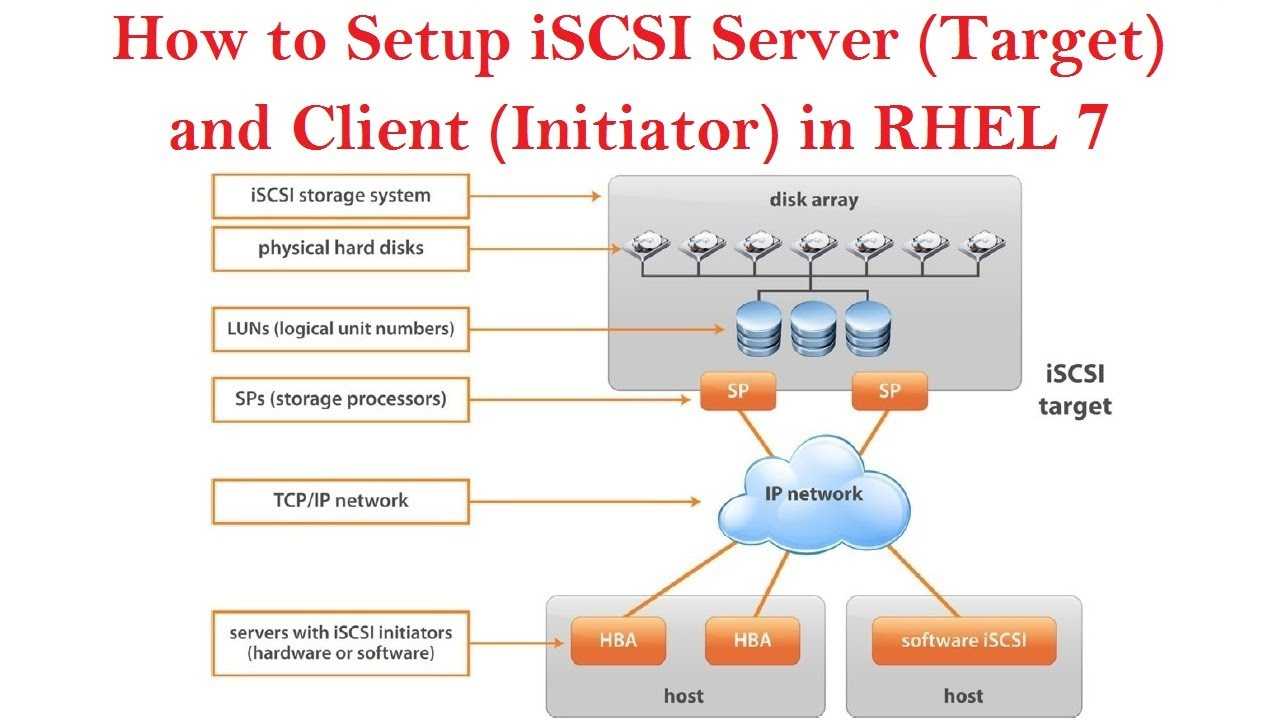
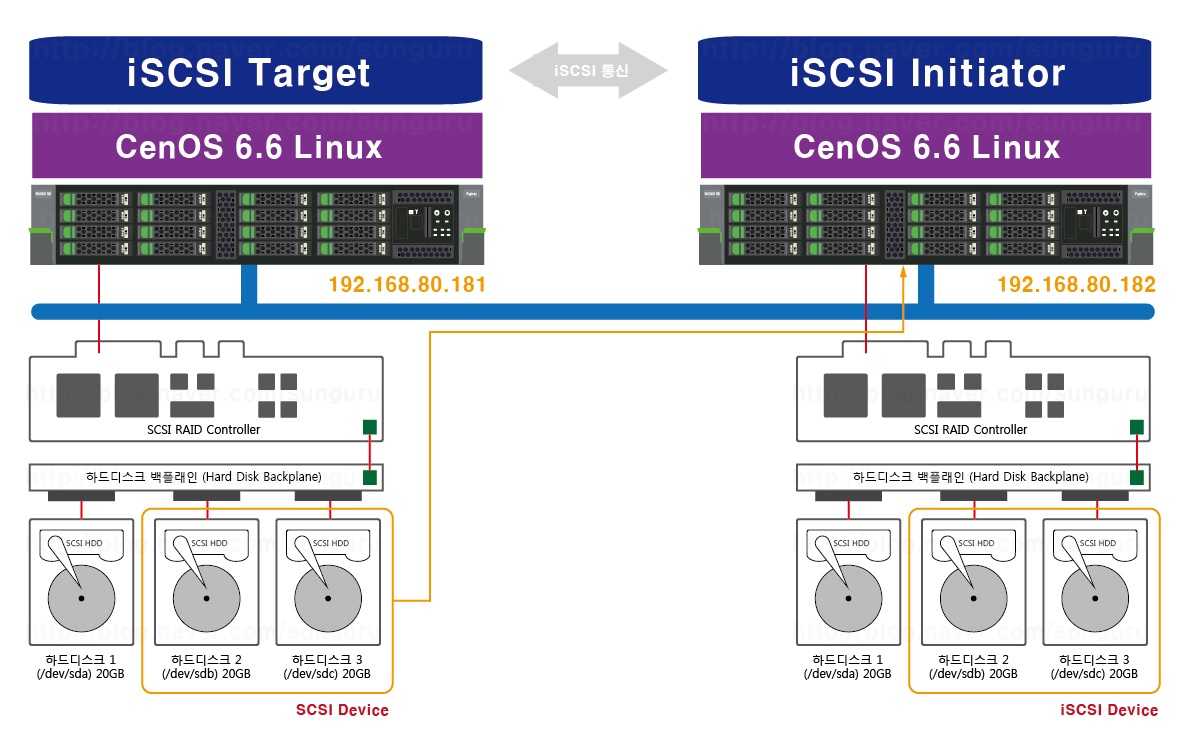
iSCSI SAN Architecture
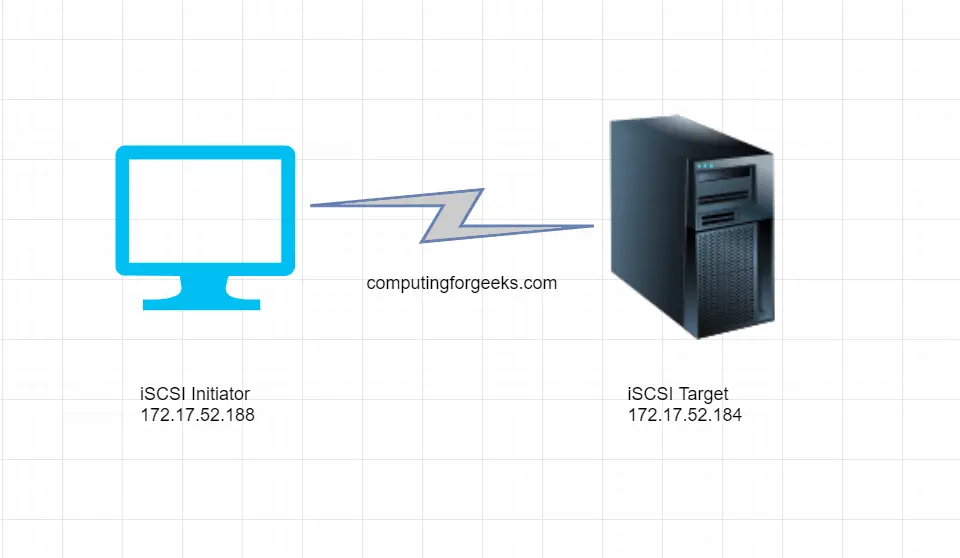
When setting up an iSCSI SAN, you configure one server as the iSCSI target. This is the server that offers access to the shared storage devices. When you configure RHEL or CentOS 7 as an iSCSI target, the shared storage devices typically are LVM logical volumes, but they can be complete disks or partitions as well.
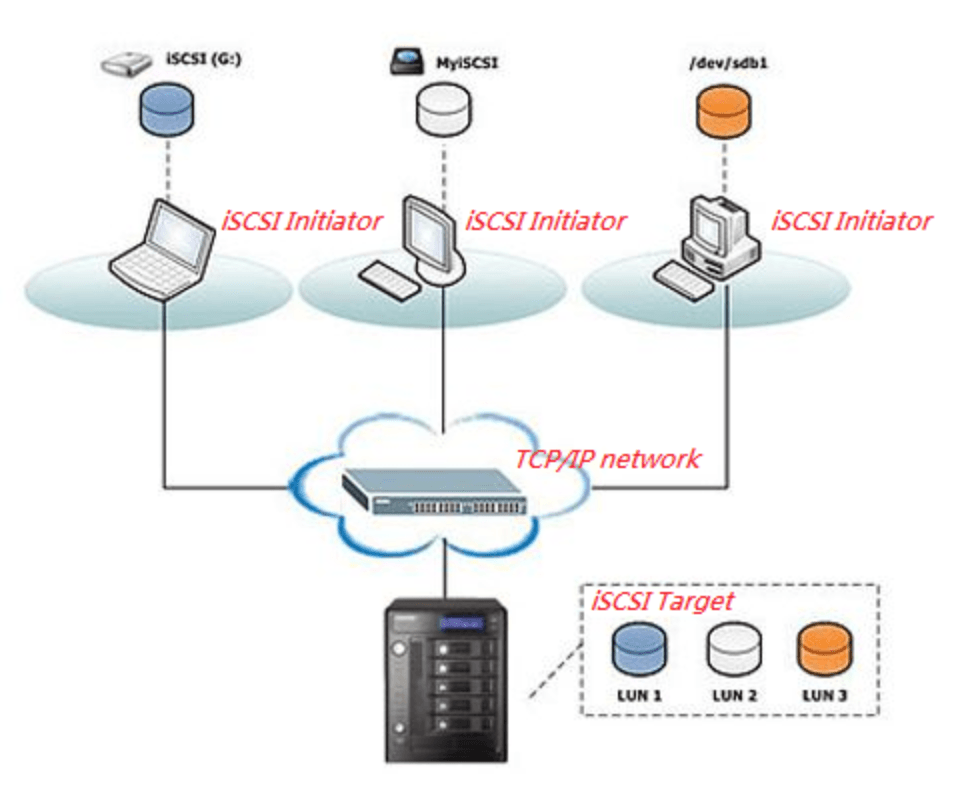
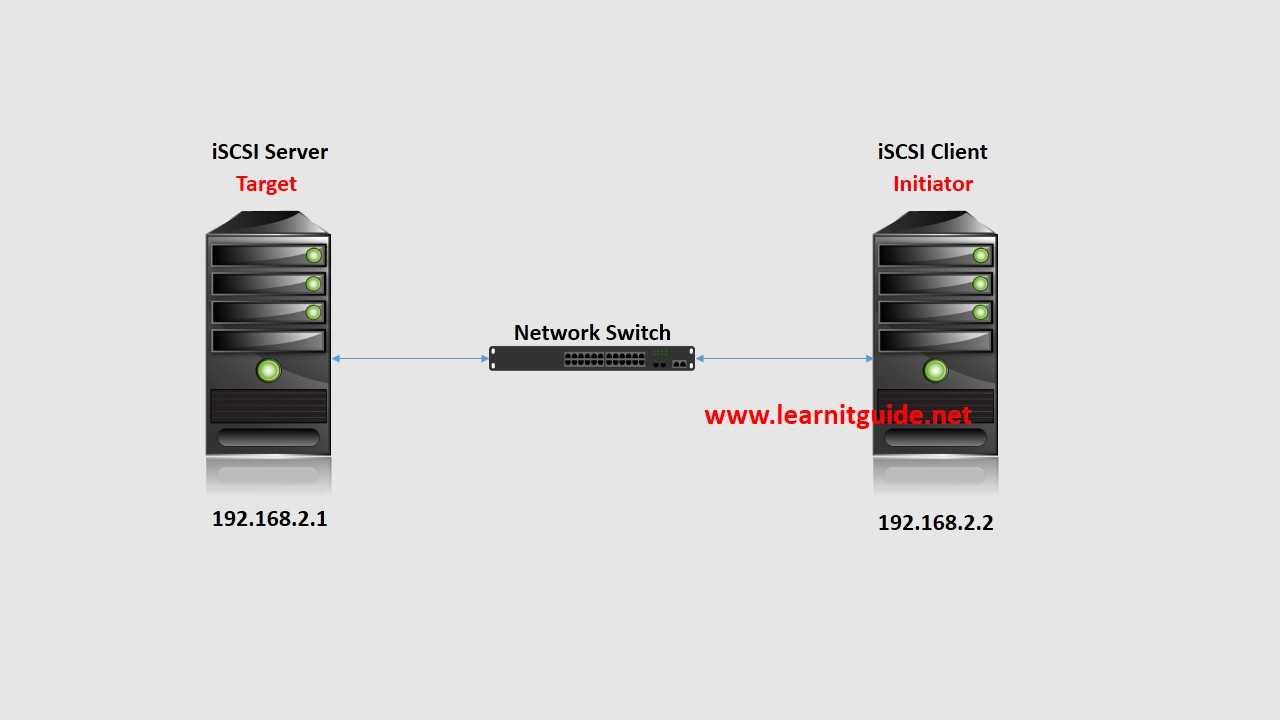


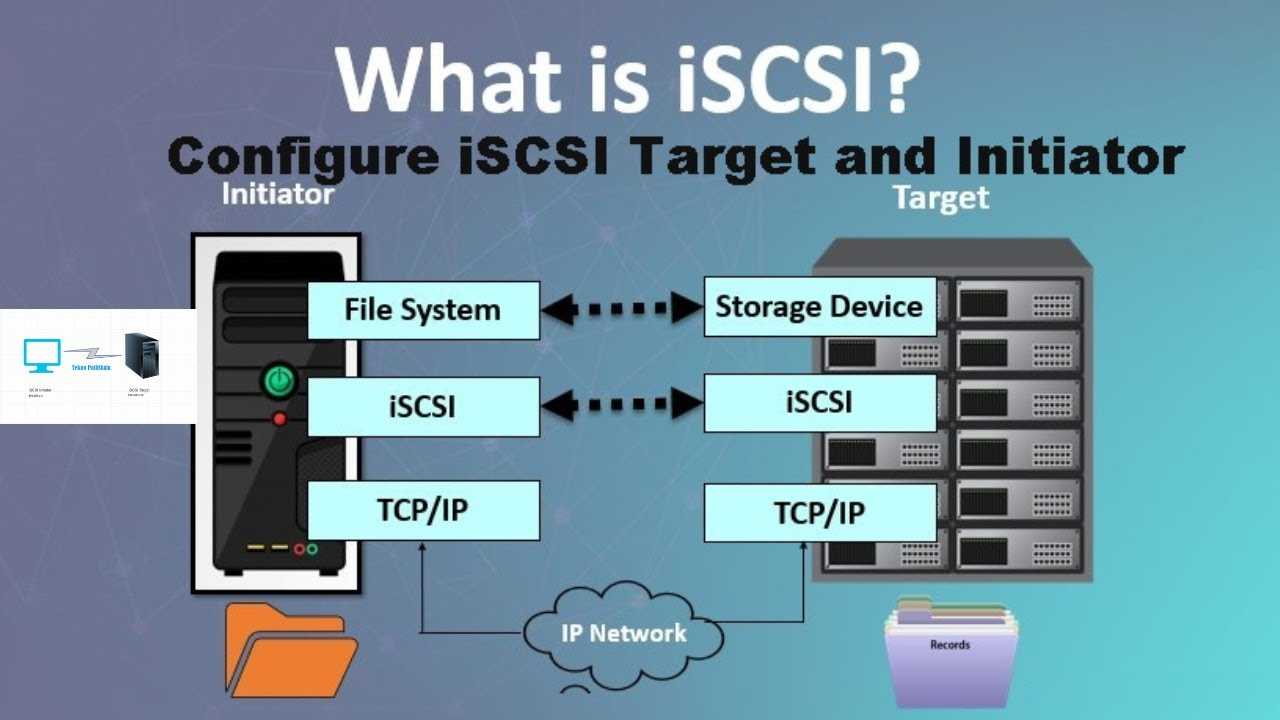
The other server is going to be used as the iSCSI initiator. This is the server that connects to the SAN. After connecting to the SAN, the iSCSI initiator sees an additional disk device.
Now iSCSI initiator goes through the process of discovering targets on the network, authenticating and logging in. Eventually accessing these iSCSI LUNs on localhost.
IMPORTANT NOTE:
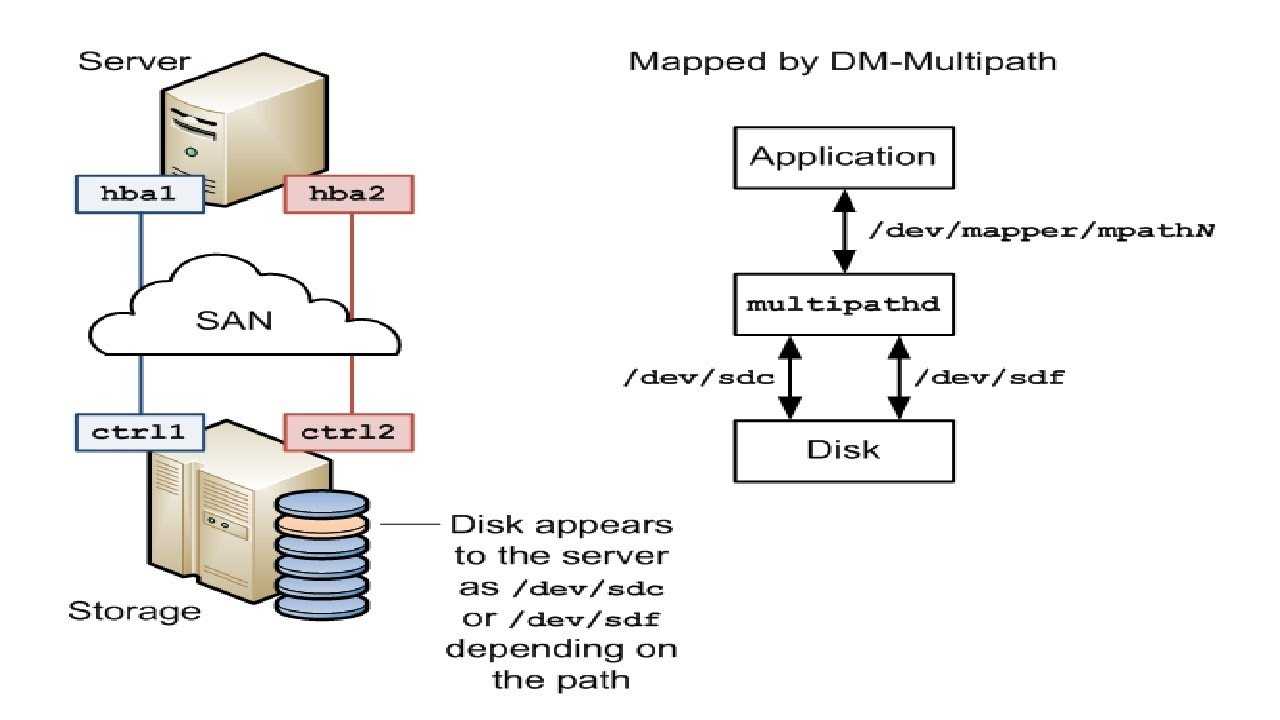
When using a redundant network connection, the iSCSI initiator will see the SAN device twice, once over each different path to the SAN. This might lead to a situation where the same shared disk device is presented twice as well. To make sure that in such a setup where redundant paths are available the SAN device is addressed correctly, the iSCSI initiator should be configured to run the multipath driver.
Принципы работы
Создание хранилища
При создании iSCSI-хранилища в VMmanager:
- на сервере с iSCSI создаётся таргет с именем iqn.YYYY-MM.<hostname-reverse>.<хранилище>_ID, где ID — уникальный номер;
- в libvirt создаётся пул с именем <хранилище>_ID. Libvirt импортирует таргет и все LUN этого таргета.
Таким образом, хранилище представляет собой набор пулов с разными ID.
Например, создаём iSCSI-хранилище с именем NetStorage:
-
- будет создан пул libvirt в c именем NetStorage_001;
- на сервере iSCSI будет создан таргет c именем iqn.2013-04.org.our-dc.stor1.NetStorage_001;
- таргет будет добавлен в файл /etc/tgt/vmmgr/<имя таргета>.conf для того, чтобы таргеты сохранялись при перезагрузке хранилища. Для каждого таргета создаётся отдельный файл конфигурации в директории /etc/tgt/vmmgr/.
Такая схема создана для того, чтобы VMmanager мог создавать больше 150 виртуальных дисков на одном хранилище. Когда в таргете id последнего луна равен 150, будет создан новый таргет NetStorage_002 и т.д.
Создание виртуального диска
В iSCSI-хранилище диски создаются в виде файлов в директории, заданной параметром iSCSITargetDir в файле конфигурации VMmanager (по умолчанию — /iscsivolumes).
Таким образом, при добавлении нового виртуального диска будут произведены действия:
- на iSCSI-сервере создаётся файл в директории /iscsivolumes. Имя файла соответствует имени виртуального диска;
- VMmanager выясняет ID таргета, в котором будет создан LUN. Если в таргете больше 150 LUN, будет создан новый таргет iqn.YYYY-MM.<hostname-reverse>.<хранилище>_ID, в котором ID больше на единицу;
- на узлах кластера будет добавлен новый libvirt pool с именем <хранилище>_ID;
- в этом таргете будет создан LUN, добавлен в файл /etc/tgt/vmmgrtargets.conf, его номер будет сохранен в базе данных;
- на всех узлах кластера будет запущен процесс обновления информации о пулах libvirt (команда virsh pool-refresh <хранилище>_ID).
После этого виртуальный диск становится доступным на всех узлах кластера. В libvirt его можно найти в pool с именем <хранилище>_ID под именем unit:0:0:LUN_ID.—-
Configure iSCSI Target
Steps for Configure iSCSI Target
- Open New iSCSI Virtual Disk Wizard
- Select iSCSI virtual disk location
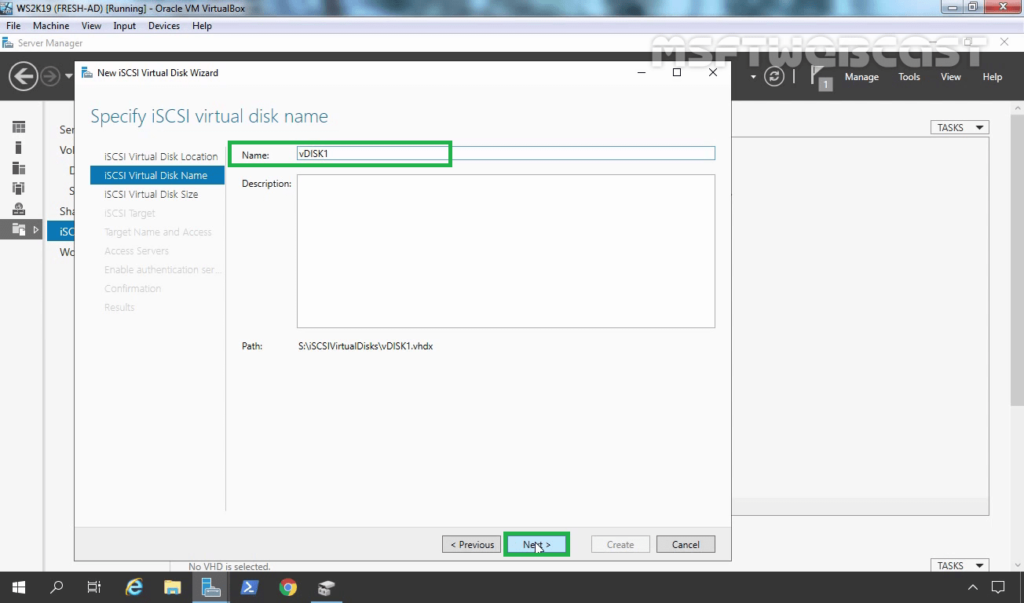
- Specify iSCSI virtual disk name
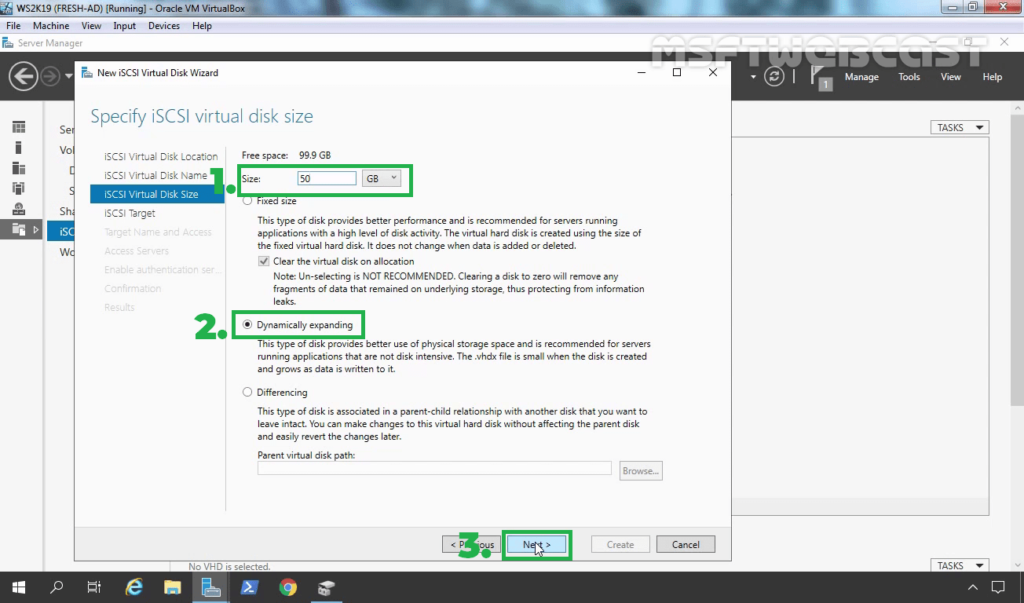
- Specify iSCSI virtual disk size
- Assign iSCSI target
- Specify target name
- Specify access servers
- Enable Authentication
- Confirm selections
- View Results
1. Open New iSCSI Virtual Disk Wizard
Open the Server Manager dashboard and click File and Storage Services.
Select iSCSI and click To create an iSCSI virtual disk, start the New iSCSI Virtual Disk Wizard.
2. Select iSCSI virtual disk location
Select Type a custom path and browse for the folder we created earlier and click Next.
Custom path: c:\disk
3. Specify the iSCSI virtual disk name
Enter the Name and Description for the virtual disk and click Next.
- Name: disk1
- Description: iSCSI Disk1
4. Specify iSCSI virtual disk size
Specify the disk size for the virtual disk, Select Dynamically expanding and click Next.
Size: 10GB
5. Assign iSCSI target
Select New iSCSI target and click Next.
6. Specify target name
Enter the Name and Description for iSCSI Target and click Next.
- Name: target1
- Description: iSCSI Target1
7. Specify access servers
Click Add to specify the iSCSI initiator that will access this iSCSI virtual disk.
Select Enter a value for the selected type, choose IP Address from the drop-down menu, enter Initiator IP Address and click OK.
Initiator IP Address:192.168.3.4
Click Next to continue.
8. Enable Authentication
Select Enable CHAP, set username and password, and click Next.
9. Confirm selections
Confirm selections and click Create.
10. View Results
After finishing the installation, click Close.
Step 2: Configure the iSCSI initiator
-
On the computer that you set up as the iSCSI initiator, start the iSCSI Initiator Properties. From Server Manager, click the Tools menu, and then choose iSCSI Initiator.
-
Click the Targets tab, and then type the iSCSI target IP address.
-
Click Quick Connect, and then select the Connect button.
After a connection has been established, you can use Windows PowerShell cmdlets to bring the disks online.
To use PowerShell cmdlets to bring the disks online
-
From Windows PowerShell, type:
Note
If there is no record returned, you can register the iSCSI target by typing:
-
Bring the disk online and create a volume on it:
Note
To manage iSCSI Target Server on a cluster, you will need to use Server Manager or Windows PowerShell cmdlets.