
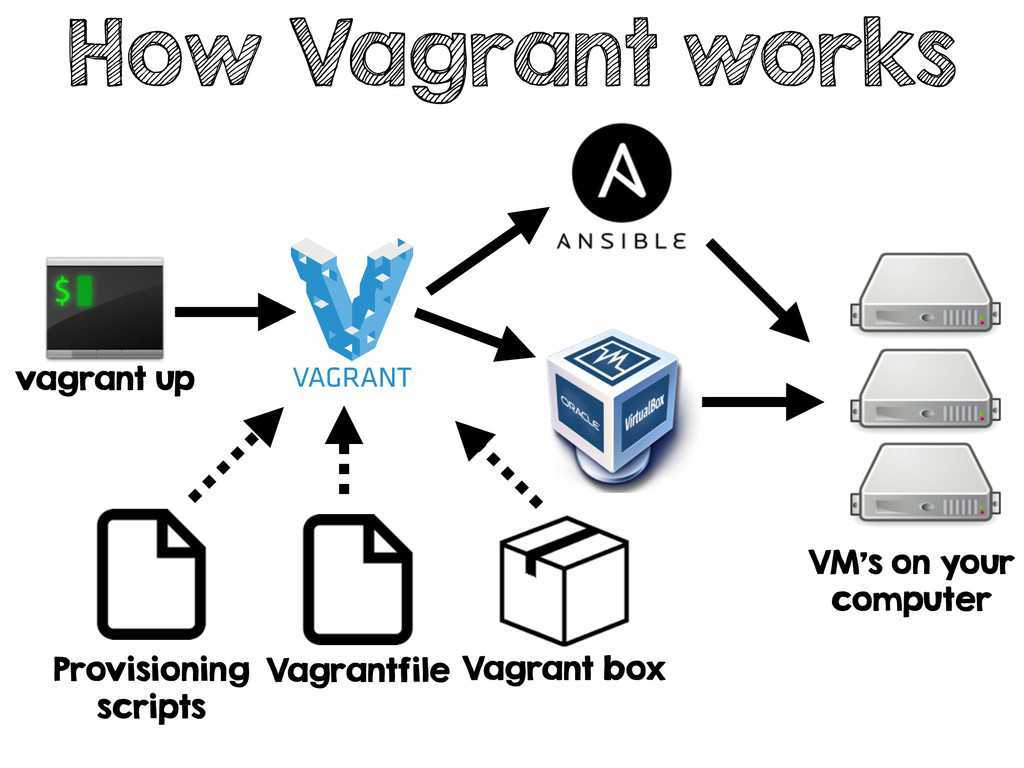
Подсистема подготовки
Подсистема подготовки — это основной компонент для управления подготовкой и настройкой во время выполнения на устройстве под управлением Windows 10/11.
Подсистема подготовки предоставляет следующие функции:
- Предоставление конфигурации в любое время, когда устройство работает, включая первую загрузку и настройку или OOBE. Его также можно расширить до других точек во время работы устройства.
- Чтение и объединение параметров из нескольких источников конфигурации, которые могут быть добавлены в образ корпорацией Майкрософт, OEM-производителем или системным интегратором либо добавлены ИТ-администраторами/администраторами образовательных учреждений или пользователями на устройство во время выполнения. Источники конфигурации могут быть встроены в образ или из пакетов подготовки, добавленных на устройство.
- Реагирование на триггеры или события и инициирование этапа подготовки.
- Аутентификация пакетов подготовки.
- Выбор набора конфигураций на основе этапа и набора ключей, таких как SIM-карта, MCC/MNC, диапазон IMSI и т. д., которые сопоставляются с конкретной конфигурацией, а затем передача этой конфигурации в инфраструктуру управления конфигурацией для применяться.
- Работа с OOBE и пользовательским интерфейсом панели управления, позволяющая пользователю выбирать конфигурацию, когда невозможно определить конкретное совпадение.
Create a Provisioning Package
We need Windows Configuration Designer to create a Provisioning package. The application can be installed from Microsoft Store.
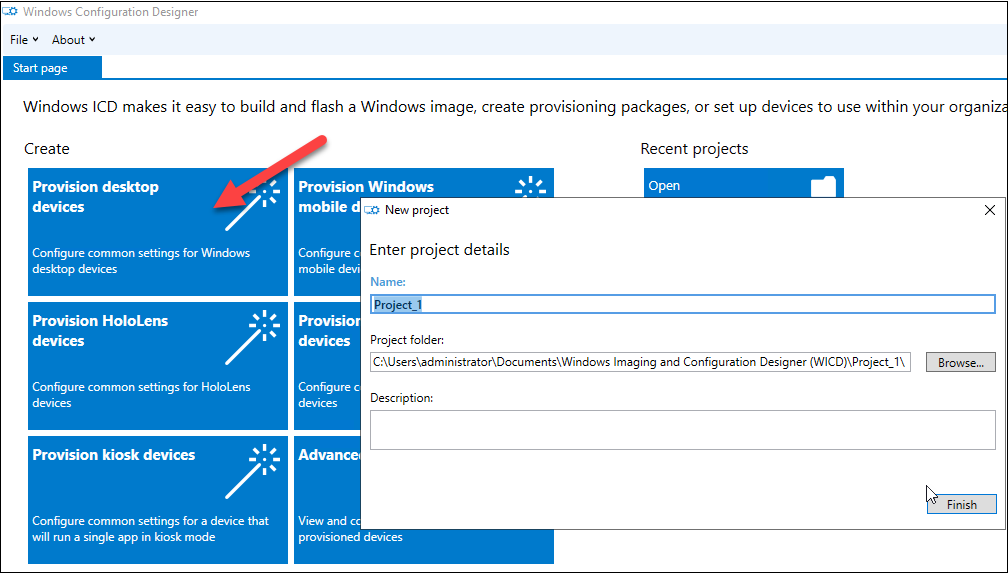
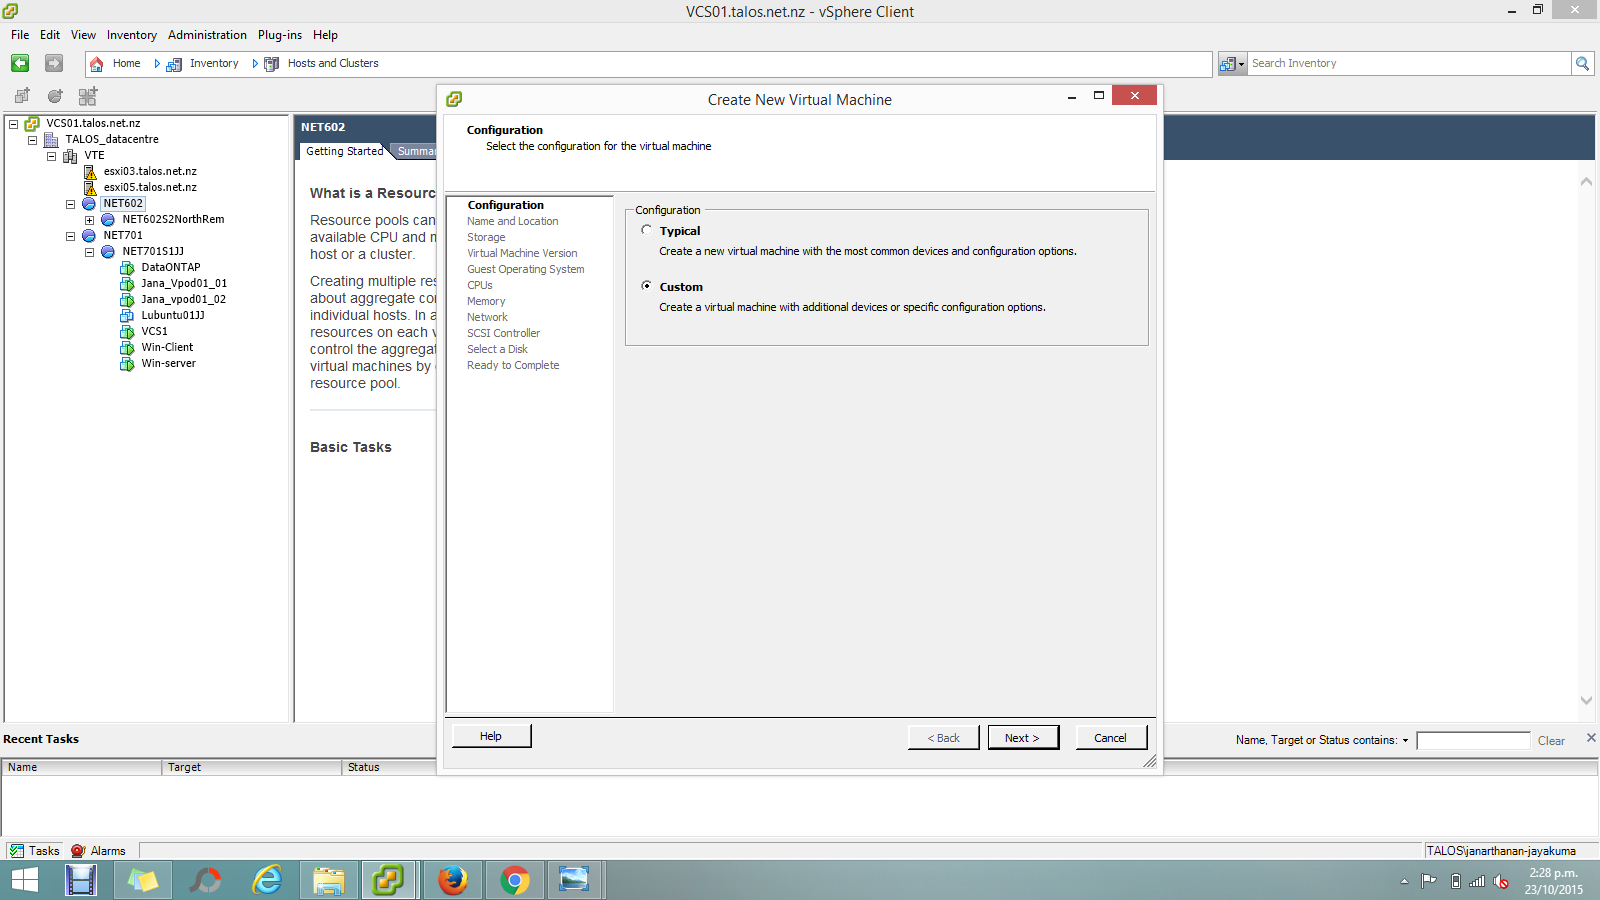
Open Windows Configuration Designer and select Provisioning desktop devices.
On the New Project window, specify the following information:
- Name – Name for your project
- Project folder – Location where you want to save the package
- Description – description for the project
Click on Finish.
On the Set up device page, provide the following details.
- Device name: Enter a unique name for your devices. The name can be based on device serial number or random set of characters.
- Product key: Optionally, you can enter a product key if you want to upgrade windows edition.
- Configure devices for shared user: You can enable and configure this option if device is to be used by shared users.
- Remove pre-installed software: You can enable and configure this option if you want to remove pre-installed software’s.
On the Set up network page, configure the WI-Fi network devices connect to when they first start. This is an optional configuration. If the Wi-Fi network is not configured, a wired network connection is required when device is first started.
On the Account Management page, select Enroll in Azure AD , enter a Bulk token Expiry date, and then click on Get Bulk Token. The token validity period is 180 days.
Important: On the Stay signed in to all your apps page, select No, sign in to this app only. If you press OK, the device you are using will become managed by your organization. If you do not intend for your device to be managed, make sure to select No, sign in to this app only.
You will be prompted for Azure AD sign-in. Login with user Azure AD account to proceed.
Click Next when Bulk Token is fetched successfully.
The Add application is an optional page, you can add the application which you want to install through provisioning package.
The Add certificates is an optional page, you can add the certificate which you want to provision on the device.
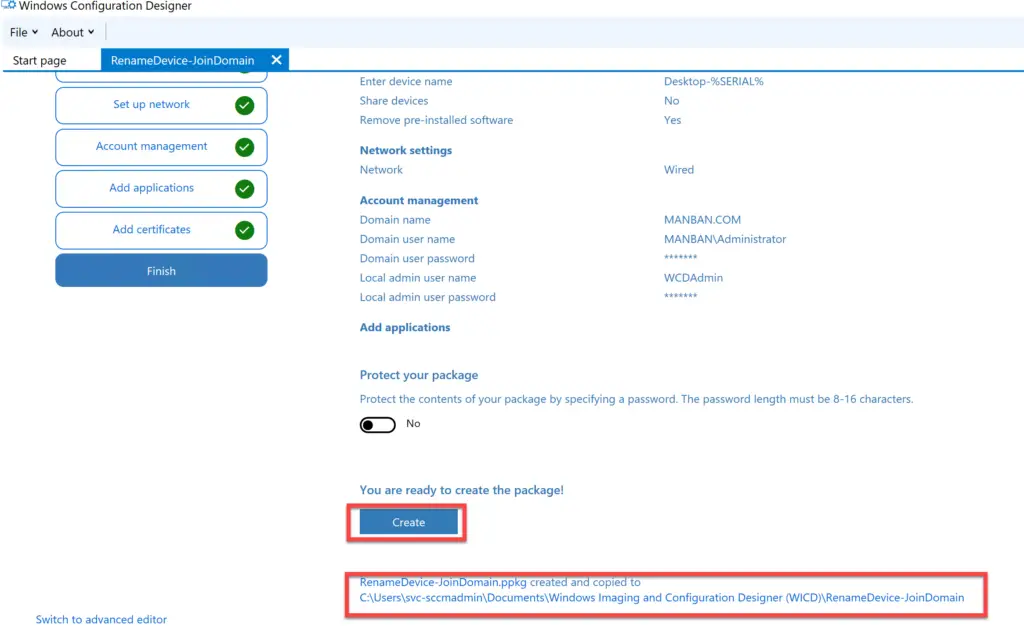
On the Finish page, review the details. You can protect your package with a password. Click on Create once you reviewed the details.
Once package is created, you will see the status message just below the Create button.
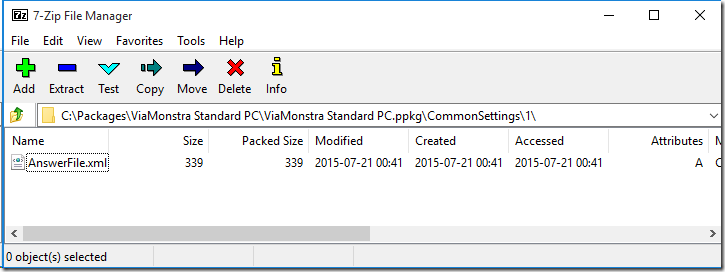
See the snapshot of folder where provisioning package was copied. The file with .ppkg is provisioning package executable.
Installing the client
Microsoft Store
Once you have received the updated App Installer you should be able to execute . Some users have reported issues with the client not being on their PATH.
Manually Update
The same Microsoft Store package will be made available via our Releases. Note that installing this package will give you the WinGet client, but it will not enable automatic updates from the Microsoft Store.
Build your own
You can also . While the client should be perfectly functional, we are not ready to provide full support for clients running outside of the official distribution mechanisms yet. Feel free to file an Issue, but know that it may get lower prioritization.
Изменения в подготовке в Windows 10 версии 1607Changes to provisioning in Windows 10, version 1607
Примечание
Этот раздел сохраняется для клиентов, использующих Windows 10 версии 1607 в Current Branch for Business.This section is retained for customers using Windows 10, version 1607, on the Current Branch for Business. Некоторые из этих сведений не применяются в Windows 10 версии 1703.Some of this information is not applicable in Windows 10, version 1703.
Windows ICD для Windows 10 версии 1607 упрощает выполнение распространенных сценариев подготовки.Windows ICD for Windows 10, version 1607, simplified common provisioning scenarios.
Windows ICD в Windows 10 версии 1607 поддерживает следующие сценарии, доступные для ИТ-администраторов.Windows ICD in Windows 10, version 1607, supported the following scenarios for IT administrators:
-
Простая подготовка — позволяет ИТ-администраторам определять нужную конфигурацию в Windows ICD, а затем применять эту конфигурацию на целевых устройствах.Simple provisioning – Enables IT administrators to define a desired configuration in Windows ICD and then apply that configuration on target devices. Мастер простой подготовки упрощает и ускоряет весь процесс, позволяя ИТ-администратору выполнять пошаговые действия для настройки общих параметров конфигурации.The simple provisioning wizard makes the entire process quick and easy by guiding an IT administrator through common configuration settings in a step-by-step manner.
-
Дополнительная подготовка (развертывание классических приложений (Win32) и приложений универсальной платформы Windows (UWP), а также сертификатов) — позволяет ИТ-администратору использовать Windows ICD для открытия пакетов подготовки в редакторе расширенных параметров и включать приложения для развертывания на конечных устройствах.Advanced provisioning (deployment of classic (Win32) and Universal Windows Platform (UWP) apps, and certificates) – Allows an IT administrator to use Windows ICD to open provisioning packages in the advanced settings editor and include apps for deployment on end-user devices.
-
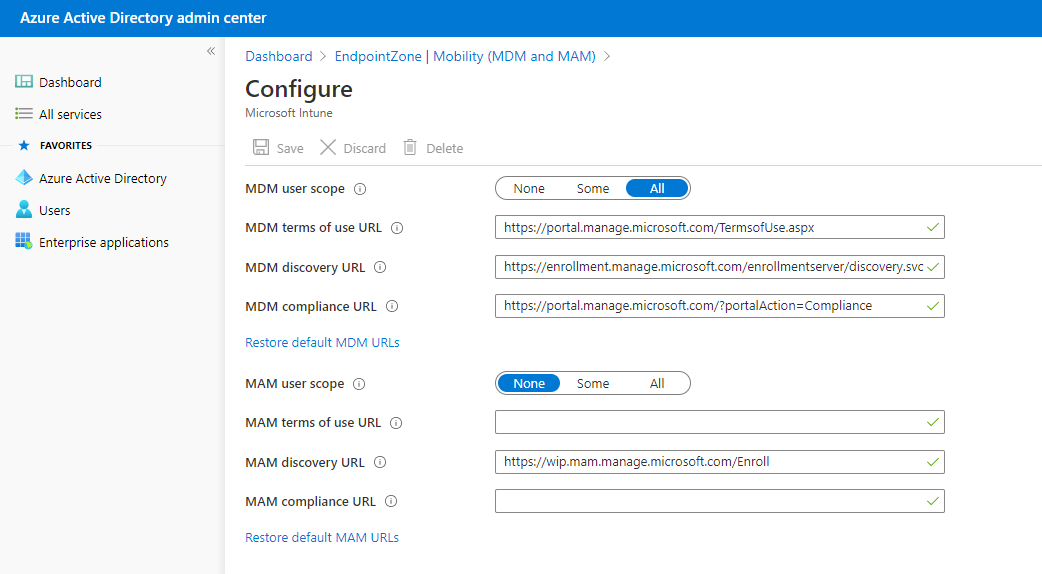
Регистрация мобильных устройств для управления — позволяет IT-администраторам приобретать продаваемые в розницу устройства под управлением Windows 10 Mobile и регистрировать их в системе управлении мобильными устройствами (MDM) перед их распространением среди пользователей организации.Mobile device enrollment into management — Enables IT administrators to purchase off-the-shelf retail Windows 10 Mobile devices and enroll them into mobile device management (MDM) before handing them to end-users in the organization. ИТ-администраторы могут использовать Windows ICD для определения конечной точки управления и конфигурации целевых устройств путем подключения к ним с компьютера с Windows (связанное развертывание) или с помощью SD-карты.IT administrators can use Windows ICD to specify the management end-point and apply the configuration on target devices by connecting them to a Windows PC (tethered deployment) or through an SD card. Поддерживаемые конечные точки управления включают:Supported management end-points include:
- Microsoft Intune (регистрация на основе сертификата)Microsoft Intune (certificate-based enrollment)
- AirWatch (регистрация на основе парольной строки);AirWatch (password-string based enrollment)
- Mobile Iron (регистрация на основе парольной строки);Mobile Iron (password-string based enrollment)
- прочие средства управления MDM (на основе сертификатов).Other MDMs (cert-based enrollment)
Примечание
Windows ICD в Windows 10 версии 1607 также предоставлял мастер для создания пакетов подготовки для компьютеров в образовательных учреждениях.Windows ICD in Windows 10, version 1607, also provided a wizard to create provisioning packages for school PCs. Дополнительные сведения см. в разделе Настройка компьютеров учащихся для присоединения к домену.To learn more, see Set up students’ PCs to join domain.
When can you apply a provisioning package?
Applies to Provisioning packages can be applied to client devices during the first-run experience (out-of-box experience or “OOBE”) and after (“runtime”). Applying a provisioning package to a desktop device requires administrator privileges on the device.
How do I create a provisioning package in Windows 10?
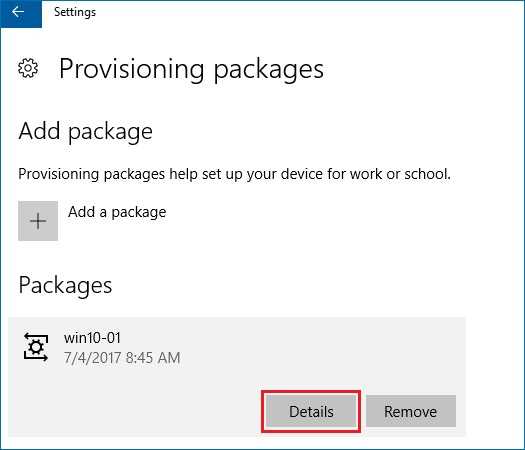
Insert the USB drive to a desktop computer, navigate to Settings > Accounts > Access work or school > Add or remove a provisioning package > Add a package, and select the package to install.
When can you apply a provisioning package Windows 10 IOT?
Should I delete provisioning packages?
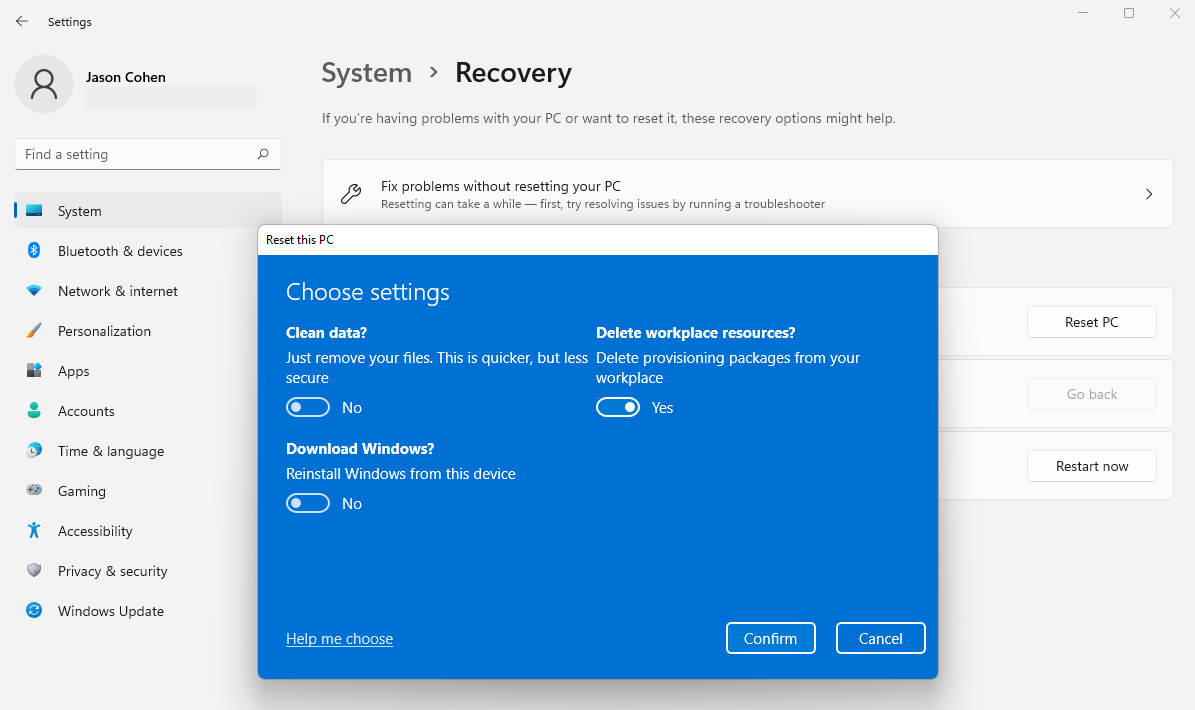
Even though it does not remove all configuration settings set. The removal of a package nevertheless is not useless – it allows you to run it the package again. That means if a dedicated package is not removed you cannot run it again.
How do I activate IoT for Windows 10?
All Windows 10 IoT Enterprise devices must be enabled for activation. Device activation may be completed by having devices contact Microsoft activation verification servers directly through an Internet connection or indirectly via a proxy tool.


How do I activate IoT for Windows?
Provisioning Packages
If you simplify it, a lot, you can think of provisioning packages as an uber-version of the unattend.xml, but with other settings, and with the ability to attach file assets. These packages are only for Windows 10, and they are authored by the Windows Imaging and Configuration Designer (WICD) tool, which is a part of the Windows ADK 10.
The official documentation for Provisioning Packages and WICD, including some nice step-by-step guides, is found here.
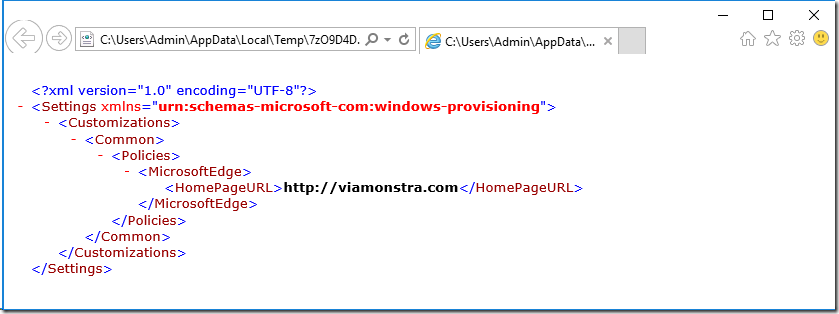
Anyway, the packages that you create, ends with the PPKG extension, but they are really just WIM files, meaning you can mount them using ImageX/DISM/7-Zip and even do changes on the fly to them (even though that never was the intention, and is not supported either ). Here is the content in a provision package that sets the Microsoft Edge home page.
Note: The 10240 version of WICD is quite slow, and will often go to “not responding” when using it. But simply give it some time and it normally comes back.
 Sample package.
 Sample Setting.
Как установить и использовать winget
c http-equiv=»Content-Type» content=»text/html;charset=utf-8″>lass=»remon-after-2nd-h2″ id=»remon-1888383128″>
Для установки winget, который пока доступен лишь в виде предварительной версии, вы можете:
После установки, для начала использования Windows Package Manager или winget запустите PowerShell от имени администратора (проще всего сделать это, нажав правой кнопкой мыши по кнопке «Пуск» и выбрав нужный пункт меню). Осталось начать вводить команды. Можно начать с простого ввода winget чтобы получить информацию о доступных в менеджере пакетов командах.
winget search zipЭтой командой мы ищем все программы с «zip» в тексте, чтобы узнать, какое имя указывать в следующей команде.
Как видим на скриншоте выше, в репозитории удалось найти peazip и 7Zip. Для установки 7Zip вводимwinget install 7Zip
Как видно на скриншоте выше, началась загрузка установщика с официального сайта, но, как упоминалось выше, 7-zip.org недоступен у нас и установка не удалась (я надеялся, что загрузка будет происходить с сайта Майкрософт).
Пробую аналогичным образом установить что-то еще, например, Sublime Text (один из лучших текстовых редакторов для работы с кодом)
Обратите внимание на скриншот: я могу выполнить установку по имени программы (Sublime Text, при наличии пробелов, берем имя в кавычки) или по имени пакета — SublimeHQ.SublimeText, которое я увижу после выполнения поиска. Установка прошла успешно.
Установленную программу мы можем удалить стандартными средствами Windows 10 (программы и компоненты в панели управления или через интерфейс Параметры — Приложения).
Чтобы увидеть полный список программ, можно использовать команду (без указания имени конкретной программы) winget install. Часть результата вы можете видеть на скриншоте — здесь и многие известные программы для обычного пользователя (Steam, CrystalDiskMark, WinRAR, PDFsam, популярные браузеры, программы для восстановления данных, бесплатные средства записи видео с экрана, например OBS Studio и ShareX, мессенджеры и многое другое), так и большой набор ПО для разработчиков, включая Visual Studio и другие IDE.
При желании мы можем не устанавливать программу, а получить полную информацию о ней, включая контрольную сумму и прямую ссылку на загрузку
Для этого используется команда winget show имя_программы
Часть результата вы можете видеть на скриншоте — здесь и многие известные программы для обычного пользователя (Steam, CrystalDiskMark, WinRAR, PDFsam, популярные браузеры, программы для восстановления данных, бесплатные средства записи видео с экрана, например OBS Studio и ShareX, мессенджеры и многое другое), так и большой набор ПО для разработчиков, включая Visual Studio и другие IDE.
При желании мы можем не устанавливать программу, а получить полную информацию о ней, включая контрольную сумму и прямую ссылку на загрузку. Для этого используется команда winget show имя_программы
Напомню, это предварительная версия Windows Package Manager и, думаю, как и в случае с Microsoft PowerToys (который, кстати, тоже можно установить через winget), этот менеджер пакетов в скором времени обзаведется новыми функциями, а список доступного программного обеспечения пополнится.
А вдруг и это будет интересно:
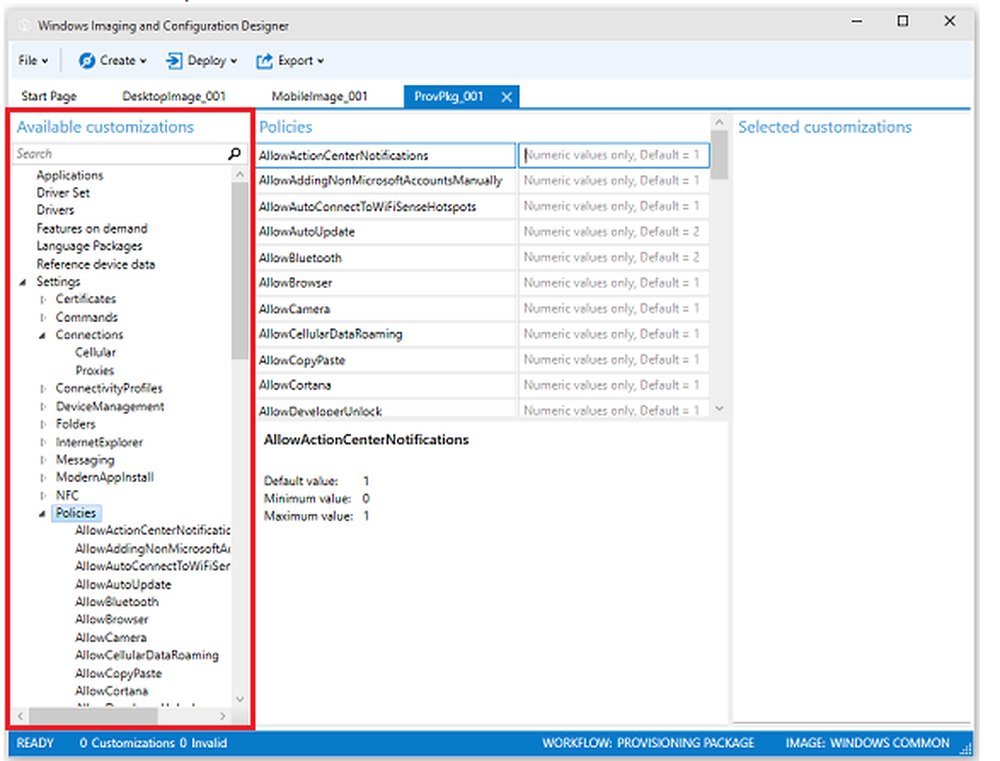
Configure settings
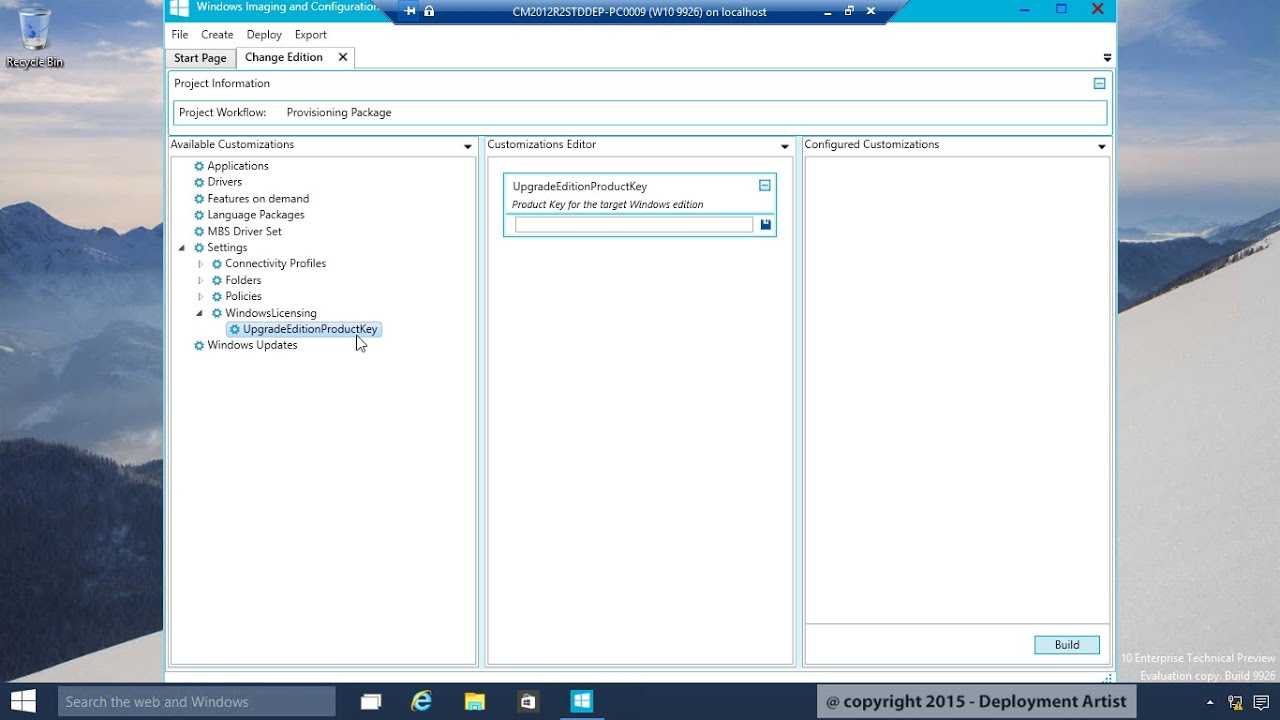
For an advanced provisioning project, Windows Configuration Designer opens the Available customizations pane. The example in the following image is based on All Windows desktop editions settings.
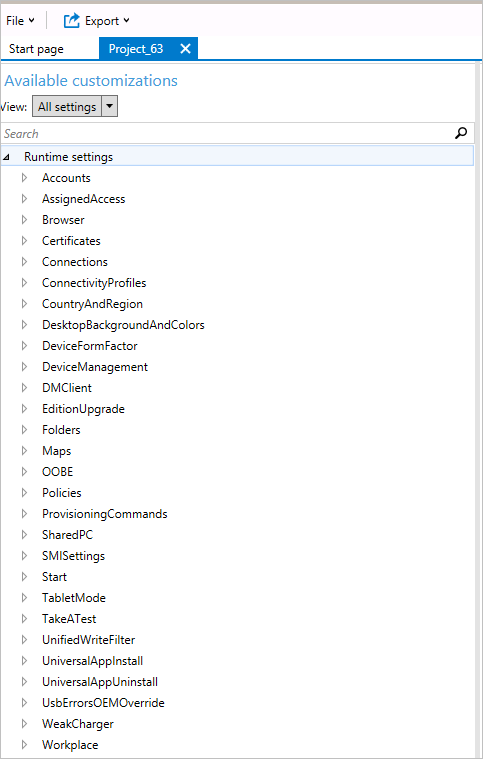
The settings in Windows Configuration Designer are based on Windows client configuration service providers (CSPs). To learn more about CSPs, see Introduction to configuration service providers (CSPs) for IT pros.
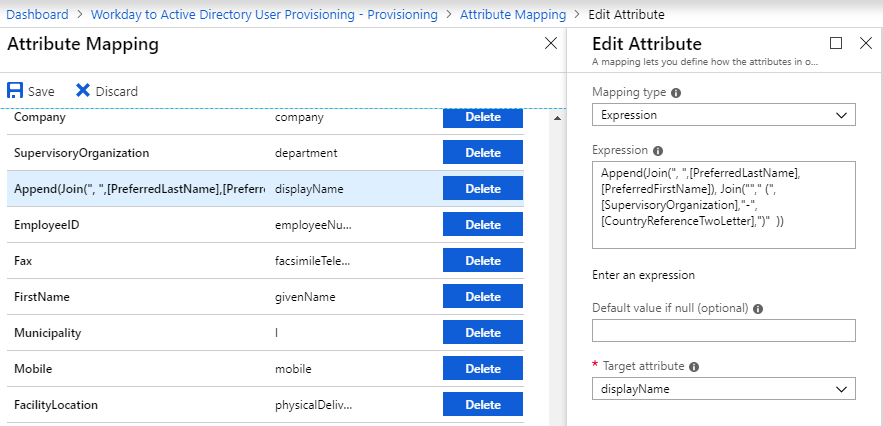
The process for configuring settings is similar for all settings. The following table shows an example.
-
Expand a category:
-
Select a setting:
-
Enter a value for the setting. Select Add if the button is displayed:
-
Some settings, such as this example, require additional information. In Available customizations, select the value you just created, and more settings are displayed:
-
When the setting is configured, it is displayed in the Selected customizations pane:
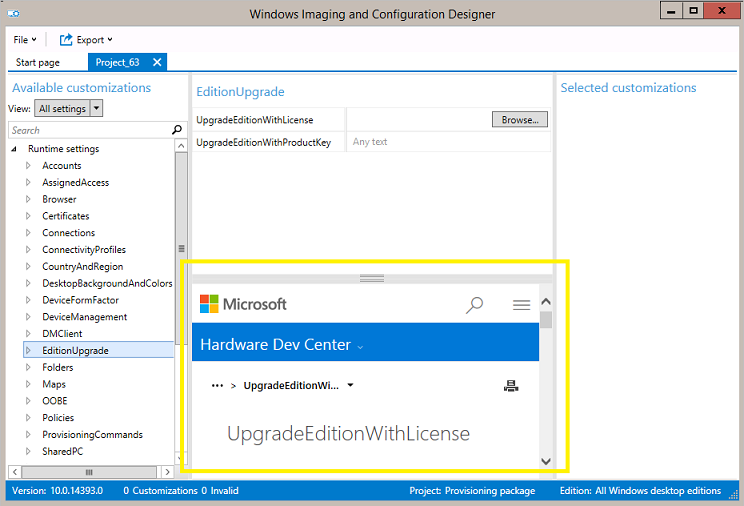
For details on each specific setting, see Windows Provisioning settings reference. The reference article for a setting is also displayed in Windows Configuration Designer when you select the setting, as shown in the following image.
Безопасность
Windows Defender Advanced Threat Protection
Новые возможности Windows Defender Advanced Threat Protection (ATP) для Windows 10 версии 1703. Кстати, напоминаем, что недавно делились описанием функционала ATP на Хабре.
Обнаружение атак
К основным улучшениям в области обнаружения атак относятся:
- возможность использовать api-интерфейса аналитики угроз для создания пользовательских оповещений;
- улучшения сенсоров ОС для памяти и ядра, чтобы обеспечить поддержку обнаружения атак в памяти и на уровне ядра;
- обновление механизмов обнаружения программ-шантажистов, а также других сложных атак;
- функциональность ретроспективного обнаружения, которая позволяет применять новые правила обнаружения атак в архивных данных с глубиной до полугода, чтобы обнаруживать атаки, которые ранее остались незамеченными.
Корпоративные клиенты теперь могут воспользоваться полным набором функций безопасности Windows благодаря тому, что информация об обнаружении атак средствами Windows Defender Antivirus и блоки Охранника устройств отображаются в портале Windows Defender ATP.
Добавлены другие возможности, позволяющие получить целостную картину расследований. К другим улучшениям расследования атак относятся:
- — возможность выявления учётных записей пользователей с наибольшим количеством оповещений и расследование случаев возможной компрометации учётных данных; — агрегирование множественных событий обнаружения и связанных с этим событий в единое представление для сокращения времени разрешения; — использование API-интерфейса REST для получения оповещений от Windows Defender ATP.
При обнаружении атаки группы реагирования могут предпринимать неотложные меры по изоляции бреши в системе безопасности:
- — быстро реагировать на обнаруженные атаки, изолируя машины или собирая пакет аналитики; — быстро реагировать на обнаруженные атаки путём остановки работы файлов, их перемещения в карантин или блокировки.
Проверка состояния работоспособности сенсоров — проверка способности конечной точки предоставлять данные сенсора и взаимодействовать со службой Windows Defender ATP, а также устранять известные неполадки.
Windows Defender Antivirus
Защитник Windows получил новое название — Windows Defender Antivirus. Его новые возможности:
- о том, как можно сконфигурировать функциональность блокировки при первом появлении (Block at First Sight);
- возможность определить уровень защиты облака;
- защита Windows Defender Antivirus в приложении Windows Defender Security Center.
Параметры безопасности групповых политик
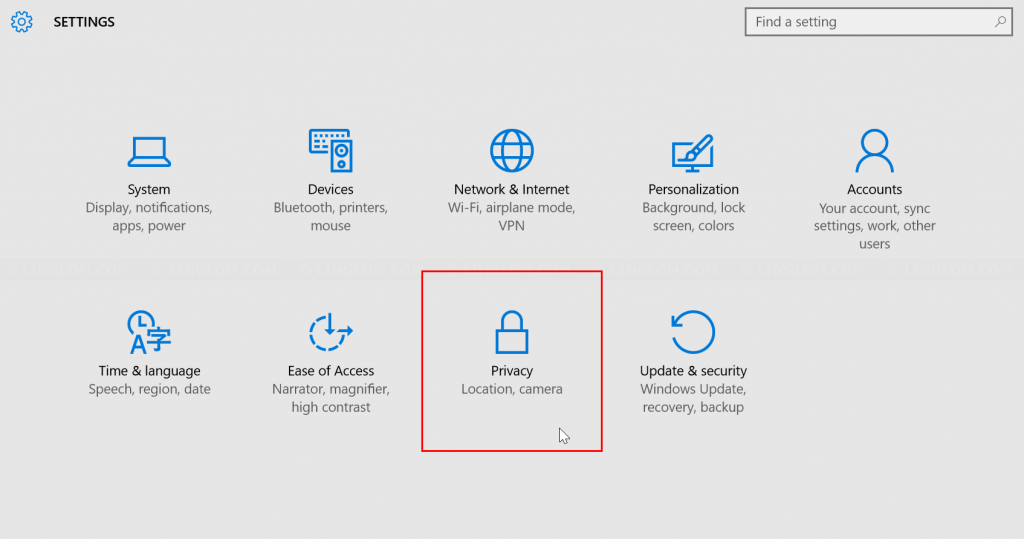
Параметр безопасности Интерактивный вход в систему: отображать сведения о пользователе, если сеанс заблокирован (Interactive logon: Display user information when the session is locked) был обновлён и теперь работает в связке с параметром Конфиденциальность в разделе Параметры > Учетные записи > Параметры входа.
Появился новый параметр политики безопасности — Interactive logon: Don’t display username at sign-in. Этот параметр определяет, нужно ли отображать имя пользователя во время входа в систему, и работает в связке с параметром Конфиденциальность в разделе Параметры > Учетные записи > Параметры входа. Этот параметр влияет только на плитку Other user.

Windows Hello для бизнеса
Теперь забытый PIN-код можно сбросить, не удаляя корпоративные данные или приложения, управляемые средствами Microsoft Intune. Администратор может инициировать удаленный сброс PIN-кода устройств под управлением PIN через портал Intune.
На настольных ПК пользователи могут сбросить забытый PIN-код в разделе Параметры > Учетные записи > Параметры входа.
Current Windows Configuration Designer limitations
Windows Configuration Designer doesn’t work properly if the Policies > Administrative Templates > Windows Components > Internet Explorer > Security Zones: Use only machine settings Group Policy setting is enabled. Instead of changing the security setting, we recommend you run Windows Configuration Designer on a different device.
You can only run one instance of Windows Configuration Designer on your computer at a time.
When adding apps and drivers, all files stored in the same folder are imported, and may cause errors during the build process.
The Windows Configuration Designer UI doesn’t support multivariant configurations. Instead, you must use the Windows Configuration Designer command-line interface to configure multivariant settings. For more information, see Create a provisioning package with multivariant settings.
In Windows Configuration Designer, you can only build one project at a time. You can open multiple projects at the same time, but you can only build one at a time.
To enable the simplified authoring jscripts to work on a server SKU running Windows Configuration Designer, you must enable Allow websites to prompt for information using scripted windows:
- Open Internet Explorer.
- Go to Settings >Internet Options >Security >Custom level.
- Select Allow websites to prompt for information using scripted windows >Enable.
If you copy a Windows Configuration Designer project from one PC to another PC, then:
- Copy all the associated files for the deployment assets with the project, including apps and drivers.
- Copy all the files to the same path as the original PC.
For example, when you add a driver to a provisioned package, you must copy the .INF file to a local directory on the PC that’s running Windows Configuration Designer. If you don’t copy the .INF file, and use a copied version of this project on a different PC, then Windows Configuration Designer might resolve the file paths to the original PC.
Recommended: Before starting, copy all source files to the PC running Windows Configuration Designer. Don’t use external sources, like network shares or removable drives. Using local files reduces the risk of interrupting the build process from a network issue, or from disconnecting the USB device.
Наверняка вы уже слышали, что сегодня официально выходит Windows 10 Creators Update. В этой статье мы решили быть на шаг впереди и рассказать вам про новые фичи для сисадминов в следующем обновлении Windows 10 (1703).
Create Provisioning Package
Launch Windows Imaging and Configuration Designer on a system where ADK for Windows 10 is installed.
Once we launch WCD, we can see multiple options of creating the package for different devices, as we are going to create the provisioning package for Windows 10, lets select Provision desktop devices.
This will ask to create a new project, specify the project name, lets use a sensible name as I am going to create a package which renames the hostname and joins the domain, I am using the name RenameDevice-JoinDomain and click Finish.
Under Set up device page, we can see the option of specifying the device name. We also have option to Switch to advanced editor which opens a whole new world of thousands of options we specify and customize. To keep it simple, I won’t be going demonstrating this in this blog
Device name consists of 15 characters. This page gives us 2 options, examples as follows:
- Contoso-%SERIAL% = We will get 15 digits of hostname starting with initial 8 characters as “Contoso-“ and remaining 7 characters will be serial number of device (last 7 characters will be used in this case)
- Fabrikam-%RAND:5% = It will consists of 9 initial characters as “Fabrikam-“ and remaining 6 characters will be random number.
We are going to use the naming convention as Desktop-%SERIAL%. Click on Set up network.
Under Set up network, we have option for Connect devices to a Wi-Fi network, as we are not configuring this option, I have toggled the switch to Off. Click Account management.
Under Account management, we have several options such as Enroll into Active Directory, Enroll in Azure AD, Local Admin. As I am going to show you domain joining process, I will go with Enroll into Active Directory option.
Specify Domain name, User name, User Password who has the privilege to join a device to the domain.
We have option for creating local administrator account as well, I have provided the User name as WCD Admin and password assigned to it.
Click on Finish, verify the settings we have specified and click on Create.
Package will be created under the location which was specified while creating project.
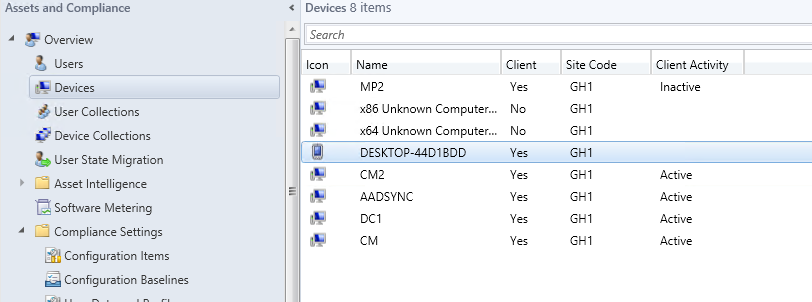
Login to any workstation which is part of workgroup, you can run following command to check the serial number of the system.
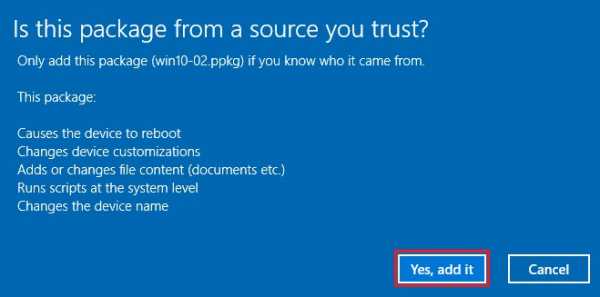
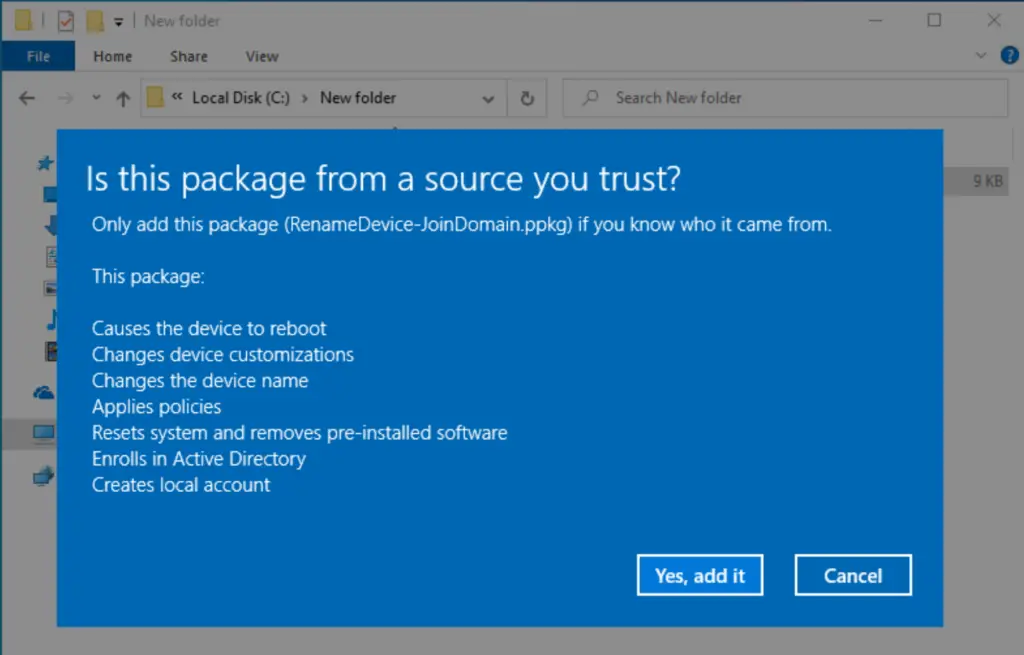
Copy the RenameDevice-JoinDomain.ppkg under c:\new folder. Run the package, which will show Is this package from a source you trust ? Click on Yes, add it to continue the process.
We can use dism.exe tool to inject the ppkg package as well:
Or, powershell command can be used:
System will go through restart phase with resetting the PC (you won’t loose any data, as we have specified “Remove pre-installed software” option on “set up device” page it will go through reset the PC option to uninstall pre-installed apps) processing all the configuration settings specified under ppkg file.
Обновление
Windows Update for Business
Функция приостановки обновления изменилась: теперь в ней требуется указывать дату начала установки. Если не сконфигурирована соответствующая политика, у пользователей теперь есть возможность отложить обновление в параметрах Windows Settings → Update & security → Windows Update → Advanced options. Также увеличилось время, на которое можно откладывать исправления, — до 35 дней.
Обновление устройств, управляемых с помощью Windows Update for Business, теперь можно откладывать на срок до 365 дней (ранее обновление можно было отложить только на 180 дней). Пользователи могут задавать в параметрах уровень готовности своей ветви и время, на которое следует отложить обновления.
Windows Insider for Business
Добавилась возможность загружать сборки предварительной версии Windows 10 Insider Preview, используя корпоративные учетные данные Azure Active Directory (AAD).
Оптимизация доставки обновлений
Изменения в новой версии позволили обеспечить полную поддержку экспресс-обновлений в System Center Configuration Manager, начиная с версии 1702 этого продукта, а также обновлений и управления продуктами сторонних производителей, в которых реализована эта функциональность. Она дополнила существующую поддержку экспресс-обновлений в Центре обновлений Windows, Центре обновлений Windows для бизнеса и WSUS.


Примечание. Указанные изменения доступны в Windows 10 версии 1607 после установки апрельского обновления 2017 года.
Политики оптимизации доставки обновлений теперь позволяют задавать дополнительные ограничения, что дает возможность лучше управлять различными сценариями обновления.
К новым политикам относятся:
- поддержка загрузки при заданном уровне заряда, когда устройство работает от батареи;
- поддержка однорангового кеширования при подключении устройства через VPN;
- определение памяти (включительно), которую разрешено использовать для однорангового кеширования;
- минимальный объём дискового пространства, который разрешено использовать для однорангового кеширования;
- минимальный размер файла для содержимого однорангового кеширования.
Установленные ранее приложения больше не обновляются автоматически
При обновлении до Windows 10 версии 1703 поставляемые в составе Windows приложения, которые пользователь ранее удалил, не будут автоматически устанавливаться в рамках процесса обновления.
How do I create a provisioning package?
Create a Project
- Download and Install Windows Configuration Designer on a Windows 10 device.
- Open Windows Configuration Designer.
- Click on File and choose New project.
- Provide the project details.
- Select project workflow as Provisioning package and click on Next.
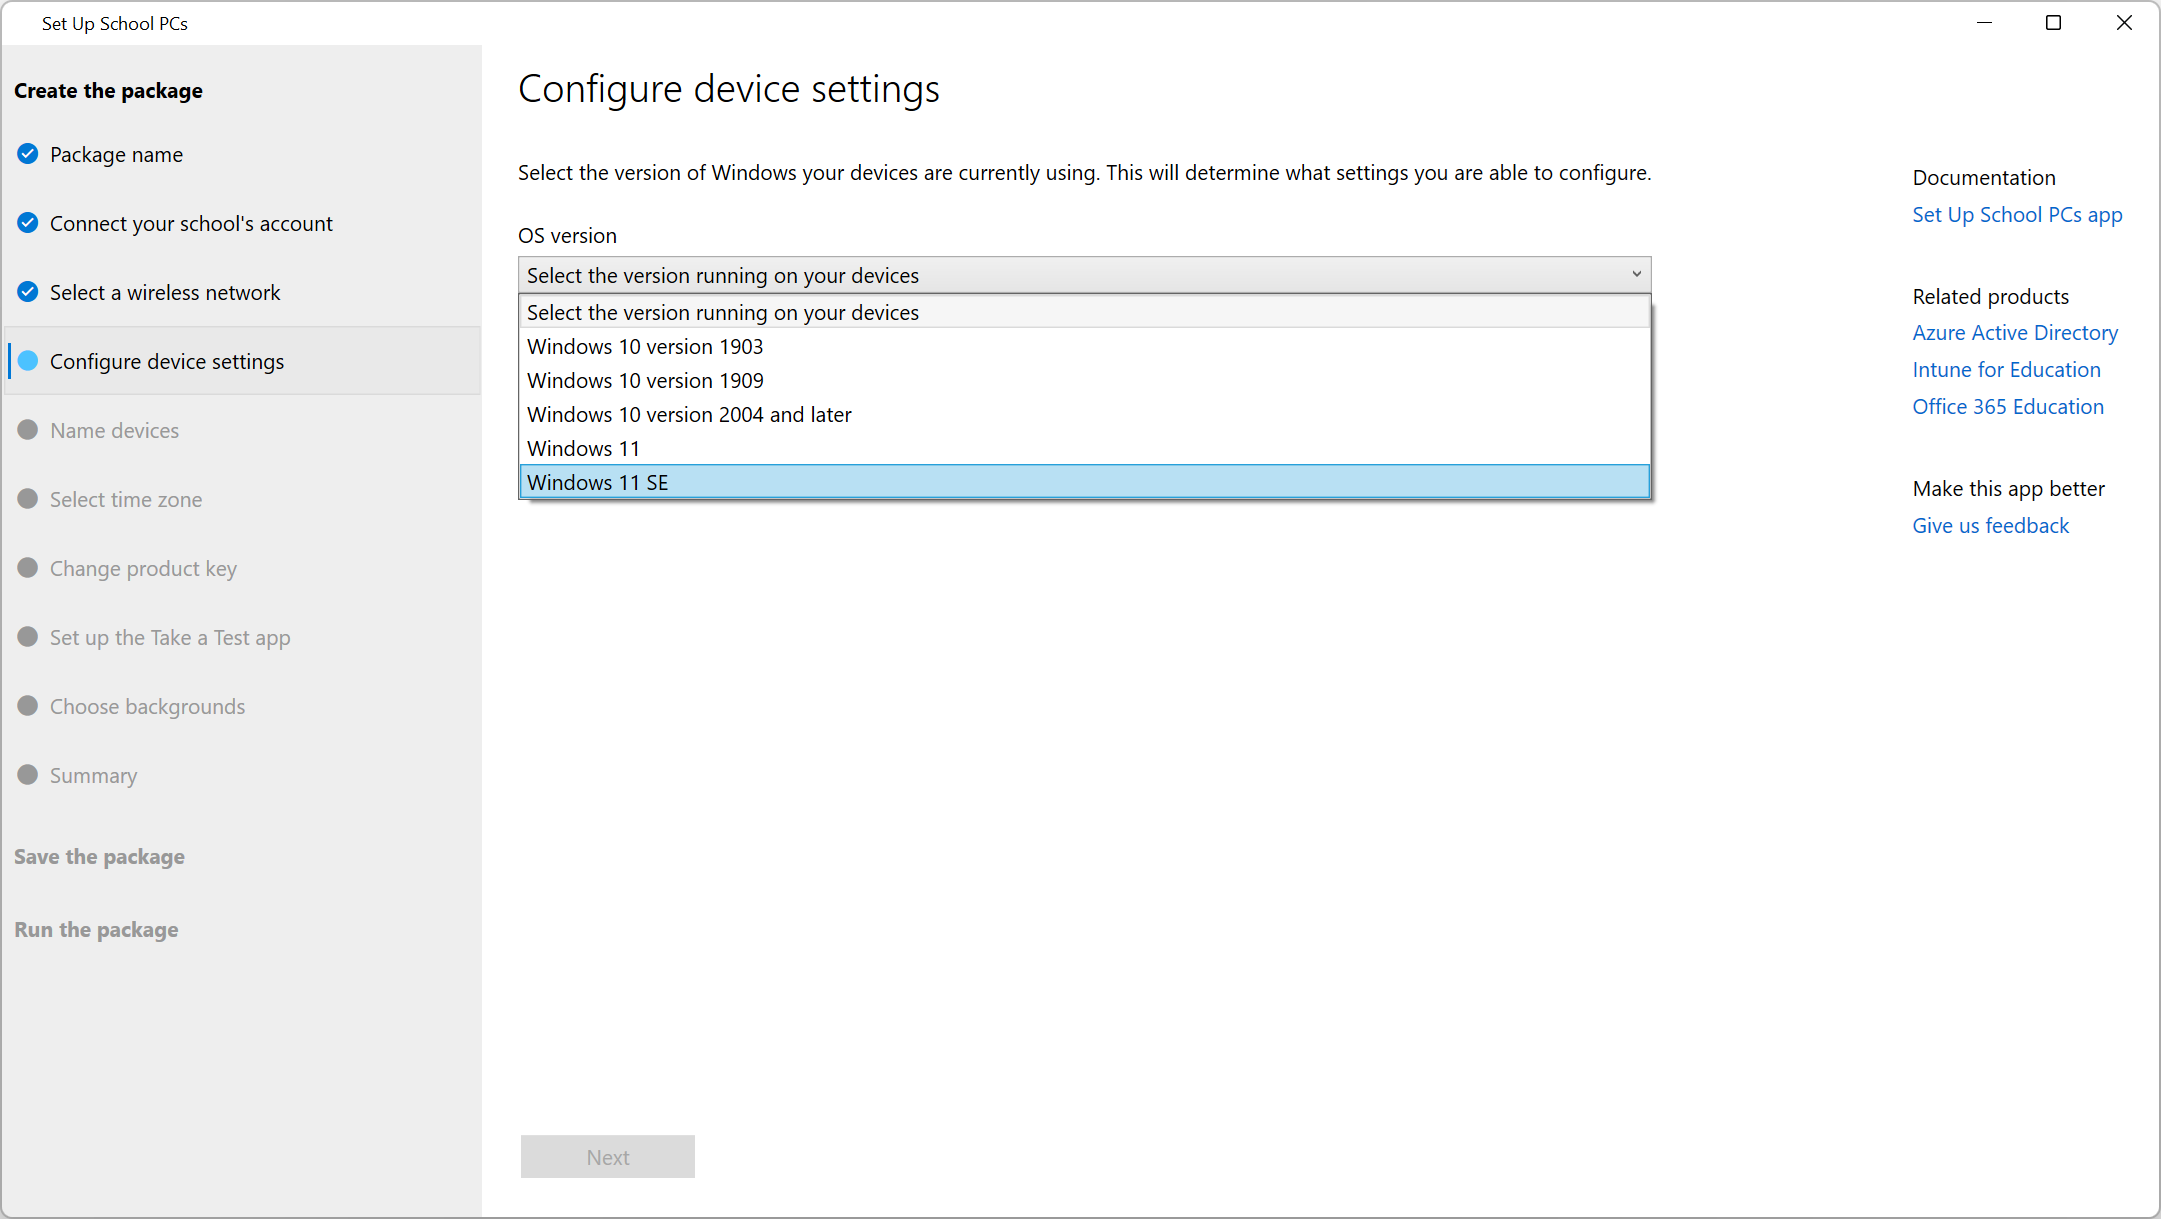
- Choose the type of Windows edition and click on Next.
Which tool should you use to create the provisioning package?
The WICD tool is a part of the Windows 10 ADK and can be downloaded here. After installing and launching the WICD tool, you can then proceed to start creating provisioning package. Next we can select “New Provisioning Package” and go through the short wizard to create your provisioning package.
What is provisioning package runtime processing tool?
A provisioning package (. ppkg) is a container for a collection of configuration settings. With Windows client, you can create provisioning packages that let you quickly and efficiently configure a device without having to install a new image.
How do I create a provisioning package for surface hub?
Apply a provisioning package using Settings app ppkg file into the Surface Hub. From Surface Hub, start Settings and enter the admin credentials when prompted. Navigate to Surface Hub > Device management. Under Provisioning packages, select Add or remove a provisioning package > Add a package.
How are provisioning packages distributed?
Where are provisioning packages stored?
After a stand-alone provisioning package is applied to the device, the package is persisted in the %ProgramData%\Microsoft\Provisioning folder on the device.
Related topics
- How provisioning works in Windows 10
- Install Windows Configuration Designer
- Create a provisioning package
- Apply a provisioning package
- Settings changed when you uninstall a provisioning package
- Provision PCs with common settings for initial deployment (simple provisioning)
- Use a script to install a desktop app in provisioning packages
- PowerShell cmdlets for provisioning Windows 10 (reference)
- Windows Configuration Designer command-line interface (reference)
- Create a provisioning package with multivariant settings
- Use Windows Configuration Designer to configure Windows 10 Mobile devices
Add an OS upgrade package
Configuration Manager Current Branch includes a native in-place upgrade task. This task sequence differs from the MDT in-place upgrade task sequence in that it does not use a default OS image, but rather uses an OS upgrade package.
On CM01:
- Using the Configuration Manager console, in the Software Library workspace, expand Operating Systems, right-click Operating System Upgrade Packages, and click Add Operating System Upgrade Package.
- On the Data Source page, under Path, click Browse and enter the UNC path to your media source. In this example, we have extracted the Windows 10 installation media to \\cm01\Sources$\OSD\UpgradePackages\Windows 10.
- If you have multiple image indexes in the installation media, select Extract a specific image index from install.wim… and choose the image index you want from the dropdown menu. In this example, we have chosen Windows 10 Enterprise.
- Next to Architecture, select x64, choose a language from the dropdown menu next to Language, and then click Next.
- Next to Name, enter Windows 10 x64 RTM and then complete the wizard by clicking Next and Close.
- Distribute the OS upgrade package to the CM01 distribution point by right-clicking the Windows 10 x64 RTM OS upgrade package and then clicking Distribute Content.
- In the Distribute Content Wizard, add the CM01 distribution point, click Next and click Close.
- View the content status for the Windows 10 x64 RTM upgrade package. Do not continue until the distribution is completed (it might take a few minutes). You also can review the D:\Program Files\Microsoft Configuration Manager\Logs\distmgr.log file and look for the STATMSG: ID=2301 line.