
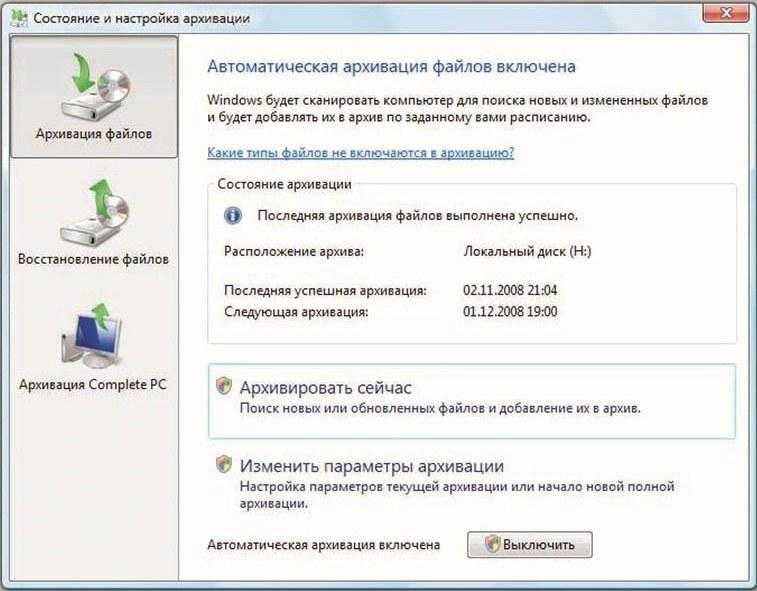
Если кто-то кое-где у нас порой
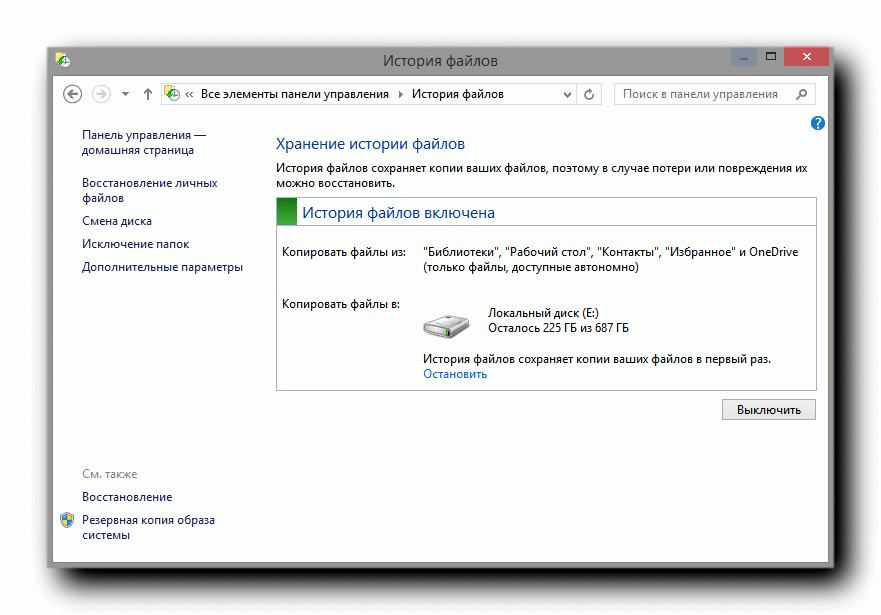
Из своего сундучка я извлек утилиты Sysinternals и приступил к исследованию. Отследить приложение, записывающее файлы на диск, было делом техники. Я настроил Process Monitor на слежение за папкой File History на внешнем диске, исключив фильтрами проводник и встроенный в Windows 8 антивирус (защитник Windows = Microsoft Security Essentials).
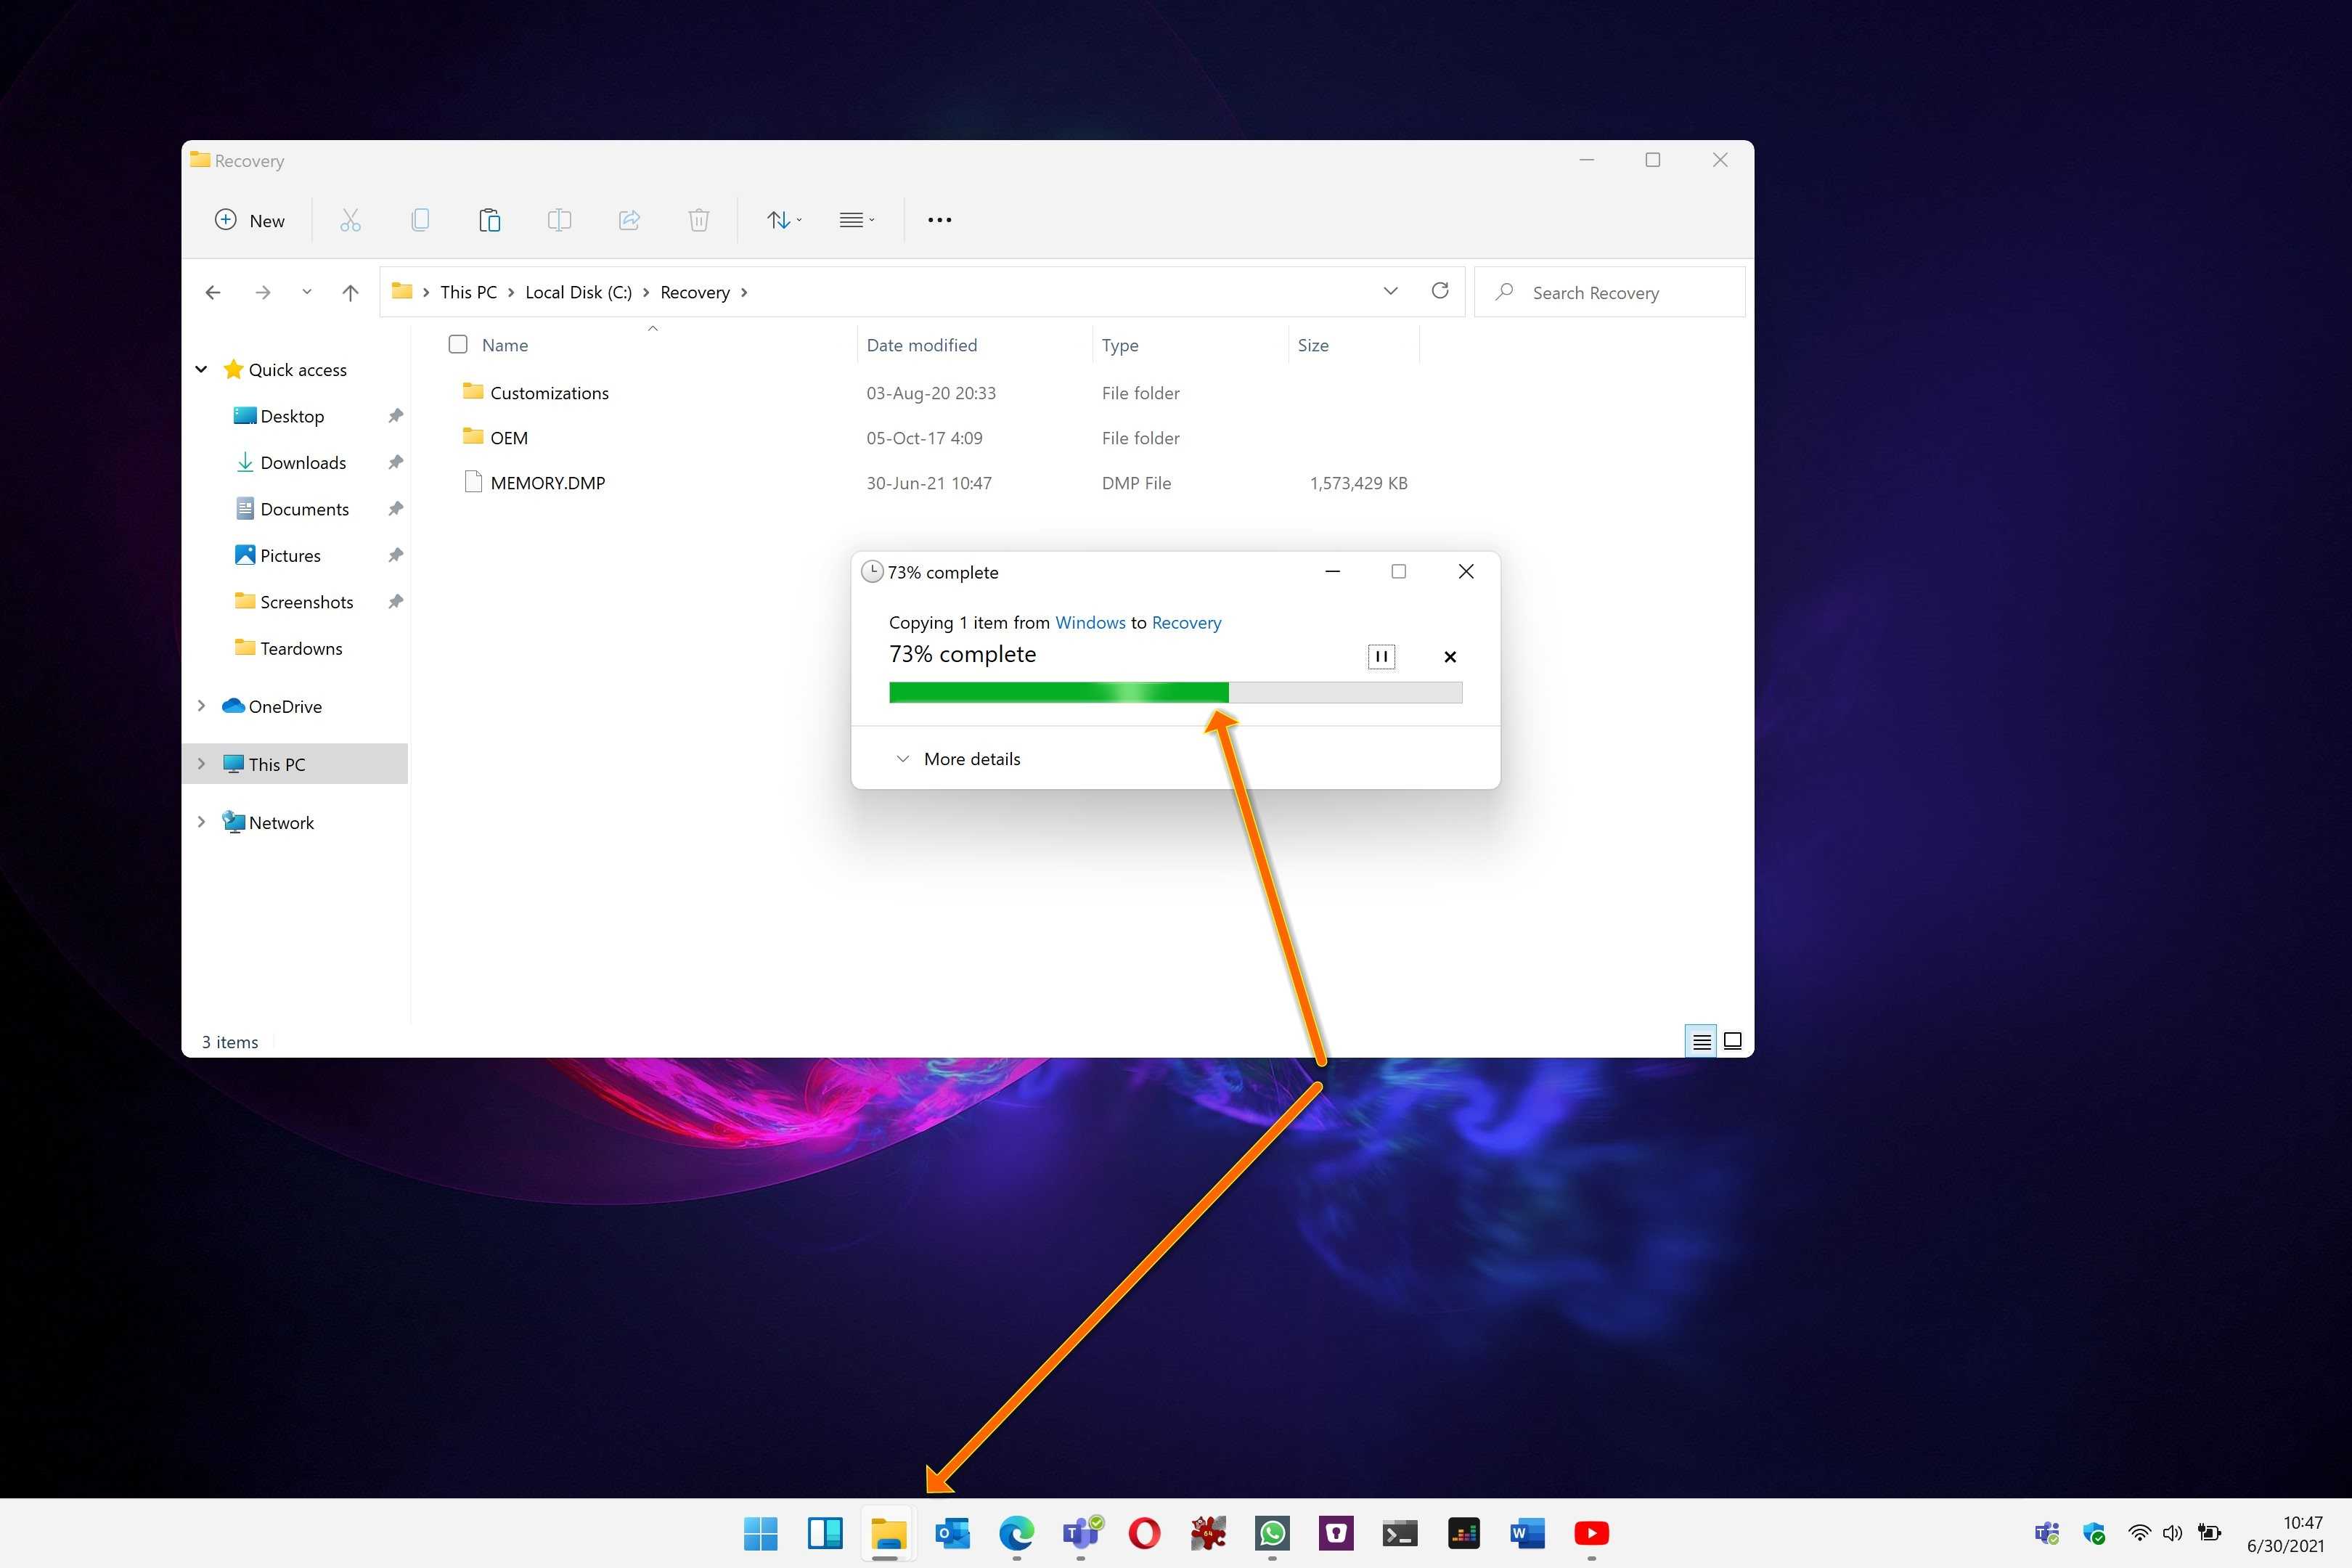
В течение часа Process Monitor поймал за руку процесс svchost.exe.
Как известно, процессы с таким именем обеспечивают работу служб Windows (svc – service, host – хозяин). Зная PID процесса, с помощью нового диспетчера задач Windows 8 было несложно выяснить, что резервное копирование обеспечивает новая служба File History.

Как восстановить предыдущие версии файлов в Windows 11/10
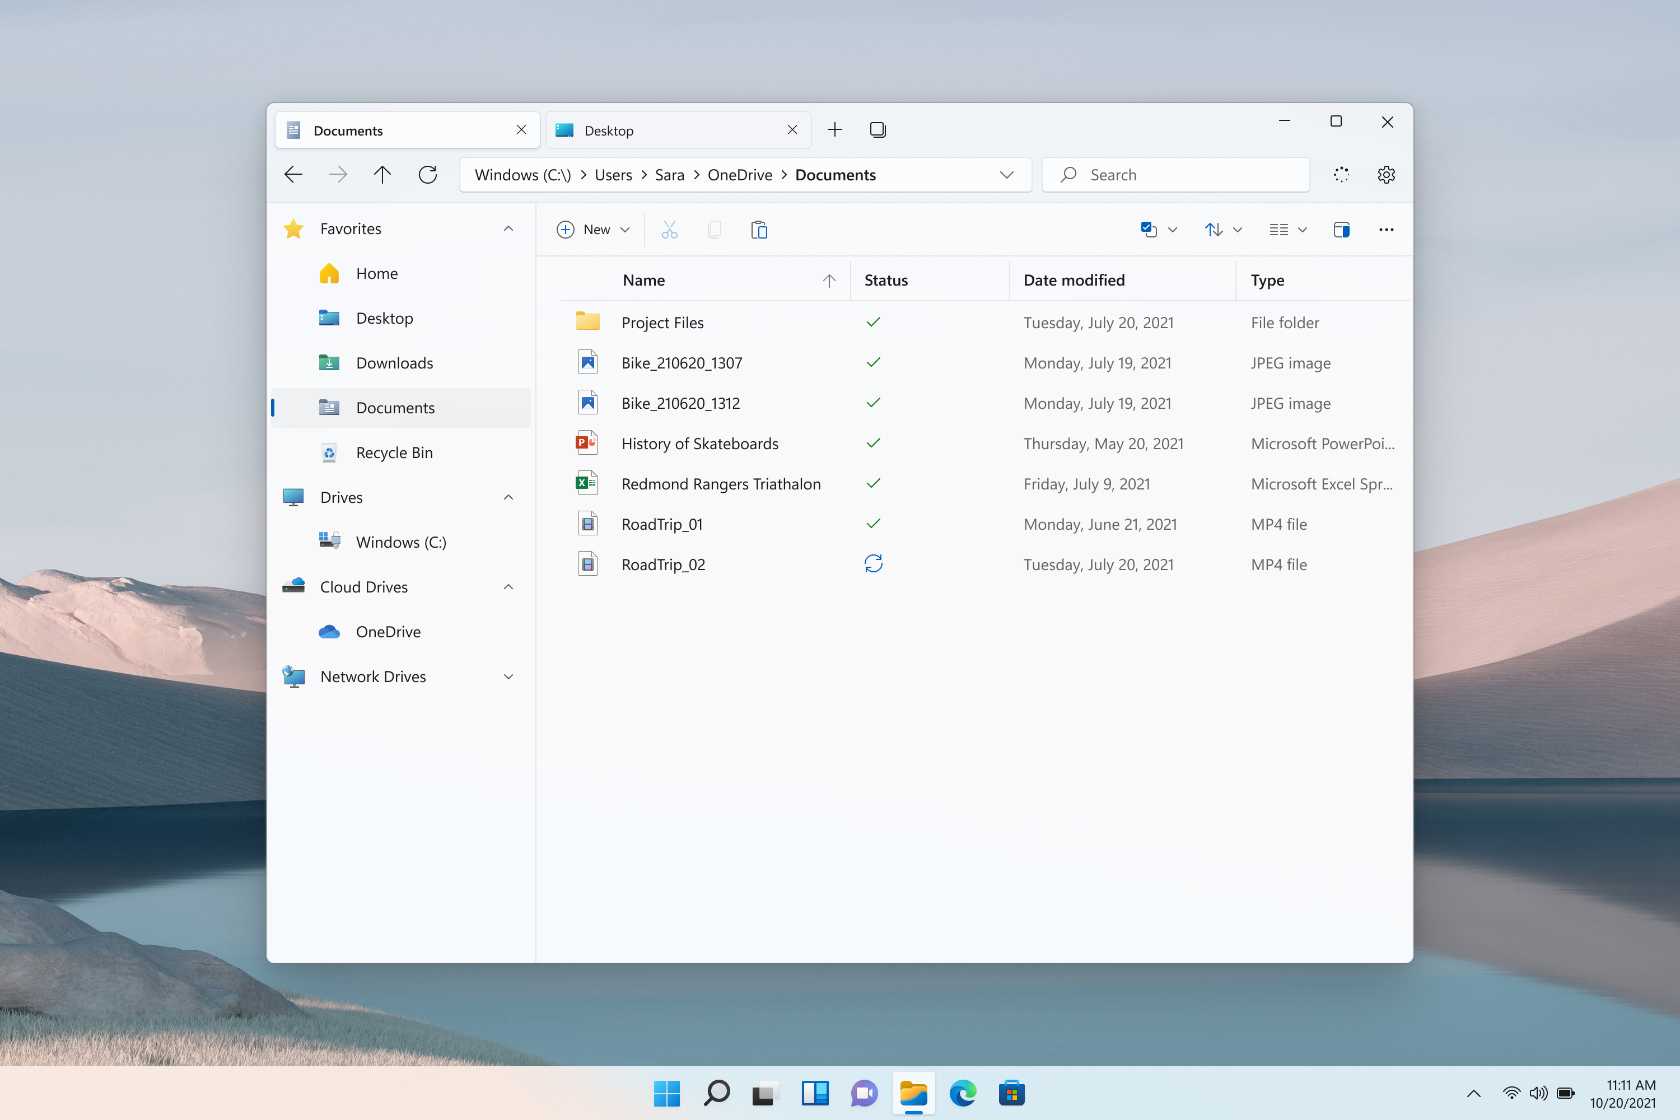
Выше мы объяснили два метода включения функции «Предыдущие версии» в проводнике. Для первого метода требуется внешнее запоминающее устройство, а для другого метода внешнее запоминающее устройство не требуется. Если вы включили функцию «Предыдущие версии» с помощью внешнего запоминающего устройства, вам необходимо подключить это устройство к компьютеру, чтобы восстановить удаленные файлы, в противном случае вы получите следующее сообщение:
Подключите внешнее запоминающее устройство, на котором вы создали резервную копию предыдущих версий ваших файлов, затем откройте Проводник. После этого откройте свойства папки, например «Загрузки», «Музыка» и т. д., и перейдите на вкладку «Предыдущие версии». Выберите предыдущую версию из списка и нажмите «Восстановить».
Если вы включили функцию «Предыдущие версии» с помощью второго метода, вам не требуется внешнее запоминающее устройство. Также этот метод работает на разделах жесткого диска. Теперь, чтобы восстановить удаленные или отсутствующие файлы на разделах жесткого диска, выполните действия, описанные ниже:
- Откройте проводник.
- Щелкните правой кнопкой мыши раздел жесткого диска, на который вы хотите восстановить удаленные файлы, и выберите «Свойства».
- В окне «Свойства» выберите вкладку «Предыдущие версии».
- Выберите предыдущую версию по дате ее создания.
- Щелкните Восстановить.
- Вы получите подтверждающее сообщение. Щелкните Восстановить.
Почему восстановление предыдущей версии недоступно?
Вы можете восстановить удаленные файлы, используя функцию «Предыдущие версии» в проводнике. Чтобы получить доступ к этой функции, вы должны открыть свойства папки или свойства раздела жесткого диска. По умолчанию эта функция отключена в проводнике. Если вы откроете свойства папки или свойства раздела жесткого диска и перейдете на вкладку «Предыдущие версии», вы увидите следующее сообщение:
Чтобы использовать предыдущие версии, вы должны включить эту функцию. Мы объяснили, как включить предыдущие версии для восстановления файлов в Windows 11/10 выше в этой статье.
Как включить предыдущие версии?
Вы можете включить предыдущие версии, создав теневую копию папки или раздела жесткого диска. Для этого вы можете использовать утилиту «История файлов» в Windows 11/10 или команду WMIC в планировщике заданий. Мы подробно объяснили оба этих метода выше в этой статье.
Есть ли в Windows 11 история файлов?
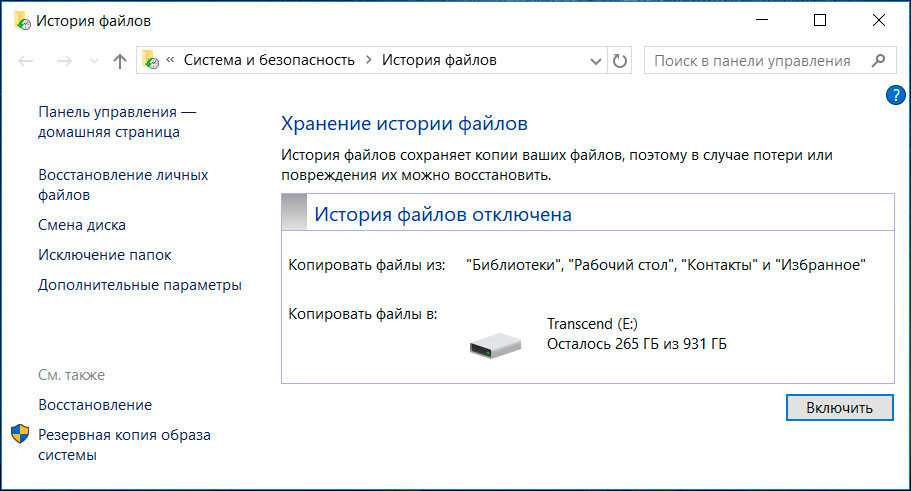
Да, в Windows 11 есть история файлов, но вы не найдете ее в настройках Windows 11. Вы можете получить доступ к истории файлов в Windows 11 в панели управления. Откройте панель управления и перейдите в «Система и безопасность > История файлов». Кроме того, вы также можете выполнить поиск истории файлов в строке поиска панели управления. На странице «История файлов» вы можете создать резервную копию своих файлов, подключив внешнее запоминающее устройство.
Надеюсь, это поможет.
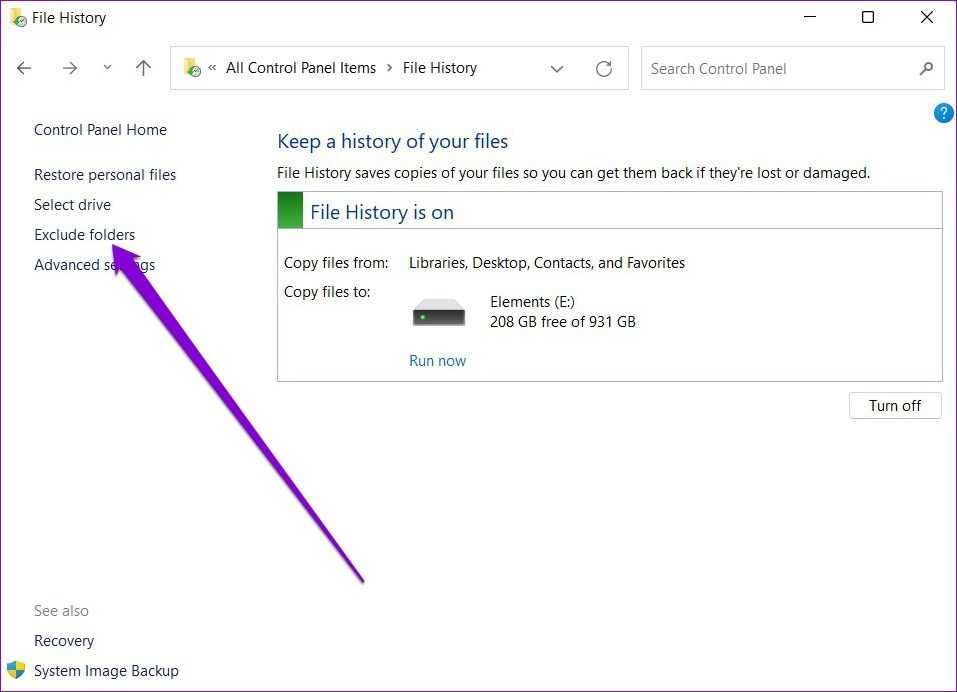
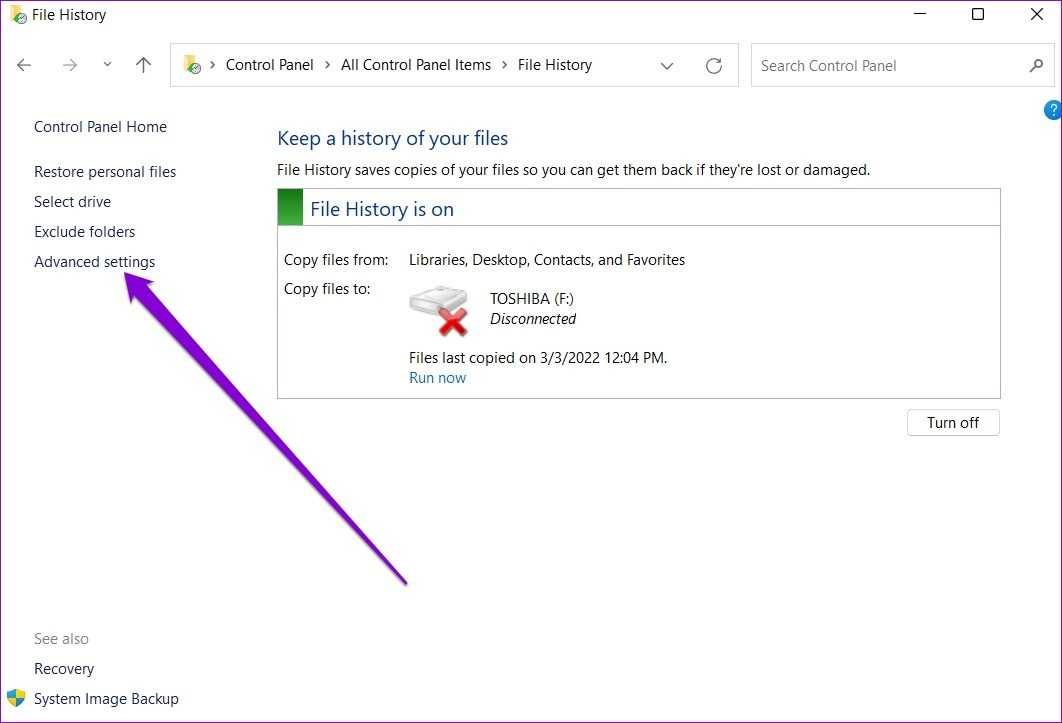
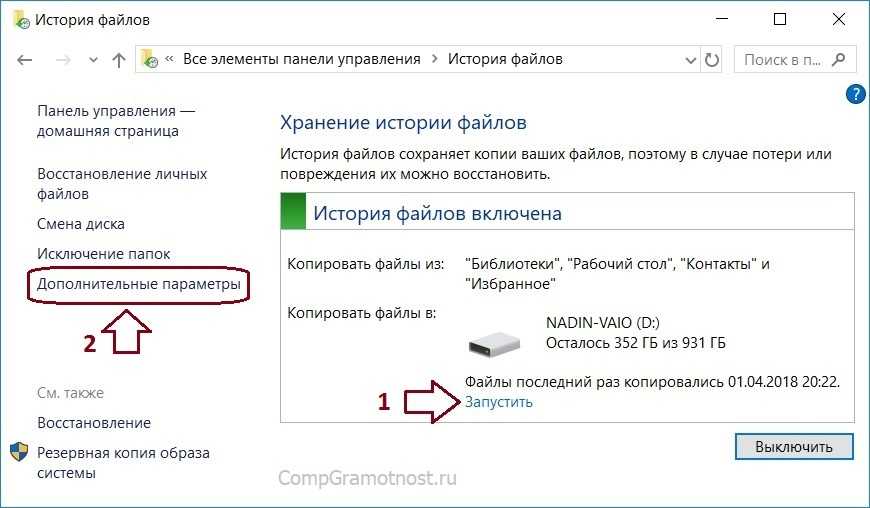
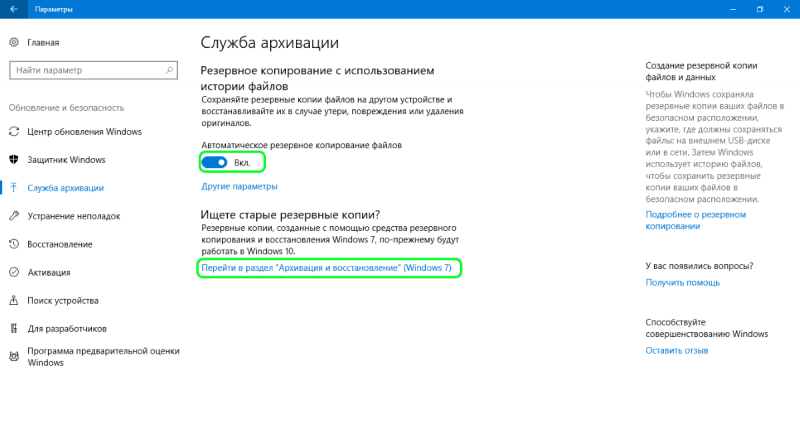
Как настроить параметры резервного копирования в Истории файлов
История файлов запущена, но вам все еще нужно внести несколько изменений. Вот как это сделать
- Нажмите Win + R , чтобы запустить командное окно ‘Выполнить’. Введите FileHistory в область ввода текста и нажмите клавишу ввода.
- Теперь перейдите в левый раздел и нажмите на опцию Advanced Settings.
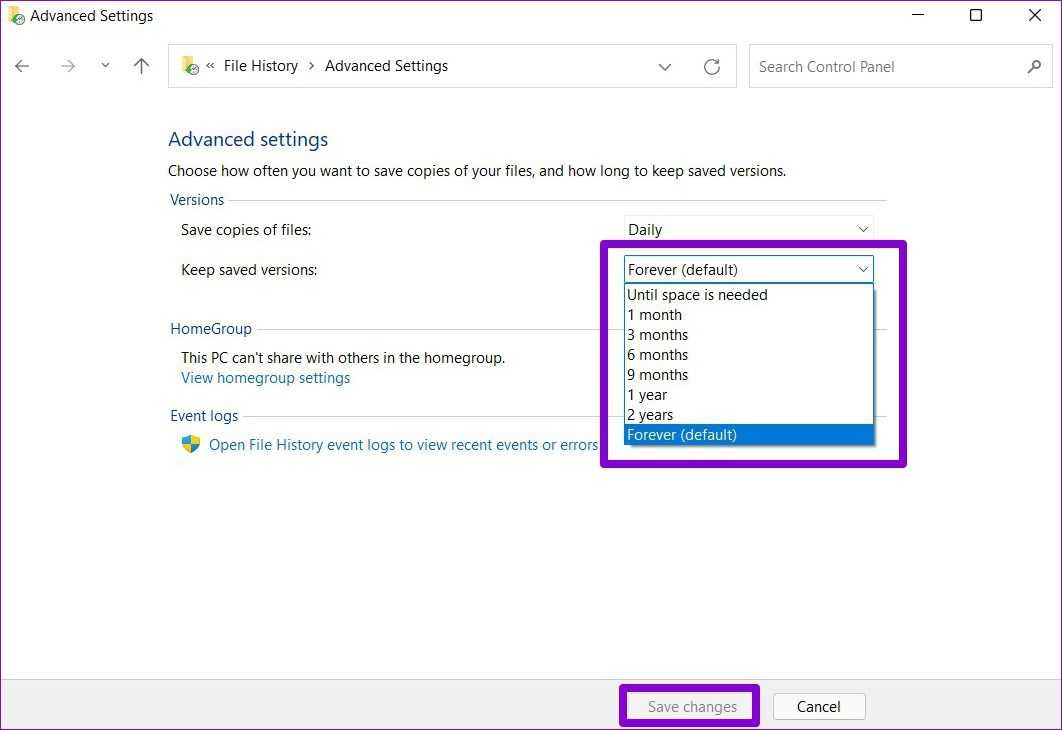
- Вы можете изменить частоту резервного копирования и сохранять файлы столько, сколько вам нужно. Перейдите к опции Сохранять копии файлов. По умолчанию будет установлено значение Каждый час. Нажмите на выпадающем списке , чтобы открыть дополнительные опции.
- Выберите вариант продолжительности времени, соответствующий вашим требованиям к резервному копированию.
- Затем перейдите к опции Сохранить сохраненные версии. Она сохраняет резервные копии, хранящиеся на внешнем диске, в течение нужного времени. По умолчанию установлено значение Навсегда. Не изменяйте его.
- Если вы хотите удалить старые резервные версии файлов и папок, нажмите на опцию Очистить версии. Это приведет к удалению всех старых версий, кроме последней резервной копии.
- Теперь нажмите на кнопку Сохранить изменения , чтобы сохранить новые настройки.
How to Use File History on Windows 11
Let’s see how you can use File History to backup files, add or remove folders, and modify the other important settings.
Backup Files with File History
By default, File History will only back up files from Libraries, Desktop, Contacts, and Favorites. However, you may add more folders as you please by following the steps below.
Step 1: Locate the folder you wish to add to File History backup.
Step 2: Right-click on the folder, navigate to ‘Include in library’ option, and select your preferred location.
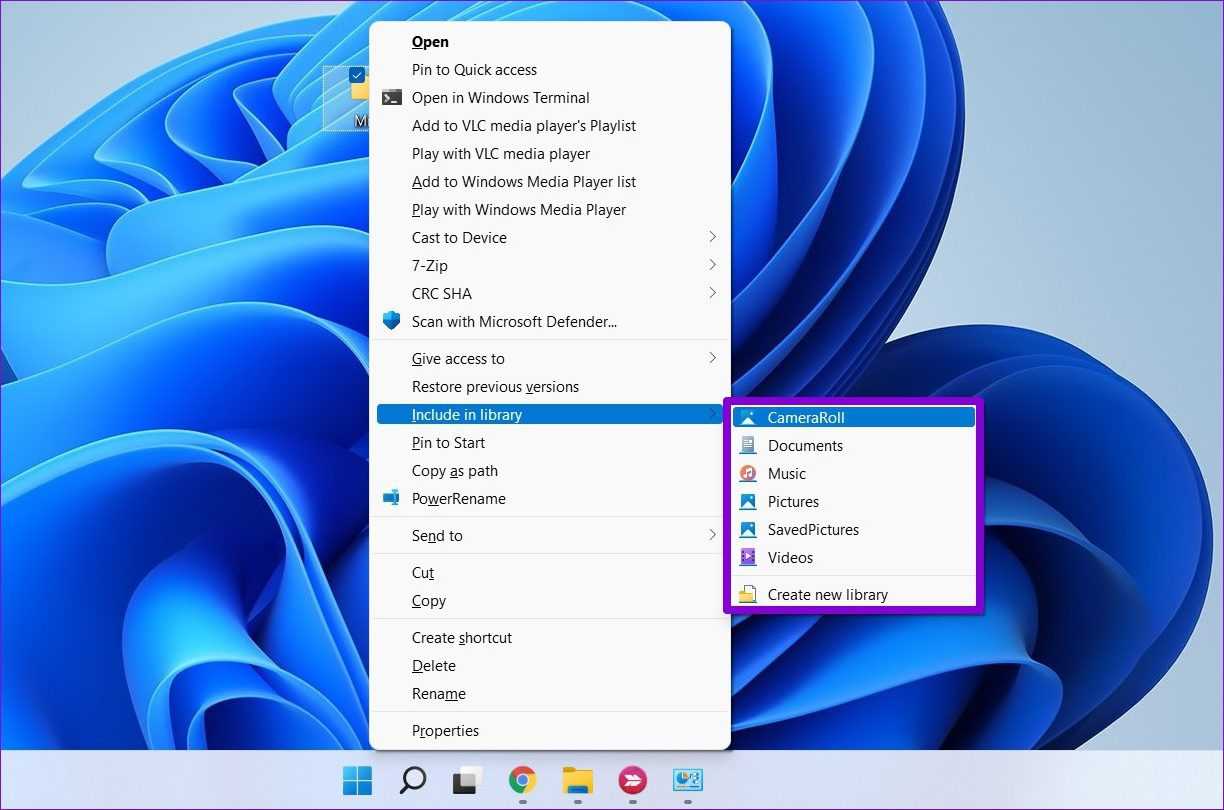
That’s it. Since your library is already being backed up, any files or folders added there will be part of it.
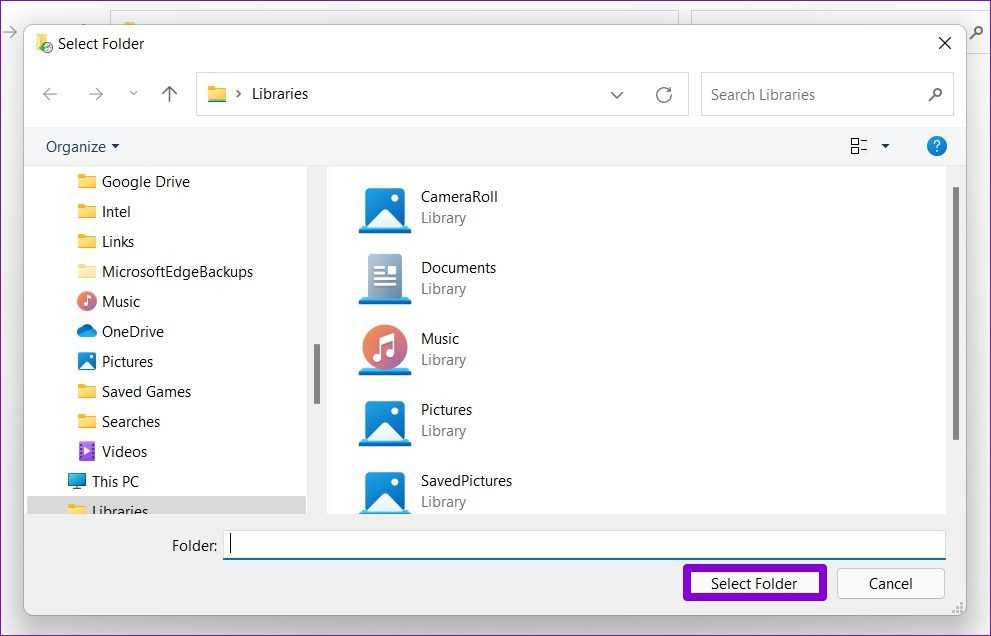
Likewise, if you wish to exclude some of the folders from your File History backup, here’s what you need to do.
Step 1: Click the Windows Search button, type in file history, and press Enter.
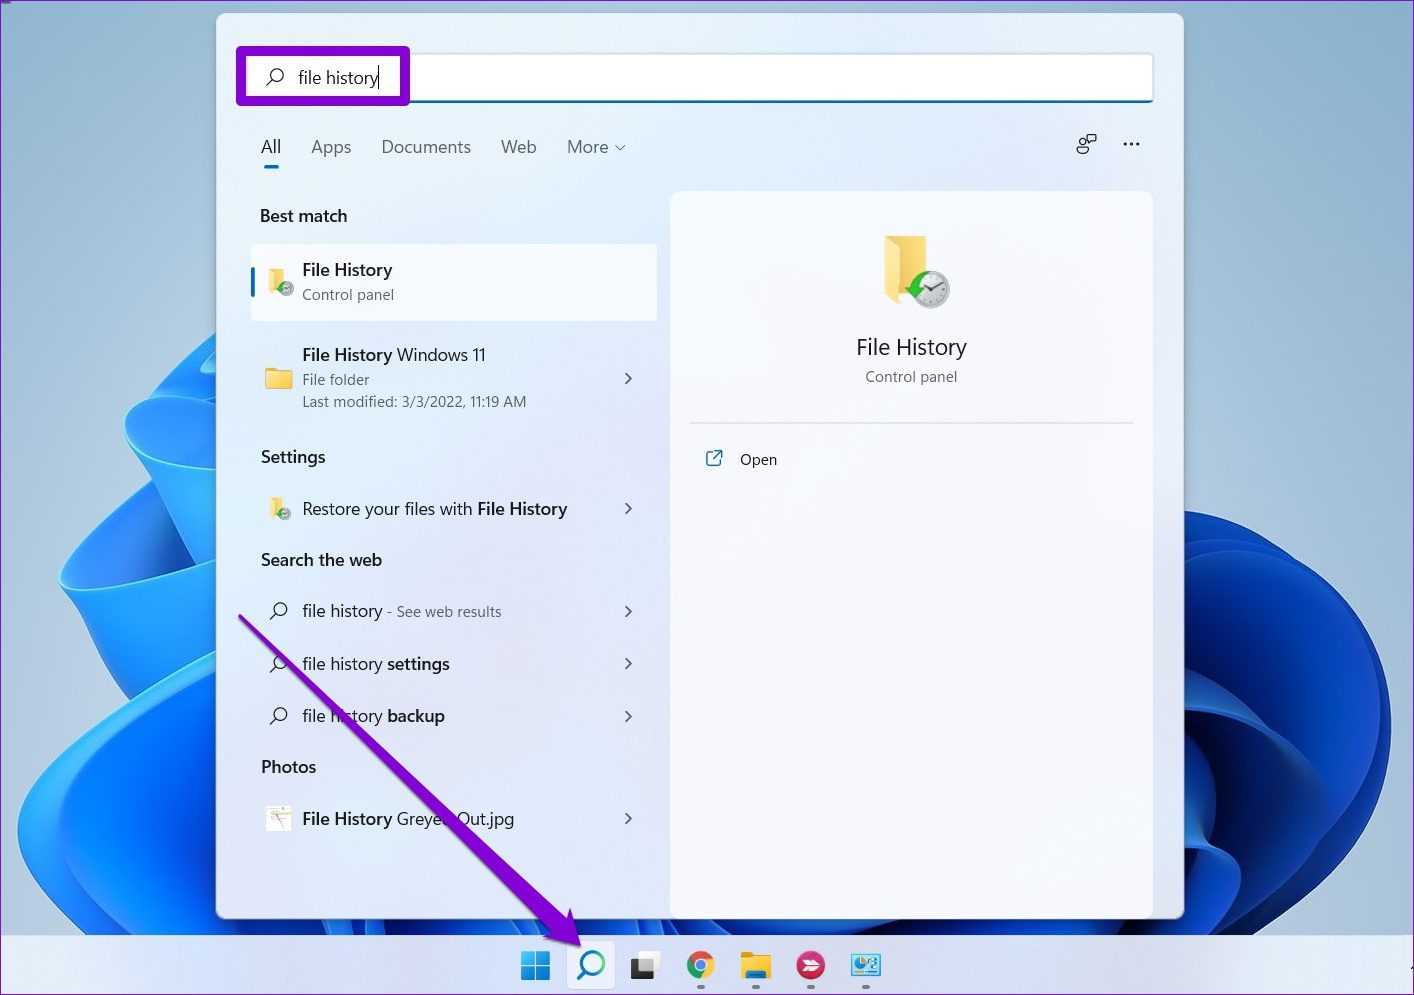
Step 2: Use the left pane to select Exclude folders.
Step 3: Click on Add.
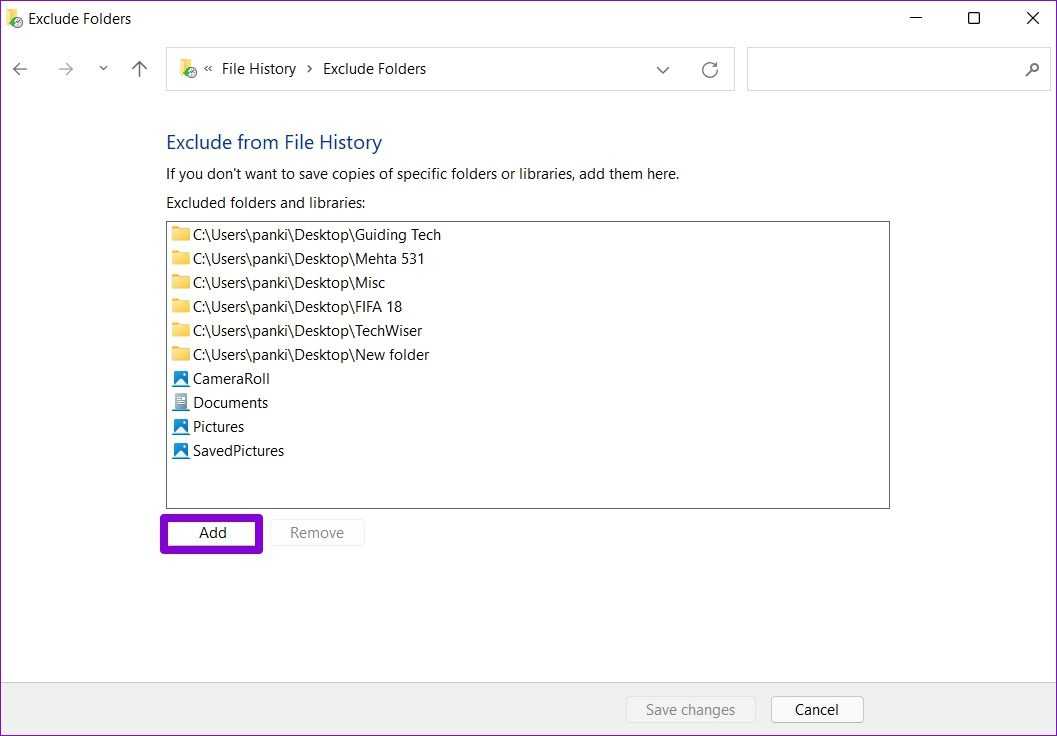
Step 4: Locate the folder or the subfolder you wish to exclude from your backup. Then click on Select Folder.
Change Backup Frequency
You can also define how often you want your files to be backed up automatically. You can set the backup frequency to every few minutes or on a daily basis provided that the external or the network drive is available. Here’s how.
Step 1: In the File History window, open Advanced settings.
Step 2: Under Versions, use the drop-down menu next to ‘Save copies of files’ to select your preferred backup frequency.
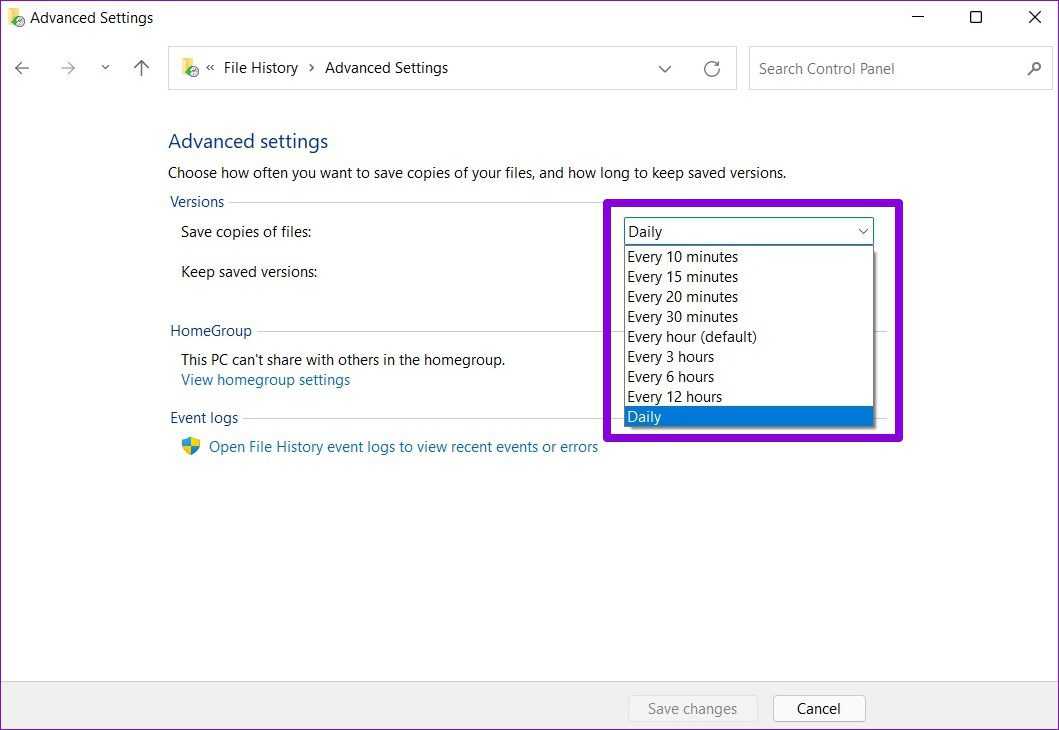
Additionally, you can also define how long you wish to keep your saved versions. Once done, hit Save changes.
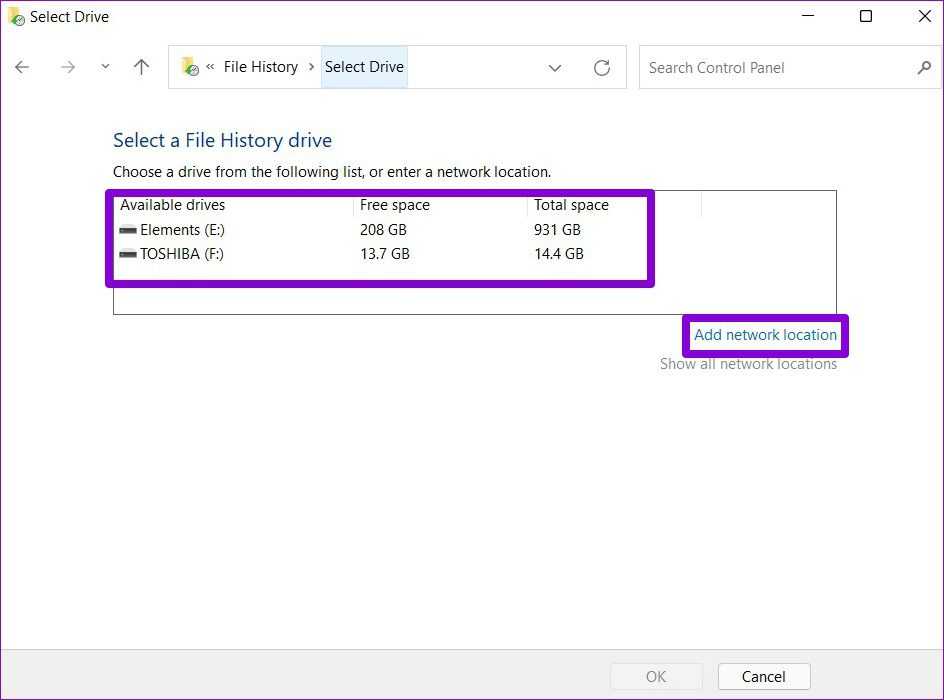
Select File History Drive
Depending on the number of files and the backup frequency, your external hard drive is bound to run out of space sooner or later. Thankfully, you can switch to a different drive at any point by following the steps below.
Step 1: In the File History window, click on Select drive.
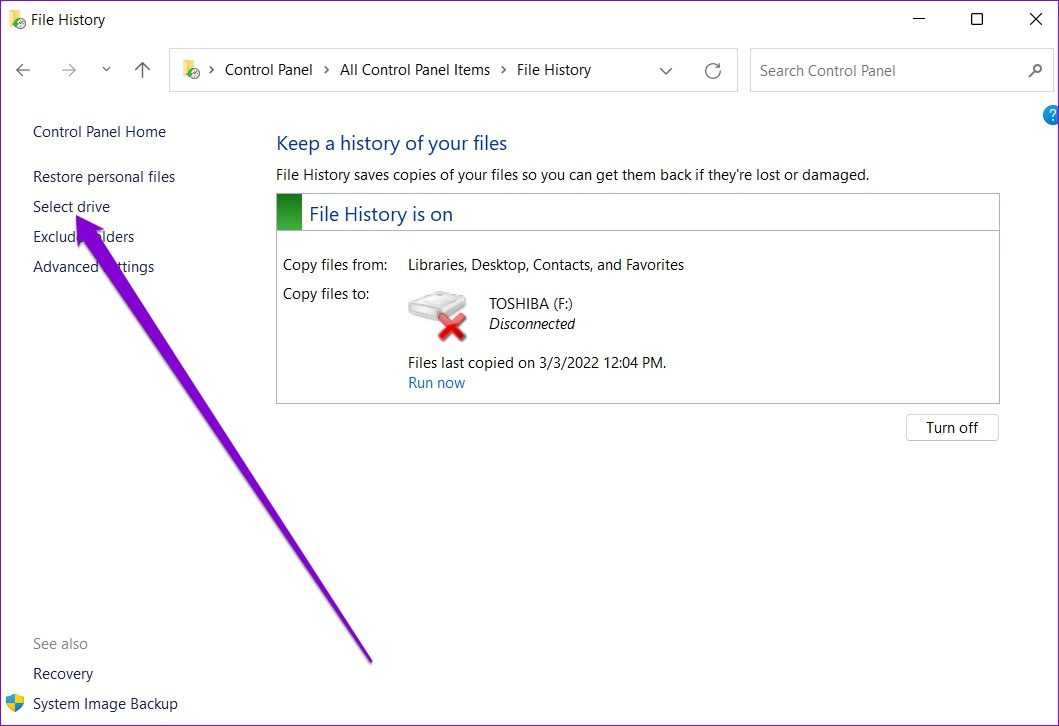
Step 2: Here, you’ll be shown a list of available drives. Alternatively, you can also click on Add network location option to back up your files on the network.
Windows 10 File History Restore
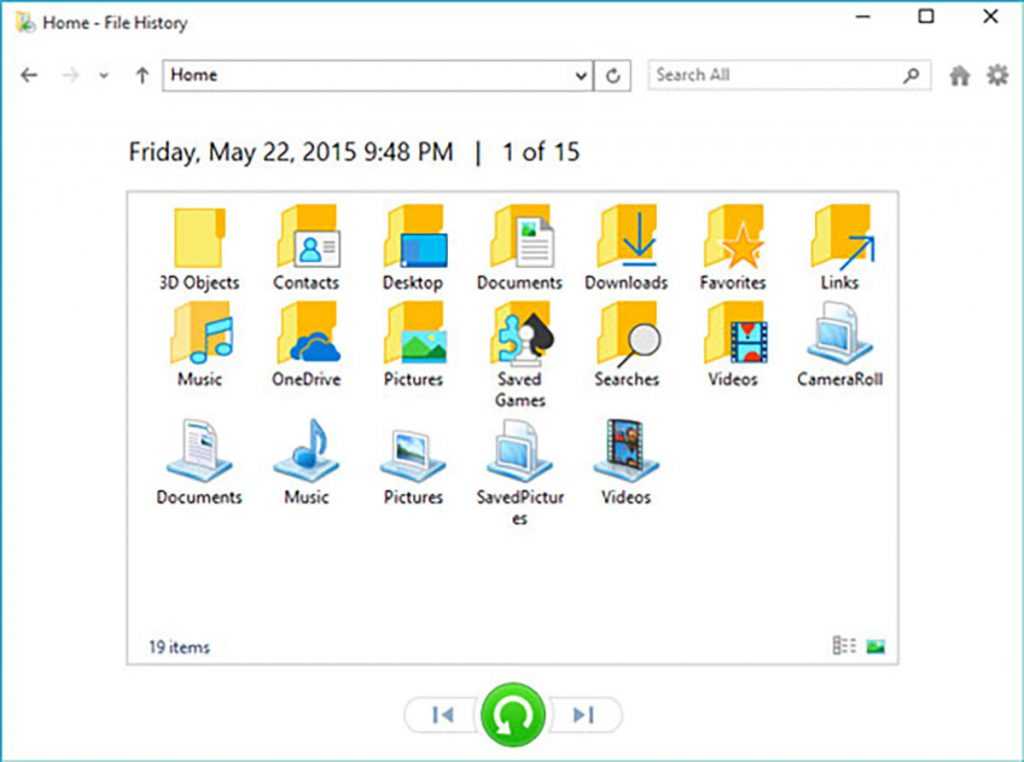
Now let’s say one or more of the files backed up through File History goes missing, gets corrupted, or is otherwise unreadable and unusable, and you want to restore that file from the backup. Scroll to the bottom of the File History screen in Settings and click the link for «Restore files from a current backup» (Figure 7).
Figure 7
Lance Whitney/Screenshot
Up pops a File History window showing the last backup. If you need a file from a previous backup, click the left arrow icon at the bottom of the screen. Keep clicking the icon to go back in time to each prior backup. Click the right arrow to move ahead. When you find the backup you need, open the folder that contains the file or files you want to restore, select those files, and then click the Restore button at the bottom. The files are restored to their original location (Figure 8).
Figure 8
Lance Whitney/Screenshot
How do I Restore Previous Versions of my Files?
To restore previous versions of your files, simply right click on the file, select “Show more options” and then click “Restore previous versions”. Now choose the version you want and click the restore button.Let’s look at an example. In the image below I have right-clicked a file called myworddocument.docx and I select “More options” from the menu.
Now I can select “Restore previous versions” from the file menu.
This will bring up the Windows 11 file history menu, which looks like this.
Now I can select the previous version I need (in my example there’s only one version) and click the restore button to restore the previous version of my file.
Before your actual restore action, you can also use the “Open” button to take a look at the file first before you restore it. This way you can verify first whether it’s the right version of the document that you’re about to restore.
Because the actual file that I’m trying to restore also still exists, Windows will let me know there’s a conflict and offers me the options to replace the file in the destination, skip this file or compare info for both files.
If you select “Compare info for both files”, you’ll get a file conflict dialog, where you can select both versions so you can decide later on which version you want to keep. The copied version will have a number added to its name.

Once you click continue, your selected file version will be restored.
Method 3: Enabling File History via File Explorer
If you prefer a more direct approach, you can enable File History using File Explorer. Here’s how:
1. Open File Explorer by pressing the Windows key + E on your keyboard.
2. In File Explorer, navigate to the folder or drive that you want to back up using File History.
3. Right-click on the folder or drive and select «Properties» from the context menu.
4. In the Properties window, click on the «File History» tab.
5. Click on the «Turn on» button to enable File History for the selected folder or drive.
Pros:
1. Allows you to enable File History directly for specific folders or drives.
2. Quick and convenient method.
3. Provides control over individual folders or drives.
Cons:
1. Requires enabling File History for each folder or drive separately.
2. Limited customization options compared to other methods.
Windows 11 File History backup to external USB drive
To enable File History to create a file backup on Windows 11, connect an external drive, and use these steps:
-
Open Start on Windows 11.
-
Search Control Panel and select the top result to open the app.
-
Click on System and Security.
-
Click on File History.
-
Click the “Turn on” button if the backup drive already shows in the list.
Quick tip: If you want to use another drive, click the “Select drive” option on the left to change the settings.
-
(Optional) Click the Advanced Settings option from the left pane.
-
Under the “Advanced settings” section, choose how often File History should create incremental backups of your files using the “Save copies of files” setting.
-
Choose the backup retention using the “Keep saved versions” setting.
-
Click the Save changes button.
-
(Optional) Click the Exclude Folders option from the left pane.
-
Click the Add button.
-
Select the folder location to exclude from the backup.
-
Click the Select Folder button.
-
Click the Save changes button.
Once you complete the steps, File History will begin saving copies of your files in the external storage.
On the “Advanced Settings” page, you will also find the “Event logs” section with an option to open the Event Viewer, where you can check errors and other events generated by File History.
If you want to stop File History, you can always click the “Turn off” button.
Creating a File History Backup
A file history backup is a great way to preserve your files in case of a computer crash. By creating a backup of your file history, you’ll be able to easily restore any file you’ve ever downloaded or edited.
To create a file history backup:
1) Open the Windows File History tool by pressing Win+R and typing “filehistory.”
2) In the File History window, click the “Create a restore point” button.
3) In the “Name” field, type a name for your restore point.
4) In the “Description” field, type a description of your restore point.
5) Click the “Create restore point” button.
6) To create a new file history backup, click the “Create a new backup” button.
7) In the “Name” field, type a name for your new file history backup.
![]() In the “Description” field, type a description of your new file history backup.
In the “Description” field, type a description of your new file history backup.
9) Click the “Create backup” button.
10) To view your file history backups, open the Windows File History tool by pressing Win+R and typing “filehistory.”
11) In the File History window, click the “Restore points” button.
12) If you created a restore point before creating a file history backup, the “Restore point” column will be populated with the name of
Using the File History feature
The “File History” feature is also present in Windows 11, but the main drawback of this method is that you can recover only data stored on the desktop and in “My Documents“, “My Pictures“, “My Music“, “Favorites“, and “Contacts” folders. In the case of losing files on other local or removable disks, this method cannot be used.
Important: It is worth noting that “File History” does not always work correctly, and in some cases either refuses to work, or the data recovery process may not work correctly. So you should be prepared that this method may not work and you will lose important data.
Unlike Windows 10, you can’t run “File History” in Windows 11 through the system settings, as the developers removed it from this menu, focusing on laconic and usability. The settings display the basic settings only, which, according to the developers, will be used most often.
1.1 How to enable “File History” in Windows 11?
In Windows 11, you can launch the “File History” feature using the “Control Panel“. However, before you start using this function, get an external hard drive or flash drive. The larger the drive, the more information the function can save, and, thus, more data you will be able to recover in case of problems.
Let’s take a closer look at the enabling the File History feature:
Step 1: Connect your external hard drive or flash drive to your computer.
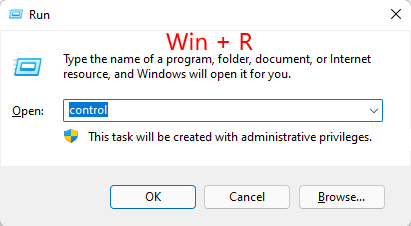
Step 2: Press the “Win + R” key combination, then in the opened window type “control” and press “OK“
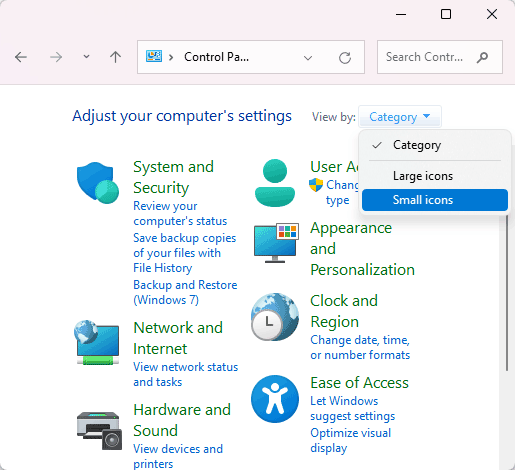
Step 3: The “Control Panel” will open up in front of you. At the top right, near “View” section, select the “Small Icons” display mode.
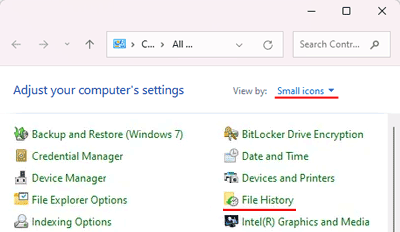
Step 4: On the menu that appears, locate “File History” and select it.
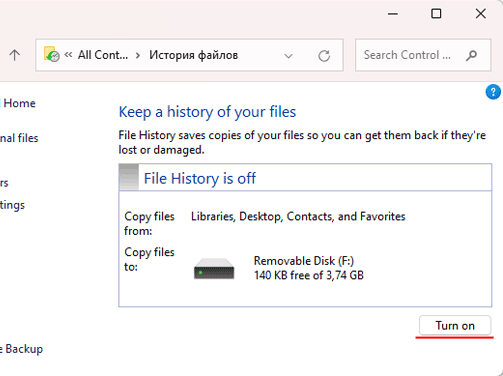
Step 5: The File History window appears. It will show the connected drive to which the data will be copied. Click the “Enable” button.
Tip: If you change your mind about using “File History” for any reason, just click the “Stop” button
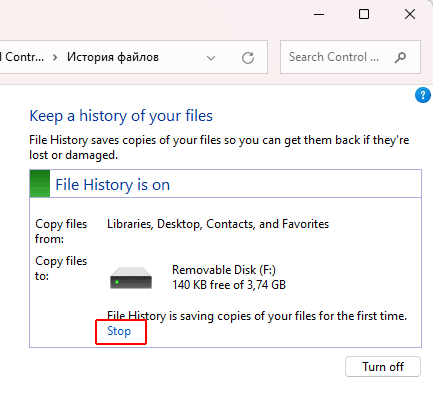
The date of the last copy will be shown when copying is complete.
Important: Your computer will periodically copy data as long as the drive is connected to your computer. But if you have more recent data that you want to keep, repeat these instructions.
1.2 How to disable the “File History” in Windows 11?
If you no longer need to use File History, you can easily disable it. To do this, open the “File History” window using the first four steps from the previous paragraph and click the “Turn Off” button to stop the data backup.
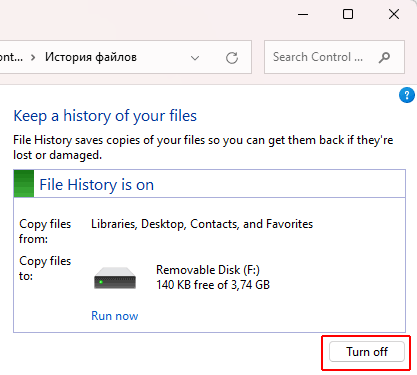
When you click the “Turn off” button, the File History function will be completely turned off, but the previously saved files will remain on the drive. Consequently, if you intend to lend someone the drive – delete the data manually.
1.3 How to recover data using File History
Using the File History feature you can recover the desired file from any of these folders: “My Documents“, “My Pictures“, “My Music“, “Favorites“, and “Contacts“. To do this, you should:
Step 1: Open the File History window using the steps in paragraph 1.1
Step 2: In the menu on the left click on “Restore personal files“
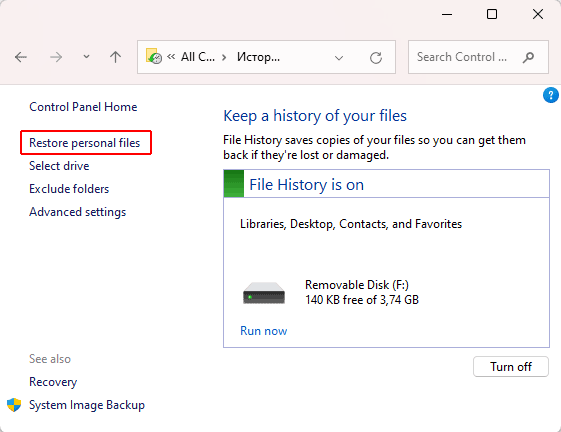
The system scans the drive for files to recover. It may take some time, depending on the size of the disk.

Step 3: Once the drive scan is complete, the disk will open in front of you and you can select the folder or file you want to recover. Just click on the green button in the bottom middle to start the recovery.
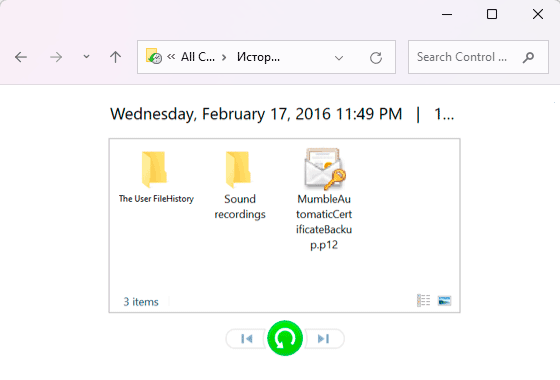
Tip: To open a folder and find the file you want, double-click on it. That is, all navigation through the backup looks like in regular Explorer.
By default, the File History feature restores files to where they were stored before. If you want to write the restored file to a different location – click on the gear icon at the top right and select “Restore to“
A window will open where you can select the folder where you want to restore your files
Restore Personal Files
If you look at the file history window (where you actually turn on file history), you’ll notice that on the left side there are a couple different links that you can click. The first one is “Restore personal files”.
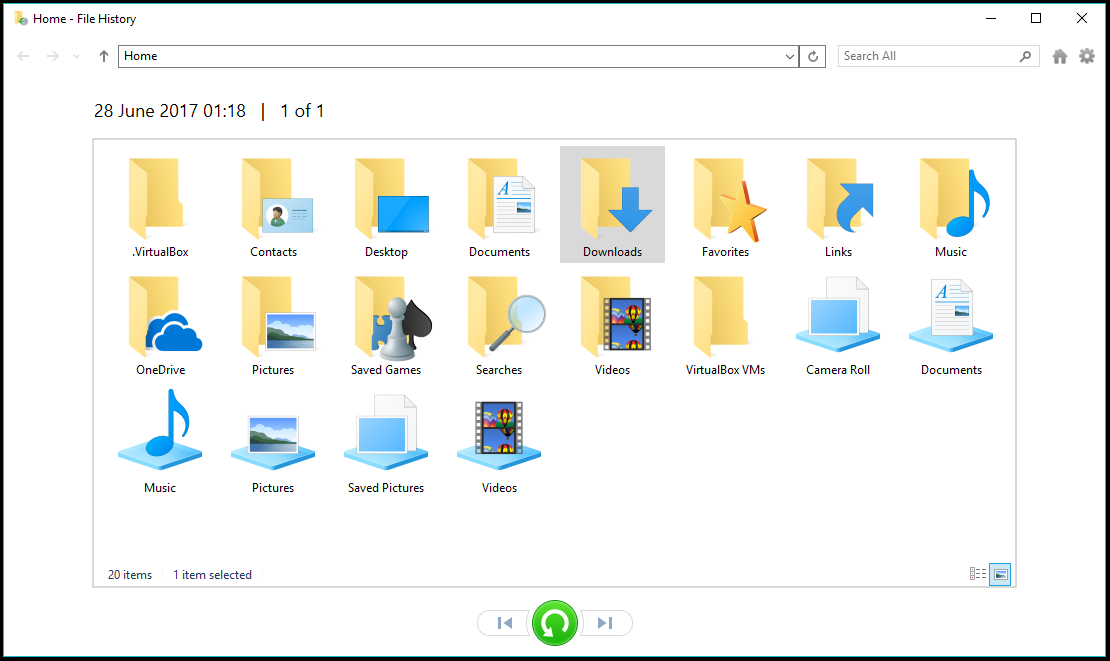
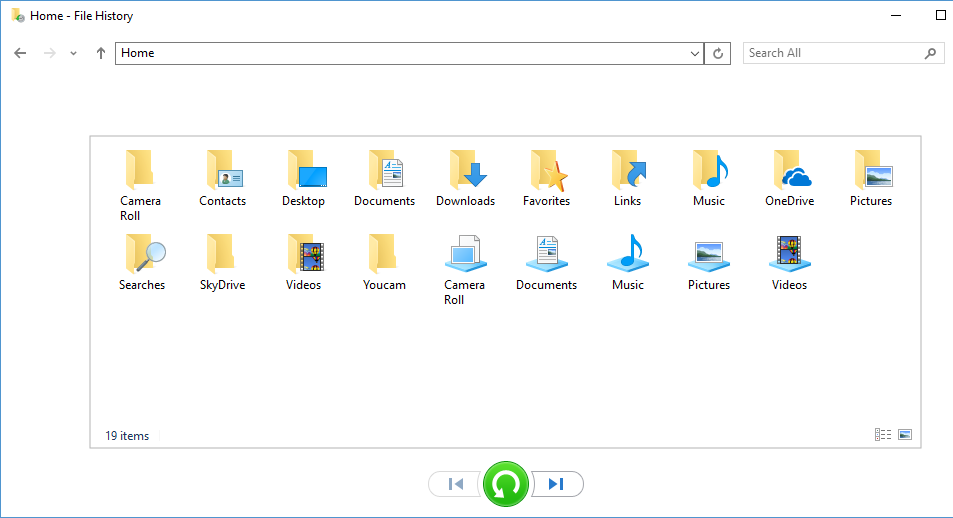
This option allows you to restore multiple files or even entire folders at once. If you click on the link, a new file history window will appear. It will look similar to a normal file explorer window, but it has a few extra features.
At the bottom it has two navigation buttons to browse through older and more recent versions of your files and folders and a green restore button to start a restore operation of what you’re currently looking at.You can navigate through your file versions, click the folder to look inside and open any of your files to check if they are the version you are looking for.Whether you are looking at a single file, a group of files or an entire folder, you can always click the green restore button to start restoring any item(s) you’re looking at.
How to Restore Files Using File History on Windows 11
The most important part of the File History features is it allows you to recover files if you accidentally delete them. Since it makes a copy of files, when you retrieve it from File History, some recent edits to the doc may not be present. However, it still allows you to get important files which is the most important thing.
To restore a file using File History:
- Open the Start menu, search for file history, and select the top result.
- When File History opens, click the Restore personal files link from the list on the left.
- A File History window with all your backup files will be available. The controls at the bottom let you scroll through your files and folders.
- To restore file(s) or folder(s), select what you need and click the Restore button at the bottom.
That’s all there is to it. Once you restore a file or folder, it’s moved to the original location on your PC, and you can access it like normal.
Method 1: Enabling File History via Settings
Enabling File History via the Settings app in Windows 11 is the most straightforward method. Follow these steps to enable File History:
1. Open the Start menu and click on the Settings app (gear icon).
2. In the Settings app, select the «System» category.
3. Click on the «Storage» option from the left pane.
4. Scroll down to the «Backup» section and click on the «More options» link.
5. Under the «File History» section, click on the «Add a drive» button.
6. Select your external storage device from the list of available drives.
7. Once the drive is selected, click on the «Turn on» button to enable File History.
Pros:
1. Easy and straightforward process.
2. Accessible through the Settings app.
3. Allows you to select the specific external storage device.
4. Automatically backs up your files at regular intervals.
Cons:
1. Limited customization options.
2. Requires manual selection of files and folders for backup.
5 FAQs about Enabling File History
Q1: Can I use File History with an internal hard drive?
A: No, File History requires an external storage device such as an external hard drive or a USB flash drive to store the backup files.
Q2: How often does File History back up my files?
A: By default, File History backs up your files every hour. However, you can customize the backup frequency in the File History settings.
Q3: Can I exclude certain files or folders from being backed up?
A: Yes, you can exclude specific files, folders, or file types from being backed up using the File History settings. This is helpful if you have large files or folders that you do not want to include in the backup.
Q4: Can I access previous versions of a file with File History?
A: Yes, File History allows you to access previous versions of a file that has been backed up. Simply open the file in File Explorer, right-click on it, and select «Restore previous versions» to view and restore older versions of the file.
Q5: Can I use File History to back up my entire operating system?
A: No, File History is designed to back up your personal files and folders, not the entire operating system. For system-level backups, you can use other backup solutions like System Restore or third-party software.
Как попасть в историю
У меня на планшете немного файлов, которые обновляются регулярно. Поэтому я закинул в планировщик заданий пару команд, обновляющих текстовые файлы на рабочем столе каждые 30 минут.
Структура папок
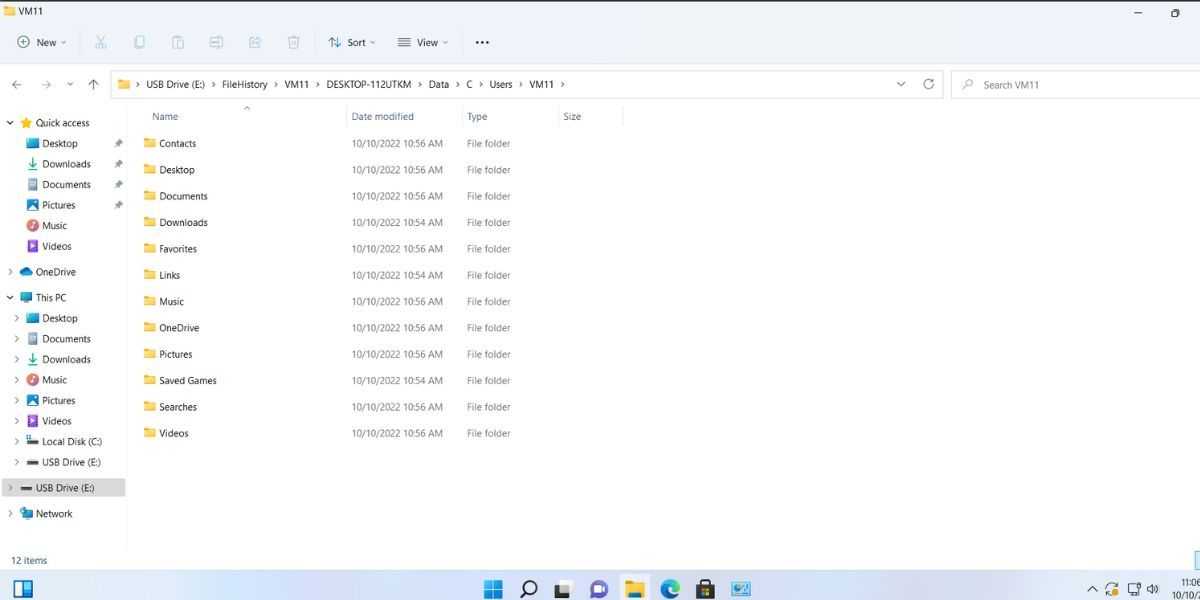
Распутывать клубок я начал с папки File History в корне внешнего USB-диска, на который выполнялось резервное копирование.
Из структуры папок можно сделать сразу несколько выводов:
- В одной папке могут храниться резервные копии с нескольких компьютеров, например, домашней группы. Таким образом, несколько членов семьи могут использовать один сетевой диск для хранения истории своих файлов с любого домашнего компьютера. При этом их общие файлы хранятся в единой папке Public.
- История изначально подразделяется не по компьютерам, а по учетным записям пользователей. Папка ICONIA-WIN8 названа по имени планшета и входит в папку vadikan – под этой учетной записью я настраивал историю файлов.
- Для каждого компьютера полностью воспроизводится структура папок, включенных в историю.
Кстати, интересно будет проверить на досуге, отображаются ли в интерфейсе восстановления файлов сразу все данные одного пользователя с разных систем.
Содержимое папок
Давайте посмотрим, что Windows 8 скопировала с рабочего стола, где регулярно обновлялись текстовые файлы.

Первый и самый очевидный вывод – для архивации файлов не используется сжатие, на что ранее . Это не слишком экономно с точки зрения дискового пространства, но сильно упрощает навигацию и просмотр файлов при восстановлении.
Второй интересный момент заключается в том, что в имени каждого файла содержится дата в формате UTC (отставание от московского времени на 4 часа). В имени файла указана дата создания резервной копии, при этом последнее изменение файла отражено в столбце проводника «Дата изменения».
На рисунке выше выделен файл, который был сохранен 27 октября в 02:40 по московскому времени. Его резервная копия была создана девятью минутами позже, 27 октября 02:49:04 (в имени файла это 26 октября в 22:49 UTC + 4 часа разницы между поясами).
Пусть вас не смущает такое большое количество копий моих файлов – ведь я изменял их каждые полчаса, а резервное копирование выполнялось ежечасно. Поэтому в каждую версию истории включалась обновленная версия файла. Если бы с момента создания первой версии мои файлы ни разу не обновлялись, Windows 8 сохранила бы только по одной копии.
Как исправить — ваш диск с историей файлов был слишком долго отключен в Windows 11/10
1. Снова подключите внешний жесткий диск
В случае, если внешний жесткий диск, который вы используете для резервного копирования, отключен на более длительный период, вы можете получить сообщение об ошибке «Ваш диск истории файлов был отключен слишком долго».
В таком случае вы можете попробовать сначала отключить, а затем повторно подключить внешний диск, а затем снова запустить процесс резервного копирования. Выполните шаги, указанные ниже, чтобы начать резервное копирование.
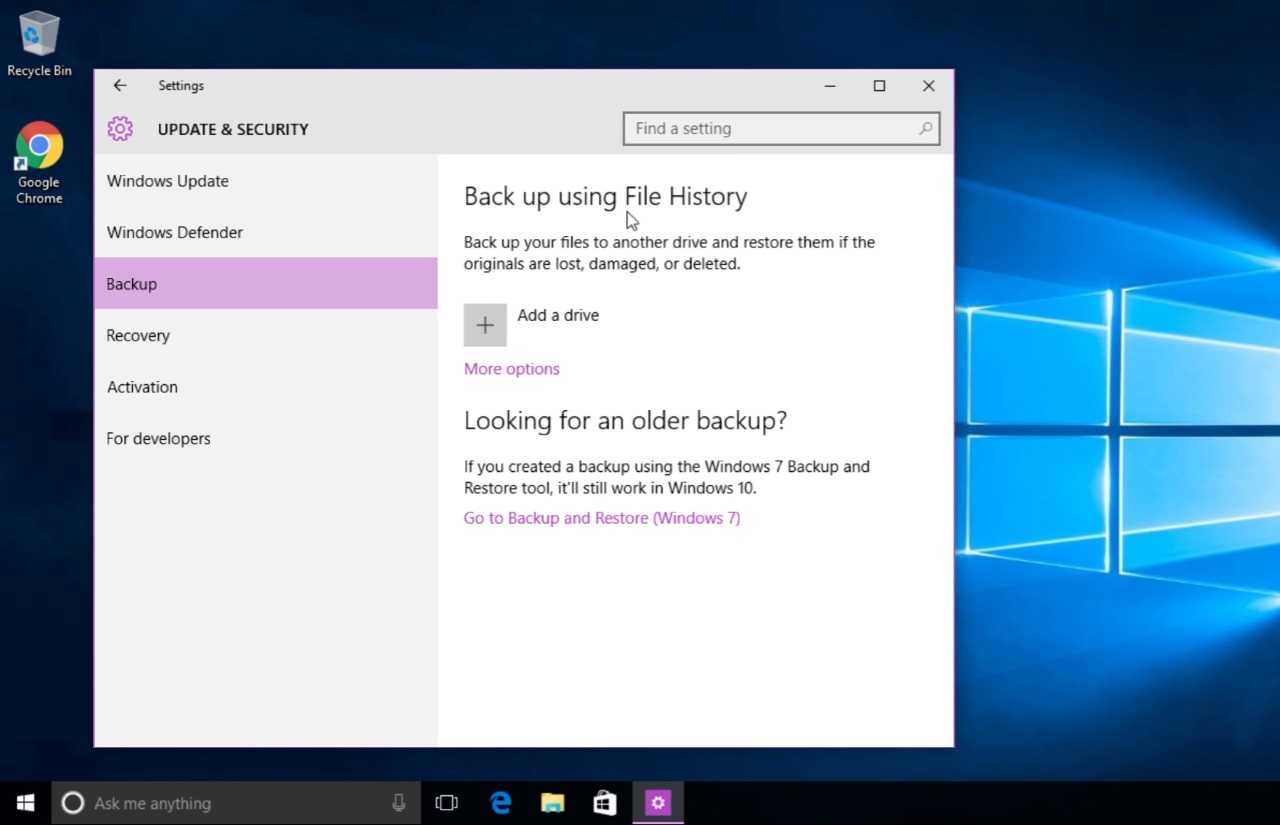
1. Открыть Настройки нажав на Окна + я комбинация клавиш.
2. Нажмите Обновление и безопасность.
3. Нажмите Резервное копирование.
4. С правой стороны нажмите + Добавить диск для повторного выбора внешнего жесткого диска или сетевого диска.
2. Ремонт внешнего жесткого диска или сетевого диска
Если вы все еще получаете сообщение об ошибке «Ваш диск истории файлов был отключен слишком долго», вы можете восстановить диск с помощью Командная строка. Вот шаги, чтобы сделать это –
1. В строке поиска Windows введите команда и выберите Запустить от имени администратора.


2. Когда откроется командная строка, введите chkdsk X: /FВ упомянутой выше команде замените букву X на букву вашего диска, который вы используете для резервного копирования истории файлов. Итак, если буква диска H, то команда будет chkdsk H:/F
3. Удалить данные приложения
Удаление AppData истории файлов оказалось полезным для многих пользователей. Но прежде чем сделать это, убедитесь, что вы видите скрытые папки и файлы. Чтобы удалить данные приложения –
1. Открыть Проводник
2. Нажмите на Вид вкладку, которую вы видите в верхнем левом углу экрана.
3. Нажмите Опции а затем выберите Изменить папку и параметры поиска.
4. В Опции папки окно, нажмите на флажок, который говорит Показать скрытые файлы, папки и диски.
5. Нажмите Подать заявление а затем нажмите на ХОРОШО.
Теперь мы приступим к удалению AppData истории файлов, и вот шаги:
1. Откройте проводник.2. В адресной строке введите C:\Users\Admin\AppData\Local\Microsoft\Windows и нажмите Enter.
3. Выберите «История файлов» и нажмите «Удалить».
4. Резервное копирование с помощью сторонней утилиты
Пока вы решаете проблему, по-прежнему важно сохранять резервные копии ваших данных. Итак, здесь у нас есть отличная утилита резервного копирования под названием Advanced System Optimizer, которая в первую очередь является инструментом оптимизации для Windows 10
Она также является отличной утилитой резервного копирования.
На самом деле, если говорить о возможностях этого замечательного инструмента и о том, как они могут помочь вам улучшить производительность Windows, вы можете взглянуть на эта почта.
Вот как вы можете создавать резервные копии и восстанавливать важные данные с помощью Advanced System Optimizer:
1. Загрузите, запустите и установите Advanced System Optimizer.
2. На левой панели щелкните Резервное копирование и восстановление.
3. Нажмите «Диспетчер резервного копирования».
4. Когда откроется окно диспетчера резервного копирования, нажмите «Начать резервное копирование».
5. В разделе «Создать задание» заполните соответствующие поля в соответствии с заданием резервного копирования, которое вы хотите создать, и нажмите «Далее».
6. Выберите «Настройки резервного копирования», где вы можете зашифровать резервную копию и даже выбрать «Коэффициент сжатия».
7. Выберите место для резервного копирования.
8. Выберите, что вы хотите создать резервную копию, и нажмите «Далее». Вы можете нажать «Добавить все» или «Добавить» в зависимости от количества файлов и папок, которые вы хотите добавить.
9. Наконец, вы можете выбрать немедленное резервное копирование данных или исключить элементы из списка. Нажмите Далее.
10. Нажмите Сохранить.
Как восстановить резервные копии файлов с помощью Advanced System Optimizer?
1. Повторите шаги с шага №. 1 к шагу №. 3, как показано выше.
2. Нажмите Восстановление резервной копии.
3. Выберите место, где вы сохранили резервную копию, и нажмите Открытым.
4. Выберите резервную копию и нажмите Следующий.
5. Выберите элементы, которые вы хотите восстановить, и нажмите «Далее».
6. Все! Вы только что восстановили резервную копию.
Подведение итогов
Мы надеемся, что после применения методов, обсуждаемых в этом посте, вы смогли исправить ошибку «Ваш диск с историей файлов отключен. Переподключите его и повторите попытку» или любая другая подобная проблема. Если да, сообщите нам в разделе комментариев, какой из вышеперечисленных методов оказался полезным. Чтобы узнать больше о таком контенте, продолжайте читать WeTheGeek. Не забудьте подписаться на нас Фейсбук, Твиттер, флипборд, YouTube, Инстаграм.