
Как правильно удалить папку SoftwareDistribution
Чтобы удалить папку SoftwareDistribution в Windows нужно сделать следующее:
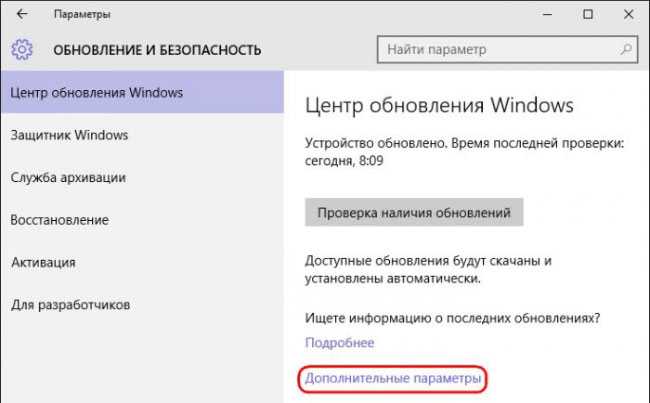
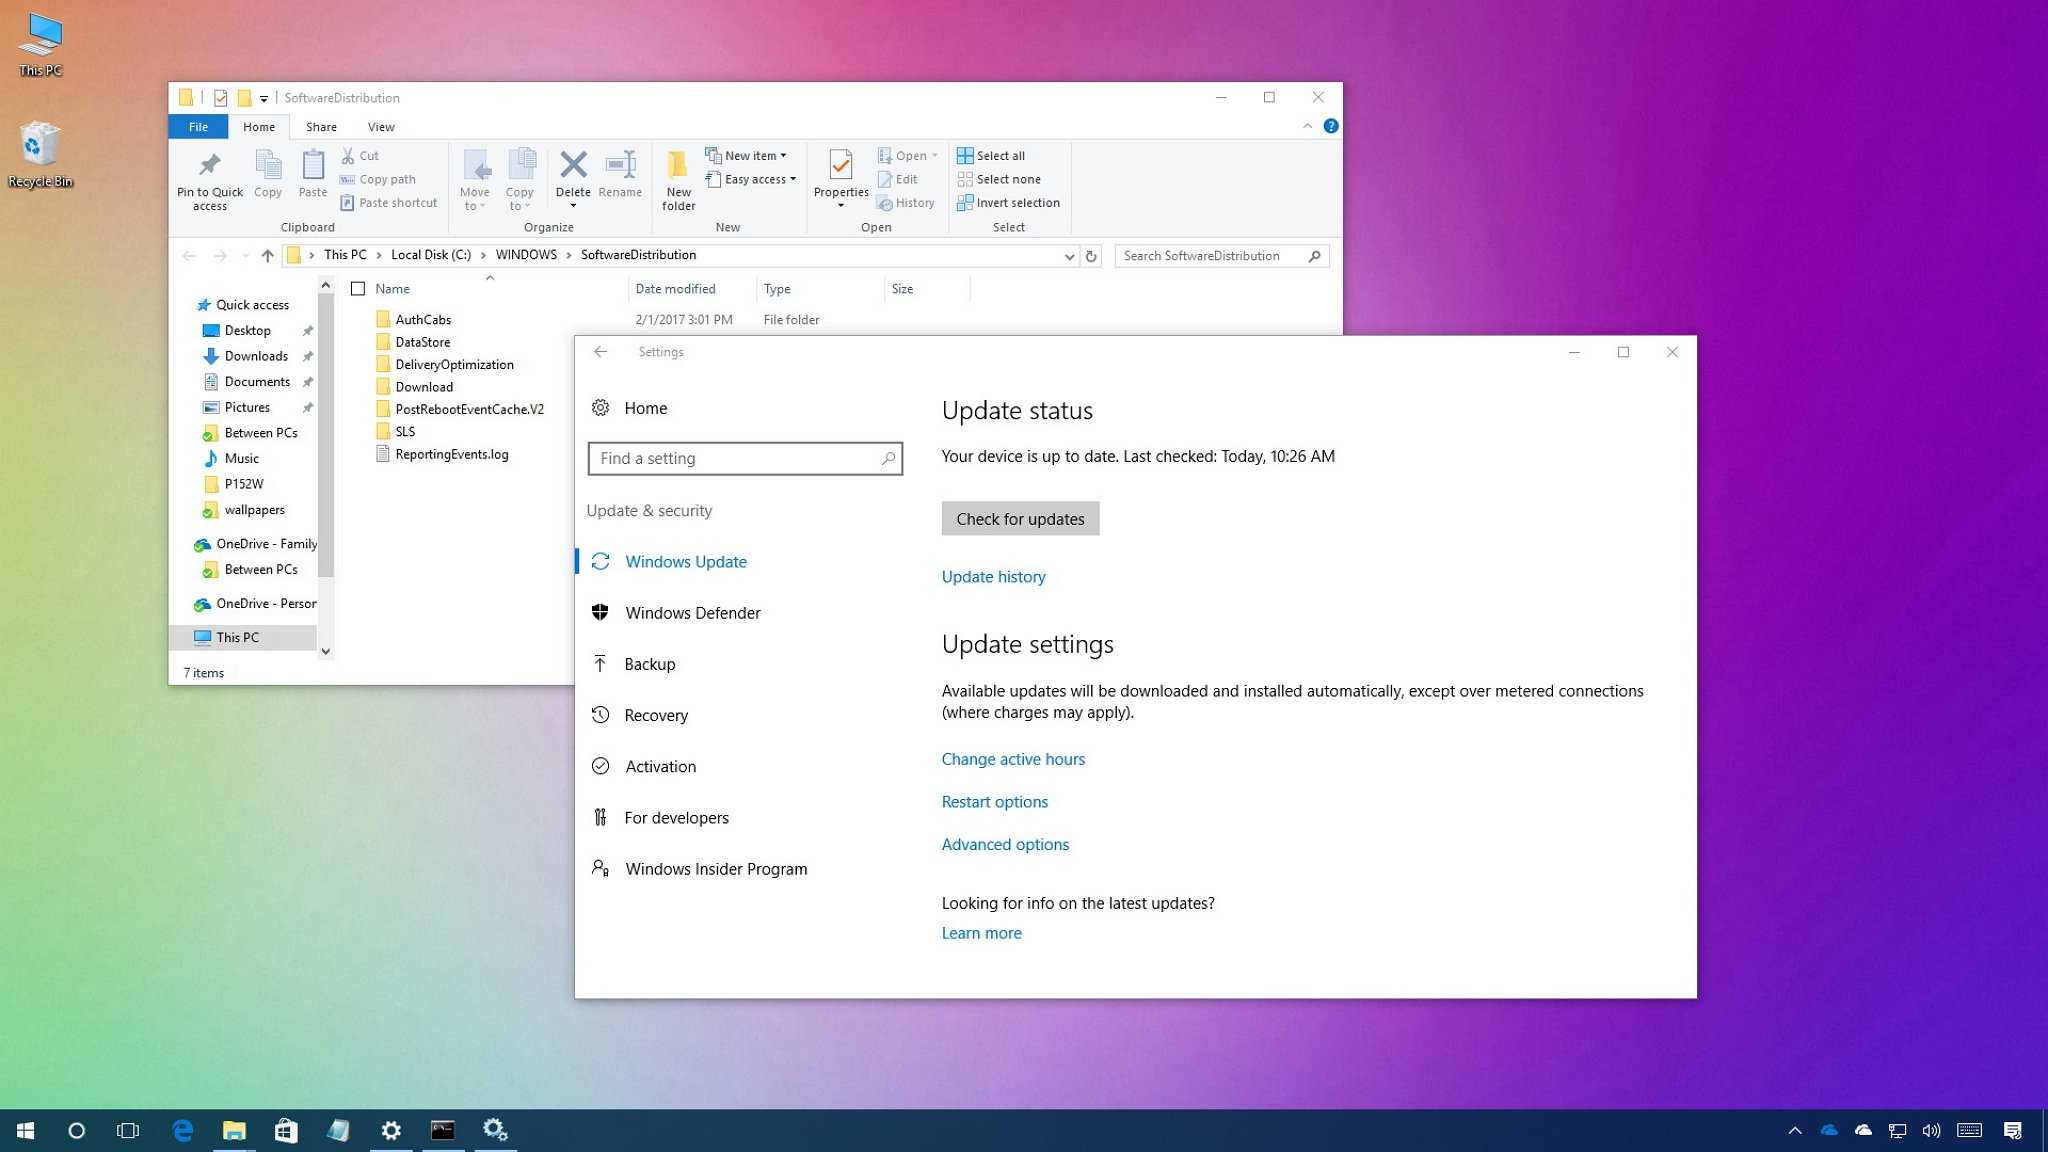
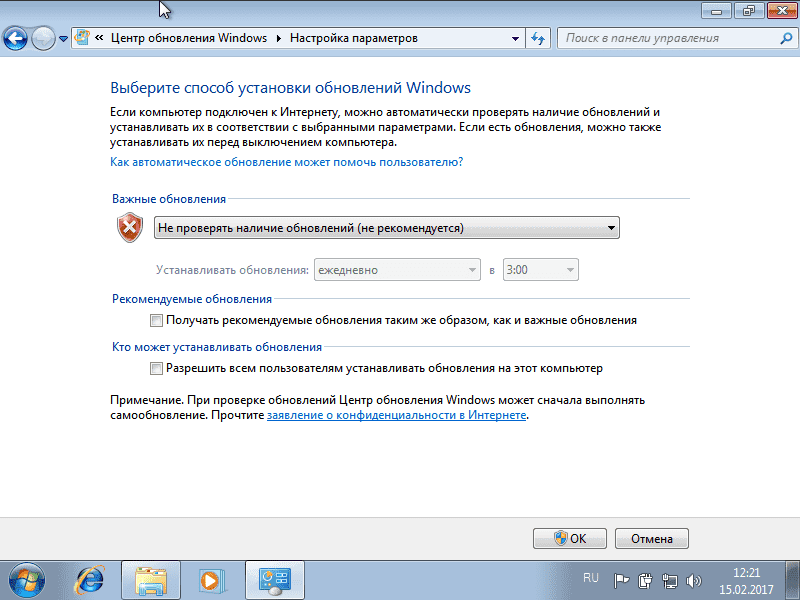
- Открыть Центр обновления Windows. Можно найти через Пуск или зайти через Панель управления;
- Далее нужно перейти в «Настройки параметров»;
- Выбрать во вкладке следующую строку: «Не проверять наличие обновлений (не рекомендуется)»;
- Убрать галочку с «Получать рекомендуемы обновления»;
- После внесения изменений нажать «ОК».
Готово! Теперь можно смело удалять все содержимое папки SoftwareDistribution. Можно даже удалить саму папку SoftwareDistribution, ведь в случае повторной загрузки обновлений Windows сам автоматически ее создаст.
Никаких ошибок или глюков можно не опасаться. Чтобы убедиться можно переименовать папку и перезагрузить компьютер.
Для очистки компьютера от лишних файлов советую установить CCleaner (Есть кстати и CCleaner для смартфонов).
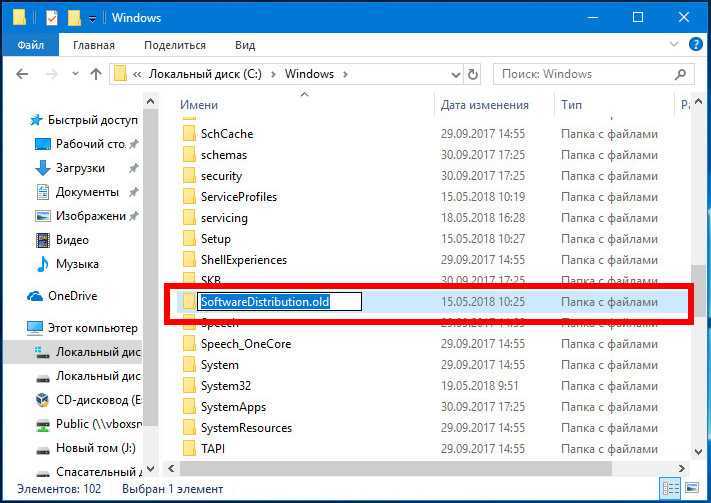
SoftwareDistribution.old – папка с устаревшими файлами обновления Виндовс.
Надеюсь, статья «SoftwareDistribution: Что это за папка Windows 7, 10, можно ли ее удалить?» была вам полезна.
How to clear the ‘SoftwareDistribution’ folder
To delete the content inside the SoftwareDistribution folder, do the following:
- Open Start.
- Search for Command Prompt, right-click the result, and select Run as administrator.
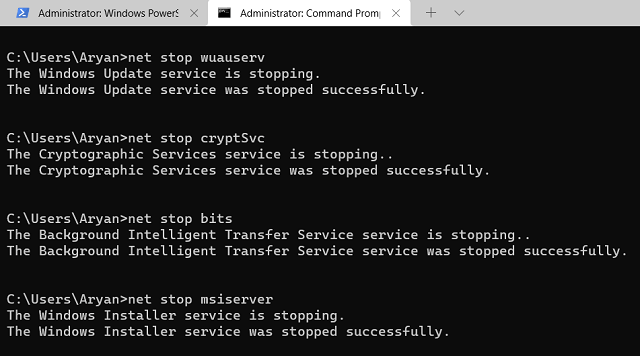
- Type the following command to stop the Windows Update Service and press Enter:
- Type the following command to stop the Background Intelligent Transfer Service and press Enter:
- Use the Windows key + R keyboard shortcut to open the Run command.
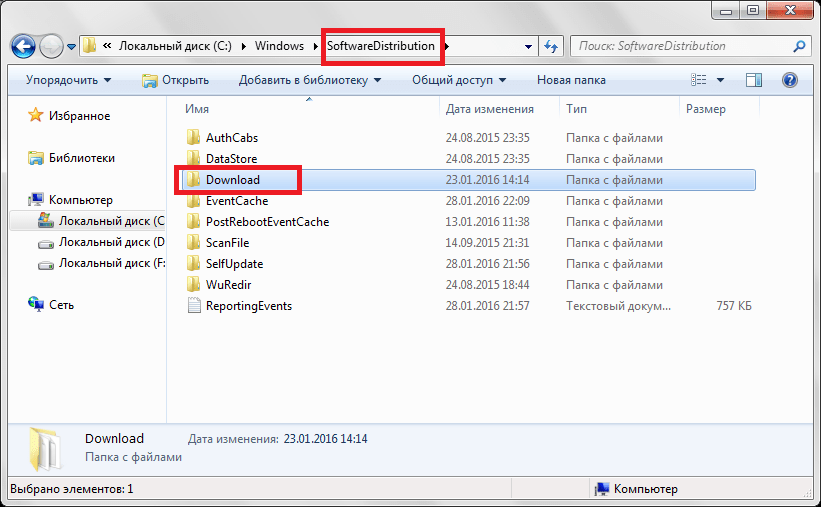
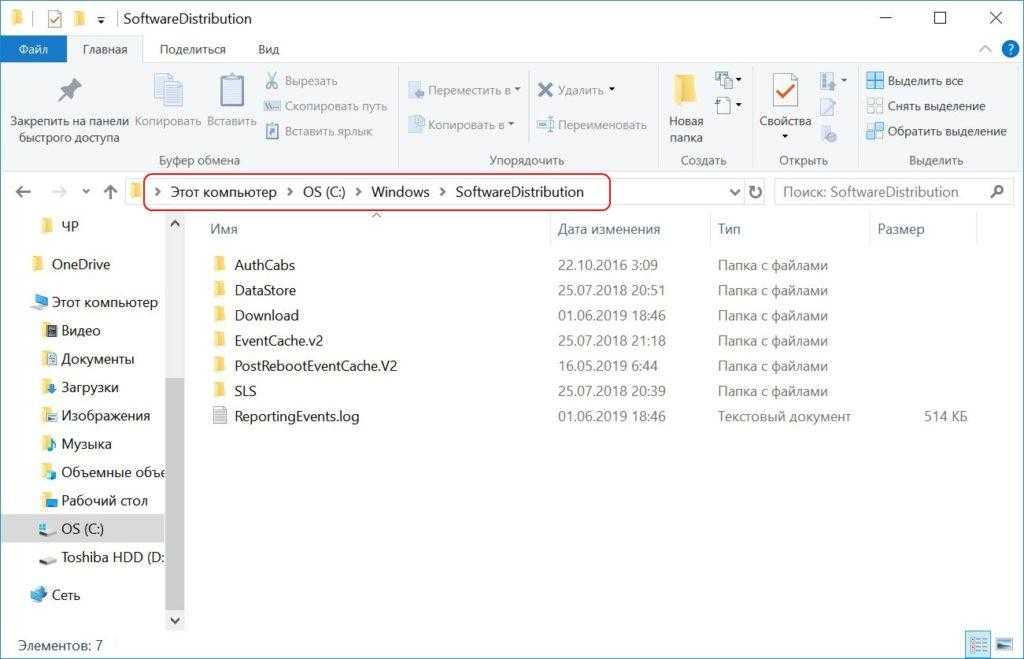
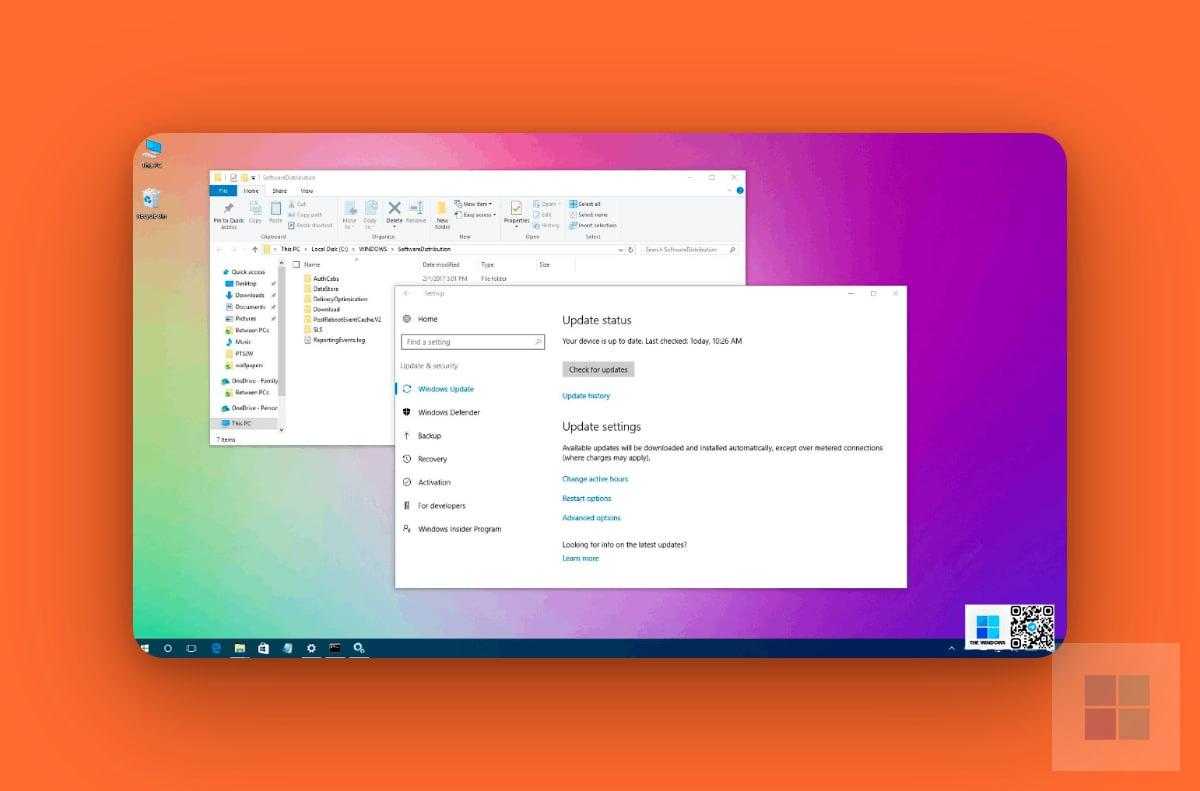
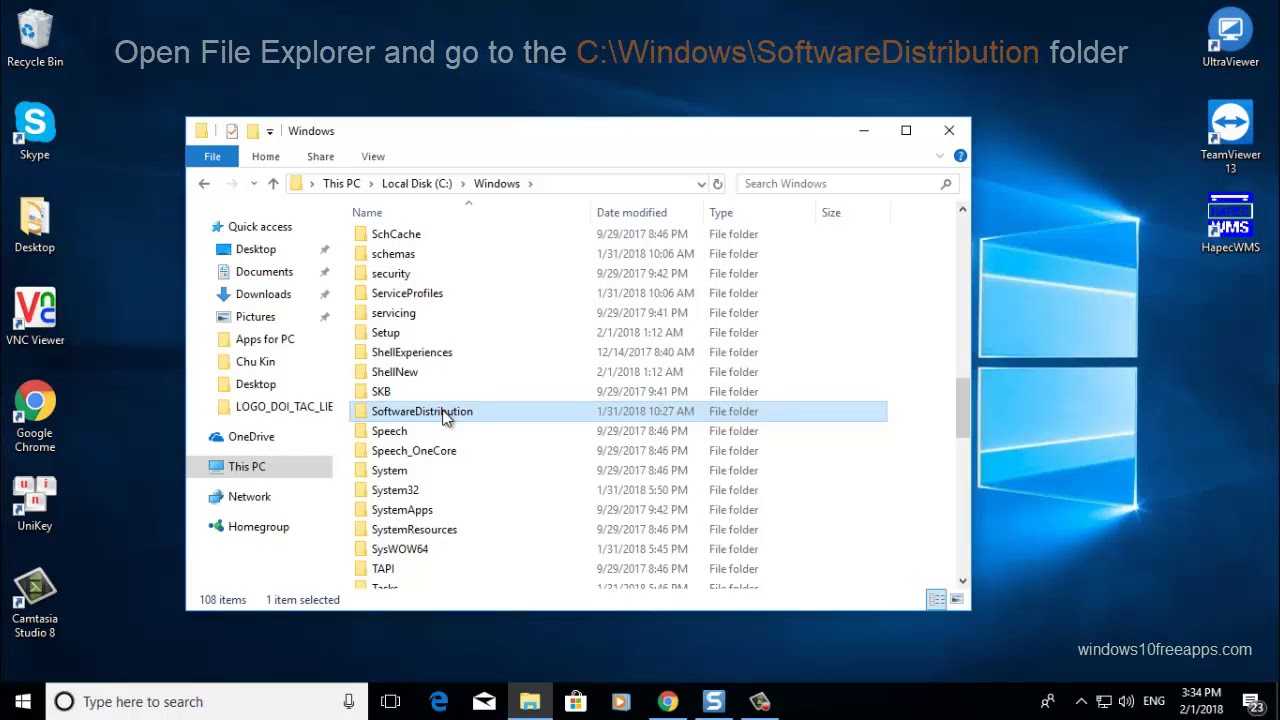
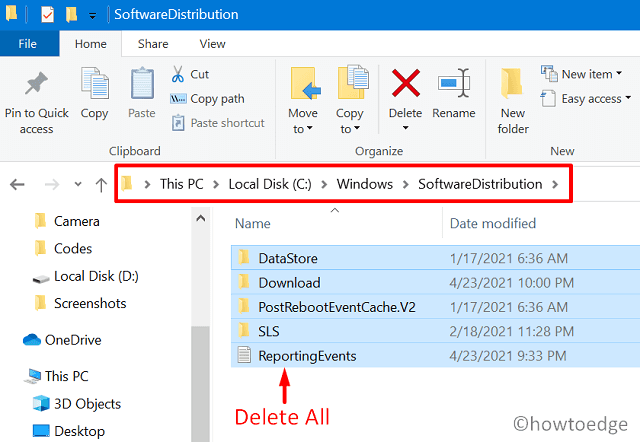
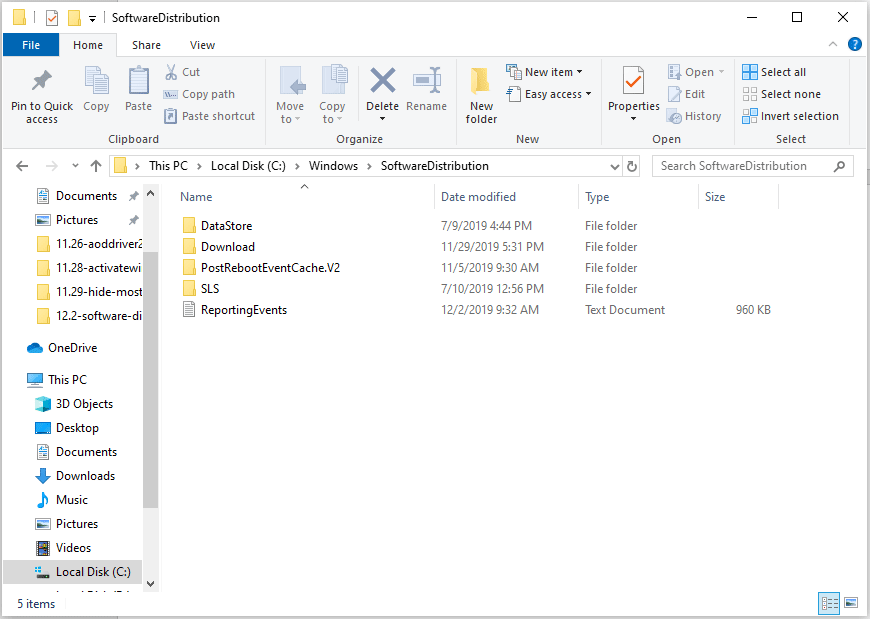
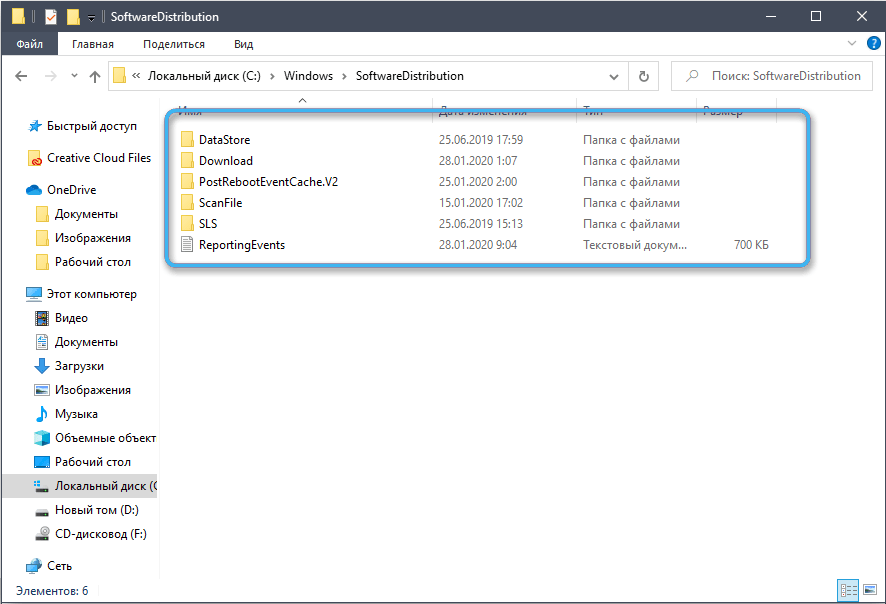
- Open File Explorer and browse the following path:
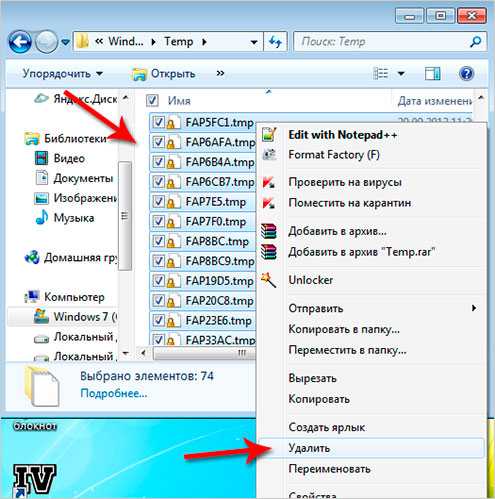
- Select all its content and click the Delete button to clear the content.Quick Tip: In the case, you’re having trouble deleting all the files, simply restart your computer, and try again.
- On Command Prompt, type the following command to start the Windows Update Service and press Enter:
- Type the following command to start the Background Intelligent Transfer Service and press Enter:
Once you completed the steps, Windows 10 will reconfigure the folder and re-download all the necessary components.
Is it Safe to Cleanup the SoftwareDistributon Folder
Although it is recommended to stay clear of the SoftwareDistribution folder, one may need to clean it up from time to time, when needed.
The SoftwareDistriution folder stores temporary files for Windows Updates and other hotfixes. These are usually downloaded through Windows Update. If you remove them, then they will be downloaded again. Therefore, it is safe to clean up the SoftwareDistribution folder.
That said, there are a few caveats about cleaning up the aforementioned folder which you should be intimated about beforehand.
If you clean the SoftwareDistribution folder, you will lose all history data of the recently-installed Windows updates. This will then make pinpointing a problematic update difficult.
Moreover, it will take longer and more bandwidth to re-download all the required files for the updates, since the WUAgent will need to recreate the Datastore directory information.
Other than that, it is completely safe to clear out the SoftwareDistribution folder.
If you are still having second thoughts about the operating system’s safety and reliability, then we suggest that you create a system restore point before proceeding with the cleanup, or, you can adapt the SoftwareDistribution folder renaming method instead of deleting it.
Можно ли удалять файлы из C:WindowsInstaller в Windows 10
Если вы загляните в папку C:WindowsInstaller (папка скрыта по умолчанию, но в нее легко попасть, введя в адресную строку проводника путь к папке, либо включив показ и скрытых и защищенных системных файлов Windows 10), в ней вы обнаружите набор файлов с расширениями .msi и .msp, а также папки: состоящие из кодов и отдельные с расширением .tmp.
Можно ли это всё удалить? Короткий ответ: нет, не следует. Вы можете безопасно удалить лишь папки .tmp, но они и не занимают много места. Однако, существует возможность в какой-то степени очистить эту папку, о чем в следующем разделе.
А сначала о том, что представляют собой эти файлы в WindowsInstaller — это файлы установщиков программ (тех, что установлены на вашем компьютере), использующих для установки службу «Установщик Windows» и они используются когда программа обновляется или когда вы её, наоборот, удаляете через «Панель управления» — «Программы и компоненты». Также они могут использовать для функции «Исправить установку». Соответственно, при их удалении могут возникнуть проблемы при выполнении этих задач.
When Should You Cleanup SoftwareDistribution Folder
As we mentioned earlier, it is recommended to steer clear of the SoftwareDistribution folder and only manipulate it when absolutely necessary. Therefore, do not rename or delete it without a reason.
You can clean up the SoftwareDistribution folder if you are experiencing an issue with Windows updates. For example, if an update is getting stuck, or won’t install at all. You can also do so when you encounter an error code relating to Windows updates, like error code 0x80070424. Or any other issue with Windows Update.
Now that you understand what the SoftwareDistribution folder is about, when to clean it out, and that it’s safe to do so, let us show you 2 safe methods to clean up the SoftwareDistribution folder.
FAQ
What Is the Software Distribution Folder in Windows 7?
The Software Distribution folder is an essential part of the Windows Update service. It keeps temporary files as well as information about Windows Updates. It also includes installation files and downloaded updates.
Where Can I Find the Software Distribution Folder in Windows 7?
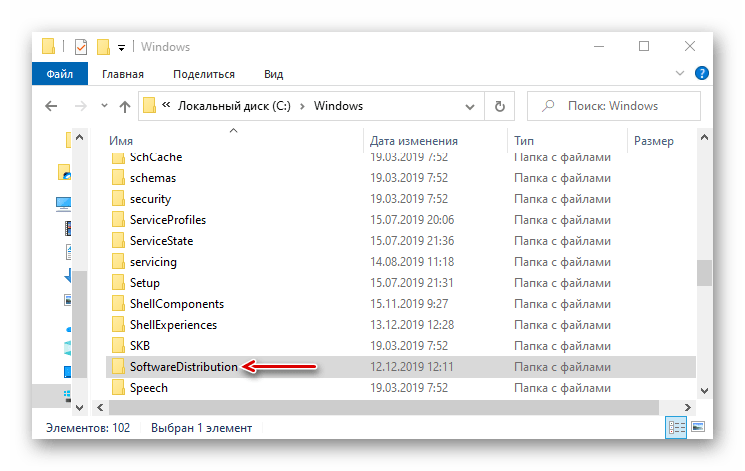
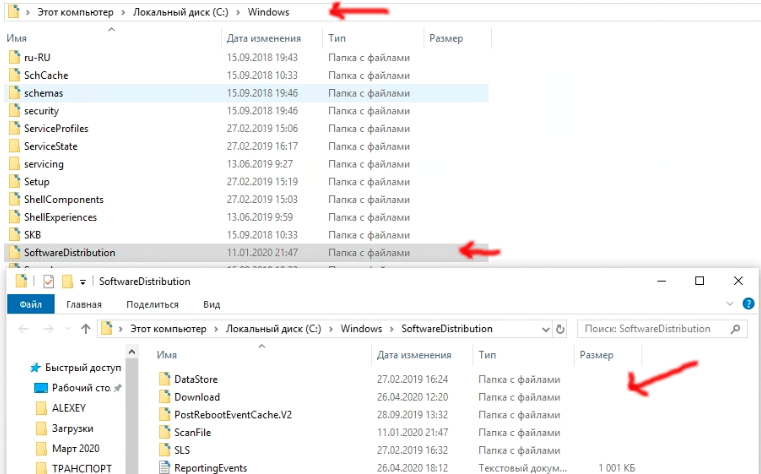
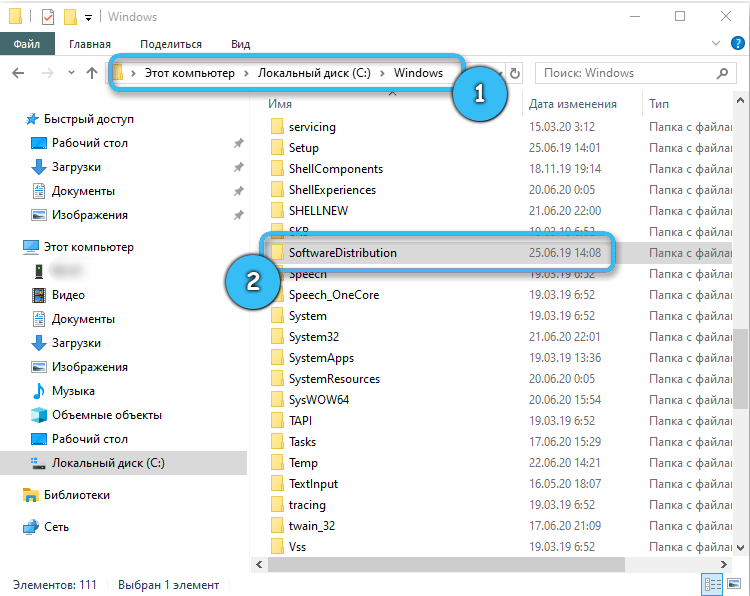
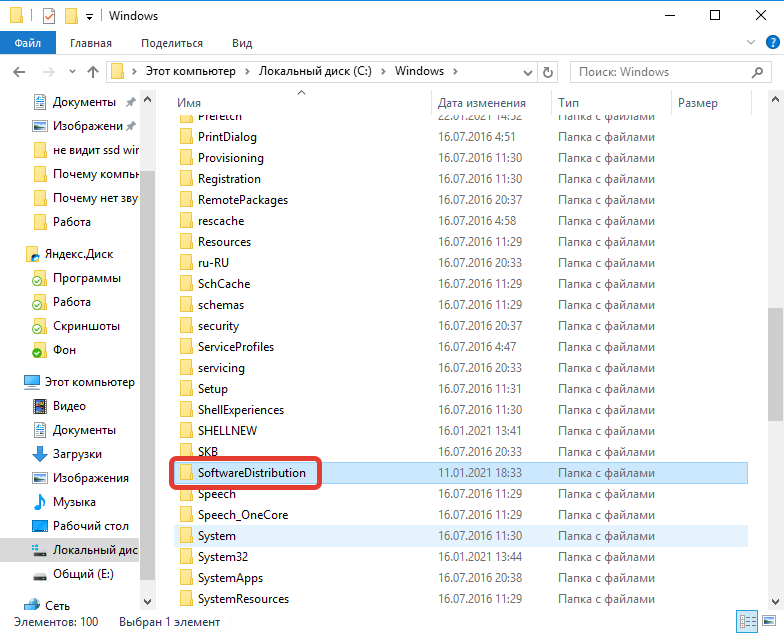
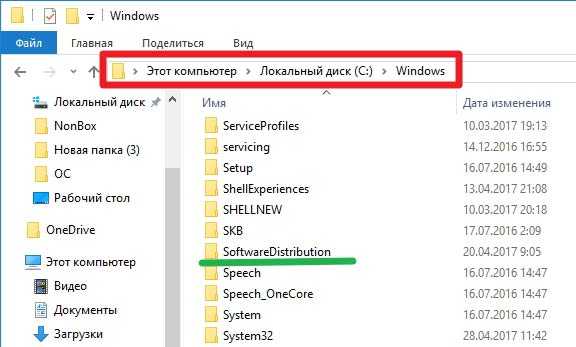
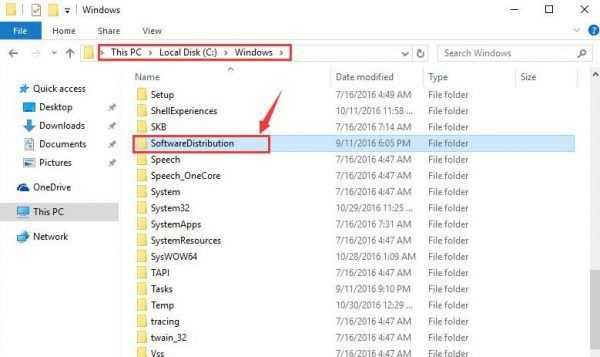
The C:\Windows\SoftwareDistribution directory in Windows 7 contains the Software Distribution folder. You can access it by launching File Explorer and going to your C: drive. You should see the “SoftwareDistribution” folder from there when you access the “Windows” folder.
How Do I Delete the Software Distribution Folder in Windows 7?
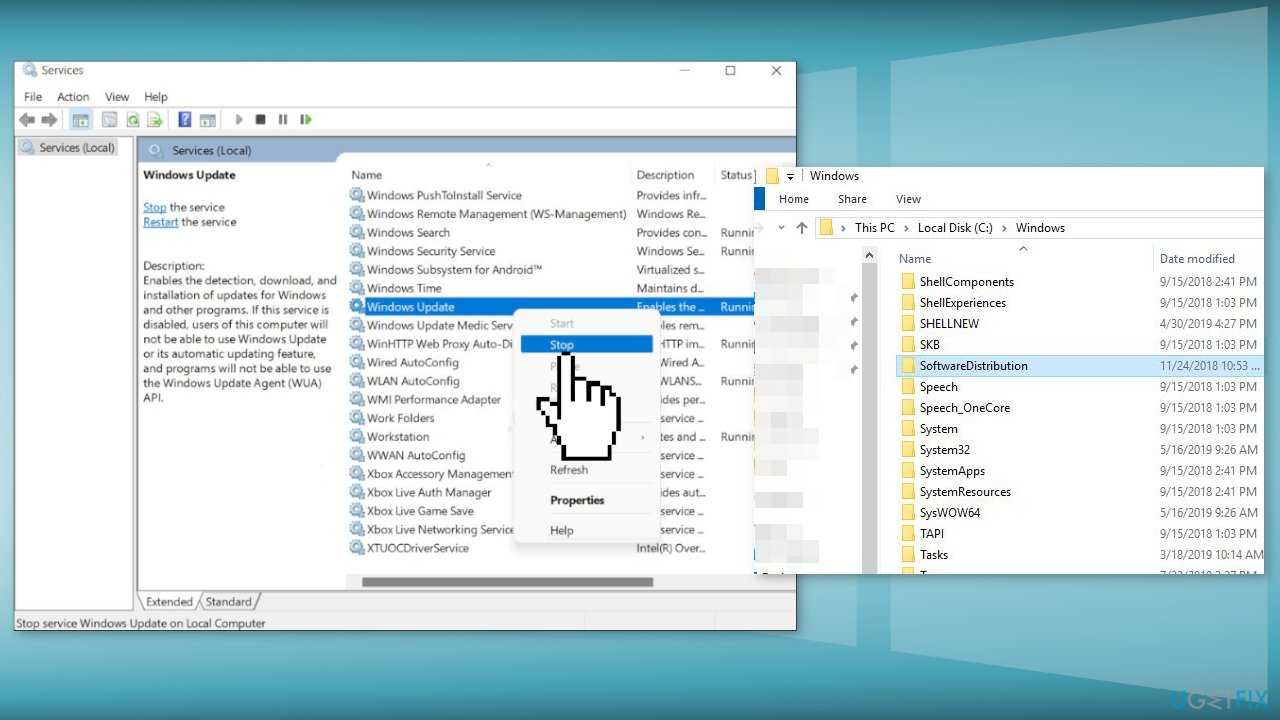
First, stop the Windows Update Service. To do this, open the Run dialog box by pressing the Windows key and R, then type “services.msc” into the box and click Enter. Right-click “Windows Update” in the list and choose “Stop.”
Use File Explorer to find C:\Windows\SoftwareDistribution after pausing the service. Select and remove all of the directory’s files and folders. After deleting the contents, return to the Services pane, right-click “Windows Update,” and choose “Start” to restart the Windows Update Service.
Where Can I Find the Software Distribution Folder?
As said earlier, you can find the Windows Software Distribution folder in the C:\Windows directory. Here’s how to find it:
- Press the “Windows + E” to open the Windows folder.
- Search for the primary hard drive on your computer, which is usually “Local Disk (C:)” or just “C:” and click on it.
Open the “Windows” folder on the C: drive.
You’ll find the “SoftwareDistribution” folder inside the Windows folder.
So, the path to the Software Distribution Folder on a Windows computer is usually “C:\Windows\SoftwareDistribution.”
Related: Windows Update Troubleshooter: Fixing Windows Update Issues
What is the Software Distribution Folder?
The SoftwareDistribution folder is a directory on your computer, usually found in the C:\Windows directory. The Windows operating system uses it to store temporary files and information about Windows Updates.
It’s essential for downloading, storing, and managing updates for your Windows operating system. In other words, it functions as a storage space where Windows maintains all the files required for updating your PC.
Also Read: Windows Update Cleanup: How to Delete Old Windows Update Files
These folders contain downloaded update packages, installation files, and other information required to keep your system secure and up to date.
Use Third-Party Software to Delete Old Update Files
Auslogics BoostSpeed is computer optimization software that enhances your Windows PC performance and keeps it healthy. It provides tools and features to remove unused files, speed up the system, and fix typical computer problems.
Among its features, BoostSpeed has a Deep Disk Cleaner tool for managing and removing outdated update files. With just a click, you can quickly delete out-of-date update files that might take up space on your computer.
Launch BoostSpeed, select “Deep Disk Cleaner,” and click “Scan now.” The program will take care of the rest!
Related: Get the Most out of Auslogics BoostSpeed Free Trial
How to rename the ‘SoftwareDistribution’ folder
If you don’t want to delete the content inside of the folder, you can alternatively, rename the folder to troubleshoot Windows Update problems.
To rename the SoftwareDistribution folder, do the following:
- Open Start.
- Search for Command Prompt, right-click the result, and select Run as administrator.
- Type the following command to stop the Windows Update Service and press Enter:
- Type the following command to stop the Background Intelligent Transfer Service and press Enter:
- Use the Windows key + R keyboard shortcut to open the Run command.
- Type the following command to rename the folder and press Enter:Quick Tip: If the command isn’t letting you rename the folder, try steps No. 3 and 4 one more time, and then try to rename the folder.
- Type the following command to start the Windows Update Service and press Enter:
- Type the following command to start the Background Intelligent Transfer Service and press Enter:
After you’ve completed the steps, Windows 10 will re-create the folder and re-download all the necessary components.
The only caveat with this process is that the SoftwareDistribution folder also includes the Windows Update history information, which means that emptying up the folder will result in loss of this data. In addition, you’ll notice that Windows Update will take longer than usual to detect and update your computer because the WUAgent must check and re-create the Datastore information. However, it’s a small price to pay to get your device to update again.
While sometimes the folder may grow, it’s only recommended to use these instructions only when necessary. You shouldn’t mess with the SoftwareDistribution folder to free up storage space on your computer.
How to Cleanup the SoftwareDistribution Folder
-
Launch an elevated Command Prompt.
-
Run the following cmdlets to stop the “Windows Update” and the “Background Intelligent Transfer Service” services.
Stop dependent services
Do not close the Command Prompt.
-
Now navigate to the following path using :
-
Select everything by pressing the CTRL + A hotkeys, and then click Delete.Delete everything in SoftwareDistribution folder
Alternatively, you can also run the following cmdlet in Command Prompt to clear out the SoftwareDistribution folder silently:
-
(Conditional) If asked for administrative permission, click Continue.Provide administrative privileges
-
Now run the following cmdlets in the Command Prompt to start the stopped services.
Start the dependent services
You will now have a clean and good-as-new SoftwareDistribution folder for a fresh start.
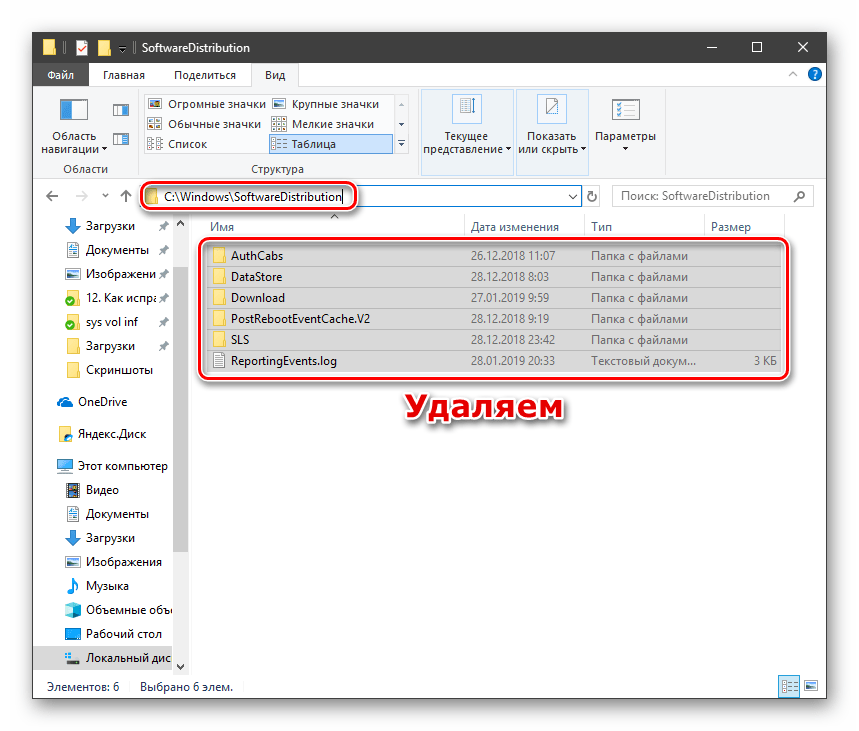
Как “SoftwareDistribution” удалить папку
Чтобы избавиться от содержимого самой папки SoftwareDistribution, напишите следующее:
- Откройте “Пуск”.
- Найдите командную строку, щелкните результат правой кнопкой мыши и выберите «Запуск от имени администратора».
-
Введите новую следующую команду, чтобы остановить наши решения Центра обновления Windows, и нажмите Enter:
-
Чтобы остановить все службы интеллектуальной передачи записей, введите следующую команду и нажмите Enter:
- Используйте сочетание клавиш Windows + R в начале строки, чтобы открыть команду “Выполнить”.
-
Откройте проводник, не говоря уже о том, чтобы перейти по следующему пути:
-
Выделите все содержимое и нажмите кнопку «Удалить», чтобы удалить содержимое.
Совет. Если вам сложно удалить все файлы, просто перезагрузите компьютер и попробуйте еще раз.
-
-
В командной строке введите команду сразу после, чтобы запустить службу Windows Update, и нажмите Enter:
-
Просто введите следующую командуdo, чтобы начать новую фоновую трансляцию интеллектуальной службы и рекламы Enter:

После выполнения этих действий Windows 10 перенастроит папку и загрузит все необходимые компоненты в будущем.
Затем переименуйте папку SoftwareDistribution в Вы
Кроме того, если вы не хотите удалять наиболее важные элементы папки, вы можете переименовать файл, чтобы диагностировать проблемы с Центром обновления Windows.
- Откройте “Пуск”.
- Найдите командную строку, щелкните правой кнопкой мыши прямой результат и выберите «Выполнить», чтобы отобразить этого администратора.
-
Введите следующую команду, чтобы остановить конкретную службу Центра обновления Windows, и нажмите Enter:
-
Чтобы остановить конкретную фоновую бизнес-операцию по интеллектуальной передаче, введите следующую команду и нажмите Enter:
- Используйте сочетание клавиш Windows + R, чтобы открыть команду “Выполнить”.
-
Введите следующую команду, чтобы переименовать файл “Сохранить”, и нажмите Enter:
Подсказка: если команда не просит вас переименовать папку, попробуйте шаг 3 и еще раз взгляните, а затем попробуйте переименовать папку.
-
Введите следующую команду, чтобы войти в службу Windows Update и войти в аудиторию:
-
В дополнение к Enter введите некоторые из следующих команд, чтобы запустить продукт Smart Transfer в фоновом режиме:
После выполнения всех действий Windows 10 поднимет файл и снова загрузит все необходимые соединения.
Настоящим ограничением этого метода является то, что моя папка SoftwareDistribution также предлагает информацию журнала обновлений Windows, что означает, что очистка каталога приведет к потере этой информации. Кроме того, вы обнаружите, что Центру обновления Windows требуется больше времени для обнаружения и обновления вашего портативного компьютера просто потому, что WUA необходимо просматривать вместе с воссозданием информации нашего собственного хранилища данных, чтобы вернуться и снова открыть его.
Хотя файл является усеченным, рекомендуется использовать такие простые инструкции только в случае необходимости. Они не должны сопровождаться каталогом SoftwareDistribution, чтобы освободить место на вашем компьютере.
Другие ресурсы по Windows 10
Чтобы получить поддержку, дополнительные статьи, обложки и ответы на часто задаваемые вопросы о Windows 10, посетите следующие элементы:
- Windows 10 в Windows Central – все, что вам нужно знать
- Советы и рекомендации по поддержке Windows 10
- Форумы Windows 10 почти всегда находятся в Windows Central
г.
Что такое Software Distribution
Название папочки дословно переводится с английского языка, как распространение программного обеспечения. В ней размещаются файлы обновления ОС Виндовс. Ее можно найти в 7, 8 и даже 10 версии операционной системы.
Именно в ней хранятся данные обновления ОС. Они загружаются на устройство с серверов корпорации Microsoft Виндовс. На вес папочки напрямую влияет количество выполненных обновлений OS. В некоторых случаях он может измеряться в гигабайтах.
Папка Software distribution расположена в папке Windows на диске C
Еще пользователь в той же директории может увидеть папку с названием DataStore. Здесь тоже размещаются временные файлы. В этом месте хранится история осуществления самообновлений. Нередко данная папка может также иметь внушительный вес.
Кроме того, в других местах директории хранится кэш и тоже данные самообновления OS. Удаленные файлы также хранятся в корзине , которую можно очистить.
How to Clear the SoftwareDistribution Folder on Windows
To purge the SoftwareDistribution folder on Windows 11/10 PC, follow these easy steps –
- Press Windows + R to launch the Run dialog.
- Type “CMD” without quotes on it and hit Ctrl + Shift + Enter.
- When the UAC prompt appears, hit Yes to authorize accessing Command Prompt as an administrator.
- On the elevated console, copy/paste the below commands, and press the Enter key separately.
- These codes will stop all essential update-related services from running on your computer.
- Now that you have stopped the essential services, press Windows + E to launch File Explorer.
- When the explorer opens up, navigate to the below path –
- If the root drive differs from C: on your computer, use the appropriate root drive’s letter in the above command.
- The system will take you inside the SoftwareDistribution folder.
- Use Ctrl + A to select all items, and then Ctrl + X to move the selected items to a different folder.
- Open a new folder anywhere on the non-root drive, and use Ctrl + V to paste the copied items here.
Note: If you want, you may even choose to delete all items instead of copying the cache items to a new folder. However, we don’t recommend doing so, as you may end up losing some important files or folders.
- Now that you have purged all items from the SoftwareDistribution folder, you may now restart all those services that you stopped earlier.
- To do this, re-open the Command prompt as administrator and run the following codes on it –
Restart your computer so that the recent changes come into effect from the next login.
That’s it, you have successfully cleared the SoftwareDistribution folder on Windows 11. Catroot2 is another important cache folder on Windows PC. If you want to clear the contents inside this folder as well, read this guide.
Renaming the SoftwareDistribution folder in Windows
Alternatively, users may also rename the SoftwareDistribution folder on their computers. Proceeding this way, you may easily re-use the previous folders that you have renamed recently. Here’s how to perform this task on your Windows PC –
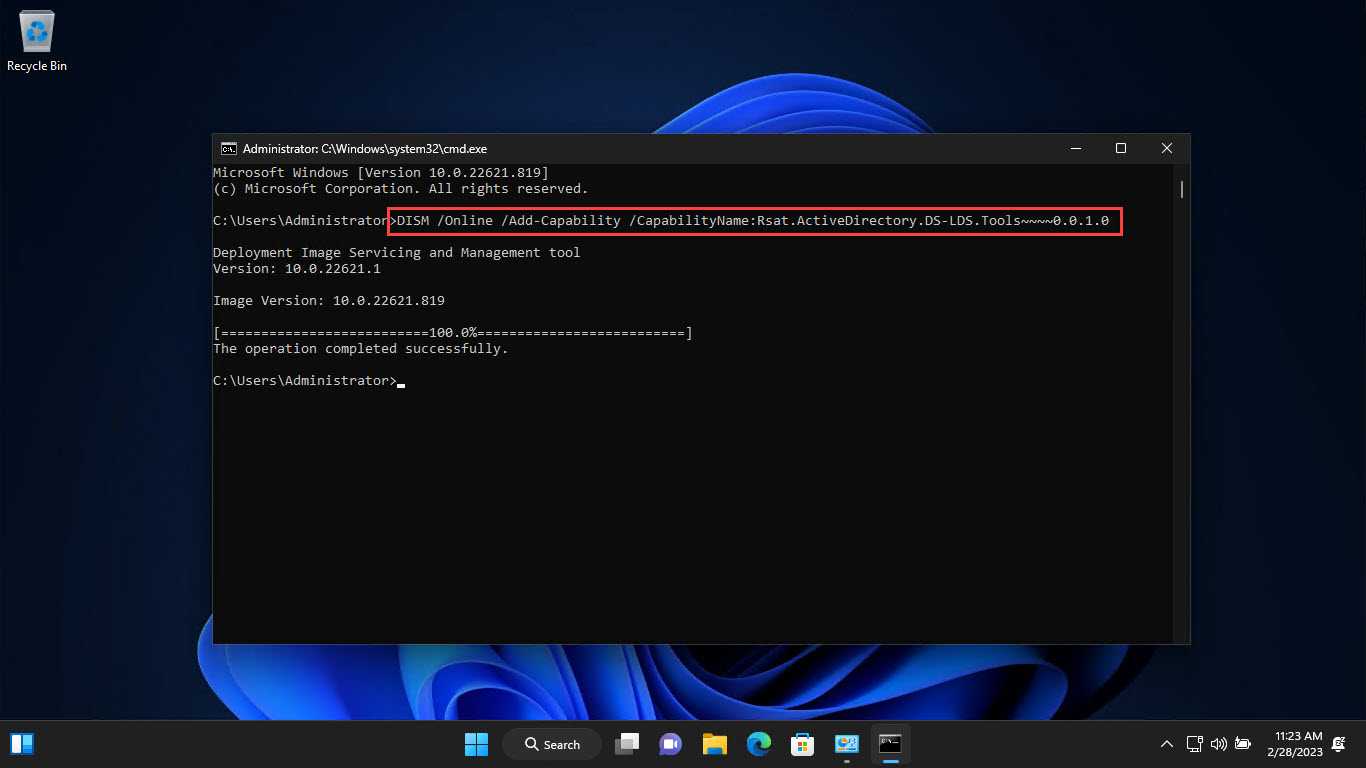
Launch Windows PowerShell as administrator first and then run the following codes on it.
- After all update services are disabled or stopped, you may go ahead and rename the SoftwareDistribution folder. You may rename this folder to anything, however, we recommend adding an extension “” by its name end. This way you need not require remembering the folder name to be used in the future.
- Here are the codes that you need to run on the PowerShell.
- While the first command renames the SoftwareDistribution folder, the second one renames the Ctaroot2 folder.
- Restart all those services that you have stopped previously next. To do this, run these commands one after another.
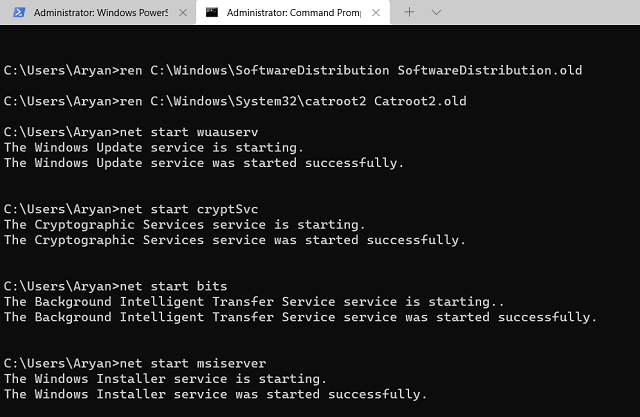
- Restart your PC and check if the SoftwareDistribution folder is cleared of its old contents. When you reach out to the C:\Windows path, you will see two SoftwareDistribution folders, out of which one bears the extension.
- You may delete the earlier instances of this folder if your device is functioning pretty well.
How do I delete the SoftwareDistribution Folder on Windows 11?
If you don’t want to manually move all the items from inside the SoftwareDistribution to a different folder, or even rename this folder, use the following codes on the elevated console to delete these folders. Make sure to disable the update-related services first so that they don’t get compromised and corrupt the entire operating system.
Note: The above two commands will remove both the SoftwareDistribution and Catroot2 folders along with their subdirectories. The “/S” switch works to delete the specified directory and all subdirectories within the main folder while the “/Q” switch is used to delete directories quietly without confirmation.
Wait for a few seconds and then restart all those services that you have stopped from running on your Windows PC.
Sometimes, when you run the above codes, it fails to run on an error message – “The process cannot access the file because it is being used by another process.” If that’s the case, you should attempt again from the start. There’s a possibility that one of the stopped services might have restarted unexpectedly. So, you need to disable that service first and then proceed ahead with the deletion part.
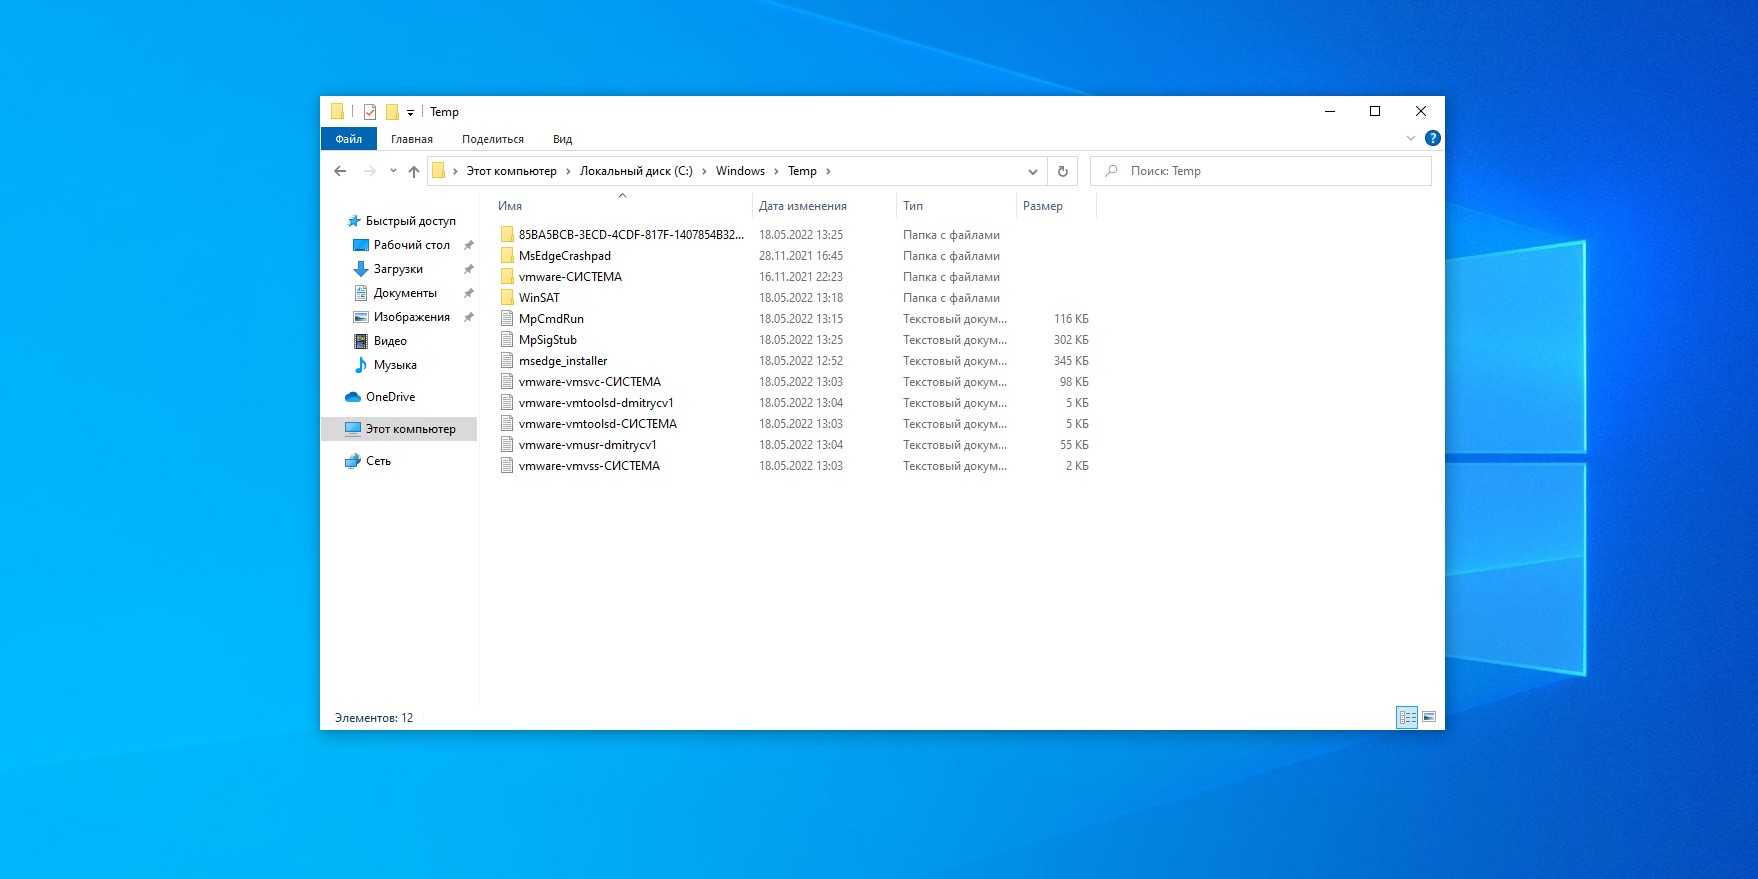
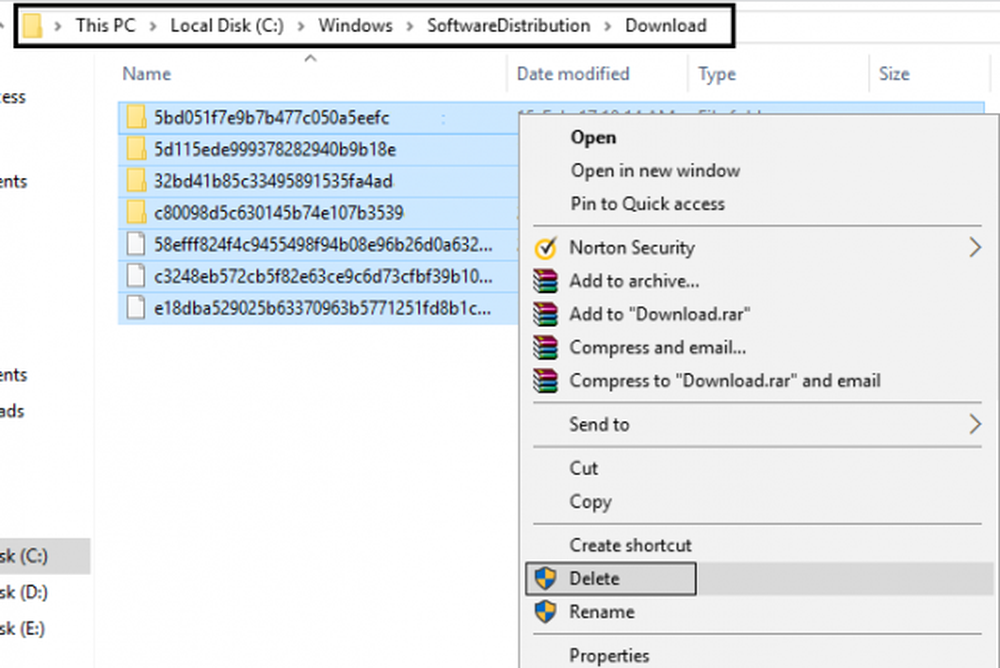
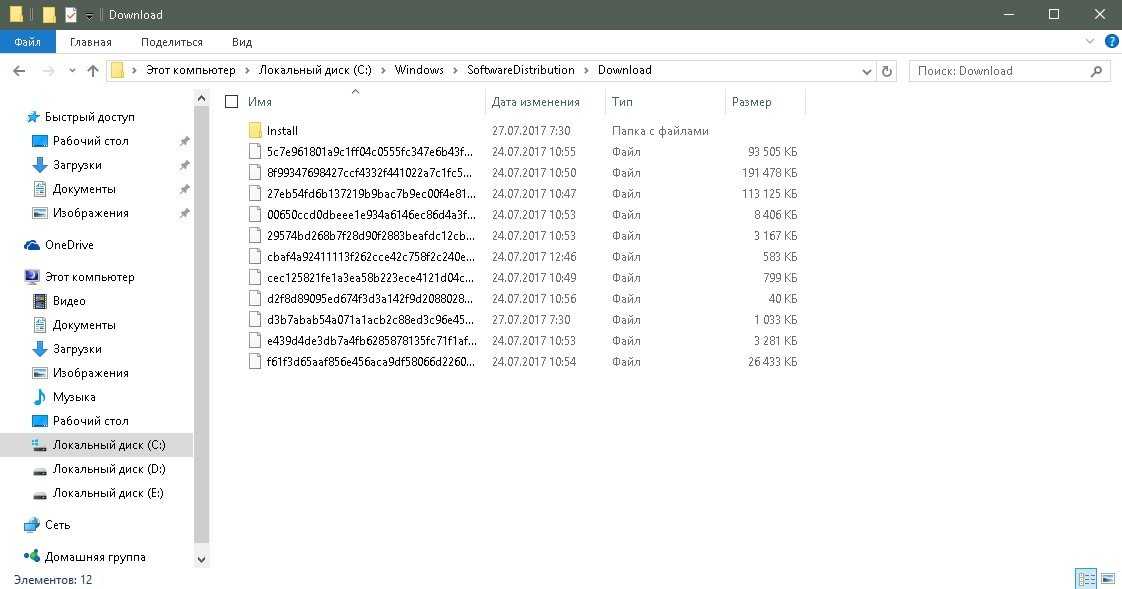
How to Remove Items From C:\Windows\SoftwareDistribution\Download Windows 10
Way 1 – Manually Delete Windows Update Cache
First of all, make sure that no updates are in action, otherwise, you will land up in a pool of troubles.
Stop the Update Services
Step 1 – Begin the procedure by wide-spreading an elevated Command Prompt. You can do this in various ways. However, the easy one is, right-click on Start. Then on the popped-up menu, tap the choice named Command Prompt (Admin).
Step 2 – Go ahead with hitting Yes button on the UAC confirmation pop up.
Step 3 – Now, write these pieces of codes one by one and hit Enter on the expanded elevated Command Prompt.
Note – The code available in the first line functions to cease the Windows Update Service. Likewise, the other command is to end another service entitled Background Intelligent Transfer Service aka BITS.
Finally, After termination of the above-outlined two services, it is time to dispose of the Windows Update cache. To do so, observe the subsequent steps –
Step 1 – With the combination of Win & E keys outspread File Explorer. Once the File Explorer is visible on the screen, travel through this path accurately
Unhide the Files
Step 2 – Click or hit the View tab, located on the menu bar.
Step 3 – On the dropped ribbon, click or hit Options box, visible at the extreme right end of the ribbon.
Step 4 – A box labeled Folder Options will arrive. Here also, move to the View tab.
Step 5 – Place a tick mark on the tiny round cell labeled as Show hidden files and folders and drives. Next, clear out mark from the square cell entitled Hide protected operating system files.
Step 6 – Click Apply and successively Ok.
Delete the Items
Step 7 – Now, all the files or folders will become visible. Use Ctrl & A sequence of keys and select all the contents of the Download folder.
Step 8 – Finally, to Remove Items From C:\Windows\SoftwareDistribution\Download Hit or tap the Delete key.
Step 9 – You will see an overlapped box labeled Folder Access Denied. Tick mark the box of Do this for all current items followed by a hit on Continue button.
Now, it is time to restart those two services that you have terminated earlier
Step 1 – Another time outspread the elevated Command Prompt by observing the procedure outlined earlier.
Step 2 – Write down these lines of codes one at a time and then hit Enter.
Way 2 – Use Comand Prompt to Delete Windows Update Cache
Step 1 – Launch elevated command prompt with the above extant process.
Step 2 – Write down these three lines of codes, one at a time, and hit Enter.
Way 3 – A Batch File to Delete Windows Update Cache
Another interesting technique to terminate the items of Windows Update Cache is generating a batch file.
Step 1 – To generate a batch file, first of all, outspread Notepad. Do this by writing in the search field and hit the same name that appears on the top.
Step 2 – Write out or copy/paste these four codes on the expanded Notepad.
Step 3 – Now, click or hit the File on the menu bar. From the dropped menu, click or hit Save as.
Step 4 – Pick up Desktop, the location to store the file. While storing, click or hit the Save as type drop-down and pick up All Files.
Step 5 – Make sure to rename the file as Erase_Cache.bat. As the last effort, click or hit Save.
Step 6 – Now, your batch file is absolutely ready to use. Next time onward, first terminate the Windows Update Service by using this code on an elevated Command Prompt –
Step 7 – Finally, to Remove Items From C:\Windows\SoftwareDistribution\Download Hit or tap the Delete key, go to your desktop, and double-click Erase_Cache file. In doing so, you will instantly remove all the items of Windows Update Cache.
Furthermore, you don’t like to be bothered with the long steps direct download Erase_Cache file from below and run.
Hopefully, Windows Update will work with all enthusiasm and should start re-downloading the files from scratch since Windows Update cache is reset. Finally, if you hold up some more ways to terminate Windows Update Cache in Windows 10, please make us aware of those by inputting them on the comments form.
How to Delete the Software Distribution Folder
You must create a restore point whenever you decide to change your system. You can always return your OS to work if anything goes wrong. So, follow the steps below:
- Go to your taskbar, then click the Search icon.
- Inside the Search box, type “Restore Point” (no quotes).
- Select “Create a restore point” from the results.
Click the “Create” button.
Let your system create a restore point. The process may take a couple of minutes to complete.
After creating a restore point, you can now delete the Software Distribution folder. To do that, you need to follow the instructions below:
Type “Command Prompt,” right-click, and select “Run as administrator.”
Copy and paste the following commands one by one:
“net stop wuauserv”
“net stop bits”
- Press “Windows Key + E” on your keyboard to open File Explorer.
- Navigate to this folder: “C:\Windows\SoftwareDistribution” and delete old Windows update files in the folder.
Note: You won’t be able to get rid of files in use. When this happens, all you need to do is restart your computer. Once you’ve rebooted, you can return to the Windows Software Distribution folder to delete its contents.
After deleting the files inside the SoftwareDistribution folder, execute the following command lines:
net start wuauserv
net start bits
These commands will restart the Windows Update and Background Intelligent Transfer services. That’s how to delete Windows update files using the command prompt.
Here’s a video version of a user deleting the Windows update folder:
Also Read: How to Get Rid of the Windows Update Error 80246001?
Как переименовать или удалить папку Software Distribution в Windows 10/8/7
Папка распространения программного обеспечения в операционной системе Windows — это папка, расположенная в каталоге Windows и используемая для временного хранения файлов, которые могут потребоваться для установки Центра обновления Windows на вашем компьютере. Таким образом, он требуется Центром обновления Windows и поддерживается агентом WUAgent.

- Расположение папки распространения программного обеспечения
- Безопасно ли удалять папку Software Distribution
- Удалить папку распространения программного обеспечения
- Переименовать папку SoftwareDistribution

Папка распространения программного обеспечения находится в следующем месте в проводнике:
Безопасно ли удалять папку Software Distribution
Хотя вы не хотите прикасаться к этой папке в обычных условиях, вам может потребоваться очистить ее содержимое, если вы обнаружите, что хранилище данных вашей системы и папка «Загрузка» не синхронизированы, в результате чего ваши обновления Windows не работают должным образом.
Вообще говоря, безопасно удалить содержимое папки Software Distribution после того, как все требуемые файлы были использованы для установки Центра обновления Windows. Даже если вы удалите файлы в противном случае, они будут автоматически загружены. Если вы удалите саму папку, она будет автоматически воссоздана, а необходимые компоненты WU загружены автоматически.
Однако это хранилище данных также содержит файлы истории обновлений Windows. Если вы удалите их, вы потеряете историю обновлений. Более того, при следующем запуске Центра обновления Windows это приведет к увеличению времени обнаружения.
Если ваш Центр обновления Windows не работает должным образом или не работает вообще, или если вы обнаружите, что размер этой папки действительно увеличился, вы можете удалить папку распространения программного обеспечения в Windows 10/8/7.
Если это просто размер, то, если вы используете инструмент очистки диска и выберете Очистить системные файлы на системном диске, а затем компоненты Центра обновления Windows и файлы оптимизации доставки, вы обнаружите, что размер эта папка будет существенно уменьшена. Но если вы сталкиваетесь с проблемами Центра обновления Windows, то, как известно, вы очищаете эту папку, чтобы помочь исправить некоторые проблемы, такие как Центр обновления Windows не работает, Обновления Windows не удается установить, Ошибка при настройке обновлений Windows, Обновление Windows застряло при загрузке обновлений. обновления, Windows 10 продолжает устанавливать то же самое обновление и так далее.
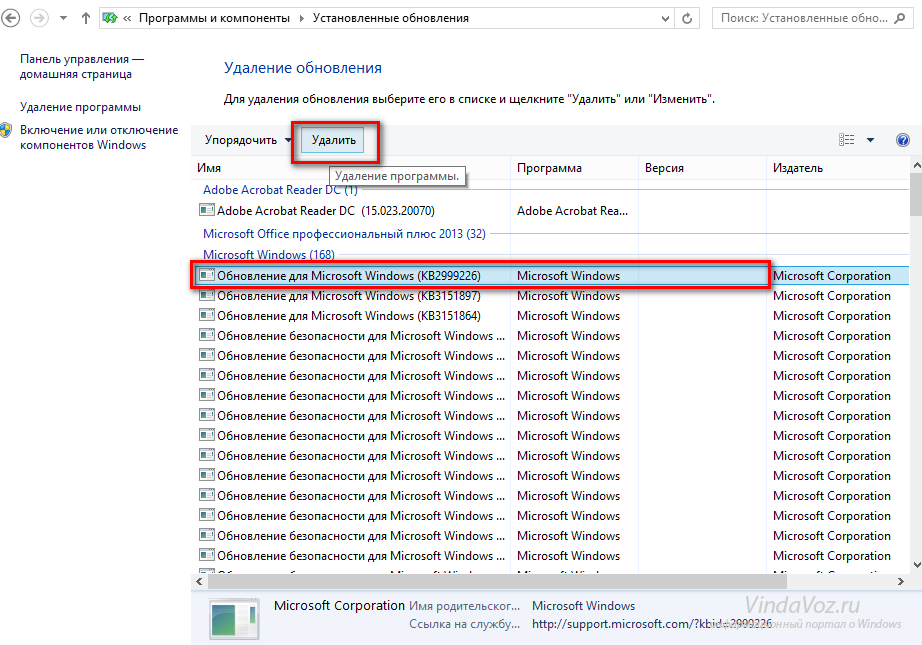
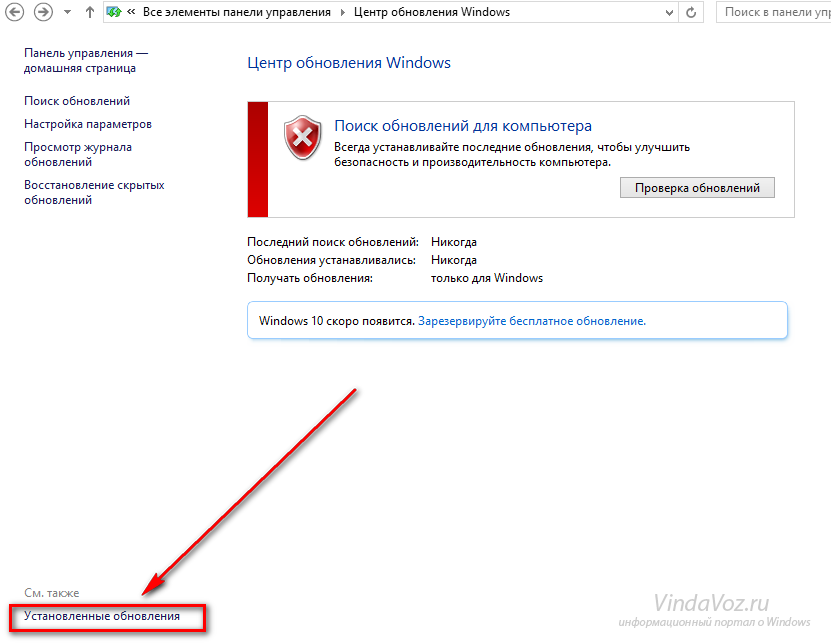
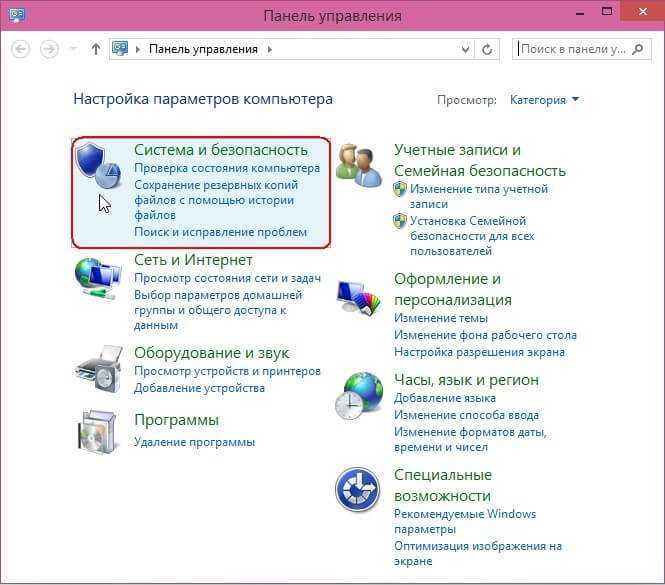
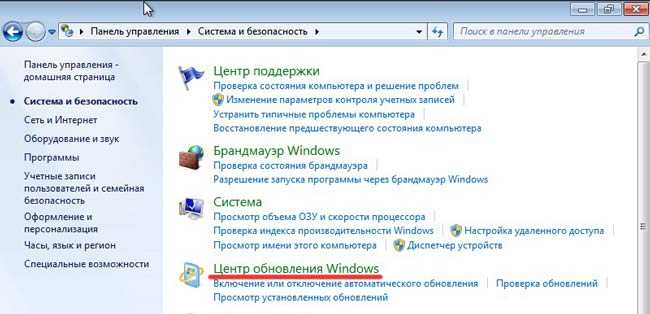
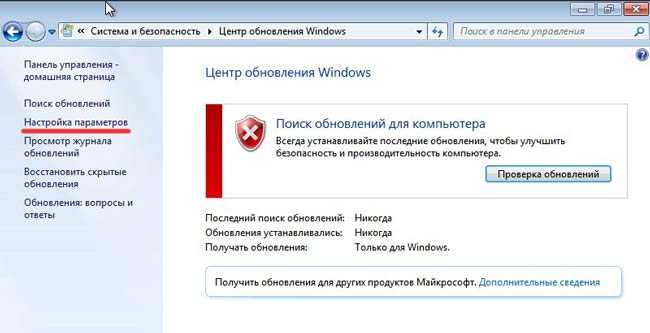
Как очистить папку SoftwareDistribution Windows 7?
Нельзя просто так взять и удалить её содержимое, если у Вас активировано автоматическое обновление системы. Виндовс не позволит Вам этого сделать. Поэтому, сначала необходимо отключить данный функционал на время выполнения манипуляций.
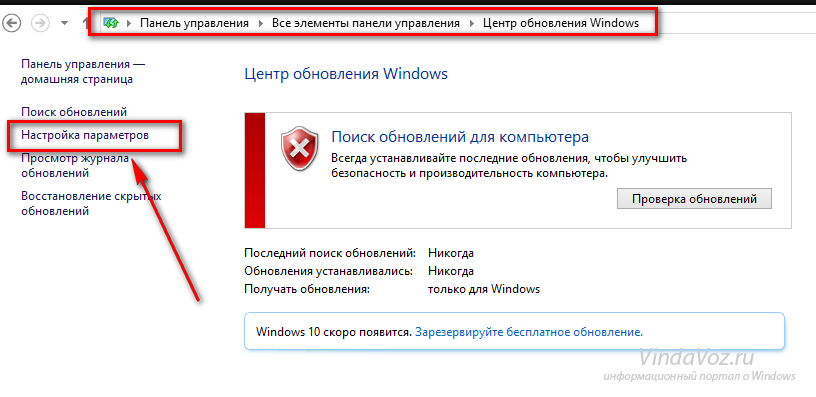
Заходим в панель управления через меню Пуск:

. Другие способы входа описаны в одной из предыдущих публикаций.
Вернемся к «семерке». Переходим к разделу «Система и безопасность», затем – открываем «Центр обновлений…»:
Также, полезно будет узнать, как устранить апдейты, которые были установлены, но приводят к сбоям активации или прочим негативным последствиям. Подробно об этом можно почитать здесь.
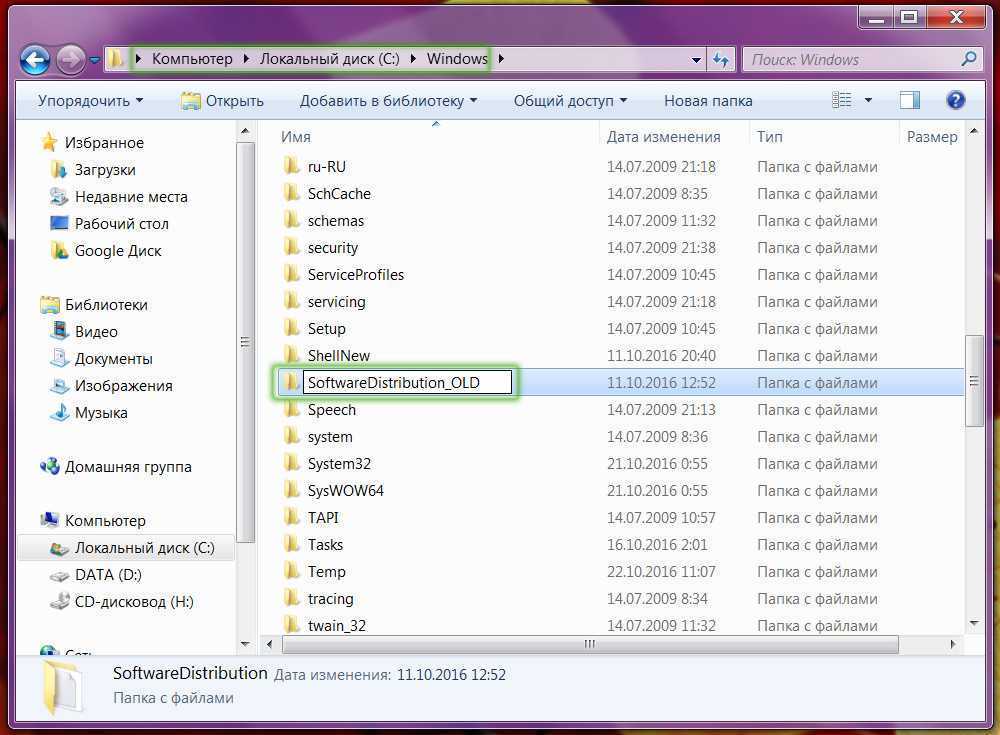

Еще одно небольшое замечание. Если при попытке очистки указанной директории возникает ошибка, попробуйте сначала переименовать её. Просто добавьте в название любой символ, затем повторите попытку. После успешного исхода верните прежнее «имя» и не забудьте снова активировать автоматическое обновление (если Вам это нужно).
Вы узнали SoftwareDistribution что это за папка Windows 10 и теперь сможете запросто освободить еще немного драгоценного дискового пространства.
Очень часто пользователю приходится вручную чистить жесткий диск от ненужных файлов и папок, когда он сталкивается с проблемой свободного пространства. Названия и назначения некоторых папок неопытный пользователь не знает, но существует системная папка SoftwareDistribution, которая позволяет освободить несколько гигабайт памяти компьютера.
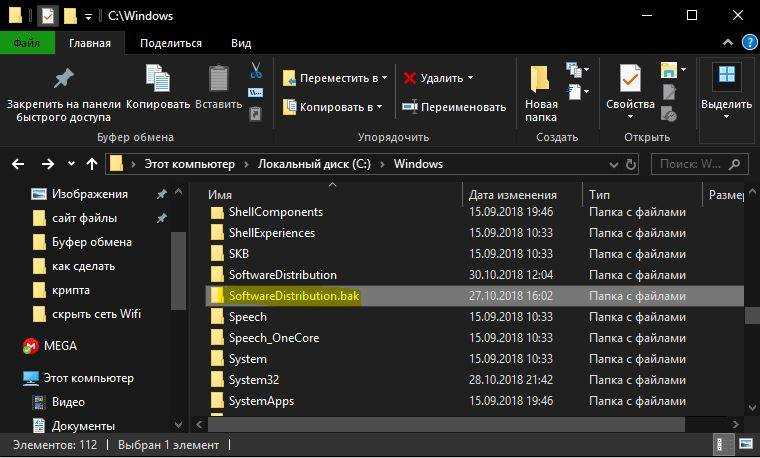
How to Rename the SoftwareDistribution Folder
The safest approach is to simply rename the default SoftwareDistribution folder. When you rename it, Windows will automatically create a fresh folder with new subdirectories and files.
Moreover, this way, you can always restore the old folder if needed. However, it will not resolve the issue of a large SoftwareDistribution folder and clear out any disk space. Therefore, this method can only be applied if you have sufficient available disk space.
Since the SoftwareDistribution folder is being utilized by the “Windows Update” and the “Background Intelligent Transfer Service” services, these 2 will first need to be stopped.
Follow these steps to successfully rename the SoftwareDistribution folder:
How To Delete Temporary Files On Wi…
Please enable JavaScript
How To Delete Temporary Files On Windows 11 and 10
-
Launch an elevated Command Prompt.
-
Run the following cmdlets to stop the “Windows Update” and the “Background Intelligent Transfer Service” services.
Stop dependent services
-
Now immediately run the following cmdlet to rename “SoftwareDistribution” to “SoftwareDistribution.old”.
Rename the SoftwareDistibution folder
-
Now run the following cmdlets to start the stopped services.
Start the dependent services
Now try reinstalling the Windows update (or whatever it was you were having trouble with) and see if the new, fresh SoftwareDistribution has helped in any way.
If this did not work for you, then always clean up the existing SoftwareDistribution folder using the steps given in the next section below.