
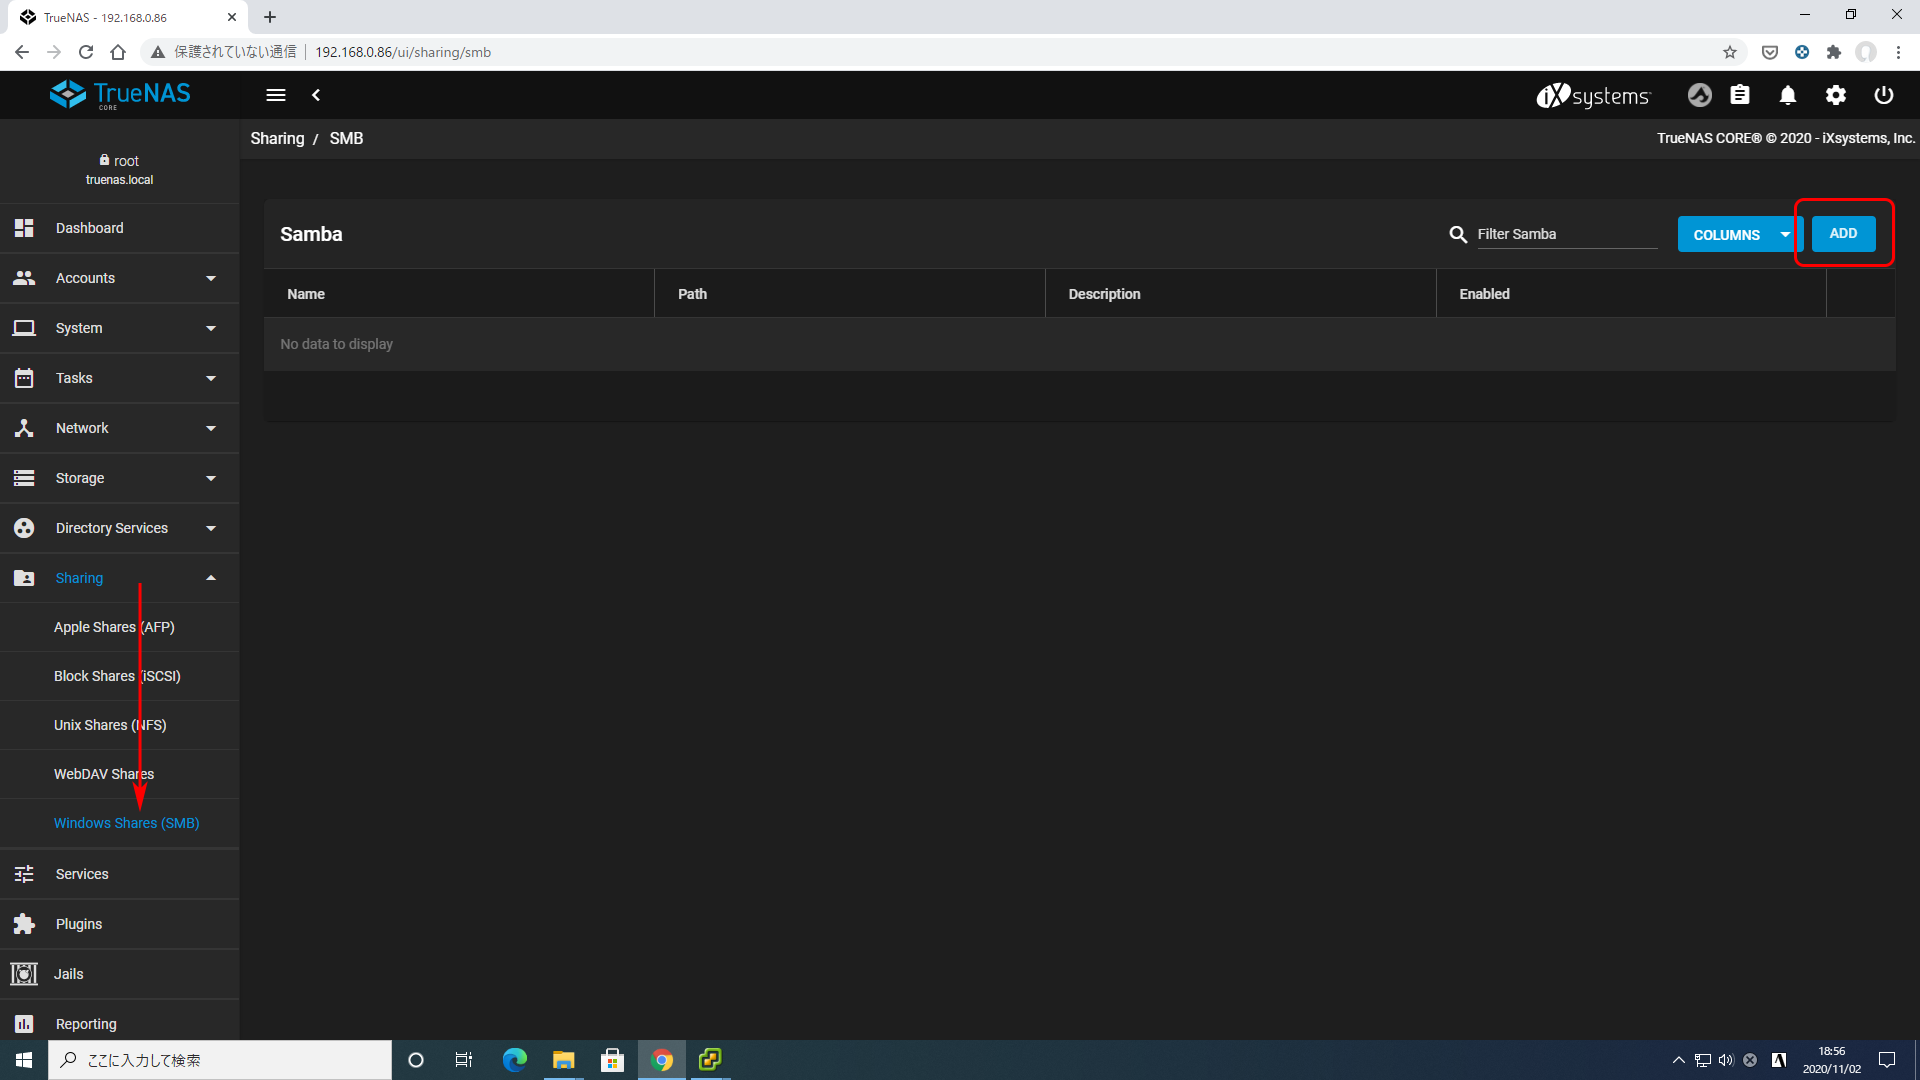
HPE iLO 5 on the MicroServer
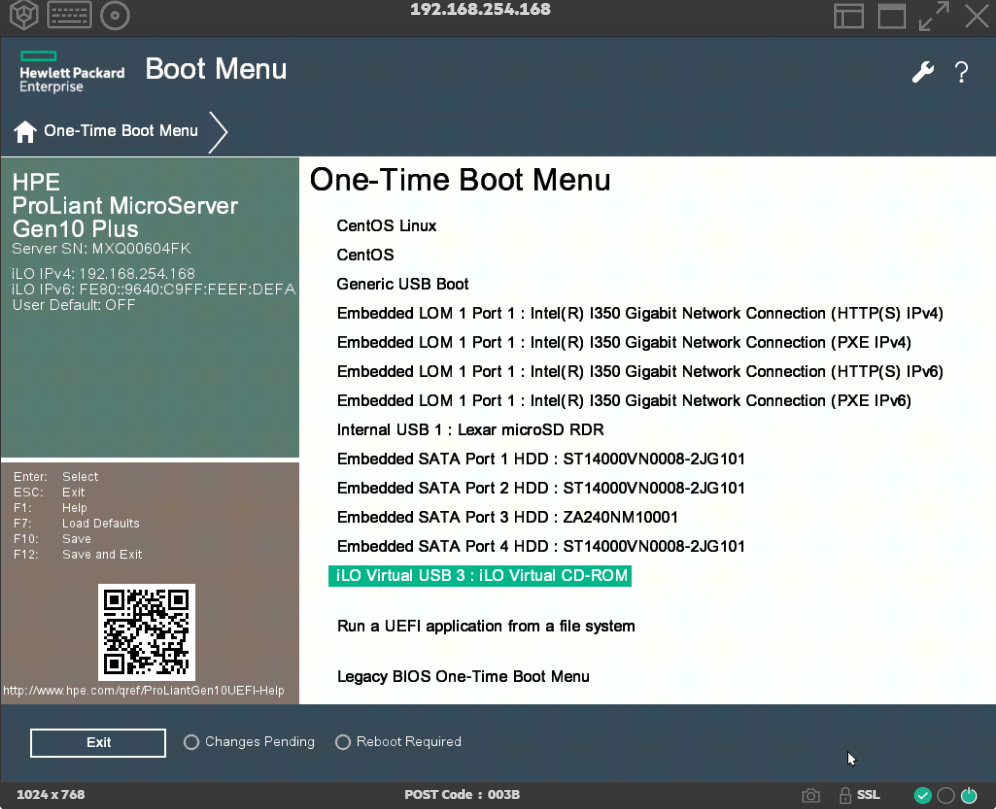
The HPE ProLiant MicroServer Gen10 Plus has built in iLO 5 that allows us to connect Virtual Media from local or remote storage. This is accomplished by logging into the iLO 5 interface – selecting Remote Console & Media and Virtual Media – loading either a local image (ISO from your local machine) or use an image URL – in this case the actual ISO path from the iXsystems server) – **If you are running the installer on your own hardware – Simply download the ISO and use Rufus – https://rufus.ie/– with a USB stick to boot from.**
Once you have an image loaded in virtual media – move back over to Launch and open a console to the machine.
Selecting HTML5 console will allow you to open a console that will give you a live screen to work with. Select F-11 to open a boot menu and boot the iLO virtual CD-ROM.
What is TrueNAS Scale?
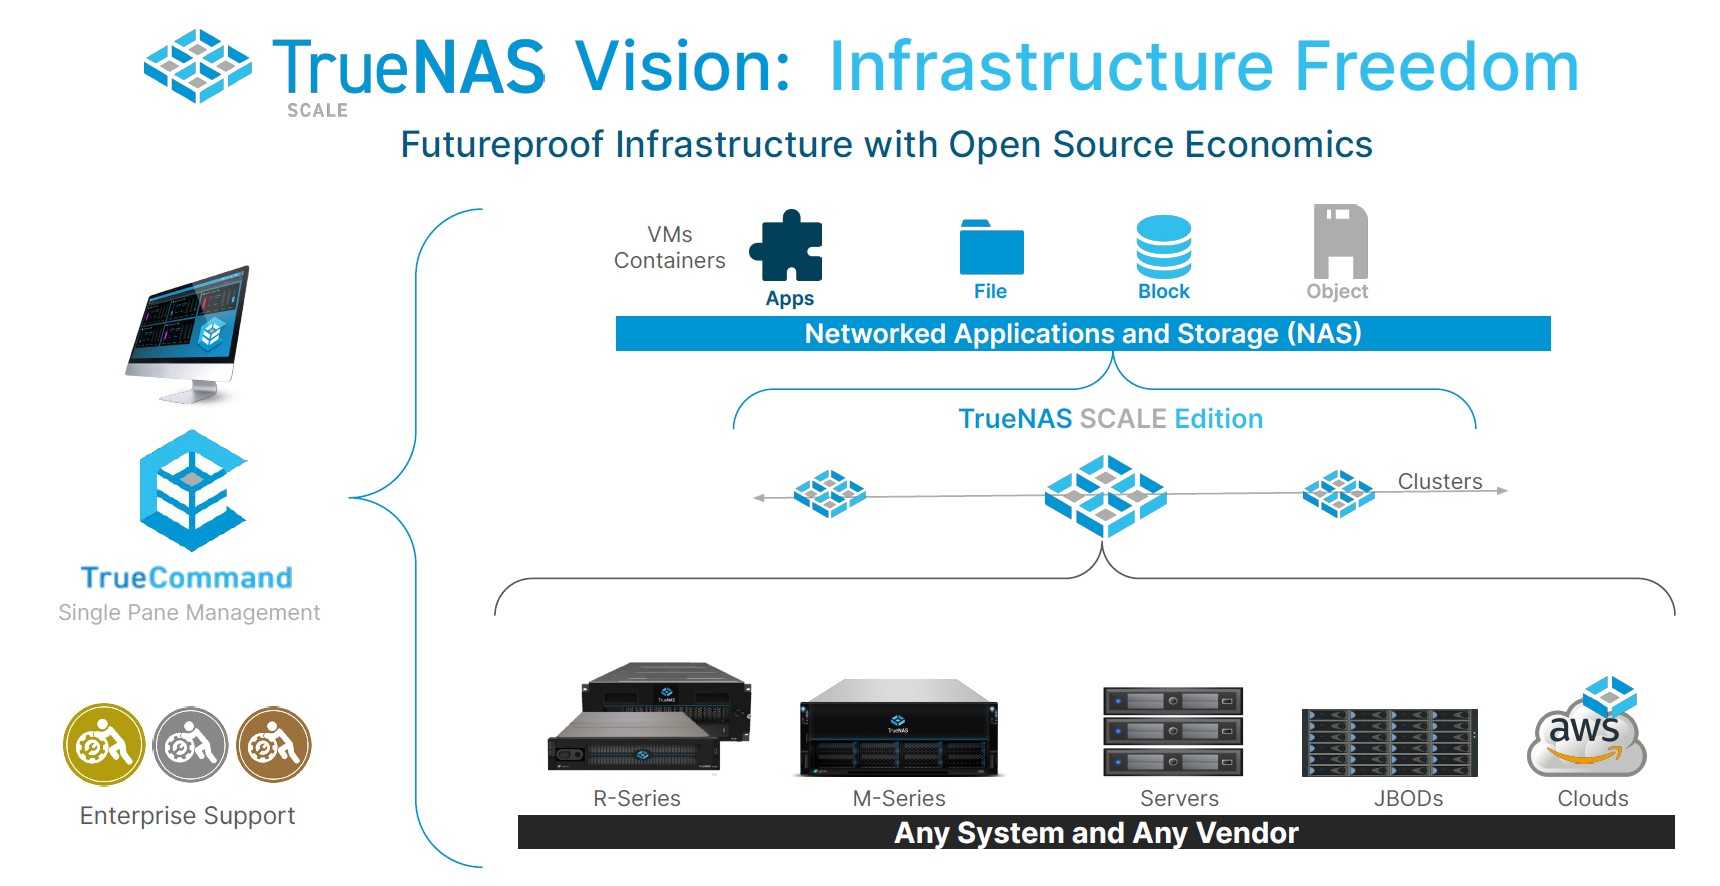
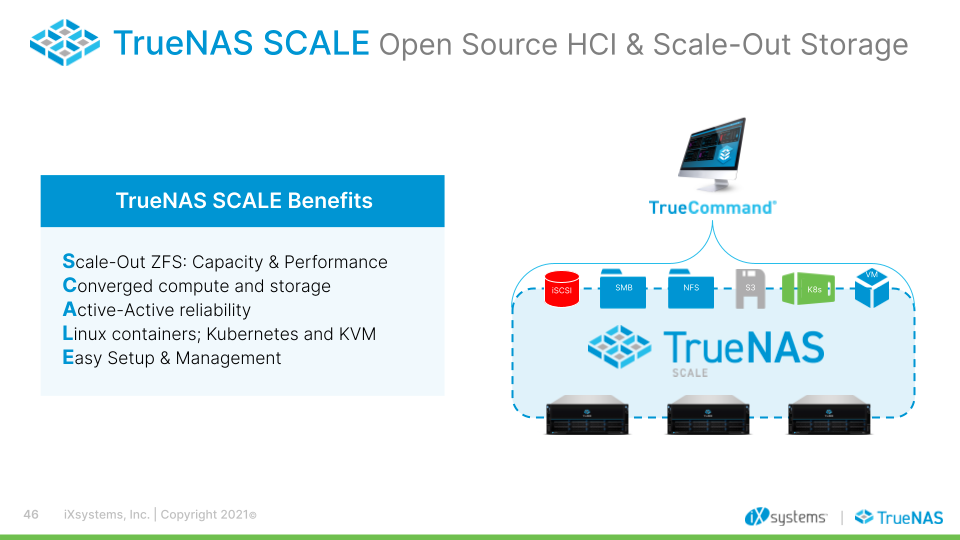
TrueNAS Scale is an open-source storage and virtualization platform and an operating system in its own right. Building upon the foundation set by TrueNAS Core, Scale extends its capabilities by emphasizing virtualization, containerization, and support for Linux-centric workflows. It’s designed to provide both scalable storage solutions and run applications directly on the platform, providing even more use cases besides storage.
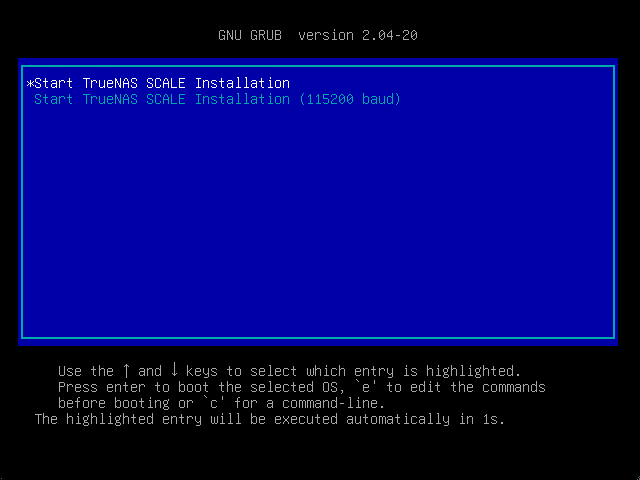 Installing truenas scale
Features and Capabilities of the host system:
-
Linux Base: Unlike TrueNAS Core which is based on FreeBSD, TrueNAS Scale is Debian Linux-based, widening compatibility for applications and configurations.
-
Virtualization: Direct support for creating and managing virtual machines, with built-in tools and a user-friendly interface. You can load VM operating system instances directly on the TrueNAS platform
-
Containerization: Support for docker containers and Linux containers, enabling efficient deployment of applications.
-
Unified Storage: Offers both file (NAS) and block (SAN) storage, ensuring flexibility based on use case.
-
High Availability: Minimizes system downtime by providing failover capabilities, ensuring data is continuously accessible.
-
Clustering: Allows for multiple nodes to be connected, distributing the load and improving performance.
-
Expandable Plugins: A wide range of plugins are available to extend its functionalities, from media servers to cloud sync tools.
Download – You can download it here: Download.
Optional, but recommended — Back up ADM
The first thing I did, to make sure I would be able to restore my system to running ADM no matter what, is back up ADM from the Flashstor’s built-in eMMC to another USB flash drive.
This is not required, especially if you disable the eMMC in BIOS (see the next section), but I like having the peace of mind, since (AFAICT) there’s no way to download a copy ADM from ASUSTOR’s website, at least not publicly.
- Plug in an empty USB flash drive
- Write a bootable Linux ISO to a different USB flash drive (I’m wrote Ubuntu 22.04 Desktop to a flash drive using Balena Etcher), and plug that in, too
- Boot the box with a monitor, keyboard, and mouse plugged in, and press F2 once the TianoCore splash screen appears
- In the BIOS, move to the left until you reach the Boot menu
- Scroll down to ‘eMMC’ entry, and press repeatedly to move it to the bottom of the boot order (alternatively, go to the USB flash drive entry and press repeatedly to move it to the top)
- Press F10 to save changes. Confirm, and reboot.
Once it reboots, it should boot into Ubuntu (or whatever Linux distro you had installed) instead of the built-in ADM OS.
Assuming you’re booting from an Ubuntu ISO, when it asks, choose ‘Try Ubuntu’, and this will boot you into the desktop environment. Open a terminal, and run to verify you can see an device (should be 8 GB), and your blank USB flash drive (something like ).
Make sure your blank USB flash drive (in my case ) is formatted and mounted. In my case, when I plugged in my exFAT or NTFS-formatted USB drive, Ubuntu identified it and automatically mounted it to .
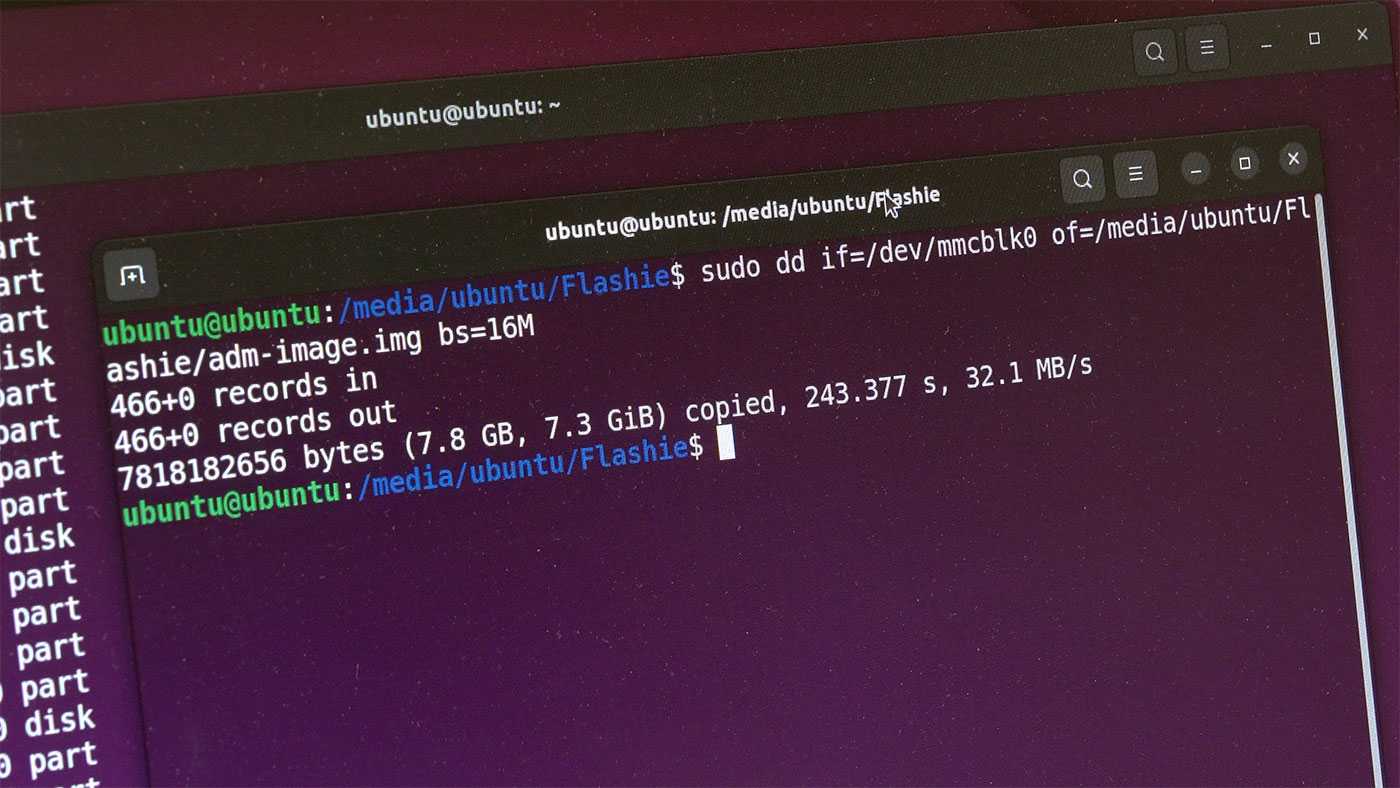
Now, the important part: use to clone the contents of the eMMC drive to the flash drive:
This will take a few minutes, but once it’s complete, consider storing that ADM file somewhere safe so you can re-image the eMMC if you ever need to.
Preparation
Once the hardware is ready, you can start using the software. surf to www.tiny.cc/trucdl and click No Thank you and Download Now to download the TrueNAS CORE iso file (900 MB). You now need to convert this disk image to a live system. You can do that with a USB stick and a free tool like Win32 Disk Imager. Insert an (empty) USB stick into your PC and start the tool. Refer to your iso file via the folder icon, but change the drop-down menu with Disk Images in *.*. Then select the stick at Target device and you only need to confirm with To write and yes.
It is now the intention that you start the other PC from this stick. If that doesn’t work, disable the function in the BIOS Secure Boot or set the UEFI BIOS to Legacy Bios Mode or csm boot.
Next, we’re going to install TrueNAS on that PC. As mentioned, this can be done on a USB stick (you must also have it plugged in), but it runs much better on a hard drive or SSD.
All existing data on your USB stick will be irretrievably lost.
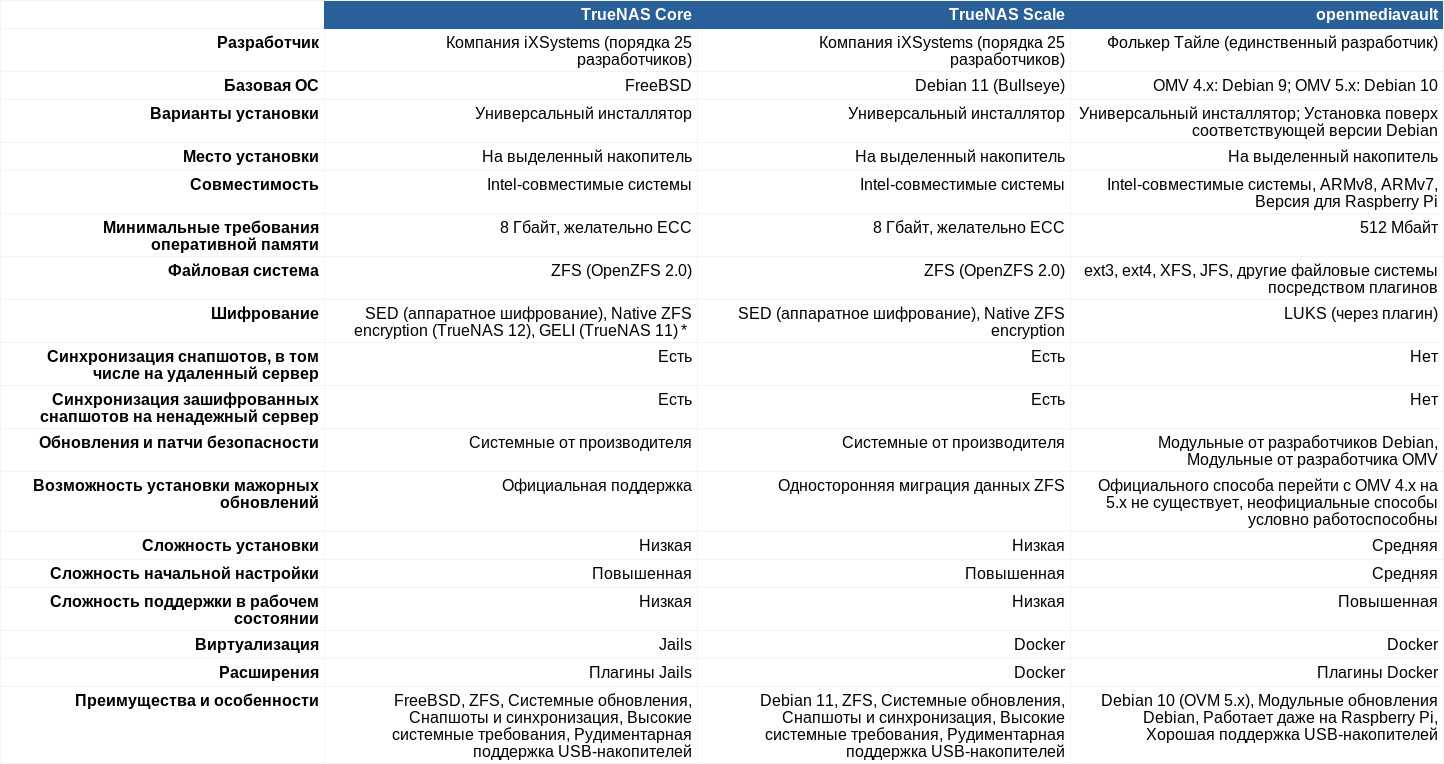
TrueNAS Scale, TrueNAS Core и openmediavault
Еще недавно при настройке нового сетевого хранилища у пользователей самосборных NAS было две основные возможности: FreeNAS и openmediavault. Интересна история этих проектов. FreeNAS был выпущен в 2005 году разработчиком Оливье Кошар‑Лаббе (Olivier Cochard-Labbé), который со временем потерял интерес к проекту. К 2009 году единственным активным разработчиком FreeNAS остался Фолькер Тайле (Volker Theile), предложивший перевести проект на основу Linux вместо использовавшейся на тот момент m0n0wall, основанной, в свою очередь, на embedded FreeBSD. Оливье переводить проект на новые рельсы отказался, и Фолькер покинул FreeNAS, создав новую систему openmediavault на основе Debian Linux. Оливье же передал права на FreeNAS американской компании iXSystems, которая и занимается разработкой и продвижением проекта.
info
Мир тесен: openmediavault разрабатывается и поддерживается бывшим ключевым разработчиком FreeNAS.
Со временем под управлением iXSystems вышла коммерческая версия — TrueNAS. Еще чуть позже ветки бесплатного FreeNAS и коммерческого TrueNAS были объединены, а совсем недавно уже объединенный TrueNAS вновь разделился на два проекта: основанный на FreeBSD TrueNAS Core и TrueNAS Scale, работающий на Debian 11 (Bullseye).
Таким образом, на сегодняшний день выбор стоит между тремя похожими, но очень разными системами: TrueNAS Core, TrueNAS Scale и openmediavault. Для начала приведу таблицу, в которой сравниваются выбранные мной ключевые параметры трех систем.
(* Миграция зашифрованных GELI томов )
А теперь — расшифровка таблицы.
Optional, but recommended — Disable eMMC
Once you’ve made a backup of ADM from the eMMC, you could erase the eMMC drive and install Linux on top of it. But that’s a bad idea, because (a) that eMMC drive is only 8 GB, which means you could run out of space on it pretty easily, and (b) it’s easier to leave that volume in place and just boot from an external USB drive.
So to disable the eMMC drive entirely, for safekeeping:
- Boot into BIOS (hold down F2 during boot)
- Go to Advanced > Intel Advanced Menu > PCH-IO Configuration > SCS Configuration
- Set eMMC 5.1 to ‘Disabled’
- Press F10 to save changes. Confirm, and reboot.
If you reboot, it will likely just enter the UEFI Shell since it is set to boot only off eMMC from the factory. You have to go back into BIOS following the steps in the next section.
Connecting from Ubuntu
Connecting with SSH
On the Ubuntu computer, open a terminal window and type the following command to connect to the TrueNAS CORE computer using SSH. Substitute the name of your user and the IP address of your TrueNAS CORE computer in the command:
ssh dave@192.168.1.22

You can use the network name of the TrueNAS CORE if you prefer:
ssh dave@truenas.local

Once you’ve entered your password you’ll be connected to the TrueNAS CORE computer, in your user’s home directory. The command prompt will remind you you’re in a remote session on the TrueNAS CORE computer. The directory will be empty.
ls

To disconnect, use the command.
exit
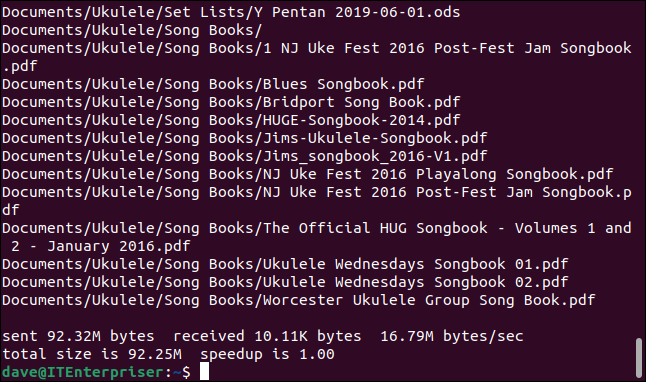
We’ve verified we can connect to the TrueNAS CORE computer via SSH. Let’s use SSH to send some data to the TrueNAS CORE. The file syncing and backup utility uses SSH to transfer files. If you don’t have installed on your computer you can install it with:
sudo apt install rsync

Here’s the command we’re using.
rsync -avh /home/dave/Documents/ dave@192.168.1.22:/mnt/pool1/dataset1/dave-data

You’ll be prompted for the password of the “dave” account on the TrueNAS CORE—not your Ubuntu Linux account password—and then the file transfer takes place.
Connecting via NFS
Because we configured TrueNAS CORE to share the user’s dataset by NFS, we can mount the shared dataset on our Ubuntu computer and access it as though it were a local directory.
If you don’t already use them you’ll need to install the NFS utilities.
sudo apt install nfs-common

Now we’ll create a mount point to mount the remote dataset on.
sudo mkdir /mnt/truenas

Now we’ll mount the remote dataset:
sudo mount -t nfs 192.168.1.22:/mnt/pool1/dataset1/dave-data /mnt/truenas

When you break that command down, it isn’t as bad as it looks.
- sudo: We need root permissions to execute the command.
- mount: The command performs the mount action for us.
- -t nfs: We need to tell that we’re mounting an NFS share. We do this using the (type) flag.
- 192.168.1.22:/mnt/pool1dataset1/dave-data: The location of the NFS network share.
- /mnt/truenas: Where we want the share to be mounted.
of course, you’ll need to use the IP address and dataset name and path that you have set up on your system. Once the NFS share has been mounted you can browse to it just like any other location on your computer.
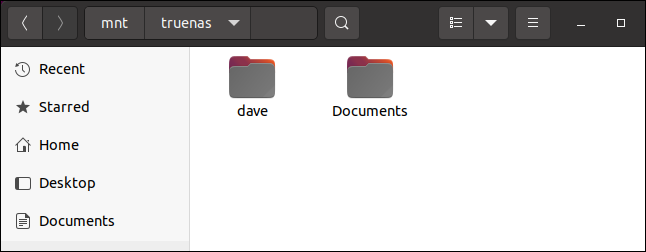
By browsing to the mount location on your Ubuntu computer you’ll see the remote dataset just as though it were a local directory. It contains the home folder of the user “dave” and the files in “Documents” that we copied across earlier using .
If you press “Ctrl+D” in your file browser while you’re in the mounted NFS share, it is added to your file browser list of locations as a bookmark, which is convenient.
This proves we can mount the remote dataset, and that everything is working fine. But you don’t want to have to remember to mount the share each time you use your computer. So let’s automate that.
Automatically Mounting the Shared Dataset
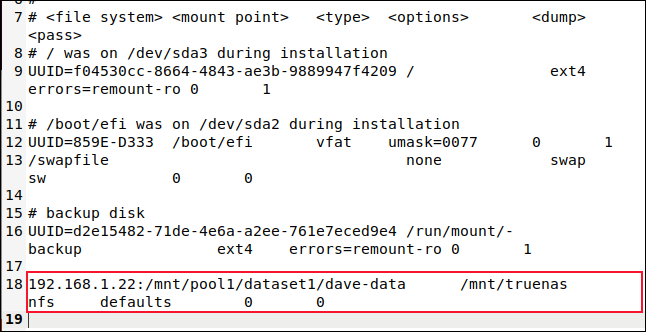
To have the shared dataset mounted automatically at boot time, you need to add a command to the file system table file.
sudo gedit /etc/fstab

The line we need to add at the bottom of the file looks like this. Make sure you use the IP address of your TrueNAS CORE, your shared dataset name, and the name of your mount point.
Also, take care to use the “Tab” key between the different parts of the command—don’t use spaces. Enter the whole command on one line, and hit “Enter” at the end to start a new line.
192.168.1.22:/mnt/pool1/dataset1/dave-data /mnt/truenas nfs defaults 0 0
Although the text has wrapped round in our screenshot, the command is actually all on one line:
Save the file and close the editor. Now, when you reboot your Ubuntu computer, your TrueNAS CORE dataset will be automatically mounted for you.
Basic settings
Under the menu with the eleven options, you should also see the IP address of the TrueNAS machine appear, for example http(s)://192.168.0.128. In principle, you should now also be able to reach this machine on any other network PC. All you have to do is type this IP address into your browser.
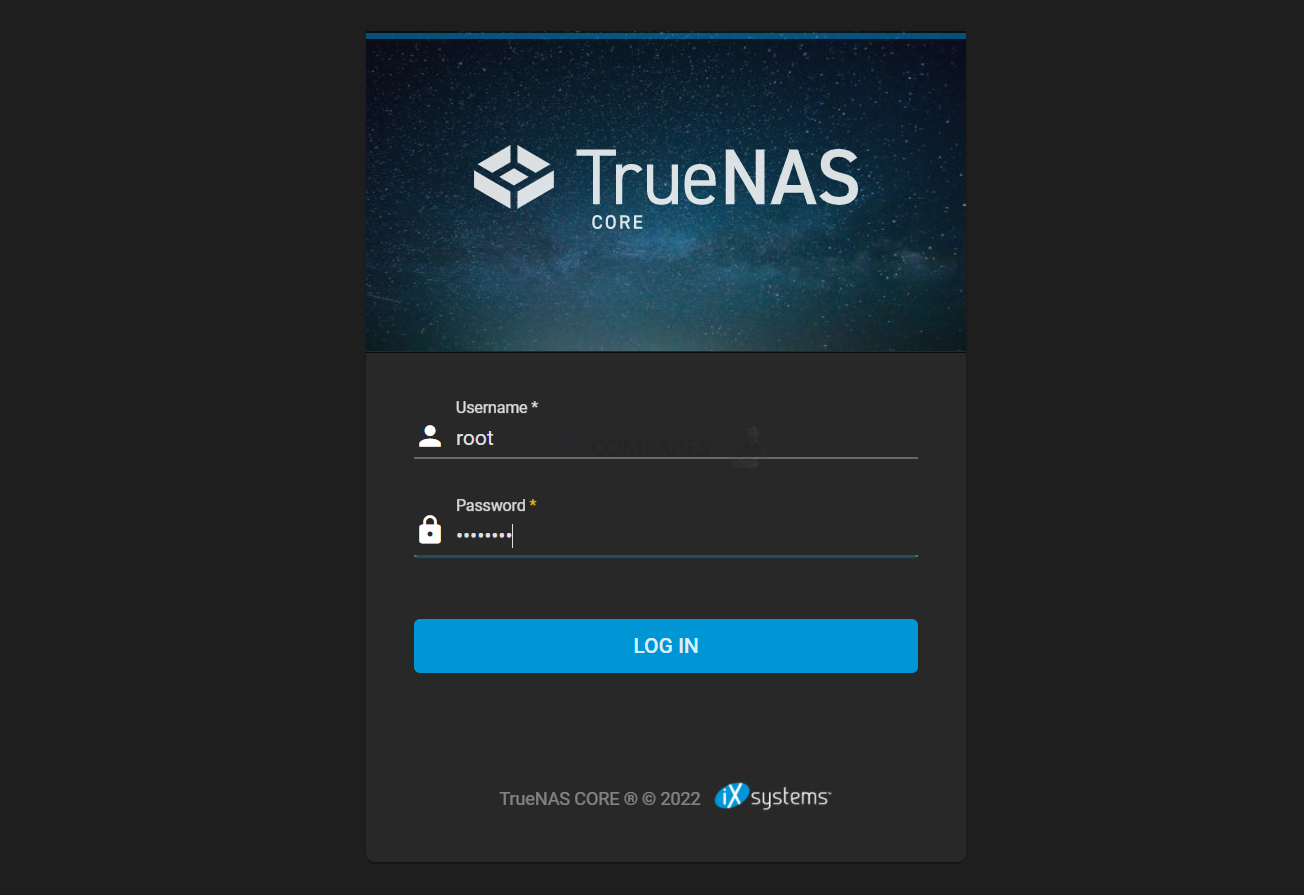
TrueNAS will of course ask you to register first. You do that with root if username and the previously entered password as password. You now land in the Dashboard with the status window of TrueNAS, with an impressive number of headings like . on the left Accounts, System, Tasks, Network, Storage, sharing and so forth. We will return to some of these in the next section. To unsubscribe, click on the top right power and choose your Log Out.
In the dashboard you will also find the button Check for updates at. It is a good idea to try this feature regularly. This can also be done via System / Update.
The interface language is set to English by default, which isn’t too bad, as most TrueNAS forums, tutorials, and how-to videos are also in English. Via System / General you can in principle also set the language to Dutch (nl), but that turned out to have no effect on our system, even after a reboot via Power / Restart / Confirm / Restart.
Take the opportunity to immediately check the time zone to set (on Europe/Amsterdam). Confirm with Save.
The graphical interface of TrueNAS is quite nice and makes management a lot more comfortable.
Для каких целей можно использовать сервер с TrueNAS SCALE
Сервер с TrueNAS используют для решения разных задач. Вот некоторые из возможных сценариев использования:
-
Функция установки приложений в TrueNAS SCALE может быть полезна для системных администраторов и пользователей, которые хотят расширить возможности своей системы хранения данных и управления ими. Она позволяет устанавливать приложения напрямую на сервер TrueNAS SCALE, что расширяет его функциональность и удобство использования. Гибкая система назначения прав пользователей позволяет администратору организовать как доступ к установленным приложениям для всех пользователей, так и для отдельных учетных записей.
-
Хранение данных идеально для больших объемов данных, таких как файлы, базы данных и виртуальные машины. Это полезно тем, кто работает с большим количеством данных и нуждается в надежной и безопасной платформе для их хранения.
-
Резервное копирование подойдет для создания резервных копий данных и обеспечения их сохранности в случае сбоев в работе системы или других проблем. Резервное копирование особенно полезно тем, кто стремится обезопасить данные от любых рисков, например для E-commerce и финансовых компаний.
-
Виртуализация позволяет создавать виртуальные машины и контейнеры и удобно управлять ими. Эта функция может принести пользу всем, кто нуждается в гибкости и масштабируемости своей инфраструктуры, например технологическим стартапам или облачным сервисам.
-
Совместное использование данных идеально для обеспечения совместного доступа к данным между различными устройствами и пользователями, что позволяет обеспечить централизованный доступ к данным и организовать совместную работу над проектами.
-
Облачное хранилище может использоваться для обеспечения доступа к данным из любой точки мира. Этот функционал может принести пользу не только компаниям со штатом сотрудников на удаленке, но и стать удобным решением для хранения личных данных любого человека.
Несколько конфигураций виртуальных серверов, при заказе которых можно выбрать автоматическую установку TrueNAS SCALE:
-
Vm.storage-1000: 2 ядра / 2,4 Ггц / 4 Гб / 2000 Гб
-
Vm.storage-2000: 4 ядра / 2,4 Ггц / 8 Гб / 2000 Гб
Выделенные серверы на 8 и 12 дисков до 160 Tb полезной емкости в ЦОД РФ, Нидерландов и Финляндии.
Оплата рублями с помощью российских банковских карт и платежных систем.
Предоставляем скидку до 12% в зависимости от срока аренды, а также индивидуальные скидки.
Закажите виртуальный или выделенный сервер с быстрой сдачей и TrueNAS SCALE на сайте hostkey.ru.

TrueNAS Core Software on QNAP NAS Hardware – What You Need?
It is worth highlighting that having just a QNAP NAS is not quite enough and in order to get TrueNAS Core up and running on a QNAP NAS requires a few extra checks and use of a few items you might have already in the home/office, or a quick $10 shop online at most. In order to upgrade your system to TrueNAS Core, you will need to consider/have the following:
- A QNAP NAS Drive with (minimum) an Intel 64bit x86 CPU and a minimum 4GB of Memory (recommended 8GB+)
- Download the latest stable release of TrueNAS Core here as a system image (you will be converting this to USB later on) – DOWNLOAD
- Any Data that is currently on the QNAP NAS RAID that is mission critical to be backed up or moved (as it will be completely formatted)
- A USB drive to use as the TrueNAS installation drive ( I recommend THIS ONE here from Sandisk, as it is low price and incredibly small, even at 32GB)
- I recommend not using a USB larger than 32GB, due to the constraints of 1st party software to format larger than this in FAT32. Don’t be tempted to spend like $2 more for a 64GB, as the TrueNAS Core installation will occupy the full USB space (as you will create a system-image-USB) and space is utterly irrelevant when the TrueNAS Core installation is so small
- A Disk Image to USB conversion too. I recommend ‘Rufus’, currently in ver 3.19 and can be run in a portable .exe form that doesn’t require installation – DOWNLOAD
- A basic USB Keyboard (example HERE but really, any will do) and an HDMI Monitor (or simply any device that has an HDMI input – NOT output) such as a TV or Capture card
- Hard Drive and/or SSD media (you should already have these, but just in case) for your storage Pool / RAID
- Optional M.2 NVMe SSD of at least 120GB, but highly recommended – Installing TrueNAS Core is not unlike installing a Windows OS on a new PC, as you are connecting a USB to run the installer, but you need to target a drive in the QNAP NAS to install TrueNAS onto. Whichever drive you use, it will make that drive largely inaccessible for anything but the TrueNAS operating system. Therefore IF you are running a QNAP NAS that has internal m.2 NVMe SSD bays OR one with dedicated 2.5″ SSD bays, I highly recommend getting a low-capacity drive of between 60-120GB (these will be very cheap compared with larger HDDs that start in the Terabyte scales) and then use this for the TrueNAS software. This means that ALL of the main SATA storage bays of the QNAP are then used for your storage pool(s) (aka the RAID). Do NOT install TrueNAS on another USB drive during installation, as this is less stable.
- Optional – Download Advanced IP Scanner HERE, as it is a really useful tool for analyzing your network and finding your new TrueNAS Core NAS for remote access
That is about it. Most of these are devices are that you will almost certainly already have to hand.
Установка TrueNAS
Как говорилось ранее мы рассмотрим несколько типов установки ОС, но для начала нам необходимо скачать образ системы. Для этого выполните следующие действия:
По окончании загрузки файла (*.iso), мы можем приступить к установке TrueNAS.
TrueNAS CORE установка на виртуальную машину
Поскольку TrueNAS построен и предоставляется как .iso файл, он работает на всех решениях виртуальных машин (VMware, VirtualBox, Citrix Hypervisor и т. д.).
Рассмотрим пример установки TrueNAS CORE на программный продукт виртуализации VirtualBox в Windows.
Виртуальная машина будет иметь следующую конфигурацию:
ОПЕРАТИВНАЯ ПАМЯТЬ: 8192 МБ (8 ГБ);
- ДИСКИ: один виртуальный диск 8 ГБ для ОС и загрузочной среды, один дополнительный виртуальный диск с объемом памяти не менее 4 ГБ, который будет использоваться в качестве хранилища данных;
- СЕТЬ: используем мост. Этот режим является оптимальным, поскольку при этом сетевая карта обрабатывается так, как если бы она была подключена к простому коммутатору в существующей сети.
Запускаем VirtualBox и создаем новую виртуальную машину (ВМ):
Укажем объем оперативной памяти.
После этого шага виртуальная машина создана.
Выполним дополнительную настройку виртуальной машины:
Отключим загрузку гибких дисков.
Добавим в оптический привод сохранённый ранее загрузочный образ TrueNAS CORE.
Добавим новый контроллер (SCSI) для виртуального диска под хранилище данных.
Следующим шагом, добавим сам виртуальный диск.
Следующим шагом указываем диск для загрузочных сред.
Следующим шагом устанавливаем пароль для входа в систему root.
После окончания установки TrueNAS выключаем виртуальную машину, чтобы изъять из оптического привода загрузочный образ:
Установка TrueNAS CORE закончена.
TrueNAS CORE установка на физическое оборудование
Установка TrueNAS CORE на физический сервер происходит аналогичным образом, за исключением того, что установочный образ ОС необходимо записать на физическое устройство. Обычно для этого используется компакт-диск или съемное USB-устройство.
Давай рассмотрим пример того, как создать загрузочную USB флешку из установочного образа ОС TrueNas CORE при помощи бесплатной утилиты balenaEtcher.
Для начала скачаем и установим утилиту balenaEtcher.
После запуска выберем ранее скаченный файл (*.iso):
Укажем флешку, на которую будем производить запись.
Загрузочная флэшка готова.
Для начала установки Truenas CORE необходимо перезагрузить компьютер и выбрать загрузку с USB-устройства.
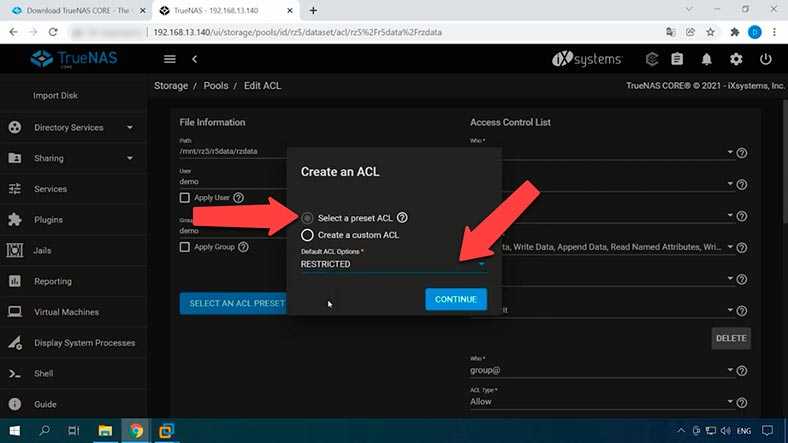
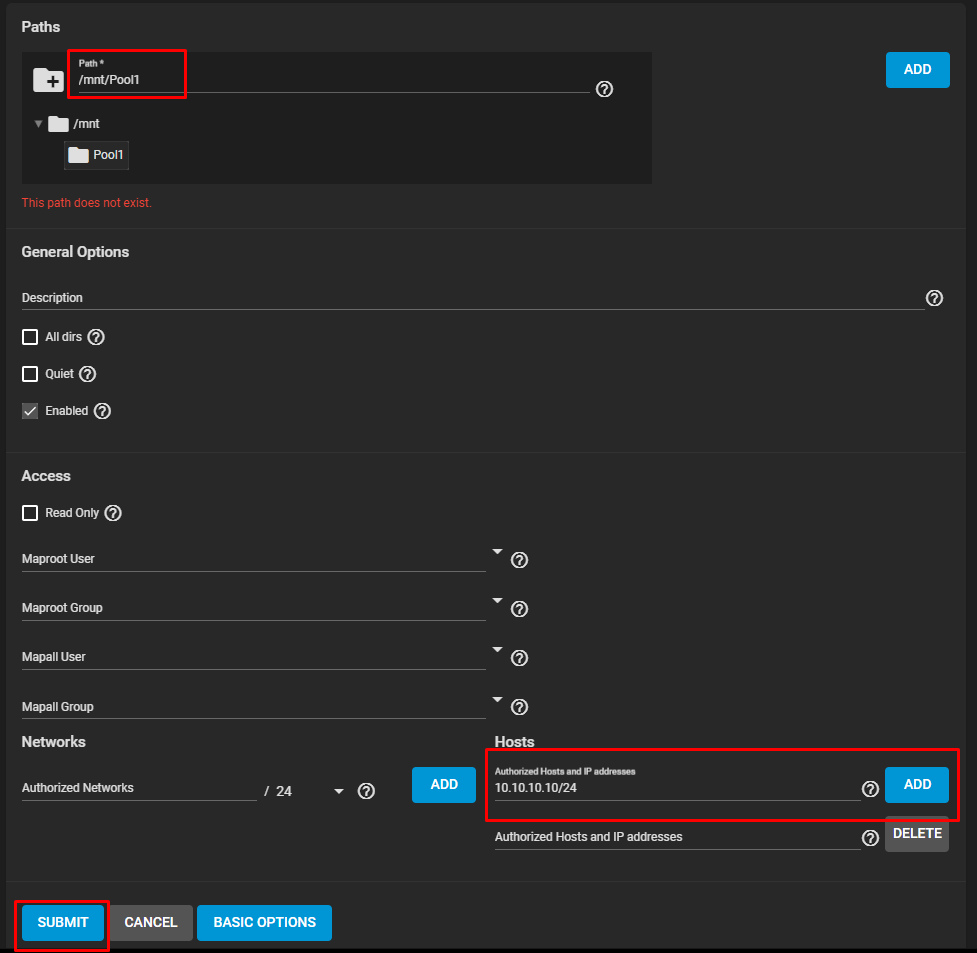
NFS Setup on TrueNAS
NFS share setup on TrueNAS is not very involved. However there are a few gotchas I’ll cover here.
-
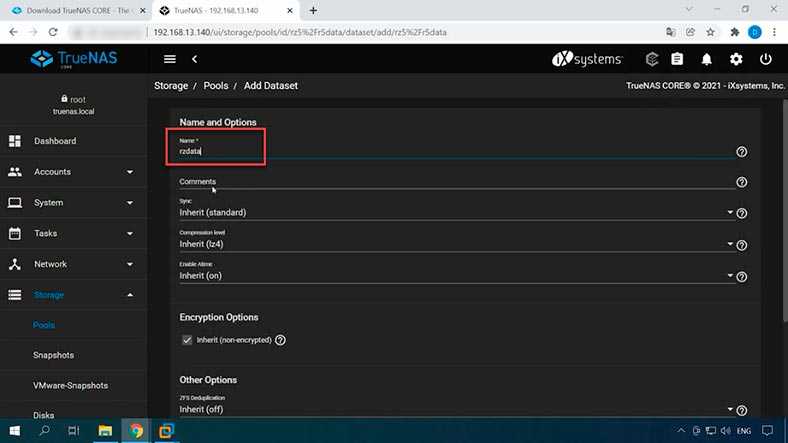
On your storage pool (Storage > Pools) make a new Dataset for the NFS share
-
Name your storage pool, the defaults are likely fine if you’re using lz4 compression on and dedupe off.
- On the new right of the new datastore click the dots and go Edit Permissions.
-
Make sure you tick to enable read/write here.
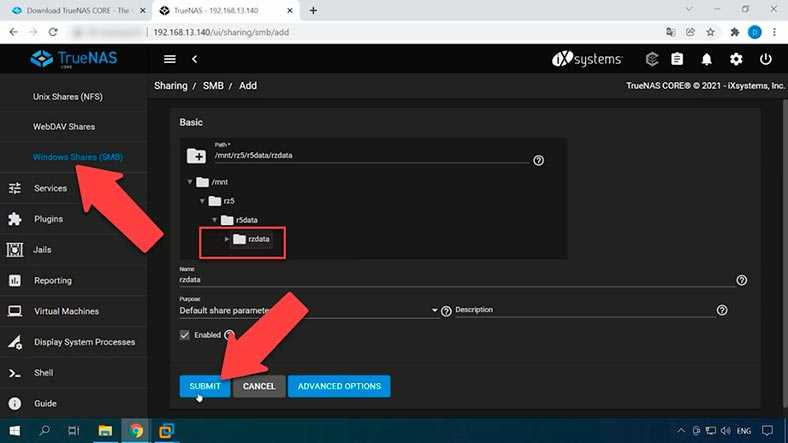
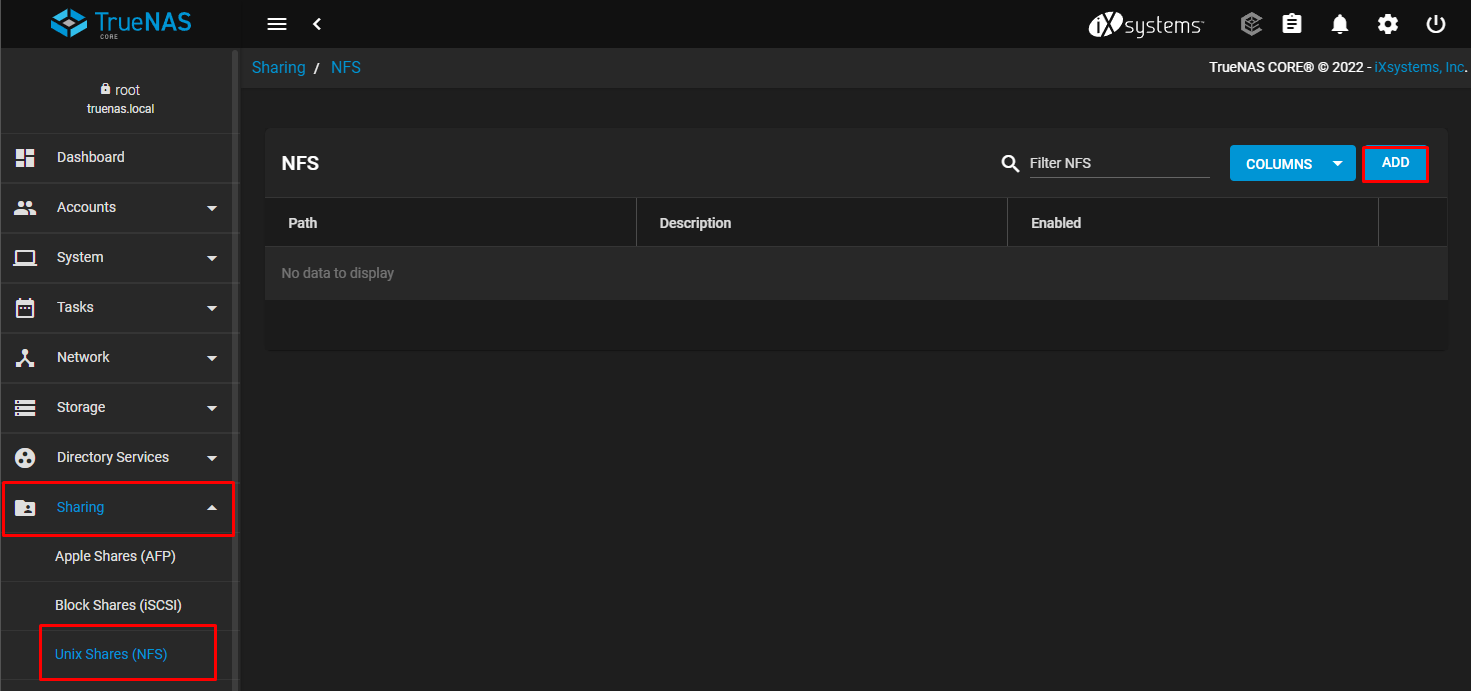
- On the left go to Shares > Unix Shares (NFS) and click ADD.
-
Select the datastore path and give the share a description.
- On the left go to Services and enable NFS. Also tick the box to Start Automatically.
-
Click ADVANCED OPTIONS and make sure you have a subnet allowing access to all network you’ll be using.
-
Click the pencil icon to get NFS options and tick Enable NFSv4.
- Open the Shell and put in this command making sure you are targeting your NFS datastore:
root@truenas# zfs set sync=disabled ssd-test/ssd-nfs-test
This last command will solve the issue of NFS requesting that ZFS sync all data to disk after every write before doing anything else. ZFS will lie to NFS saying “the data is synced!” when it’s still in ram waiting to write. With ZFS this is generally fine and won’t cause data corruption on a power failure. In a theoretical worst case you may lose up to 5 seconds of write data, but no corruption. However, the benefit is drastically improved write performance.
Подготовка к установке TrueNAS Scale
Перед тем, как начать установку TrueNAS Scale, необходимо выполнить несколько подготовительных шагов. В этом разделе мы рассмотрим, как правильно подготовиться к установке операционной системы TrueNAS Scale на вашем сервере.
| Шаг | Описание |
|---|---|
| 1 | Убедитесь в совместимости оборудования |
| 2 | Создайте загрузочное устройство |
| 3 | Настройте BIOS сервера |
| 4 | Подключите необходимые диски |
| 5 | Подготовьте сетевое соединение |
Перед установкой TrueNAS Scale важно убедиться, что ваше оборудование совместимо с данной операционной системой. Проверьте список поддерживаемого оборудования на официальном сайте TrueNAS
Если вы не уверены, обратитесь к документации к вашей системе.
Далее вам нужно создать загрузочное устройство с установочным образом TrueNAS Scale. Для этого вам понадобится флеш-накопитель или другое устройство с достаточной емкостью. Следуйте инструкциям на официальном сайте TrueNAS по созданию загрузочного накопителя.
После создания загрузочного устройства вам необходимо настроить BIOS на вашем сервере. Установите загрузку с созданного накопителя и убедитесь, что все параметры в BIOS установлены правильно для работы с TrueNAS Scale.
Следующий шаг — подключение необходимых дисков. Проверьте, что все диски, которые вы хотите использовать, подключены к серверу и распознаны в BIOS. Убедитесь, что диски пустые или вы готовы потерять данные на них, так как установка TrueNAS Scale будет форматировать диски и удалит все данные с них.
Наконец, подготовьте сетевое соединение. Подключите сервер к сети и убедитесь, что у вас есть доступ к Интернету. Это позволит вам загрузить необходимые пакеты и обновления во время установки TrueNAS Scale.
После выполнения всех этих шагов вы будете готовы к установке TrueNAS Scale на ваш сервер. В следующем разделе мы рассмотрим процесс установки и начальной настройки операционной системы.
Загрузка и установка TrueNAS Scale
Перед началом установки TrueNAS Scale необходимо скачать образ операционной системы с официального сайта TrueNAS. На сайте доступны образы для разных платформ, выберите подходящий для вашей системы.
После загрузки образа вам потребуется записать его на USB-накопитель или DVD-диск. Для записи на USB-накопитель вы можете использовать программу Rufus (для Windows) или dd (для Linux и macOS). Если вы решили записать образ на DVD-диск, вам понадобится программное обеспечение для записи дисков, например, ImgBurn.
После записи образа на носитель, подключите его к компьютеру, на который вы хотите установить TrueNAS Scale. Затем перезагрузите компьютер и выберите загрузку с USB-накопителя или DVD-диска в соответствующем меню загрузки.
После загрузки образа TrueNAS Scale вам будет предложено выбрать язык установки. Выберите нужный язык и нажмите «Далее». Далее следуйте инструкциям установщика, предоставляя необходимую информацию о настройках сети, дисковой системе и пользовательских учетных записях.
После завершения установки TrueNAS Scale перезагрузите компьютер и извлеките USB-накопитель или DVD-диск. Затем введите IP-адрес, который был назначен вашему серверу TrueNAS Scale, в веб-браузере. Вы увидите страницу входа в веб-интерфейс TrueNAS Scale, где сможете управлять своим сервером и настраивать его параметры.
| Шаг | Описание |
|---|---|
| 1 | Скачайте образ операционной системы TrueNAS Scale с официального сайта TrueNAS. |
| 2 | Запишите образ на USB-накопитель или DVD-диск. |
| 3 | Подключите носитель с образом к компьютеру и выберите его в меню загрузки при перезагрузке. |
| 4 | Выберите язык установки и следуйте инструкциям установщика. |
| 5 | Перезагрузите компьютер и извлеките USB-накопитель или DVD-диск. |
| 6 | Введите IP-адрес сервера в веб-браузере и войдите в веб-интерфейс TrueNAS Scale. |
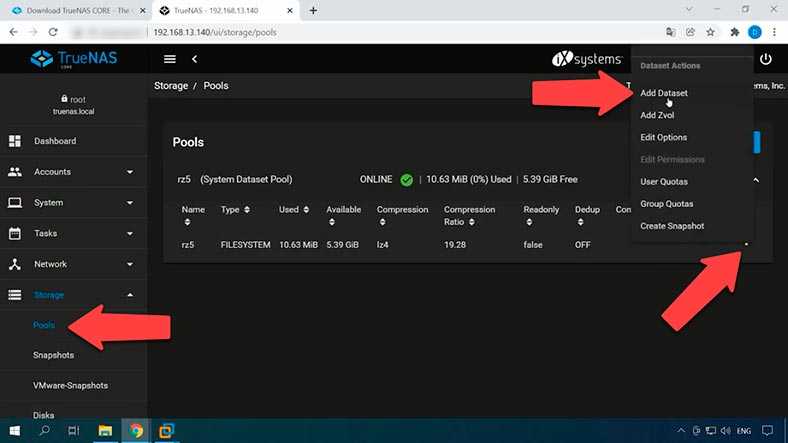
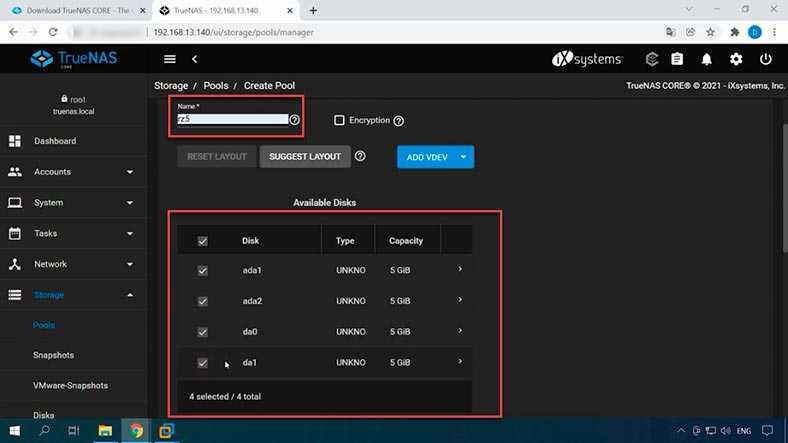
Storage area
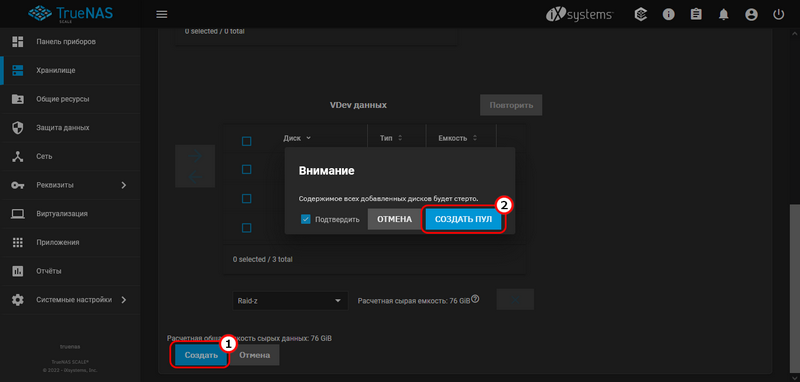
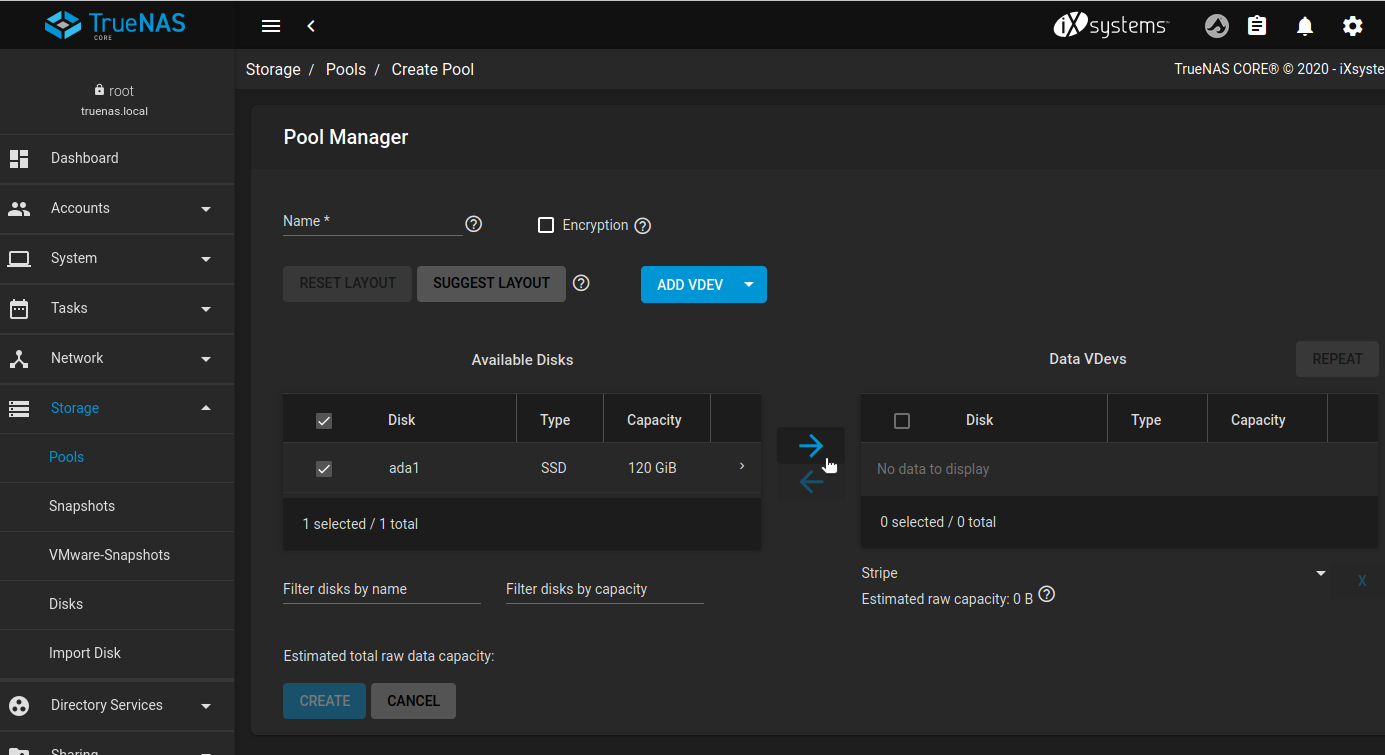
You still have (at least) one other disk in your system for your data, but unfortunately this storage space is not just usable. So open the section first Storage and choose Polish (volume). Then click Add / Create pool. Enter a name for your volume, preferably all lowercase. Leave the option encryption undisturbed, unless you know what the consequences are – on www.tiny.cc/encdoc read more about it here. In addition, place a check mark next to the medium that you want to use as data storage space and move it with the blue arrow button to Dates VDevs.
This selection process can also be somewhat ‘automated’ via the button Suggested layout. TrueNAS then tries to come up with an optimal layout for your storage space. This is especially useful if you want to use multiple physical drives for your storage. The use of multiple disks is safe: the built-in RAID function can then store your data redundantly, so that it can possibly survive a disk crash.
If you only have one disk, the message may appear that a ‘stripe data vdev’ is not the most appropriate solution. But life goes on and so you choose successively Force / Confirm / Continue / Create / Confirm / Create pool. The affected media will now be formatted to receive your data.


In our next episode you can read how to put your new software NAS into use.
You can also create a ‘pool’ with one disk, but that is not really optimal with a view to security.
What is TrueNAS?
TrueNAS is a free and open-source network-attached storage (NAS) operating system deveoped by iXsystems. It is based on FreeBSD and Linux and uses the OpenZFS file system. It can run on almost all X86-based hardware.
TrueNAS has several editions and includes TrueNAS CORE (previously known as FreeNAS), TrueNAS Enterprise (commercial edition), and TrueNAS SCALE (Linux edition). You can visit this link to learn more about the differences between them.
TrueNAS supports clients running multiple operating systems such as Windows, macOS and Linux. It also ofers various virtualization hosts such as XenServer and VMware using the SMB, AFP, NFS, iSCSI, SSH, rsync and FTP/TFTP protocols. It also includes advanced features such as full-disk encryption and a plug-in architecture for third-party software.

Setting up iSCSI share on clustered pools
As with NFS and SMB shares, TrueNAS uses a local configuration to save
details of iSCSI shares created for a pool, and thus any new iSCSI share
created requires it’s config to be duplicated on
each node in the cluster.
For example, in a cluster with two nodes, and ,
to create an iSCSI share:
-
On , start the service you want to create iSCSI shares on.
-
Navigate to and create a Zvol; in this example
we have created a 1GB zvol called using default options. -
Navigate to and create an iSCSI
share using the wizard: -
In step 2 (Portal), make sure the IP address entered
is 0.0.0.0 (this is so it can be accessed using the cluster
VIP that moves with the service in the event of a failover). -
If desired, provide initiators/authorized networks
in the next step (in this example
it’s been left blank so any client/network
can connect to the target): -
Finally confirm the iSCSI target creation by clicking :
-
Now move the service over to , and re-create
the iSCSI share using the same perameters as used on -
Your iSCSI share should now be discoverable via the VIP (in this
example the service VIP is ):
-
Startup/running performance can also be improved by using
SSD or NVMe disks as the boot drive(s). -
Because if this service is unavailable when the cluster tries to
resolve the hostname then service startup cannot continue in a
normal fashion. -
If any drives in a clustered pool are local to a node, i.e. do not
reside in the shared storage, then this will result in a failure to
import on any other cluster node as that local drive will be
inaccessible. For this reason it is mandatory that all cluster drives
reside in shared storage. -
Use the GUI menu item to access the cli.
-
If the pool is imported on say then the URL is
. -
TrueNAS uses the default global IQN of
suffixed with the name of the share.
NAS — зачем он нужен
Первое, с чем стоит определиться, это какие задачи будет решать NAS. Основные его функции:
- Снятие нагрузки с рабочего компьютера. Часть клиентов можно перенести на NAS. В случае с торрентами можно забыть про тонкие настройки скорости, кэширования, соединения.
- Медиа-сервер. Отличная возможность обзавестись домашней библиотекой и делиться медиаконтентом по домашней сети. Смотрите фильмы с того момента, где остановились в последний раз, независимо от устройства. Транскодирование потребляет ресурсы процессора. Даже если дома гигабитная сеть, а скорость внешней сети достигает 500 Мбит/с, это не гарантирует корректной работы медиа-сервера, если процессор занят другими задачами. Для примера, возьмем один из самых популярных медиа-серверов PLEX. Системные требования — 2 ГБ оперативной памяти и процессор не медленнее Intel Core i3.
- Резервное копирование. Наверное, самая важная операция в NAS. Человек существо ленивое. Никто не хочет на каждодневной основе доставать с полки внешний накопитель данных и переносить на него файлы, которые скопились за сутки. Гораздо лучше осуществлять операции резервного копирования в автоматическом режиме задачей в планировщике или отдельным программным обеспечением. Еще лучше, когда резервное хранилище состоит из нескольких дисковых устройств и управляется RAID-контроллером.
- Раздача файлов. Общее рабочее пространство.
Есть два вида RAID-контроллеров — аппаратный и программный. У каждого из видов есть свои преимущества и недостатки. Хороший аппаратный RAID обойдется недешево. Программный RAID будет работать медленнее. RAID-контроллер с материнской платы (аппаратный) способен выйти из строя, и никакой другой контроллер данные больше не прочитает. Для low-end систем достаточно использовать программный RAID.
В данном случае low-end является определяющим фактором. Строим NAS на обычном компьютере, т. е. предполагается использование типов памяти DDR3-DDR4 без поддержки ECC. Если планируется использовать NAS под задачи, связанные с бизнесом, то стоит пересмотреть свой подход и озадачиться вопросом приобретения буферизированной памяти.
Программная часть строится на *nix/GNU/Linux операционных системах. Есть масса сборок для реализации NAS, которые позволяют избежать избыточности. У каждой есть свои плюсы, но и еще не создан такой продукт, на который бы никто не жаловался. Под наш список основных задач подойдет любая ОС для NAS.
Список популярных операционных систем для NAS:
Xpenology (сборка от производителя NAS — Synology)