
Microsoft Robocopy: знакомство с инструментом
Что такое Microsoft Robocopy?
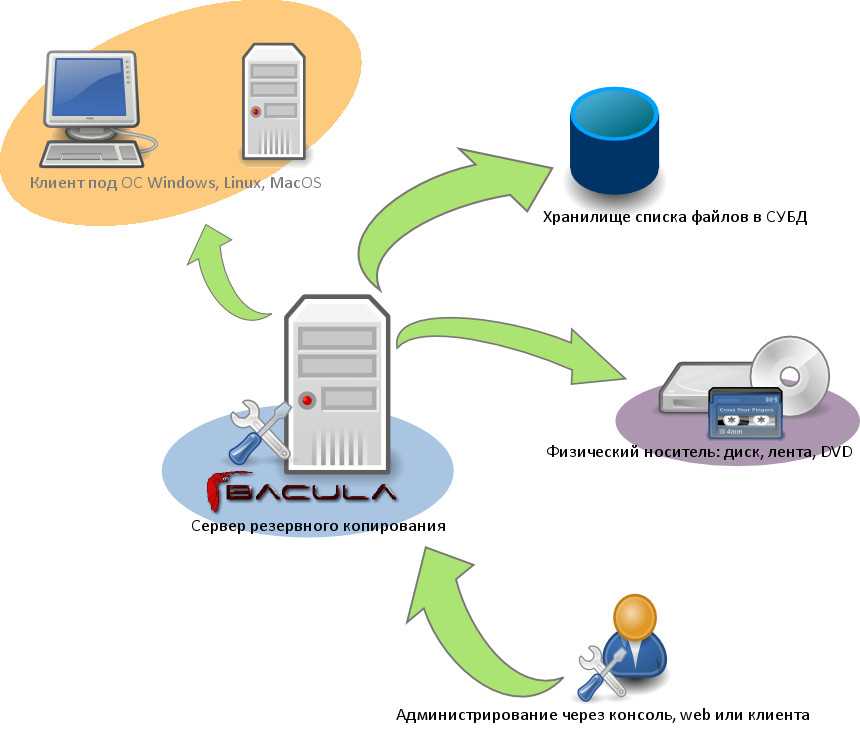
Microsoft Robocopy — это инструмент командной строки для копирования файлов и папок на компьютерах под управлением операционной системы Windows. Этот инструмент предоставляет пользователю множество возможностей для управления файлами и папками с помощью команд. Microsoft Robocopy может быть установлен отдельно на компьютер и входит в состав Windows Server 2003 Resource Kit.
Особенности Microsoft Robocopy
Среди основных особенностей Microsoft Robocopy можно выделить следующие:
- Поддержка копирования больших файлов
- Возможность восстановления копирования при обрыве связи или ошибке
- Возможность настройки скорости копирования
- Настраиваемый уровень логирования
- Поддержка многоязычности
С помощью Microsoft Robocopy вы можете выполнять копирование файлов и папок путем копирования или перемещения. Вы также можете указать, каким образом должно выполняться копирование, кто должен иметь доступ к скопированным файлам и многое другое.
Применение Microsoft Robocopy
Microsoft Robocopy может быть использован в различных сценариях, например, для создания резервных копий файлов и папок, для миграции данных на новый сервер, для автоматического копирования файлов на удаленный сервер и т.д. Благодаря гибкой настройке и возможности автоматического выполнения копирования Microsoft Robocopy может значительно упростить работу с файлами и папками на компьютере.
Таким образом, Microsoft Robocopy является мощным и удобным инструментом для копирования и управления файлами и папками в Windows.
Introduction
is a powerful tool included in the Microsoft Windows Server that is used to perform more advanced file replication tasks. The biggest benefit you’ll find is the ability to create full mirror duplicates of two file structures (including all subdirectories and files, if you choose). also allows you to preserve all of the associated file information, including date and time stamps, security access control lists (ACLs) and more which is missing from normal file copy operations.
For people who like to work with command line, RoboCopy.exe tool as it is comes with package is great enough for them. However, for those who are comfortable to work with GUI, here it is , a simple and intuitive GUI tool to command.
This tool is developed using Cinchoo — An application framework for .NET. It is another working example of using some of the key features of Cinchoo framework.
Robocopy vs XCopy for Copying Recordsdata
Earlier than Robocopy, Microsoft supplied XCopy for copying/transferring information over the community. As Robocopy is an enchancment of XCopy, and Microsoft retains updating it, it’s the higher of the 2.
How is it higher? As a result of the Robocopy command-line has many options that XCopy doesn’t have.
- Robocopy makes use of mirroring whereas XCopy doesn’t. This allows Robocopy to sync/replace information with out copying all of the information each time.
- Robocopy has automation settings whereas XCopy doesn’t have them. With automation, you’ll be able to schedule the copying course of.
- It’s also possible to discover monitoring help for Robocopy. This implies, if the monitoring command is used, it is going to monitor information for modifications and replace them when they’re modified. XCopy lacks this function.
Ошибки работы Robocopy
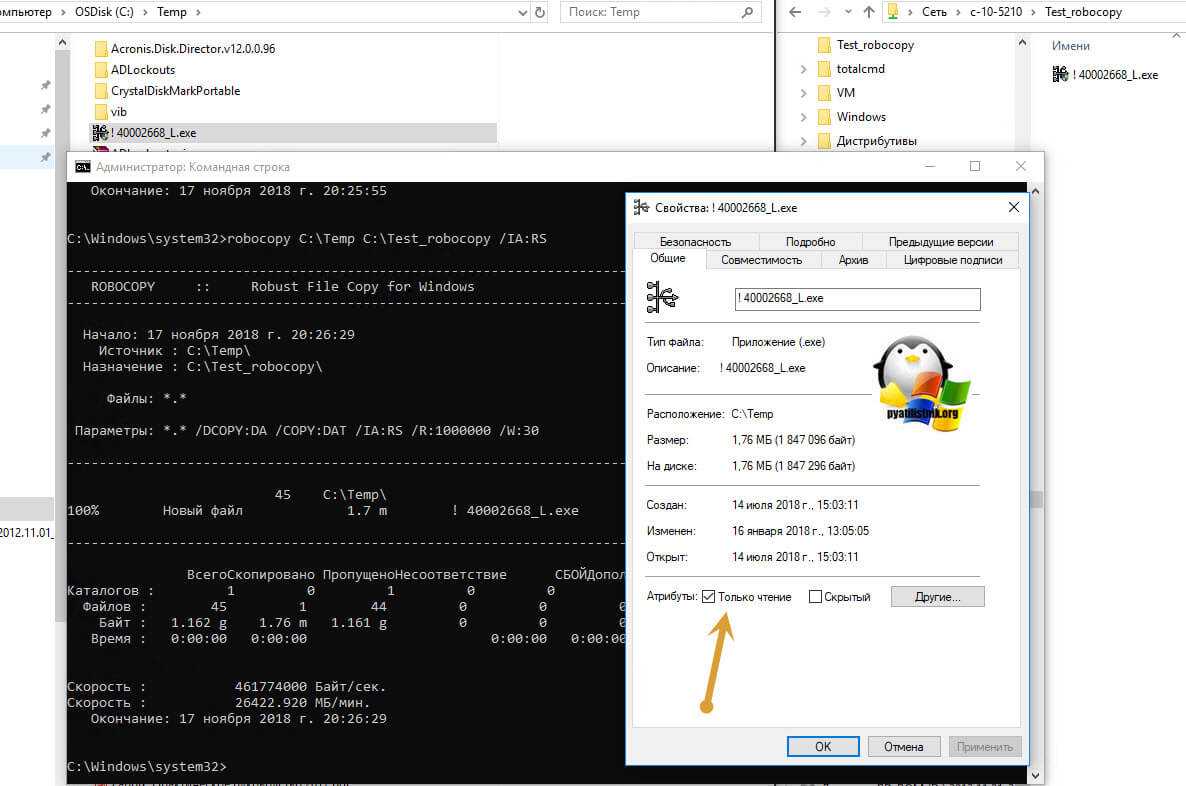
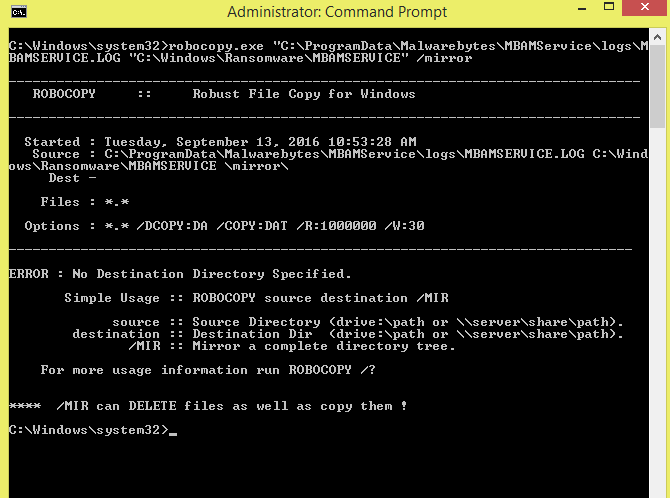
У этой утилиты, конечно, могут быть проблемы, но очень часто они несущественны и решаются очень просто, например, вы можете столкнуться с ошибкой «ОШИБКА 5 (0x00000005) Копирование настроек безопасности NTFS в целевой файл» . Эта ошибка говорит о том, что у вас недостаточно прав для передачи параметров и прав файлам, дело в том, что ваша консоль cmd работает в режиме администратора.
Таблица кодов ошибок, которые появляются в Robocopy
Вот подробная сводная таблица, отражающая все коды ошибок 0-8 в этой утилите и предоставляющая подробное описание проблемы. (Подробнее на https://support.microsoft.com/en-us/help/954404/return-codes-that-are-used-by-the-robocopy-utility-in-windows-server-2)
How to construct the command line in Robocopy
The basic command line syntax for Robocopy is similar to the syntax used for the familiar Xcopy command line application popular in DOS, so many years ago. The basic Robocopy command line will follow this general pattern:
Table A: A sample of Robocopy command line copy options
| Option | Description |
| /s | Copies subdirectories. Note that this option excludes empty directories. |
| /e | Copies subdirectories. Note that this option includes empty directories. |
| /b | Copies files in Backup mode. |
| /efsraw | Copies all encrypted files in EFS RAW mode. |
| /copy: | Specifies the file properties to be copied. The following are the valid values for this option:
· D Data · A Attributes · T Time stamps · S NTFS access control list (ACL) · Owner information · U Auditing information The default value for CopyFlags is DAT (data, attributes, and time stamps). |
| /purge | Deletes destination files and directories that no longer exist in the source. |
| /mov | Moves files and deletes them from the source after they are copied. |
Source: Microsoft Docs
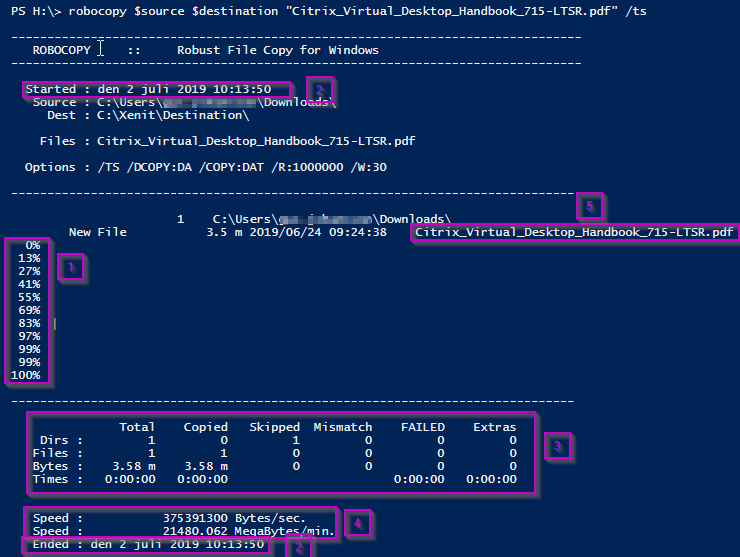
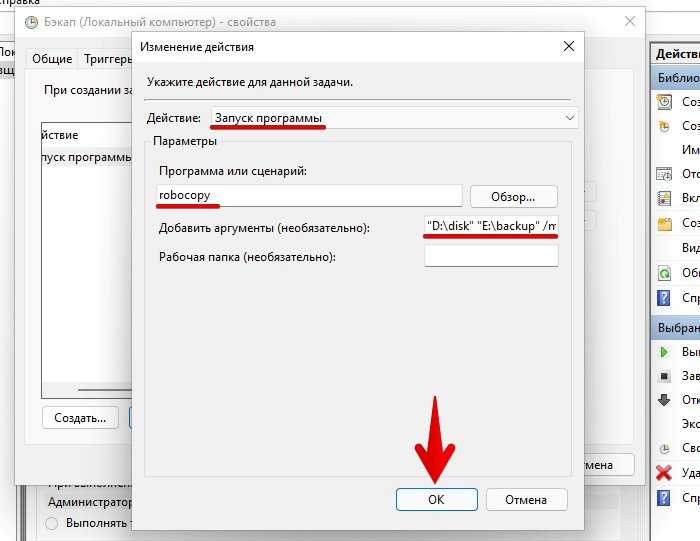
For my example, I’m going to back up the data file contents of my user profile folder, C:UsersGreg Shultz, to a folder named TheBackup on an external hard disk, which is assigned drive letter F. (You’ll of course substitute the names and paths with your own.) My basic command begins with:
Now, I want to back up every folder in the source, even any empty folders, as they may be placeholders for future data. I also don’t want to have files on the backup that I deleted from my hard disk. While I could use the /S and /PURGE switches to accomplish my goal, the /MIR switch lets me accomplish both tasks with one switch. My command is now:
The C:UsersGreg Shultz folder contains several hidden system files and folders I don’t want or need to back up under my Robocopy operation–they are picked up by the other backup tools. For example, I don’t need to back up the NTUSER.DAT file, nor do I need to back up the contents of the AppData folder. In addition, the C:UsersGreg Shultz folder contains a host of junction points I don’t need to back up. Windows 10 uses junction points to link various operating system folders to the user profile folder. For example, the Cookies folder and the SendTo folder are linked to the user profile folder via junction points.
I’ll use the /XA:SH switch to exclude the hidden system files, and I can use /XD AppData to exclude the entire AppData folder. I’ll then use the /XJD switch to exclude all the junction points. My command is now:
One of Robocopy’s most handy features comes into play when it encounters a file that is in use. When it does, Robocopy will stop and wait for that file to be closed so that it can continue with the copy operation. It will retry to copy the file every 30 seconds. The default number of retries is 1 million (no joke!). As this will most likely prevent the backup operation from ever completing, you should reset it to a reasonable number.
To change the number of retries, you’ll use the /R switch. To change the wait time between retries, you’ll use the /W switch. I chose five retries with a 15-second wait time. That way, after a reasonable number of retries and wait period, Robocopy will move on. My command is now:
At this point, I am ready to add the multi-threaded switch, which enables Robocopy to perform a multi-threaded copy option. More specifically, with multi-threaded capabilities, Robocopy can simultaneously copy multiple files in parallel, which will result in very fast backup operations.
The multi-threaded switch is: /MT, where n is a number from 1 to 128 and indicates the number of threads to be used. Keep in mind that n is optional and that by default, the /MT switch will use eight threads. I’m using 32 threads in my example, as I found it to be a good starting point. My command is now:
Like all command-line tools, Robocopy keeps you apprised of the status of operation right in the Command Prompt window. However, you’ll probably want to customize and record that feedback in a log file. I like to have the whole picture, so I’ll use the /V switch. However, I really don’t need to know the percentage progress of each file copy, so I’ll also use the /NP switch. Then to create my log file, I’ll use the /LOG switch, which will overwrite the existing log file each time. Now, my command is:
SEE: Windows 10 power tips: Secret shortcuts to your favorite settings (TechRepublic Premium)
Robocopy Switches
Robocopy is loaded with options and switches to copy/move files as you want. A few popular Robocopy switches are listed below:
| Switch | Meaning |
|---|---|
| \S | Copy subfolders excluding empty ones |
| \E | Copy subfolders including empty folders |
| \B | Copy files in backup mode |
| \COPY: | Copy the attributes of the file including date and time stamp and security information |
| \COPYALL | Copy all file information |
| \NOCOPY | Don’t copy any file information |
| \MIR | Mirror a folder and its subfolders |
| \MOV | Move files and then delete them from the source folder |
| \MOVE | Move files and folders and delete them from the source |
| \MT | Perform multithreading. The number of threads to run should be specified in place of . For example: \MT . If it’s not mentioned, the default value of 8 is used. You can use from 1 to 128. |
To find the full list of options and switches, perform these steps:
- Click Start, type cmd, and click ‘Run as administrator’.
- Go to Robocopy help by typing robocopy /? and view the Robocopy switches list.
You can find more Robocopy examples on Microsoft’s site.
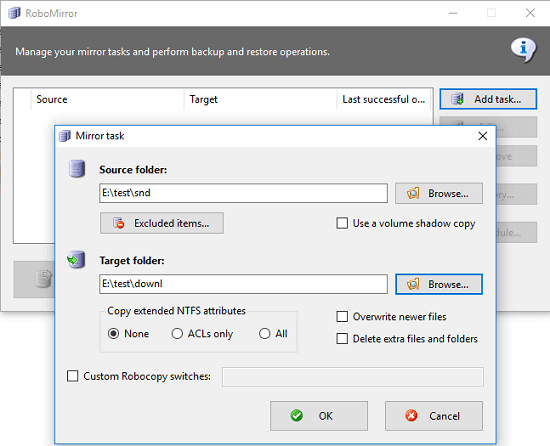
RoboMirror
RoboMirror надає хороший, чистий графічний інтерфейс, який дозволяє визначати завдання резервного копіювання, які можна запускати безпосередньо або розкладати на більш пізній час. Також можна легко відновити резервну копію.
Виберіть початкові та цільові папки та вкажіть, які розширені атрибути NTFS для копіювання, якщо такі є. Ви також можете видалити файли та папки в цільовій папці, які не існують у вихідній теці. Це дає точну копію вихідної папки.
RoboMirror також дозволяє створювати тіньову копію обсягу вихідного тома під час резервного копіювання. Це дозволяє створювати резервні копії файлів, заблокованих запущеними процесами.
ПРИМІТКА. Функція копіювання тіней доступна лише у Windows Vista та пізніших версіях.
Якщо у вихідній папці є файли або підпапки, які не потрібно створювати, можна виключити ці елементи. Також можна виключити файли на основі їх атрибутів.
RoboMirror дозволяє планувати резервне копіювання щодня, щотижня або щомісяця.
Під час резервного копіювання очікувані зміни відображаються перед початком процесу резервного копіювання. Це дозволяє припинити процес і внести зміни в налаштування завдання, якщо це необхідно.
Ви також можете переглянути історію резервних копій, виконаних для кожного завдання у вашому списку.
What is the Robocopy Copy Command?
Robocopy is a command-line tool for copying/moving files over the network and on the same computer. Microsoft kept it as a third-party tool till Windows XP. However, from Windows Vista, Robocopy became a Windows feature.
Some would ask: Who needs a specialized copying command or tool when you have the traditional copy-paste tool available on Windows?
The general copying option on Windows is good enough for small jobs like copying a file from one folder to another or from one computer to another, but it lacks the advanced options you need to take full control of the copying/moving tasks.
- With Robocopy you can copy files over a network without worrying about network disruptions because it can automatically resume from the same file when the connection establishes again.
- Robocopy lets you copy the attributes of the files and folders like date and time stamps, security information (permissions, auditing, owners), and others.
- It can update folders in the destination folder from the source folder by skipping the already copied files and updating only those that are modified.
- It also lets you use multithreading where it transfers multiple files at the same time for speeding up the copying job.
Где скачать утилиту Windows Robocopy
Начиная с Windows 7 эта программа является ее неотъемлемой частью, и я уже показал выше, что она находится в папке C: \ Windows \ System32, если по какой-то причине у вас в ней нет файла robocopy.exe, то у вас есть несколько вариантов его загрузки.
Или вы можете скачать у меня инструменты Windows Server 2003 Resource Kit
Далее полученный файл robocopy нужно распаковать этот файл, для этого нужно иметь архив winrar или 7-zip. Правой кнопкой извлекаем содержимое.
Затем распакуйте msi-пакет rktools.msi с помощью 7-Zip.
Зайдите в папку rktools, там вас будет ждать файл robocopy.exe, который вы можете скачать где угодно.
RoboMirror
RoboMirror is a simple software that you can use as a RoboCopy GUI to mirror folders in Windows. Here it lets you create different mirroring tasks and then you can run them whenever you want. It offers a simple interface where you can create multiple mirroring tasks and then run them. In mirroring task, it lets you specify a source directory, destination directory, and additional command switches. However, here it doesn’t show you list of “robocopy” command switches. You will have to manually specify the switches and save the task.
Just get this software and start using it. It is a portable software so run it and then create a task in it. After creating a task, simply specify the parameters that it asks you to specify. After that, if you know the supported switches for the robocopy then specify that and save the task. Also, you can opt for other options as well like deleting existing files, extract files, etc.
How does Robocopy monitor the source directory tree?
As a minimum, Robocopy monitors the source directory tree for changes to file and directory names, sizes, and last write times. If attributes are to be copied Robocopy will also monitor the tree for attribute changes. Similarly, if security information is to be copied, Robocopy will also monitor the tree for security changes.
How does Robocopy work when the monitoring is specified?
When Monitoring is specified, Robocopy never terminates. Instead, it enters a loop that performs a normal Robocopy pass and then monitors the source directory tree for changes, until both n changes have been detected and m minutes have elapsed.
How to add graphical user interface ( GUI ) to Robocopy?
RoboMirror allows for easy synchronization of two directory trees, you can perform a robust incremental backup, and it also supports volume shadow copies. In order to add Graphical User Interface (GUI) to the Robocopy command-line tool using RoboMirror, first of all, you need to download RoboMirror.
What makes RoboCop different from other script generators?
RoboCop RoboCopy is a GUI skin and script generator for Robocopy.exe (Win NT Resource Kit). RoboCop RoboCopy is unlike any other robocopy script generator available. What makes this one different? Well in a nut shell the ability to monitor the progress of the robocopy job.
https://youtube.com/watch?v=3Nd6GGljyVw
9 ответов 9
Это зависит от ограничивающего фактора, не так ли? Если узким местом является служебная программа, то, конечно, запуск более одной копии или использование большего количества потоков ускорит работу. Если ограничивающим фактором является сеть, то добавление нескольких экземпляров утилиты не поможет, поскольку вы все равно застрянете, перемещая не более X байтов в секунду. На самом деле это может повредить, потому что у вас есть дополнительные накладные расходы на вторую копию приложения. То же самое с disk-IO. Вы можете копировать только так быстро, как любая машина может читать и записывать на диск. Если он уже исчерпан, добавление копий не поможет.
Что вам нужно сделать, так это проверить, что является узким местом, и двигаться дальше.
Как многопоточность не поможет:
Несколько потоков, одновременно читающих с диска клиента или одновременно отправляющих данные по сети, совершенно не помогут, так как, скорее всего, существует только один путь связи между клиентом и сервером, клиент, скорее всего, читает файлы с один жесткий диск, и файлы, скорее всего, записываются на один жесткий диск на сервере. (Даже если на сервере есть RAID, разница будет, но не большая.) Наоборот, как уже отмечалось, производительность, вероятно, ухудшится, потому что будет постоянный поиск между файлами, которые читаются в параллельно на клиенте и постоянный поиск между файлами, которые параллельно пишутся на сервере. Кроме того, файлы могут оказаться сильно фрагментированными на сервере.
Как поможет многопоточность:
Однако многопоточность может помочь по-другому: имея всего два потока на клиенте, файловый ввод-вывод может быть десинхронизирован с сетевым вводом-выводом. Это означает, что клиент может одновременно передавать фрагмент файла и одновременно читать следующий фрагмент со своего диска. (Сервер уже способен одновременно записывать фрагмент файла на диск и получать следующий фрагмент из сети.) Это значительно ускорит процесс передачи, поскольку клиент, как правило, сохраняет либо сетевой канал, либо диск. канал (в зависимости от того, что медленнее) насыщен, вместо доступа к каждому за раз, с перерывами. Я полагаю, что каждая специализированная утилита копирования файлов должна быть достаточно умной, чтобы делать это, но я могу ошибаться, поэтому, если «Robocopy» рекламирует, что они делают многопоточное копирование, это нормально, продолжайте.
EDIT: я исправил часть, которую я написал о RAID.
EDIT: я исправил часть о необходимости двух потоков на сервере.
Думаю, самое главное здесь (как и почти везде) — это измерение. У вас нет никакого контроля над тем, как работают эти утилиты, поэтому вы узнаете, делаете ли вы это максимально быстро, только если измерите пропускную способность, чтобы увидеть, близка ли она к объявленной пропускной способности вашего диска или сети (в зависимости от того, что меньше). .)
Robocopy позволяет передавать файлы несколькими потоками. Но означает ли большее количество потоков более быструю передачу?
В моем предыдущем тесте я показал, что копирование/передача файлов с параметром /MT в целом выполняется быстрее, чем без использования этого параметра.
Это ставит нас перед вопросом: сколько потоков нам нужно? А значит больше потоков = больше мощности? Давайте узнаем.
Основные возможности Robocopy
Кроме обычного копирования файлов и папок из папки источника в каталог назначения, в Robocopy есть множество очень полезных функций:
- Устойчивость к обрывам сети (robocopy может продолжить копирования после восстановления сетевого доступа);
- Корректное копирование файлов с их атрибутами и NTFS правами доступа;
- Копирование с сохранением исходной временной метки;
- Возможность копирования файлов и директорий, запрещенных для доступа даже администратору, с помощью ключа /B (ключ позволяет игнорировать проверку прав доступа, ключ доступен только для участников группы Администраторы или Операторы архива);
- Возможность задать количество попыток копирования файла, если файл недоступен;
- Режим полного зеркалирования директорий;
- Пропуск уже существующих файлов (с одинаковым размером или временной меткой timestamp);
- Индикатор прогресса копирования;
- Корректная работа с длинными путями (более 260 символов);
- Эффективные алгоритмы и многопоточность позволяют выполнять копирование файлов намного быстрее, чем обычное копирование средствами Windows;
- Поддержка коды возврата (что позволяет использовать robocopy в различных внешних скриптах и утилитах).
Официальной графической версии robocopy (c GUI) от Microsoft нет. Существуют пользовательские версии, но их поддержка прекращена. Список неофициальных GUI для robocopy (это сторонние программы):
- EazyCopy
- RoboMirror
- RichCopy
Copy directory structure
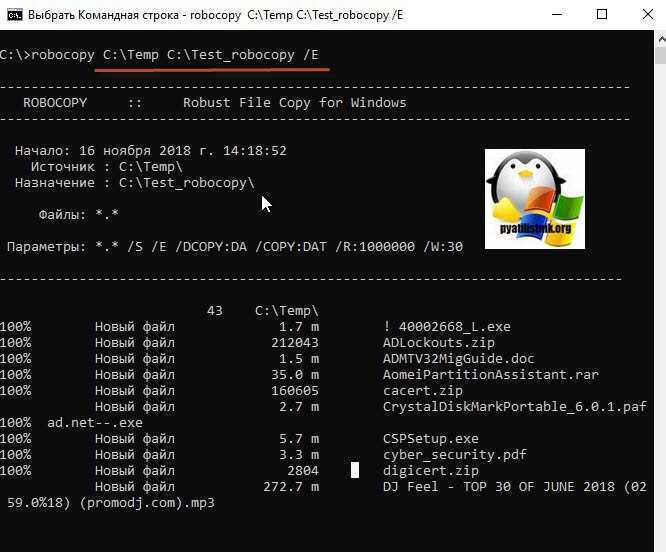
Run the below Robocopy command to copy directory structure i.e deep copy of folder hierarchy and the data in all the subfolders.
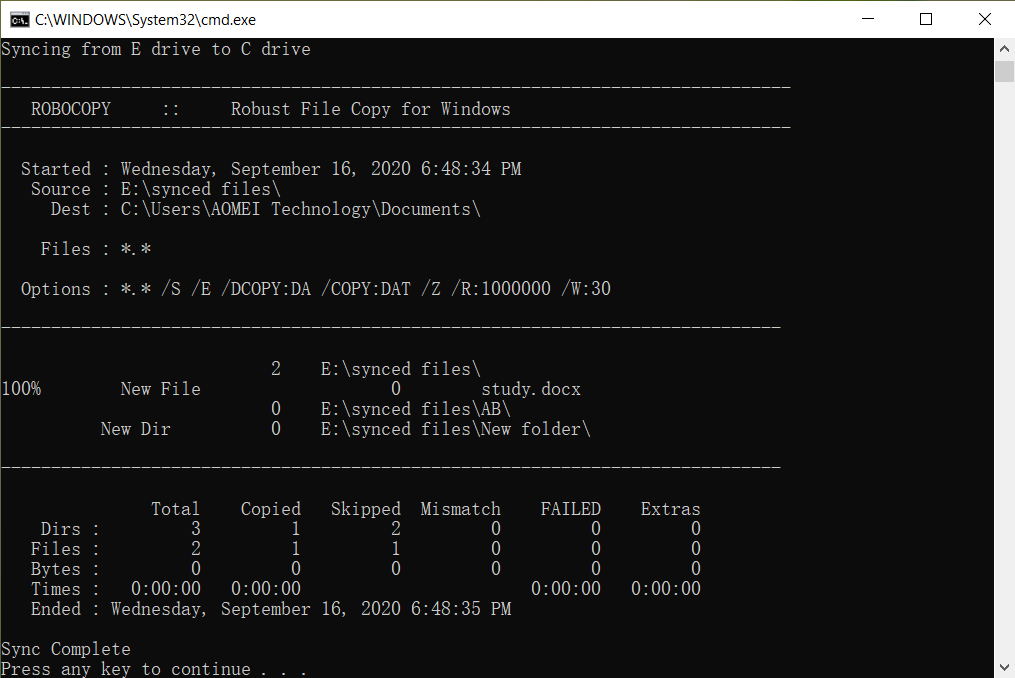
Robocopy /S D:\dir1\data E:\backup\data
This command does not copy empty directories. To copy them, you need to add /E switch.
Robocopy /S /E D:\dir1\data E:\backup\data
Delete files and directories from the source after copying
You can add /MOV switch to delete files and /MOVE switch to delete both files and directories.
For deleting files:
Robocopy /MOV /S /E D:\dir1\data E:\backup\data
For deleting files and directories:
Robocopy /MOVE /S /E D:\dir1\data E:\backup\data
Modify file attributes for the copied files
Using robocopy command we can also change attributes(system, hidden, readonly) of the copied files. This affects the attributes of the files in the new location, it does not impact the files in the source directory.
For example to copy all files from one directory to another directory and also set hidden attribute for all the files you can trigger ‘Robocopy’ with the below syntax.
Robocopy /S /E /A+:H D:\dir1\data E:\backup\data
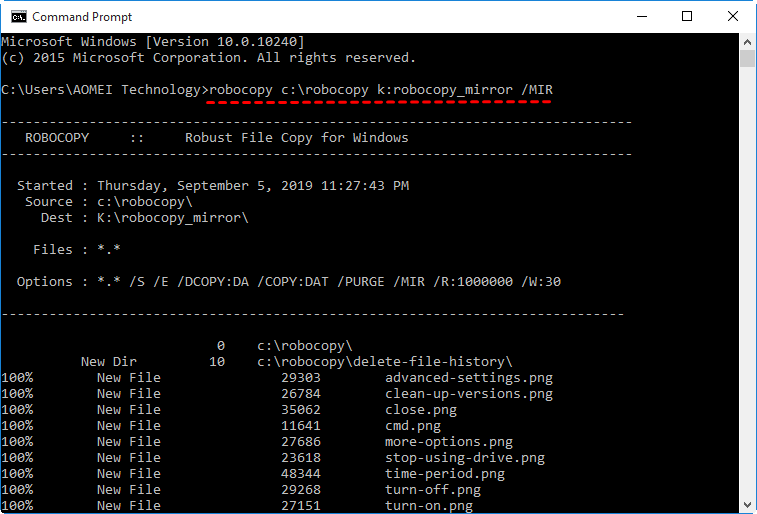
Mirror copy a directory
Below Robocopy command creates a replica of the source folder in the specified destination folder
Robocopy /MIR sourceFolder destinationFolder
This command also deletes any extra files that are present in the destination and are not present in source.
Replicate access permission on destination folder
The option ‘/sec’ copies all the file access permissions to the destination folder also.
robocopy /sec sourceFolder destinationFolder
Note that Robocopy copies the security ACLs also to the destination only if the file has been modified. If the file has not been modified, the ACLs won’t be applied on the destination. You can check this Microsoft’s post robocopy file permissions for deeper understanding.
Графический (GUI) интерфейс в Robocopy
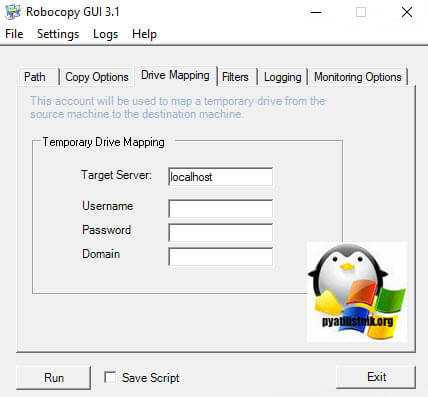
Мы ознакомились с примерами утилиты Robocopy, теперь предлагаю вам взглянуть на графическую оболочку для этого, которая, как ни странно, она есть, а о ее существовании я узнал совсем недавно. Это называется RoboCopy GUI Utility ver. 3.1, к сожалению, он не использует последнюю версию robocopy.exe, но он также работает в Windows 10 1809.
Скачайте RoboCopy GUI Utility ver. 3.1 можно с официального сайта https://docs.microsoft.com/en-us/previous-versions/technet-magazine/cc160891(v=msdn.10) или по моей ссылке из почтового облака
После загрузки RoboCopy GUI Utility ver. 3.1, нам нужно его установить. Запускаем исполняемый файл. Согласны с лицензионным соглашением.
Утилита попросит указать каталог, в который будут извлечены файлы.
Согласны с розыгрышем.
В результате вы получите такую файловую структуру. Запустите setup.exe.
Вам будет представлен простой мастер настройки графического интерфейса для Robocopy. Нажмите “Далее.
Принимаем лицензионное соглашение “Принимаю”
Укажите, будет ли программа установлена для вас или для всех.
следующий.
На этом установка графического интерфейса Robocopy завершена.
Ярлык для графического интерфейса Microsoft Robocopy появится на рабочем столе. Запустим и посмотрим, что это за утилита.
What’s the Robocopy Copy Command?
Robocopy is a command-line software for copying/transferring information over the community and on the identical pc. Microsoft saved it as a third-party software until Home windows XP. Nevertheless, from Home windows Vista, Robocopy grew to become a Home windows function.
Some would ask: Who wants a specialised copying command or software when you will have the standard copy-paste software out there on Home windows?
The final copying choice on Home windows is nice sufficient for small jobs like copying a file from one folder to a different or from one pc to a different, nevertheless it lacks the superior choices you could take full management of the copying/transferring duties.
- With Robocopy you’ll be able to copy information over a community with out worrying about community disruptions as a result of it will possibly routinely resume from the identical file when the connection establishes once more.
- Robocopy enables you to copy the attributes of the information and folders like date and time stamps, safety info (permissions, auditing, house owners), and others.
- It may well replace folders within the vacation spot folder from the supply folder by skipping the already copied information and updating solely these which can be modified.
- It additionally enables you to use multithreading the place it transfers a number of information on the identical time for dashing up the copying job.
Robocopy vs XCopy for Copying Files
Before Robocopy, Microsoft provided XCopy for copying/moving files over the network. As Robocopy is an improvement of XCopy, and Microsoft keeps updating it, it’s the better of the two.
How is it better? Because the Robocopy command-line has many features that XCopy doesn’t have.
- Robocopy uses mirroring while XCopy doesn’t. This enables Robocopy to sync/update files without copying all the files every time.
- Robocopy has automation settings whereas XCopy doesn’t have them. With automation, you can schedule the copying process.
- You can also find monitoring support for Robocopy. This means, if the monitoring command is used, it will monitor files for changes and update them when they are changed. XCopy lacks this feature.
Robocopy Features
Robocopy provides a rich set of features you can leverage to perform efficient and fast file copies and moves.
The basic syntax of the Robocopy command is as shown below:
A brief explanation of each feature is shown below:
- /Z : It is used to copy files in restartable mode.
- /S : It is used to copy subdirectories without empty ones.
- /E : It is used to copy subdirectories with empty ones.
- /ZB : Uses restartable mode. If access is denied, this option uses Backup mode.
- /B : It is used to copy files in backup mode.
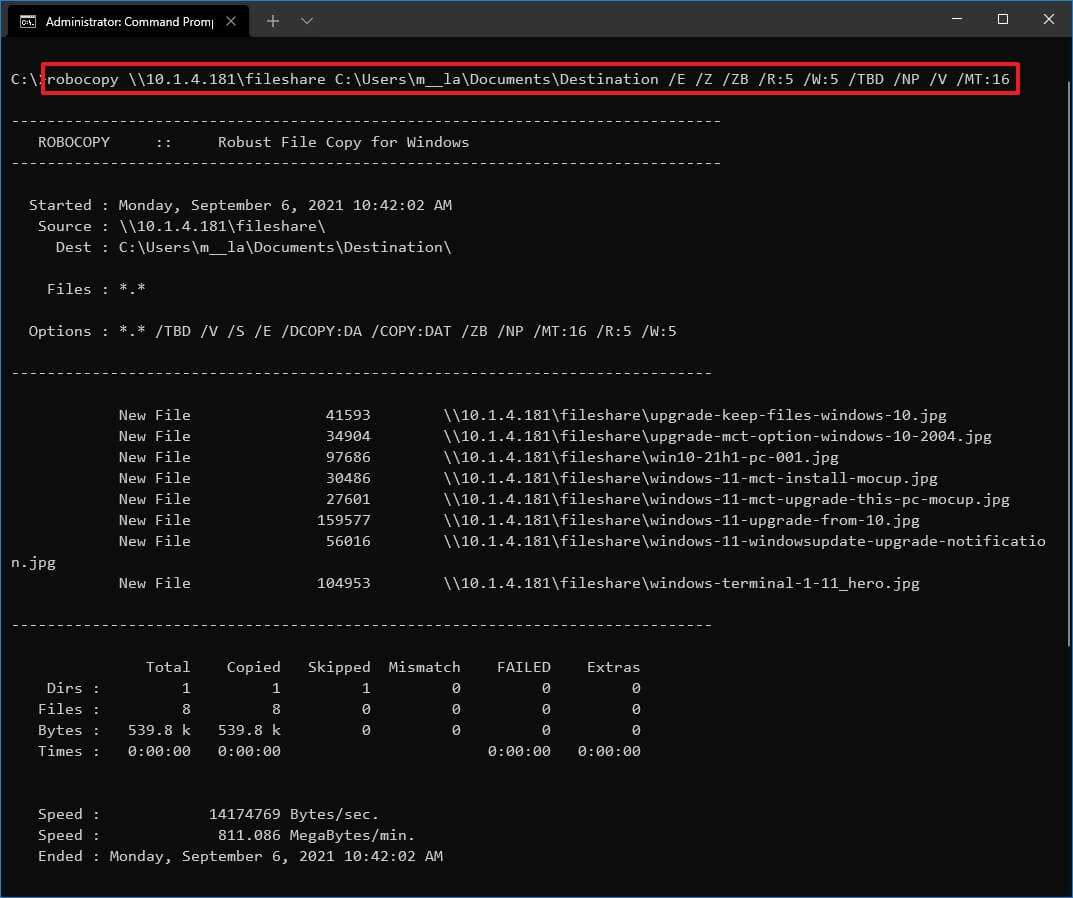
- /MT:16 : It is used to copy files in multithreaded mode. With this option, you can copy multiple files at the same time.
- /MOV : It is used to moves files, and deletes them from the source after they are copied.
- /MOVE : It is used to moves files and directories, and deletes them from the source after they are copied.
- /R:N : Specifies the number of retries on failed copies.
- /W:N : Specifies the wait time between retries, in seconds. The default value of N is 30.
- /TBD : Specifies that the system will wait for share names to be defined.
- /NP : Specifies that the progress of the copying operation will not be displayed.
- /V : Used to display verbose output, showing skipped files.
Robocopy: основные принципы использования
Robocopy (Robust File Copy) – это командная строковая утилита, предоставляемая операционной системой Windows, которая позволяет копировать и синхронизировать файлы и папки. Ниже приведены основные принципы использования Robocopy.
1. Копирование файлов и папок
С помощью Robocopy можно копировать файлы и папки на локальном компьютере или между разными компьютерами через сеть. Для этого необходимо указать путь исходных файлов или папок, а также путь назначения копирования.
2. Опции копирования
Robocopy предоставляет широкий набор опций, которые позволяют настроить процесс копирования. Например, можно указать, что нужно копировать только новые или измененные файлы, игнорировать определенные файлы или папки, сохранять атрибуты и права доступа файла, и многое другое.
3. Режимы синхронизации
Robocopy поддерживает несколько режимов синхронизации. Например, режим «Полного обновления» позволяет синхронизировать исходную и целевую папки так, чтобы целевая папка полностью соответствовала исходной. Режим «Сравнения» позволяет только сравнить содержимое исходной и целевой папок без фактического копирования файлов.
4. Многоуровневые операции
Robocopy позволяет выполнять многоуровневые операции копирования и синхронизации. Например, можно указать, что нужно копировать несколько папок и их содержимое на другой компьютер. Также можно создать сценарий, в котором последовательно выполняются несколько операций с разными параметрами.
5. Восстановление
Robocopy имеет механизм восстановления, который позволяет в случае ошибки или прерывания операции копирования продолжить с того места, где она остановилась. Также можно создать журнал, в котором будет указано, какие файлы были скопированы или синхронизированы.
6. Использование командной строки
Robocopy используется через командную строку Windows. Нужно открыть командную строку, ввести команду Robocopy, а затем указать необходимые параметры. Можно также создать пакетный файл, который будет содержать несколько команд Robocopy, для автоматизации и упрощения процесса.
7. Примеры использования
Robocopy может быть использован во множестве сценариев. Например, можно использовать его для создания резервных копий файлов и папок, для переноса данных на другой компьютер, для синхронизации файлов между разными папками или дисковыми устройствами, и многое другое.
8
Внимание к деталям. При использовании Robocopy необходимо обратить внимание на разные детали, чтобы избежать нежелательных результатов
Например, при использовании опций копирования внимательно прочитайте описание каждой опции и убедитесь, что она соответствует вашим потребностям
При использовании Robocopy необходимо обратить внимание на разные детали, чтобы избежать нежелательных результатов. Например, при использовании опций копирования внимательно прочитайте описание каждой опции и убедитесь, что она соответствует вашим потребностям
Заключение
Robocopy – это мощный инструмент для копирования и синхронизации файлов и папок. Он позволяет гибко настроить процесс копирования и обладает множеством возможностей
При использовании Robocopy следует обращать внимание на детали и внимательно ознакомиться с доступными опциями
Результаты
Один файл
Результаты предыдущего теста были довольно очевидными: многопоточность сэкономила до 50 % времени выполнения.
Копирование одного файла с большим или меньшим количеством потоков дало довольно противоречивые результаты. Использование 4 потоков сделало весь процесс еще хуже. Но в целом продолжительность осталась более или менее неизменной.
Многопоточность Robocopy — один файл
Файлы изображений
Первоначальный тест без /MT занимает около 280 секунд. Использование 1 нити только ухудшило результат. Вам нужно на 54 секунды (почти минуту!) дольше, чтобы скопировать файлы. После этого время выполнения значительно уменьшается: 8 потоков экономят больше минуты (280 против 215 секунд). А после 32 потоков результаты уменьшаются всего на несколько секунд.
Многопоточность Robocopy — файлы изображений
Текстовые файлы
Этот тест оказал наибольшее влияние на продолжительность с большим количеством потоков.
Использование без инструмента /MT заняло 1314 секунд, и снова стало хуже с 1 потоком. Но после этого продолжительность упала очень быстро: 4 потока сэкономили вам более 14 минут, а 128 потоков заняли еще на 100 секунд меньше!
Многопоточность Robocopy — текстовые файлы
Преимущества графического интерфейса для Robocopy в Windows 10
Облегчение работы с Robocopy
Графический интерфейс для Robocopy предоставляет простой и понятный способ взаимодействия с программой. Например, пользователь может выбрать источник и назначение копирования, задать параметры копирования и сохранить их для последующего использования. Все эти действия выполняются в удобном и понятном интерфейсе, что значительно облегчает работу с программой.
Возможность просмотра прогресса работы
Графический интерфейс для Robocopy позволяет просматривать прогресс работы в реальном времени. Это позволяет пользователю контролировать процесс копирования и получить информацию о его текущем состоянии. Кроме того, пользователь может получить информацию о времени окончания копирования и общем объеме скопированных данных.
Удобство использования
Графический интерфейс для Robocopy удобен в использовании и не требует опыта работы с командной строкой. Пользователи могут использовать программу без необходимости изучать синтаксис команд и параметров. Это особенно полезно для пользователей, которые не имеют большого опыта работы с операционной системой Windows и не знакомы с командной строкой.
Возможность сохранения пресетов
Графический интерфейс для Robocopy позволяет пользователям сохранять настройки копирования в виде пресетов. Это позволяет использовать эти настройки в будущем, не тратя время на их повторную настройку. Пользователи могут сохранять несколько пресетов и переключаться между ними в зависимости от текущей задачи.

- Облегчает работу с Robocopy
- Возможность просмотра прогресса работы
- Удобство использования
- Возможность сохранения пресетов
Robocopy Switches and Use Cases
| /SEC | Copy files with security (equivalent to /COPY:DATS). |
| /COPYALL | Copy all file info (equivalent to /COPY:DATSOU). |
| /NOCOPY | Copy no file info (useful with /PURGE). |
| /SECFIX | Fix file security on all files, even skipped files. |
| /TIMFIX | Fix file times on all files, even the skipped ones. |
| /PURGE | Delete dest files/dirs that no longer exist in the source. |
| /MIR | Mirror a directory tree (equivalent to /E plus /PURGE). |
| /MOV | Move files (delete from the source after copying). |
| /MOVE | Move files and dirs (delete from the source after copying). |
| /A+: | Add the given attributes to copied files. |
| S | This switch used to Copy subdirectories, but not the empty ones. |
| /E | This switch used to Copy subdirectories, including the empty ones. |
| /LEV:n | This switch used to Only copy the top n levels of the source directory tree. |
| /Z | This switch used toCopy files in restartable mode. |
| /B | This switch used to Copy files in backup mode. |
| /ZB | This switch used for restartable mode. If access denied, use backup mode. |
| /EFSRAW | This switch used to Copy all encrypted files in EFS RAW mode. |
| /COPY:copyflag | This switch for What to COPY for files (default is /COPY:DAT). |
Robocopy File Attributes
These below file attributes available when you deal with copy options.
A – Archive
C – Compressed
N – Not content indexed
H – Hidden
E – Encrypted
T – Temporary
O – Offline
R – Read only
S – System
Robocopy File Logging Options
/L : This parameter just lists the folders and files of destination path .
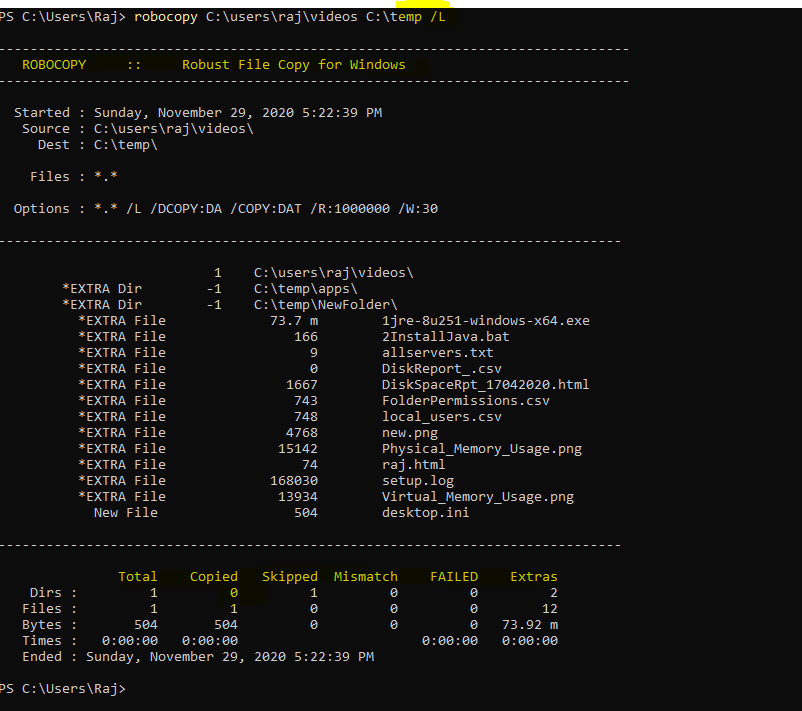 Robocopy command examples
/NP : This parameter used for not to dissplay % copied.
/Unicode : This parameter used for to Display the status output as Unicode text.
/LOG:file : This parameter used for overwrite existing log.
/UNILOG:file : This parameter used for Output status Log file overwrite.
/LOG+:file : This parameter used for appending information to existing log file.
/UNILOG+:file : Output status to Unicode Log file (append)
/NJH : This parameter used for No Job Header information.
/NJS : This parameter used setting No Job Summary after the execution.
/TS : This parameter used for Including Source file Time Stamps in the output.
/FP : This parameter used for Including full pathname of files.
/NS : This stands for No Size – This parameter used for not to mention the log size.
/NC : This stands for No Class and it is used don’t log file classes.
/NFL : This stands for No File List and it is used don’t log file names.
/NDL : This stands for No Directory List and used as don’t log any directory names.