

Как включить виртуализацию на разных материнских платах
Далее даны примеры включения Virtualization Technology в БИОСе разных производителей. Они лишь приблизительные, так как графические оболочки, количество доступных пунктов настроек и их расположение относительно друг друга на разных устройствах могут отличаться.
Gigabyte
Чтобы включить виртуализацию в БИОСе Gigabyte проделайте следующие шаги:
- Откройте BIOS с помощью клавиш F2 или Del в момент включения компьютера.
- Отыщите раздел расширенных настроек Advanced Frequency Settings (он может быть на вкладке M.I.T.).
- Перейдите к расширенным настройкам процессора (Advanced CPU Settings).
- Активируйте SVM Mode, выбрав значение Enabled.
- Сохраните изменения и перезагрузите компьютер.
MSI
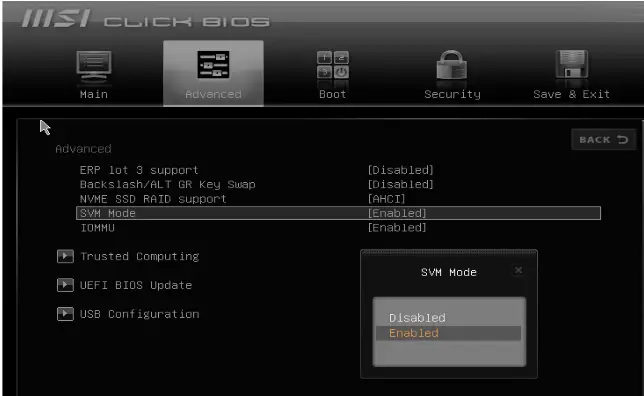
Чтобы включить виртуализацию в БИОСе на платах MSI отыщите пункт CPU Features и уже здесь найдите SVM Mode, далее проделав те же действия, что и в предыдущем примере.
HP
- Войдите в БИОС при помощи клавиши Esc.
- Нажмите F10 для перехода в настройки BIOS (следуйте указаниям, появляющимся на экране).
- Используйте клавишу «Стрелка вправо», чтобы переместиться на вкладку «Конфигурация Системы».
- Выберите пункт «Виртуализация» (Virtualization Technology если прошивка на английском) и нажмите на Enter.
- Установите значение «Включено» и подтвердите выбор нажатием клавиши Enter.
- Сохраните изменения (F10) и перезагрузитесь.
Asus
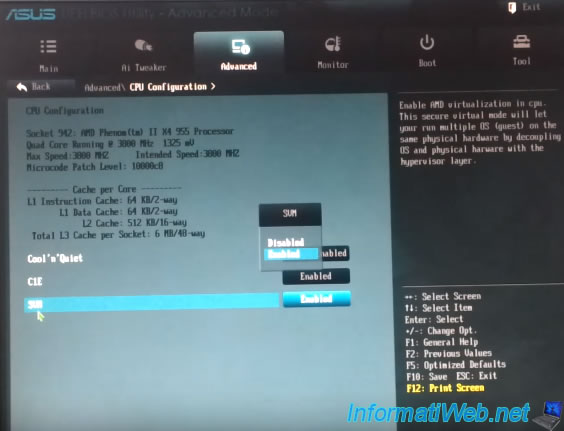
На материнских платах этого производителя включение виртуализации может быть произведено следующим образом:
- Используйте F2 для входа в БИОС.
- Нажмите на клавишу «стрелка вправо», перейдите «Продвинутые настройки».
- Выберите пункт «Виртуализация» и нажмите Enter.
- Установите значение «Включено» и нажмите Enter.
- Используйте клавишу F10 для сохранения изменений и перезагрузки.
How to Enable SVM?
So, if you’re convinced you need SVM turned on, you can follow the steps below to turn it on. The settings can vary depending on what motherboard you’re using.
Gigabyte
- Press the Delete button when your PC turns on to go to the BIOS page.
- Go to the M.I.T tab.
- In the M.I.T tab, go to Advanced Frequency Settings.
- Next, go to Advanced CPU settings.
- You should notice the SVM mode. Click on it and Enable it.
- Save your settings and exit.
MSI
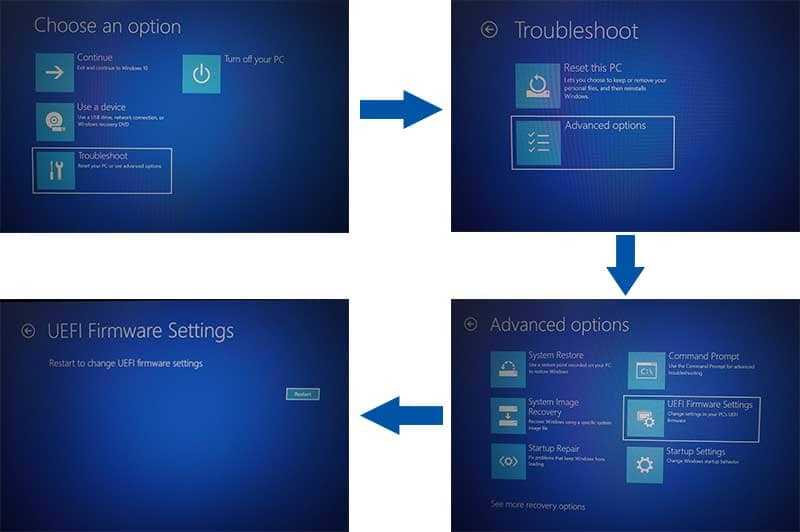
- Restart your computer while holding Shift to go to the Advanced Startup options.
- Go to Troubleshoot.
- Now go to Advanced Options.
- Click on UEFI Firmware Settings.
- Click Restart. This should take you to the BIOS.
- Go to Overclock Settings.
- Scroll down until you see CPU Features. In some devices, this can be also known as Advanced CPU Configuration.
- Find SVM and enable it.
ASUS
- Follow steps 1 to 4 in the MSI section to go to the BIOS page on your ASUS device.
- Click on Advanced Mode. You can also press F7.
- Go to the Advanced tab.
- You should see the SVM mode. Enable the mode using the toggle button.
- Save the settings and exit.
This tutorial gives you a basic overview of what SVM mode is, how it relates to virtualization, and whether or not you should enable it. We’ve also covered how you can enable this mode on different hardware.
Зачем использовать SVM mode в BIOS?
Одним из главных преимуществ использования SVM mode является возможность запуска нескольких операционных систем на одном компьютере. Это особенно полезно, если вы работаете с разными операционными системами, например, для разработки программного обеспечения или тестирования.
Виртуализация также позволяет эффективнее использовать ресурсы компьютера. Вы можете настроить каждую виртуальную машину с определенным количеством процессоров, оперативной памяти и других ресурсов, что позволяет достичь оптимальной производительности.
Также использование SVM mode обеспечивает более высокую безопасность. Виртуальные машины могут быть легко изолированы друг от друга, что может помочь предотвратить распространение вредоносного кода или атаки на систему.
Другим важным преимуществом SVM mode является возможность быстро создавать, копировать и восстанавливать виртуальные машины. Это упрощает процесс развертывания новых машин, а также позволяет быстро восстановить систему после сбоев или ошибок.
В целом, использование SVM mode в BIOS может значительно упрощать работу с виртуализацией, обеспечивать безопасность и повышать эффективность использования ресурсов компьютера.
What Are The Benefits Of Enabling Virtualization In BIOS MSI?
There are many benefits of enabling virtualization in BIOS MSI. Some of these benefits include:
– The ability to run multiple operating systems simultaneously on a single piece of hardware.
– Increased efficiency and productivity for developers and testers who need to work with multiple operating systems at the same time.
– The ability to create virtual machines that can be used for testing purposes without affecting the stability of the host operating system.
Enabling virtualization in BIOS MSI is easy , and only takes a few minutes. Follow the steps outlined in this blog post to enable virtualization in BIOS MSI and enjoy the many benefits it has to offer.
How To Verify That Virtualization Is Enabled In BIOS MSI?
There are a few different ways to verify that virtualization is enabled in BIOS MSI. One way is to check the BIOS settings to make sure that the virtualization options are enabled. Another way is to use a third-party tool such as CPU-Z or HWiNFO64 to check for the presence of virtualization features.
CPU-Z is a free tool that can be used to check for the presence of virtualization features. To use CPU-Z, simply install the tool, then run it and look for the “Virtualization” tab. If the tab is present, then virtualization is supported on your system.
SVM Mode In a Nutshell
Virtualization technology made major strides in recent years and is widely used in software development. Most modern computers have virtualization features that can be enabled via the BIOS/UEFI.
Motherboards with AMD Ryzen chips use a virtualization feature called SVM Mode. The feature is specifically available only with AMD CPUs, as Intel CPUs have their own version called Intel VT or Intel Virtualization. SVM Mode allows you to run a virtual computer (or multiple VMs) from a single hardware setup, so you can run different operating systems, browse safely, or use outdated software.
If you’d like to start experimenting with virtual machines, it’s super easy! Just enable the SVM Mode in your AMD-powered PC. Find your motherboard manufacturer above (Asus, MSI, Gigabyte, or ASRock) and follow the steps to enter your BIOS and toggle on SVM mode.
Should You Enable or Disable SVM?
And now to the real question. Do you need SVM turned on or off? This all comes down to your needs and how you plan to use your computer.
You should enable SVM mode if you intend to use virtualization technology and create virtual machines on your computer. With extra hardware support for virtualization, SVM provides better performance and security for your virtualized environments.
Some other rare but possible reasons include using legacy software that requires SVM, software application compatibility, server consolidation, etc.
On the other side, if you don’t plan on using virtualization at all. Or, if you’re concerned about malicious attacks on your virtual machine, then it’s recommended to keep SVM disabled.
For most people, keep the SVM setting as it is without tweaking it. Especially if you’re not too tech-savvy, we don’t recommend going into the BIOS page.
RELATED: What is Network Stack BIOS
How To Enable Virtualization In Bios MSI B550m A Pro Max?
1. Enter the BIOS menu by pressing F2 during bootup.
2. Go to the “Advanced” tab and select “CPU Configuration”.
3. Under the “Intel(R) Virtualization Technology” setting, change it to “Enabled”.
4. Press F10 to save and exit out of BIOS menu.
5. Your computer should now be able to support virtualization.

MSI Click Bios 5 Virtualization
Here is how to enable virtualization in MSI Click BIOS 5:
1. Boot up your computer and press the DEL key to enter the BIOS menu.
2. Go to the “Advanced” tab and select “CPU Configuration”.


3. Under the “Intel(R) Virtualization Technology” setting, change it to “Enabled”.
4. Press F10 to save and exit out of BIOS menu.
5. Your computer should now be able to support virtualization.
That’s it! Enabling virtualization in MSI BIOS is quick and easy, and can be a useful tool for developers and testers who need to work with multiple operating systems simultaneously.
How to enable virtualization in BIOS MSI?
For AMD IOMMU (Input-Output Memory Management Unit):
1. Boot up the laptop and press to open the BIOS menu.
2. Go to Advanced – > IOMMU (Default: Enable).
3. Select the desired setting (Enabled/ Disabled)
For AMD SVM (Secure Virtual Machine):

- Go to Advanced > SVM Mode (Default: Enable).
- Select the desired setting (Enabled/ Disabled).
Finally, press to save and exit once you’ve decided on a setting.
For Intel VT-d:
1. Boot up the laptop and press F2 to enter the BIOS menu.
2. Go to Advanced > CPU Configuration.
3. Under “Intel(R) Virtualization Technology”, set it to Enabled.
4. Press F10 to save and exit out of BIOS menu.
For Intel VT-x:
1. Boot up the laptop and press F2 to enter BIOS menu.
2. Go to Advanced > CPU Configuration.
3. Under “Intel(R) Virtualization Technology”, set it to Enabled.
4. Press F10 to save and exit out of BIOS menu.
What Is Virtualization And Why Do You Need To Enable It In BIOS MSI?
Virtualization is the process of creating a virtual version of something, such as an operating system, a server, or even a network. It allows you to run multiple instances of an operating system on a single piece of hardware, which can be very useful for developers and testers who need to work with multiple operating systems simultaneously.
Enabling virtualization in MSI BIOS is easy, and only takes a few minutes. Keep reading for step-by-step instructions.
For AMD IOMMU (Input-Output Memory Management Unit):
1. Boot up the laptop and press to open the BIOS menu.
2. Go to Advanced – > IOMMU (Default: Enable).
3. Select the desired setting (Enabled/ Disabled)
For AMD SVM (Secure Virtual Machine):
- Go to Advanced > SVM Mode (Default: Enable).
- Select the desired setting (Enabled/ Disabled).
Finally, press to save and exit once you’ve decided on a setting.
For Intel VT-d:
1. Boot up the laptop and press F2 to enter the BIOS menu.
2. Go to Advanced > CPU Configuration.
3. Under “Intel(R) Virtualization Technology”, set it to Enabled.
4. Press F10 to save and exit out of BIOS menu.
For Intel VT-x:
1. Boot up the laptop and press F2 to enter BIOS menu.
2. Go to Advanced > CPU Configuration.

![[answered] what is svm mode in bios & should you enable it? (2024)](https://jsk-oren.ru/wp-content/uploads/3/7/d/37dd68a8ae251e6f2862fbf5af01619d.jpeg)


3. Under “Intel(R) Virtualization Technology”, set it to Enabled.
4. Press F10 to save and exit out of BIOS menu.
Проблемы при использовании SVM mode в BIOS и их решение
Вот некоторые из наиболее распространенных проблем, связанных с использованием SVM mode в BIOS, и их возможные решения:
1. Проблемы с операционной системой
Некоторые операционные системы могут не поддерживать SVM mode, что может стать причиной некорректного функционирования системы или даже полного отказа загрузки. Если вы столкнулись с такой проблемой, убедитесь, что ваша операционная система полностью совместима с SVM mode. Если нет, вы можете попробовать обновить операционную систему или изменить настройки BIOS.
2. Ошибки в настройках BIOS
При использовании SVM mode в BIOS важно правильно настроить все соответствующие параметры. Даже небольшая ошибка может привести к проблемам с запуском системы или снижению ее производительности
Рекомендуется тщательно изучить инструкцию по использованию SVM mode и проверить все настройки BIOS, чтобы убедиться, что они правильно установлены.
3. Конфликт с другими программными решениями
Некоторые программные решения, такие как антивирусные программы, могут несовместимы с работой в режиме SVM. Это может вызывать проблемы с запуском программ или замедлять работу системы. Если вы заметили, что система работает нестабильно при использовании SVM mode, попробуйте временно отключить такие программы и проверить, решит ли это проблему.
4. Перегрев процессора
Использование SVM mode может привести к повышенной нагрузке на процессор, особенно при работе с несколькими виртуальными машинами одновременно. Это может вызвать перегрев процессора и привести к проблемам с системой. Рекомендуется регулярно проверять температуру процессора и принимать меры по его охлаждению, например, с помощью улучшенной системы охлаждения или увеличения скорости вентилятора.
Учитывая эти возможные проблемы, важно следить за работой системы при использовании SVM mode в BIOS и быстро реагировать на любые проблемы. Решение проблем может включать обновление операционной системы, проверку настроек BIOS, временное отключение некоторых программ или принятие мер по охлаждению процессора
Как включить SVM mode в BIOS?
Чтобы включить SVM mode в BIOS, следуйте инструкциям ниже:
1. Запустите компьютер и нажмите нужную клавишу, чтобы войти в BIOS. Обычно это клавиша Del, F2 или F10.
2. Перейдите в раздел Advanced или Advanced Settings.
3. Найдите опцию Virtualization или Virtualization Technology
Обратите внимание, что названия могут немного отличаться в разных версиях BIOS
4. Измените значение опции на Enabled или Enable (включено).
5. Сохраните настройки и выйдите из BIOS. Обычно для сохранения нужно выбрать опцию Save & Exit или Exit and Save Changes.
После перезагрузки компьютера SVM mode будет включен в BIOS. Теперь вы можете использовать программы виртуализации полноценно.
Убедитесь, что у вас установлена подходящая операционная система, которая поддерживает SVM mode. В противном случае, возможно, вам придется обновить свою ОС или использовать другую программу виртуализации.
Заметьте, что некоторые компьютеры могут не поддерживать SVM mode или иметь другую название опции в BIOS. В этом случае вам следует обратиться к документации на ваш компьютер или обратиться к производителю для получения более подробной информации.
How to Enable SVM Mode?
Enabling SVM mode in the BIOS (Basic Input/Output System), settings can vary depending on the specific computer and motherboard manufacturer. Here are some general steps to enable SVM mode, but please note that the exact steps may differ for your particular system:
- Start by restarting or powering your computer.
- During the startup process, before the operating system loads, you will typically see a message on the screen indicating which key to press to enter the BIOS setup. It is commonly the “Delete” key, but it can also be “F2,” “F10,” or another key. Refer to your computer’s documentation or manufacturer’s website to determine the correct key for your system.
- Press the designated key repeatedly until the BIOS setup utility opens. This may take a few seconds.
- In the BIOS, navigate to “Advanced,” “CPU,” or “Virtualization Technology.”
- Enter the submenu that contains the virtualization options. These settings’ exact wording and location can vary, so you might need to explore different menus.
- Locate the SVM or “Secure Virtual Machine” option. It might be labelled as “Virtualization Technology,” “VT-x,” “AMD-V,” or a similar term, depending on your CPU manufacturer (Intel or AMD).
- Select the SVM option and change its setting to “Enabled” or “On.” Some BIOS versions may use checkboxes or different options to enable virtualization.
- Save the changes and exit the BIOS setup utility. Typically, you can do this by pressing the “F10” key and confirming the save.
Please note that these steps are general guidelines, and the actual process may vary. It’s essential to consult your computer’s documentation or the manufacturer’s website for specific instructions tailored to your system.
Возможные проблемы при использовании режима SVM
Режим SVM (Secure Virtual Machine) в биосе процессоров Ryzen предоставляет возможность запуска виртуальных машин с обеспечением безопасности и изоляции. Однако, при использовании этого режима могут возникать некоторые проблемы.
- Неудачные обновления BIOS. Иногда после обновления BIOS на материнской плате могут возникнуть конфликты с работой режима SVM. Это связано с несовместимостью обновленной версии BIOS и режима SVM.
- Проблемы с работой виртуальных машин. В некоторых случаях возможны проблемы с запуском и работой виртуальных машин в режиме SVM. Это может проявляться в виде ошибок при запуске, низкой производительности или некорректной работе операционной системы внутри виртуальной машины.
- Влияние на производительность. Использование режима SVM может негативно сказаться на производительности системы. Это может быть связано с дополнительными накладными расходами на работу SVM, а также с конфликтами с другими функциями или процессами.
- Проблемы совместимости с программным обеспечением. Некоторое программное обеспечение может быть несовместимо с режимом SVM или работать некорректно при его использовании. Это может привести к возникновению ошибок, вылетам программ или неправильной работе функций, связанных с виртуализацией.
В случае возникновения указанных проблем при использовании режима SVM, рекомендуется обратиться к документации производителя процессора или материнской платы для получения подробной информации о возможных решениях. Также, стоит проверить наличие обновлений BIOS и драйверов, которые могут исправить существующие проблемы и повысить совместимость системы с режимом SVM.
SVM Mode – FAQs
1. Should CPU virtualization be on or off?
Ans: The decision to turn CPU virtualization on or off depends on the specific requirements and circumstances. Enabling CPU virtualization is recommended when running multiple VMs simultaneously, such as in server environments or virtualization software like VMware or VirtualBox.On the other hand, disabling CPU virtualization can be appropriate when virtualization is not required or if there are compatibility issues with specific software or hardware components. Ultimately, the decision should be based on the specific use case, system requirements, and potential compatibility or performance concerns.
2. What is the downside of SVM mode?
Ans: One potential downside of SVM is that it is hardware dependent. This means you can’t enable SVM if your hardware doesn’t support it. You have to ensure your PC or laptop hardware supports SVM mode.
3. What is SVM best for?
Ans: (SVM) is best suited for running virtual machines. If you ever want to create and run another virtual machine on your PC or laptop, SVM is best suited for that purpose.


4. Is it safe to enable virtualization?
Ans: Yes, enabling virtualization is usually safe. It allows you to run multiple virtual machines (VMs) on one physical machine, enabling efficient resource utilization and isolation between different environments. However, ensuring that your hardware supports virtualization technology (e.g., Intel VT-x or AMD-V) and that you have trusted virtualization software is necessary.Virtualization adds an extra layer of complexity, so proper security measures like regular updates, strong access controls, and monitoring should be implemented to minimize potential vulnerabilities. Virtualization can provide a secure and efficient computing environment when properly configured and maintained.
Conclusion
In conclusion, virtualization is generally considered safe when implemented correctly. It offers numerous benefits, such as efficient resource utilization and isolation between virtual environments. However, it is crucial to ensure that your hardware supports virtualization technology and that you use trusted virtualization software. Additionally, it is essential to apply proper security measures to mitigate potential vulnerabilities, including regular updates, strong access controls, and monitoring. By taking these precautions, virtualization can provide a secure and efficient computing environment, allowing for the simultaneous operation of multiple virtual machines on a single physical device.
What are Virtual Machines?
Virtual machines (VMs) are software-based emulations of physical computers. They allow multiple operating systems (OS) to run simultaneously on a single physical machine.
A VM creates an isolated environment, abstracting the underlying hardware resources such as processors, memory, and storage, and provides a virtualized environment where an OS can be installed and run. Each VM behaves like a standalone computer with its virtualized hardware components.
VMs offer several advantages. They enable efficient resource utilization by allowing multiple VMs to run on a single physical machine. They also provide isolation between VMs, ensuring that activities or issues in one VM do not affect others. VMs can be easily created, cloned, and scaled up or down, providing flexibility in managing and deploying software applications.
VMs are widely used in various scenarios, such as server virtualization, software development and testing, sandboxing applications, and creating isolated environments for running legacy software or different OS versions on a single machine.
Включение виртуализации в MSI Gaming Plus Max B450
Программы для Windows, мобильные приложения, игры — ВСЁ БЕСПЛАТНО, в нашем закрытом телеграмм канале — Подписывайтесь:)
Хотя MSI заявляет, что виртуализация по умолчанию включена для материнской платы MSI Gaming Plus Max B450, она вполне может быть отключена в режиме IOMMU / режиме SVM. Чтобы включить виртуализацию, вам необходимо войти в меню BIOS и выполнить следующие шаги.
Для AMD IOMMU (блок управления памятью ввода-вывода):
- Загрузите компьютер и нажмите открыть меню BIOS
- Перейдите в Advanced> IOMMU (по умолчанию: включить)
- Выберите желаемую настройку (Включено / Выключено)
Для AMD SVM (защищенная виртуальная машина):
- Перейдите в Advanced> SVM Mode (по умолчанию: Enable).
- Выберите желаемый параметр (Включено / Выключено).
После того, как вы выбрали желаемую настройку, нажмите для сохранения и выхода.
Если вы не можете найти режим IOMMU и режим SVM в настройках материнской платы, попробуйте перейти к OC> Overclocking> Advanced CPU Configurations. Вот как это сделать.
- Загрузитесь в BIOS, используя
- Выберите «Разгон».
- Перейдите в «OC Explore Mode» и переключите его на «Expert».
- Прокрутите вниз до «Характеристики процессора».
- Выберите «Режим SVM» и «Включить».
- Сохранить и выйти
Поддерживает ли материнская плата MSI Gaming Plus Max B450 процессор i9
Нет, MSI Gaming Plus Max B450 поддерживает только процессор AMD.
Программы для Windows, мобильные приложения, игры — ВСЁ БЕСПЛАТНО, в нашем закрытом телеграмм канале — Подписывайтесь:)
Источник
How to Enable SVM Mode?
If you’d like to enable SVM mode to take advantage of the benefits of virtualization, you will need to access the BIOS. For your motherboard to have SVM mode, you must have a motherboard running an AMD Ryzen CPU.
ASUS Motherboard
- After powering on the computer, press Del or F2 on the first loading screen, you’ll need to react quickly here. But if you miss the small window of opportunity to enter the BIOS, you can shut down your computer and try again.
- Press F7 to enter the Advanced Mode to access advanced features and settings. There’s no need to press F7 for ROG series motherboards because the advanced features are available by default.
- Click the Advanced tab and then select CPU configuration from the options.
- At the bottom of the CPU Configuration page, you’ll find SVM Mode. Click Disabled to expand the drop-down menu and then select Enabled.
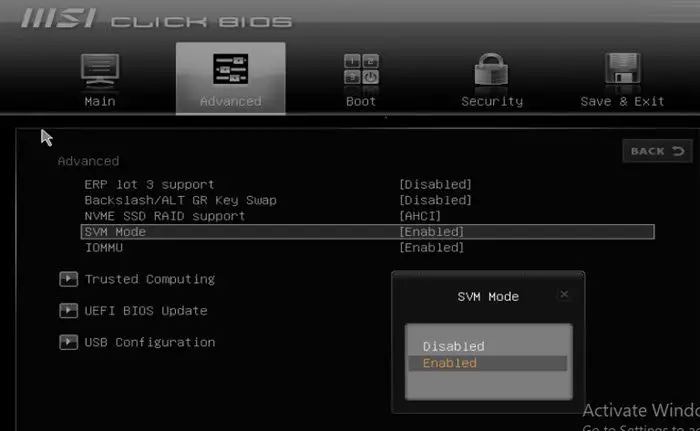
MSI Motherboards
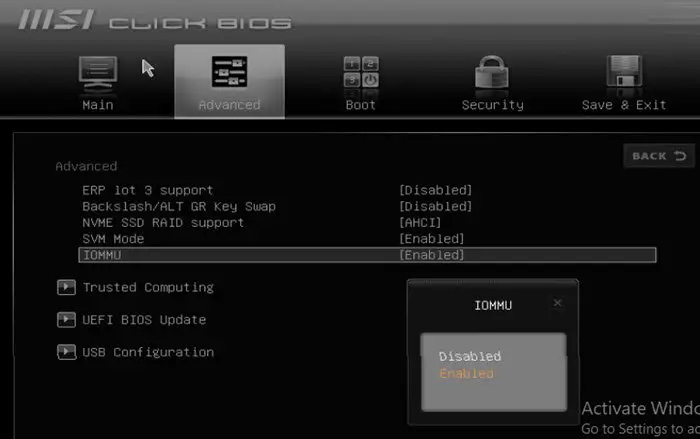
- After powering on the computer, press Del on the first loading screen. You only have a short window to enter BIOS from this point, so you’ll need to react quickly. In case you miss it and your computer has already booted, you can shut it down and try again.
- Select OC or Overclocking Settings.
- Scroll down through the options to find and click CPU Features. If you can’t locate CPU Features within your BIOS, select Advanced CPU Configurations instead.
- From the CPU Features page (or Advanced CPU Configurations), locate SVM Mode.
- Click Disabled and select Enabled from the pop-up window.
- Now select the X in the top-right-hand corner and click Yes to the prompt ‘Save configuration and exit?’
- After enabling SVM Mode, restart your PC to ensure these new features are fully applied.
NOTE: If you’re still having issues locating SVM Mode, try clicking on the Search icon in the top-right corner to search for SVM Mode.
Gigabyte Motherboards
- After powering on the computer, press Del on the first loading screen. Just like in other motherboards, your reaction should be on point. Once your computer has booted you won’t be able to access BIOS anymore. In case you missed the window of opportunity, you can shut down your PC and try again.
- On BIOS, select the M.I.T. tab.
- Within the M.I.T page, click Advanced Frequency Settings.
- Now select Advanced CPU Core Settings and find SVM Mode from the list.
- Click Disabled to switch SVM Mode to Enabled.
- Press F10 to Save and exit BIOS, then restart your PC.
ASRock Motherboard
- After powering on the computer, press Del on the first loading screen.
- Within the BIOS interface, find and select the Advanced tab.
- Then click on CPU Configuration and toggle SVM to Enabled.
- Now click Exit and save the changes. Be sure to restart your computer so the settings are fully applied.