
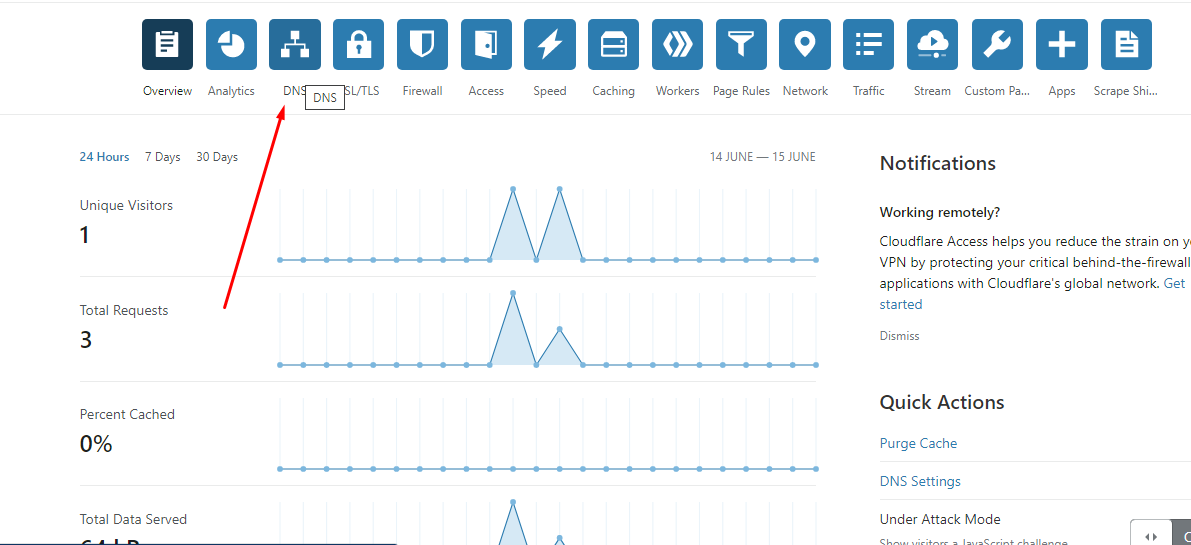
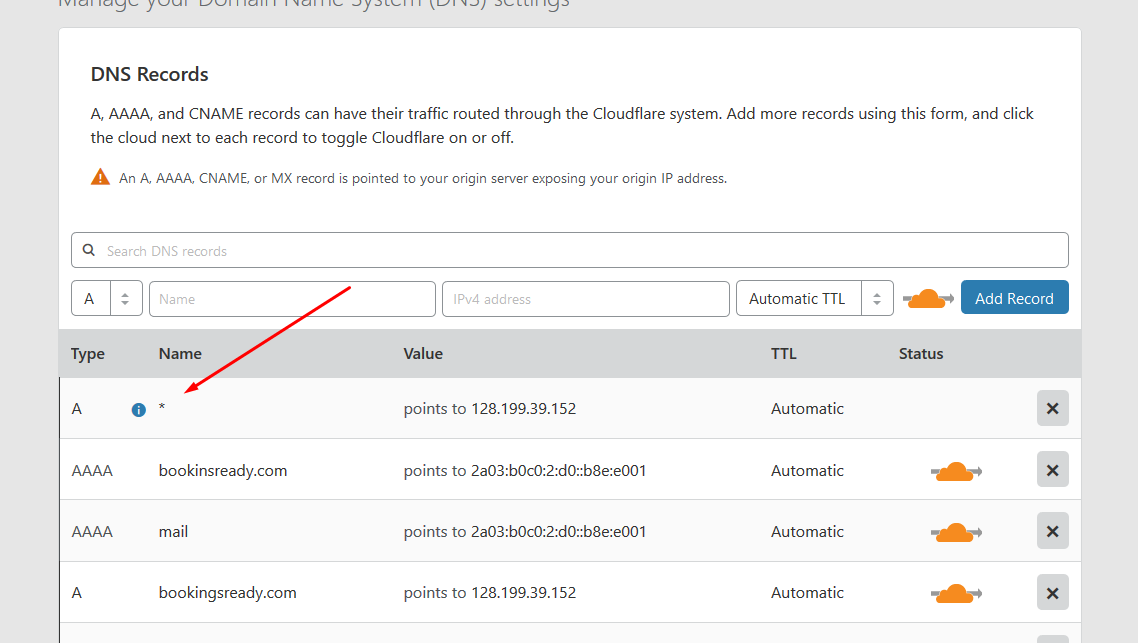
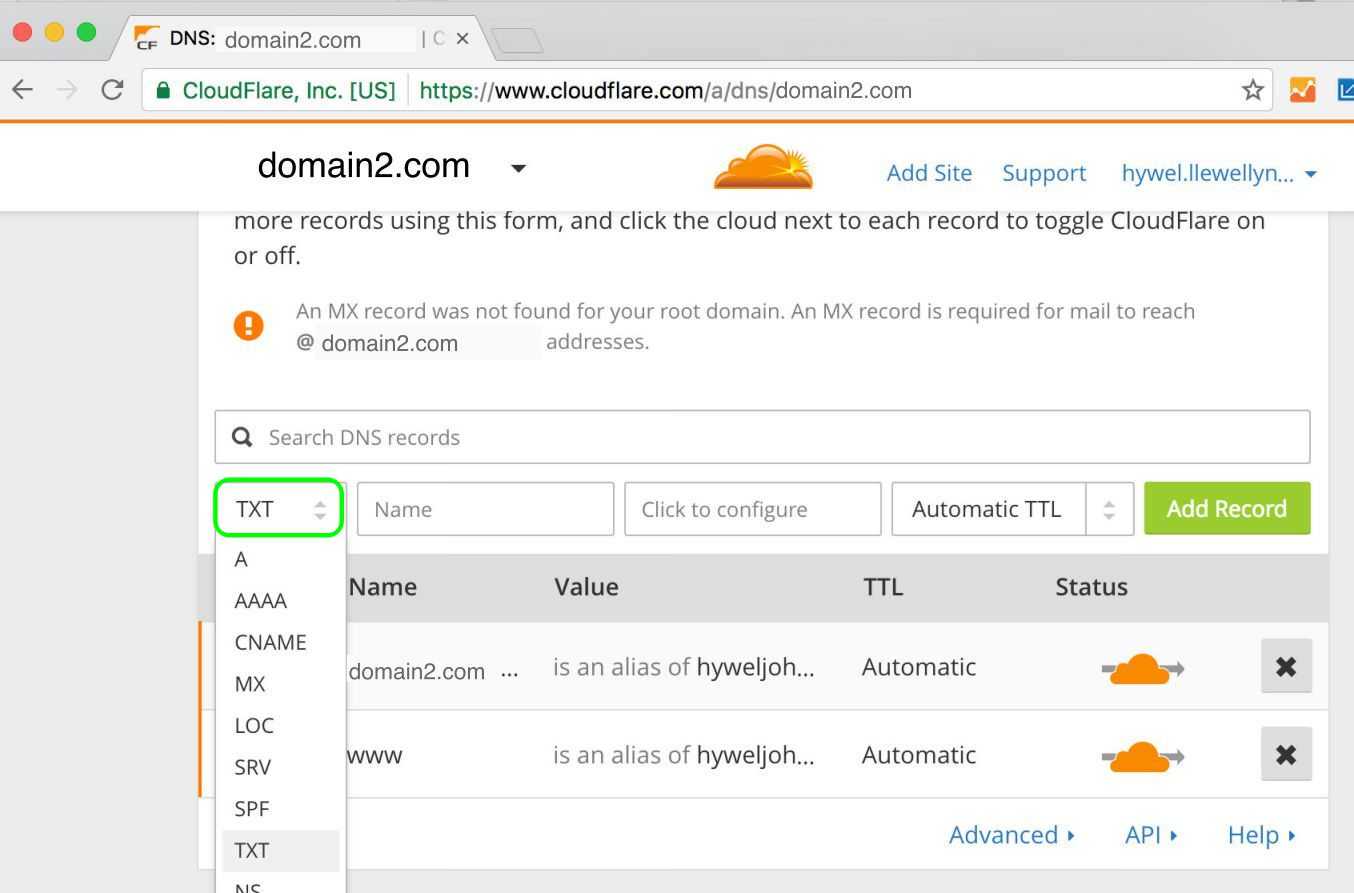
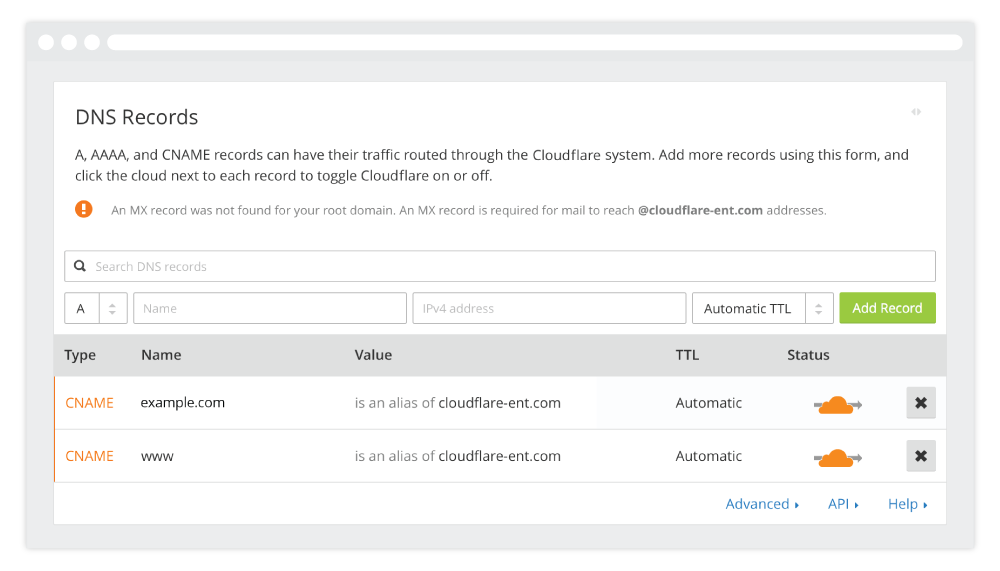
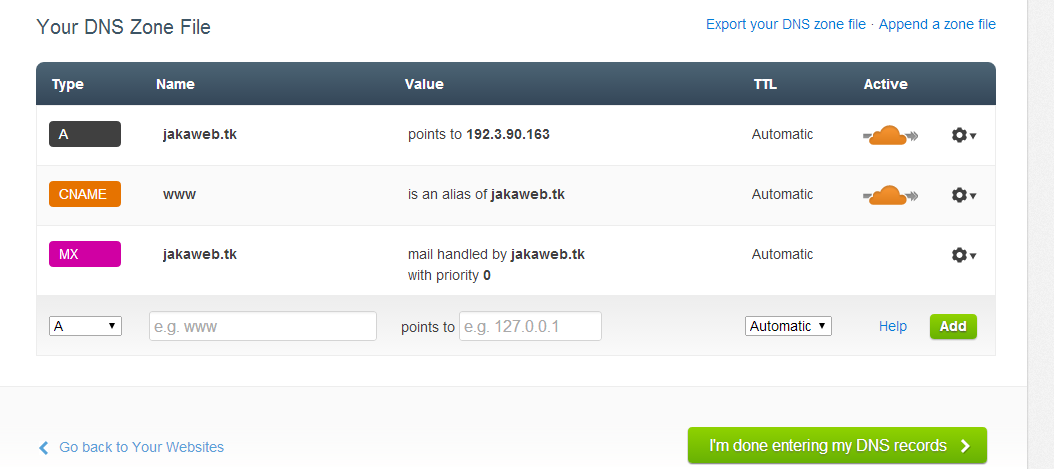
Step #1: Get Your CloudFlare DNS Settings
- Once your site has been added to CloudFlare via Manage, select Domains from the left menu, click on the CloudFlare tab and click the button next to your domain name to expand the CloudFlare dashboard.
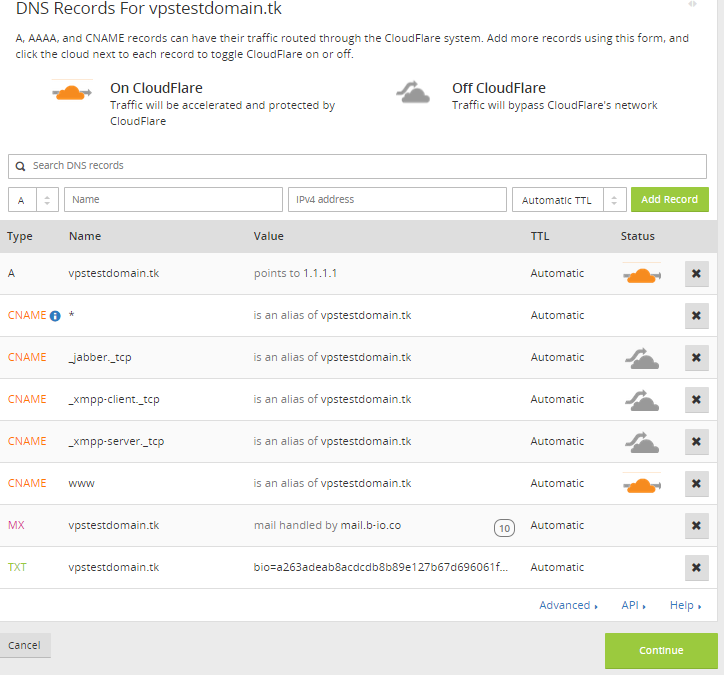
- Now click on the DNS Settings link near the bottom-right corner to view your settings.
- The popup window will show you the specific changes you’ll need to make for your site:Specifically, you’ll need to:
- Add an .htaccess redirect to ensure all traffic to your site uses the “www” subdomain.
- Add a CNAME record for the subdomain “cf-landing.yourdomainname.com”.
- Change your CNAME record for the “www” subdomain to point to “www.yourdomain.com.cdn.cloudflare.net”.
Cloudflare’s 1.1.1.1 DNS Service
By default, your Internet Service Provider (ISP) has a DNS server. However, they are known to be slow and insecure. It is possible for any hacker to “listen” to your computer’s communication with a website’s server through default DNS servers.
Cloudflare’s DNS Service promises to be the fastest DNS directory on the Internet. Their extensive experience in providing enterprise-level network services and infrastructure around the world allows Cloudflare to provide a fast, consumer-level DNS directory.
Moreover, Cloudflare puts privacy as its top priority. It is known that companies can sell your data to advertisers to create targeted ads for you. Cloudflare promises to never log your IP address when using 1.1.1.1. The company retained KPMG to audit their processes to make sure that they are fulfilling their promises.
Configuring Windows 10
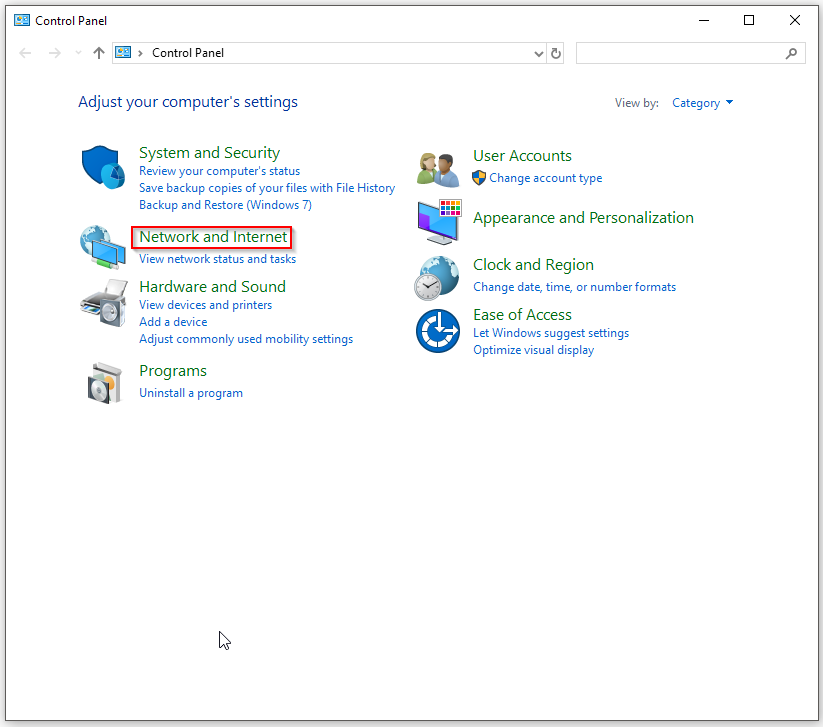
It is quite easy to set-up 1.1.1.1 as your DNS server on Windows 10. Open Control Panel. Click on Network and Internet.
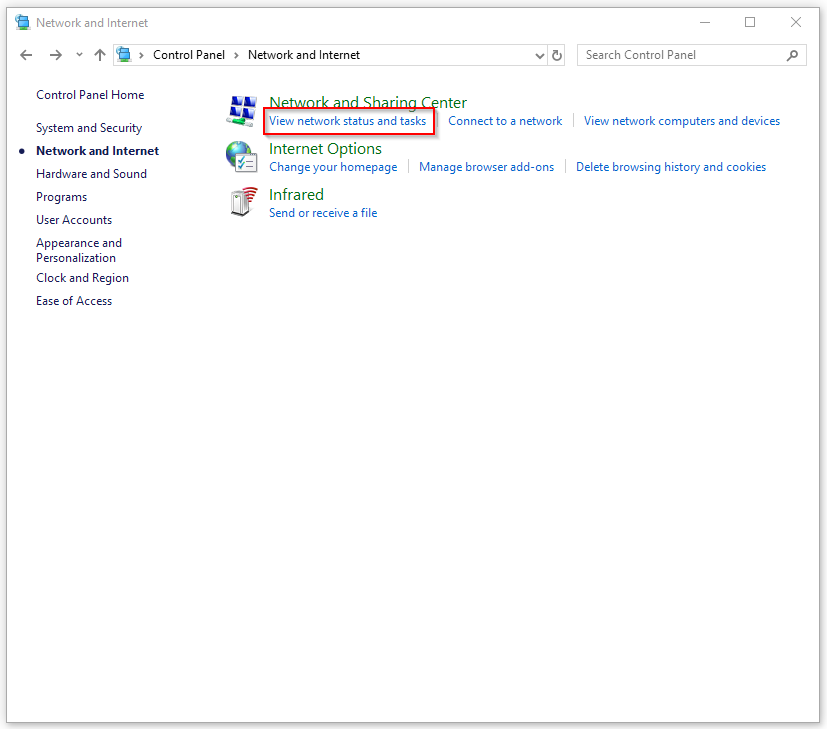
Click View network status and tasks.
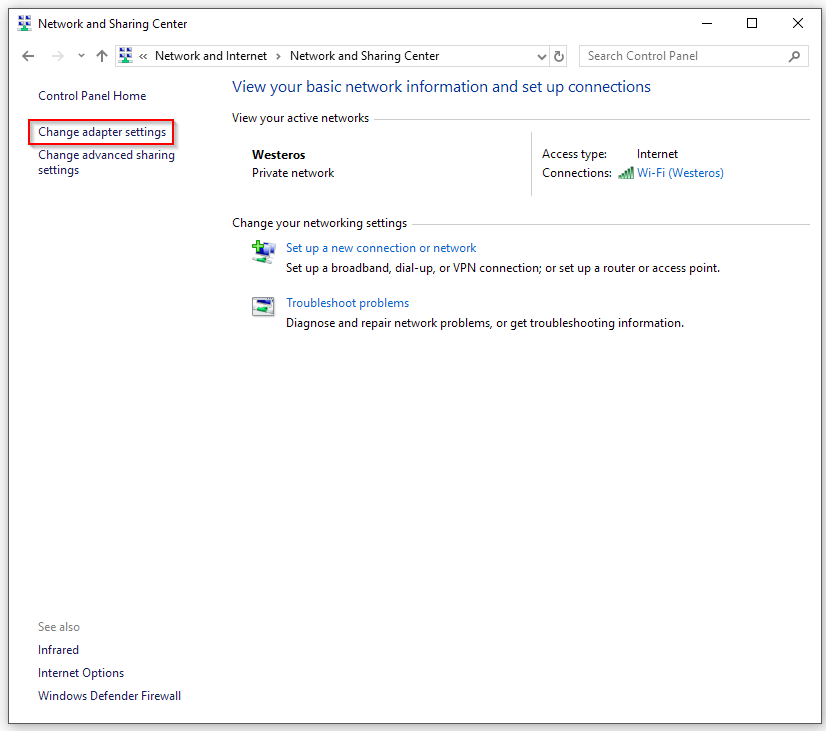
Then, click on Change Adapter Settings.
Right-click on the network that you are connected to, then click Properties.
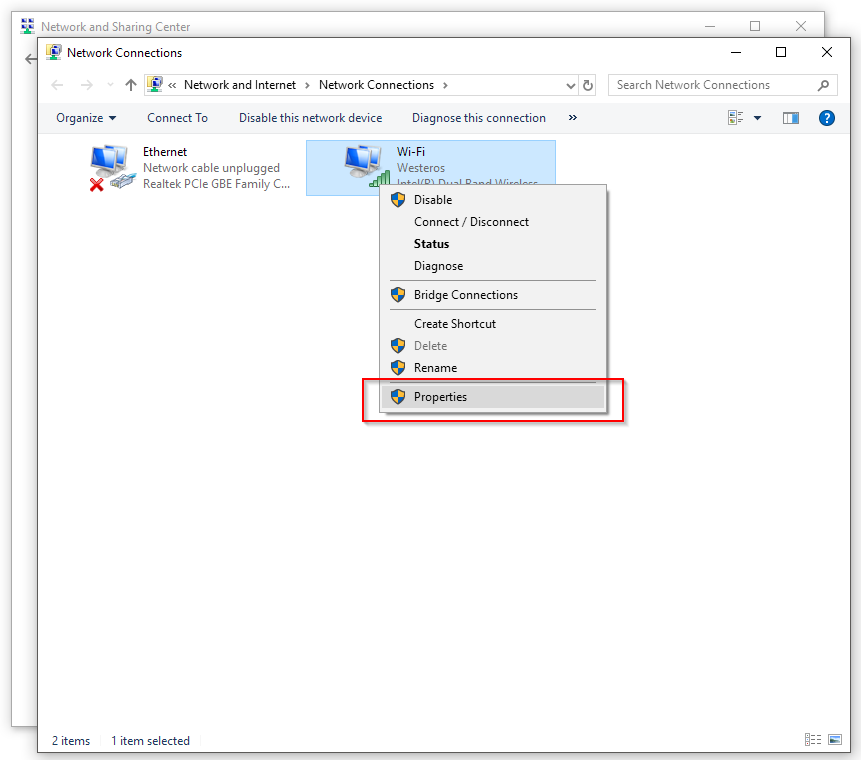
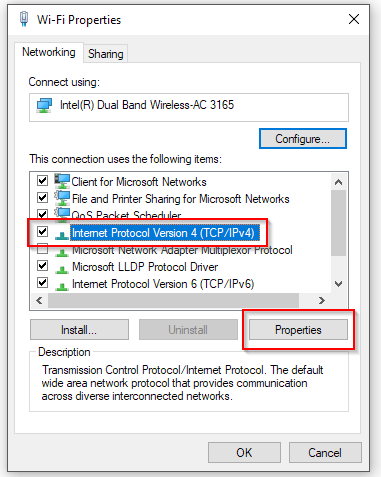
Select Internet Protocol Version 4 (or Version 6). Then, click Properties. Take note of any DNS server settings for future reference.
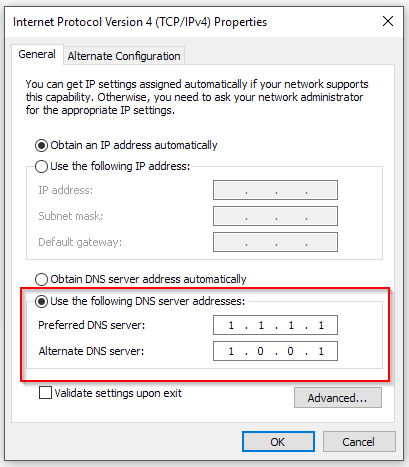
Choose Use the Following DNS Server Addresses, then enter the following:
– IPv4: 1.1.1.1 and 1.0.0.1 – IPv6: 2606:4700:4700::1111 and 2606:4700:4700::1001
Click OK, then Close. Restart your browser as well.
Configuring Your Router
Changing the DNS server settings on Windows 10 only affects that specific computer. You will need to change the settings in the router to set all devices on your network to use 1.1.1.1. Note that each router’s configuration may vary. It is best to check your router’s user manual.
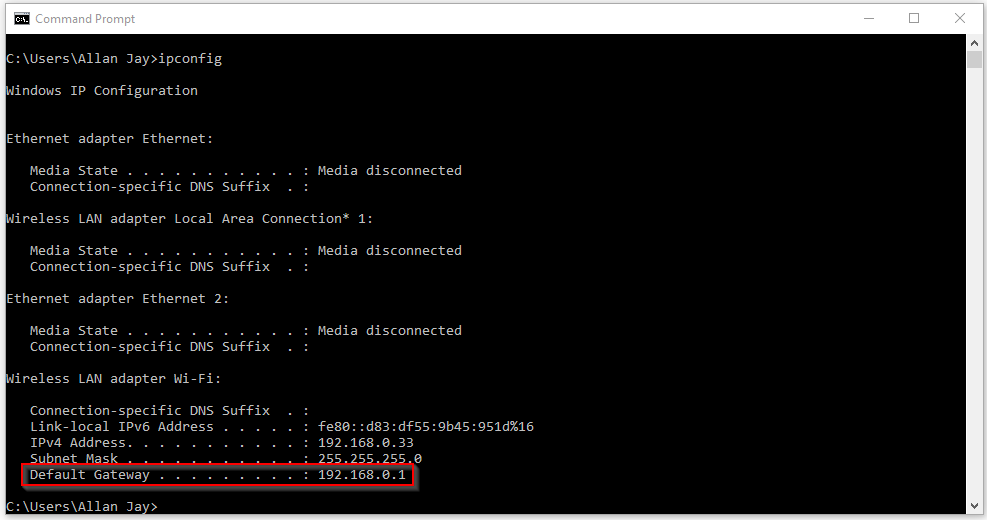
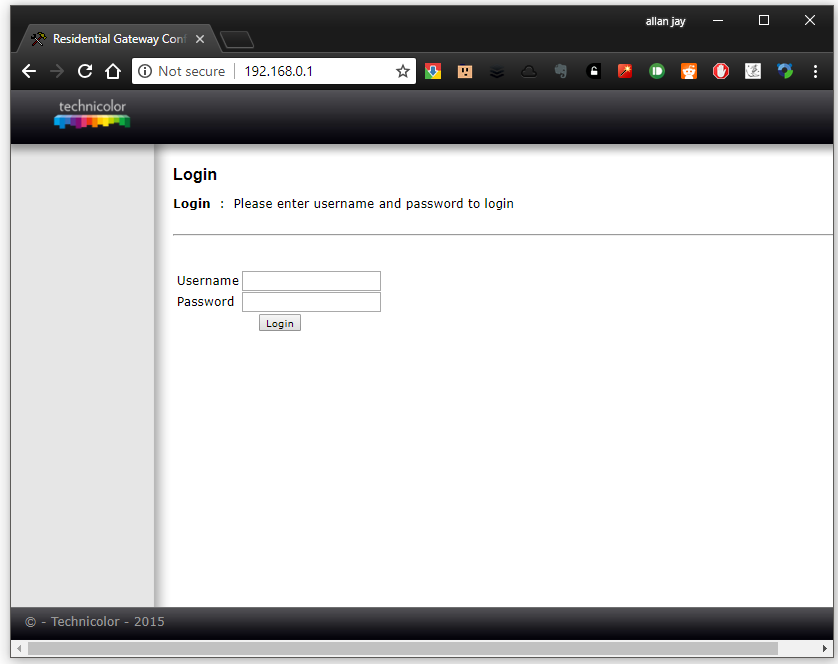
To access the router’s interface, make sure that you are connected to the router’s network. Open a browser and enter your router’s IP address. Typically, most routers use 192.168.0.1 or 192.168.0.2. To make sure that you have the right IP addrbess, launch the command prompt and enter ipconfig. The IP address on the Default Gateway is the router’s IP address.
You may need to provide a username and password to access the router’s interface.
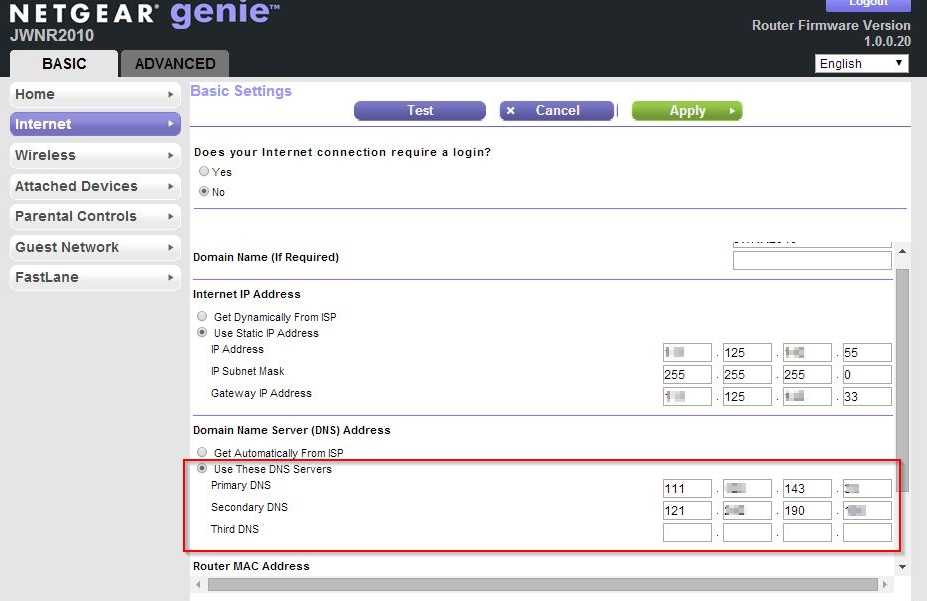
Most DNS settings can be found under the Internet or Network tab of the router interface. For example, in Netgear routers, DNS settings are under Internet.
DNS settings in Linksys routers is in Connectivity, under Local Network tab.
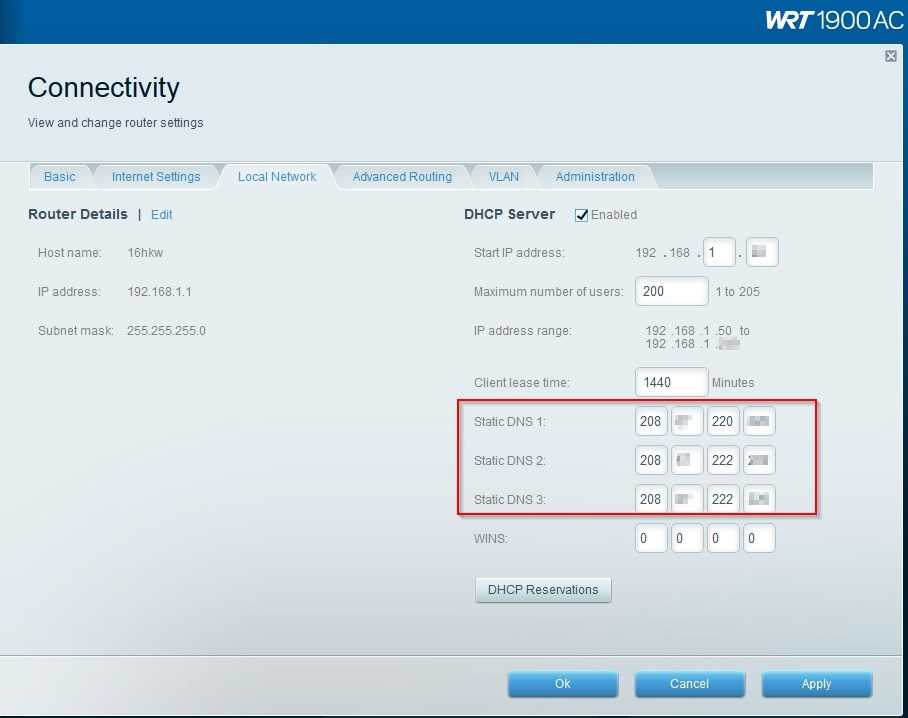
Remember to take note of any existing DNS settings for future reference. Enter Cloudflare’s DNS server settings, then save.
– IPv4: 1.1.1.1 and 1.0.0.1 – IPv6: 2606:4700:4700::1111 and 2606:4700:4700::1001
Cloudflare DNS Android setup step by step
Due to the many different versions of Android out there, the procedure to configure your device to use CloudFlare public DNS can be a little different.
For Android 9 Pie:
Android Pie is great because it allows you to use a Private DNS, that’s is a DNS over TSL, so your queries will be more secure. Now to configure your Android Pie device to use CloudFlare’s DNS do this:
First go to Settings, then to Network & internet, now move to Advanced and finally tap on Private DNS. Pick the provider option and enter the following:
1dot1dot1dot1.cloudflare-dns.com
Then simply hit Save, and that’s it.
For previous Android versions:
Just check our previous instructions regarding Android configuration on this same article, they should work fine for Android 8 and older. Still, if it’s not 100% clear, you need to do this:
Start by opening your device’s Settings app, it should be available on the main screen where the rest of your apps are located.
Once the Settings app is open, search for the Settings option and tap on it. After that, look for the Wi-Fi option. Now you should be able to see a list of Wi-Fi networks available. You have to do a long tap on the network that you are currently using, this should display an option called Modify Network.

Как изменить настройки DNS
Хотя у вашего интернет-провайдера, скорее всего, есть собственный DNS-сервер, это, вероятно, не самый быстрый доступный вариант. Вместо этого вы захотите изменить настройки DNS вашей операционной системы. Есть три ведущих альтернативных поставщика DNS; Google DNS, OpenDNS и Cloudflare DNS.
Как изменить настройки DNS в Windows 10
Чтобы изменить свой DNS в Windows 10, перейдите в Панель управления > Сеть и Интернет > Сеть и общий доступ и нажмите Изменить настройки адаптера слева.
Откроется список всех доступных сетевых устройств. Вы будете подключены к Интернету через проводной порт Ethernet или через адаптер Wi-Fi. В зависимости от ваших настроек щелкните правой кнопкой мыши подключенное к Интернету устройство и выберите « Свойства» .
Выделите параметр « Протокол Интернета версии 4 (TCP / IPv4)» и нажмите « Свойства» . Перейдите к параметру Использовать следующие адреса DNS-серверов .
В этой области введите следующие IP-адреса в зависимости от того, какого поставщика DNS вы хотите использовать:
- Google DNS: 8.8.8.8, 8.8.4.4
- Cloudflare IPv4: 1.1.1.1, 1.0.0.1
- OpenDNS: 208,67. 222,222, 208,67. 220,220
После ввода нажмите OK, чтобы сохранить эти настройки. Вы вернетесь в меню «Свойства». Отсюда выберите Интернет-протокол версии 6 (TCP / IPv6) и нажмите « Свойства» . Теперь вы можете повторить процесс для DNS-серверов IPv6.
- Google DNS: 2001: 4860: 4860 :: 8888, 2001: 4860: 4860 :: 8844
- Cloudflare IPv6: 2606: 4700: 4700 :: 1111, 2606: 4700: 4700 :: 1001
- OpenDNS: 2620: 119: 35 :: 35, 2620: 119: 53 :: 53
Нажмите OK, чтобы сохранить настройки IPv6 DNS. Затем вы можете закрыть все окна настроек и вернуться к обычному просмотру веб-страниц. После того, как вы нажали для подтверждения этих настроек, вы начнете использовать свои новые DNS-серверы.
Как изменить настройки DNS в macOS
Чтобы изменить DNS на устройстве macOS, откройте Системные настройки . Оттуда нажмите Сеть > Дополнительно . На этой странице перейдите на вкладку DNS . В отличие от Windows, вы можете легко добавлять и удалять DNS-серверы с помощью кнопок + и – в нижнем левом углу окна. После того, как вы нажали значок + , вы можете ввести IP-адрес желаемого провайдера.
Как изменить настройки DNS на iPhone
Предположим, вы хотите сменить DNS-сервер на iPhone, откройте « Настройки» > « Wi-Fi» . Коснитесь значка « i » рядом с подключенной сетью. Откроется страница настроек беспроводной сети, которую вы хотите настроить. Прокрутите страницу, пока не дойдете до заголовка DNS.
Коснитесь параметра Настроить DNS . По умолчанию это будет автоматически. Выберите « Вручную», чтобы включить дополнительные параметры. Поле «Добавить сервер» появится под DNS-сервером. Нажмите кнопку и введите IP-адрес желаемого провайдера. По завершении нажмите Сохранить в правом верхнем углу экрана.
Как изменить настройки DNS на Android
Действия по смене DNS на Android зависят от вашего устройства. Однако для стандартной версии Android 9.0 и выше откройте « Настройки» > « Сеть и Интернет» .
Нажмите на стрелку, чтобы развернуть Расширенные настройки. По умолчанию в поле Частный DNS будет установлено значение Автоматически. Выбор этой опции откроет окно ввода. Коснитесь имени хоста частного DNS-провайдера . Здесь вам нужно будет использовать имя хоста DNS-сервера, а не IP-адрес, как показано ниже;
- Google DNS: dns.google.com
- Cloudflare: 1dot1dot1dot1.cloudflare-dns.com
How to configure Cloudflare DNS service on Windows 11
Alternatively, if configuring your home router is a little challenging, or you want to use the Cloudflare DNS settings on every network you connect, including public networks (for example, coffee shops and airports), with your laptop or tablet, you can configure the DNS settings on Windows 11 (or Windows 10), instead of configuring your router.
Using these instructions is not recommended if you’re using a computer at work because changing these settings could cause connectivity problems and other issues. If you want to change these settings on your work computer, always consult with your IT administrator first.
To set the Cloudflare DNS settings on Windows 11, use these steps:
- Open Settings.
- Click on Network & internet.
- Click the active network connection – for example, Ethernet.
(Image credit: Future)
- Under the «DNS server assignment» section, click the Edit button.
(Image credit: Future)
- Select the Manual option.
- Turn on the IPv4 toggle switch.
- Under the “Preferred DNS” section, specify the Cloudflare DNS address: 1.1.1.1
(Image credit: Future)
- (Optional) Select the «On (automatic template)» option from the «DNS over HTTPS» setting.
- (Optional) Turn on the «Fallback to plaintext» toggle switch.
- Under the «Alternate DNS» section, specify the secondary Cloudflare DNS address: 1.0.0.1
- (Optional) Select the «On (automatic template)» option from the «DNS over HTTPS» setting.
- (Optional) Turn on the «Fallback to plaintext» toggle switch.
- (Optional) Turn on the IPv6 toggle switch.
- Under the “Preferred DNS” section, specify the Cloudflare DNS address: 2606:4700:4700::1111
(Image credit: Future)
- Under the «Alternate DNS» section, specify the secondary Cloudflare DNS address: 2606:4700:4700::1001
- (Optional) Select the «Encrypted only (DNS over HTTPS)» option from the «DNS over HTTPS» setting.
- Click the Save button.
Once you complete the steps, the computer will use the Cloudflare servers to resolve domain names.
Какие могут быть проблемы при использовании Cloudflare DNS и как их решить?
1. Неправильная конфигурация DNS записей
Одной из наиболее распространенных проблем при использовании Cloudflare DNS является неправильная конфигурация DNS записей. Некорректное настройка записей DNS может привести к тому, что пользователь не сможет получить доступ к сайту, а также ухудшить производительность сайта.
Решение: Перед тем как использовать Cloudflare DNS, следует убедиться, что все записи DNS настроены правильно. Необходимо убедиться, что IP-адреса в DNS-записях указаны верно и соответствуют адресам серверов, на которых размещен сайт. В случае возникновения проблем, можно обратиться в службу поддержки Cloudflare для получения помощи.
2. Конфликт с другими DNS-серверами
Еще одной проблемой, с которой можно столкнуться при использовании Cloudflare DNS, является возможный конфликт с другими DNS-серверами, которые могут быть использованы на сайте.
Решение: Для того, чтобы избежать проблем с конфликтами DNS-серверов, необходимо убедиться в том, что все DNS-записи указывают на IP-адреса Cloudflare. Также следует проверить настройки других DNS-серверов, которые могут быть использованы на сайте.
3. Низкая скорость загрузки сайта
Еще одной распространенной проблемой при использовании Cloudflare DNS является торможение загрузки сайта и, как следствие, низкая скорость загрузки страниц.
Решение: Для того, чтобы ускорить загрузку сайта, можно провести оптимизацию содержания сайта (например, сократить размер изображений, убрать ненужные скрипты и код). Также можно обратиться в службу поддержки Cloudflare за помощью в оптимизации загрузки сайта.
Почему DNS Resolver 1.1.1.1 хорош
Если вы задаетесь вопросом, почему служба распознавания DNS Cloudflare 1.1.1.1 — это то, что мы рекомендуем, в первую очередь, это правильный подход к интернет-услугам. Во-вторых, причины, по которым мы упоминаем эту услугу как отличный способ доступа к неограниченному Интернету, разнообразны, позвольте мне рассказать вам о них:
- Политика конфиденциальности Cloudflare прямо заявляет, что они никогда не будут продавать ваши данные третьим лицам .
- Cloudflare также заявляет, что никогда не будет хранить вашу личную информацию, а также уничтожит журналы отладки и аналогичные записи данных в течение 24 часов.
- Служба 1.1.1.1 работает в партнерстве с APNIC (интернет-регистратором для Азиатско-Тихоокеанского региона и Океании) и полностью бесплатна для использования.
- В отличие от VPN-сервисов, которые могут предложить аналогичные преимущества, в 1.1.1.1 нет ограничений на использование, и вам даже не нужно нигде регистрироваться.
- Вы можете получить доступ к любому заблокированному веб-сайту с помощью распознавателя DNS 1.1.1.1, а в некоторых случаях может также наблюдаться улучшение скорости вашего интернета.
Преимущества DNS Cloudflare перед другими DNS
1. Улучшенная скорость
Благодаря географически распределенным серверам Cloudflare и компоновке Anycast, DNS Cloudflare обеспечивает быстрый и надежный доступ к запрошенным веб-ресурсам. Это значит, что пользователи будут получать информацию быстрее, уменьшая задержку и оптимизируя время загрузки страниц.
2. Улучшенная безопасность
Cloudflare активно защищает своих клиентов от DDoS-атак, SQL-инъекций, спама и других видов вредоносных атак. DNS Cloudflare расширяет эту безопасность, предотвращая возможные угрозы с использованием автоматического мониторинга и фильтрации DNS-трафика. Это умиротворяющий слой безопасности, повышающий уровень защиты сайтов и пользователей.
3. Режим «1.1.1.1 для семей»
Cloudflare предлагает специальный режим DNS под названием «1.1.1.1 для семей», который обеспечивает фильтрацию нежелательного или неподходящего контента для более безопасного и дружественного веб-серфинга. Это особенно полезно для пользователей, которые хотят защитить своих детей от нежелательного или взрослого контента в Интернете.
4. Простая настройка и использование
Общедоступные DNS-сервера Cloudflare легко настраиваются на большинстве устройств и операционных систем. Благодаря их простому разворачиванию и использованию, пользователи могут быстро получить доступ к преимуществам DNS Cloudflare без необходимости в дополнительных настройках или специальных знаниях.
DNS Cloudflare предоставляет отличные возможности без каких-либо затрат. Пользователи могут бесплатно использовать DNS-серверы Cloudflare для улучшения скорости и безопасности своего Интернет-соединения. Это делает его доступным решением даже для небольших бизнесов и частных лиц, которые хотят усилить безопасность и ускорить свое онлайн-присутствие.
Как поменять настройки DNS
Скорее всего у вашего провайдера интернета есть собственный сервер DNS, но наверняка это не самый быстрый из возможных вариантов. Вы можете изменить настройки DNS в вашей операционной системе. Есть три ведущих альтернативных провайдера DNS: Google DNS, OpenDNS и Cloudflare DNS.
Как поменять настройки DNS в Windows 10
Для изменения настроек DNS в Windows 10 надо открыть Панель управления > Сеть и интернет > Сетевые подключения и с левой стороны нажать «Поменять настройки адаптера».
Откроется список доступных сетевых устройств. Вы подключены к интернету либо через проводной порт Ethernet, либо через беспроводной Wi-Fi. В зависимости от ваших настроек, нажмите на нужное устройство правой кнопкой мыши и выберите «Свойства». Выделите опцию «IP версии 4 (TCP/IPv4)» и нажмите «Свойства». Перейдите в раздел «Использовать следующие адреса DNS-сервера».
Здесь нужно вводить IP-адрес DNS-провайдера:
- Google DNS: 8.8.8.8, 8.8.4.4
- Cloudflare IPv4: 1.1.1.1, 1.0.0.1
- OpenDNS: 208.67. 222, 208.67. 220.220
После ввода нажмите OK для сохранения настроек. Вы вернётесь в меню «Свойства». Здесь выберите «IP версии 6 (TCP/IPv6)» и снова нажмите «Свойства». Можно повторить процесс для серверов IPv6 DNS.
- Google DNS: 2001:4860:4860::8888, 2001:4860:4860::8844
- Cloudflare IPv6: 2606:4700:4700::1111, 2606:4700:4700::1001
- OpenDNS: 2620:119:35::35, 2620:119:53::53
Нажмите OK для сохранения настроек IPv6 DNS. Можно затем закрыть все окна настроек. Когда вы нажали на подтверждение этих настроек, вы начали пользоваться новыми серверами DNS.
Как поменять настройки DNS на macOS
Для смены DNS на устройстве под управлением macOS откройте Системные настройки > Сеть > Дополнительно. На этой странице откройте вкладку DNS. В отличие от Windows, вы можете легко добавлять и удалять серверы DNS при помощи кнопок + и — внизу слева в окне. Когда вы нажимаете на иконку +, можно вводить IP-адрес выбранного вами провайдера DNS.
Как поменять настройки DNS на iPhone
На iPhone нужно открыть Настройки > Wi-Fi. Нажмите на иконку ‘i’ рядом с используемой сетью. Это откроет страницу настроек беспроводной сети, которую вы хотите поменять. Прокрутите вниз до заголовка DNS.
Нажмите на команду «Настроить DNS». По умолчанию задано значение «Автоматически». Выберите «Вручную» для активации других вариантов. Под заголовком «Сервер DNS» появится поле «Добавить сервер». Нажмите на кнопку и введите IP-адрес выбранного вами провайдера DNS. После завершения нажмите «Сохранить» в верхнем правом углу экрана.
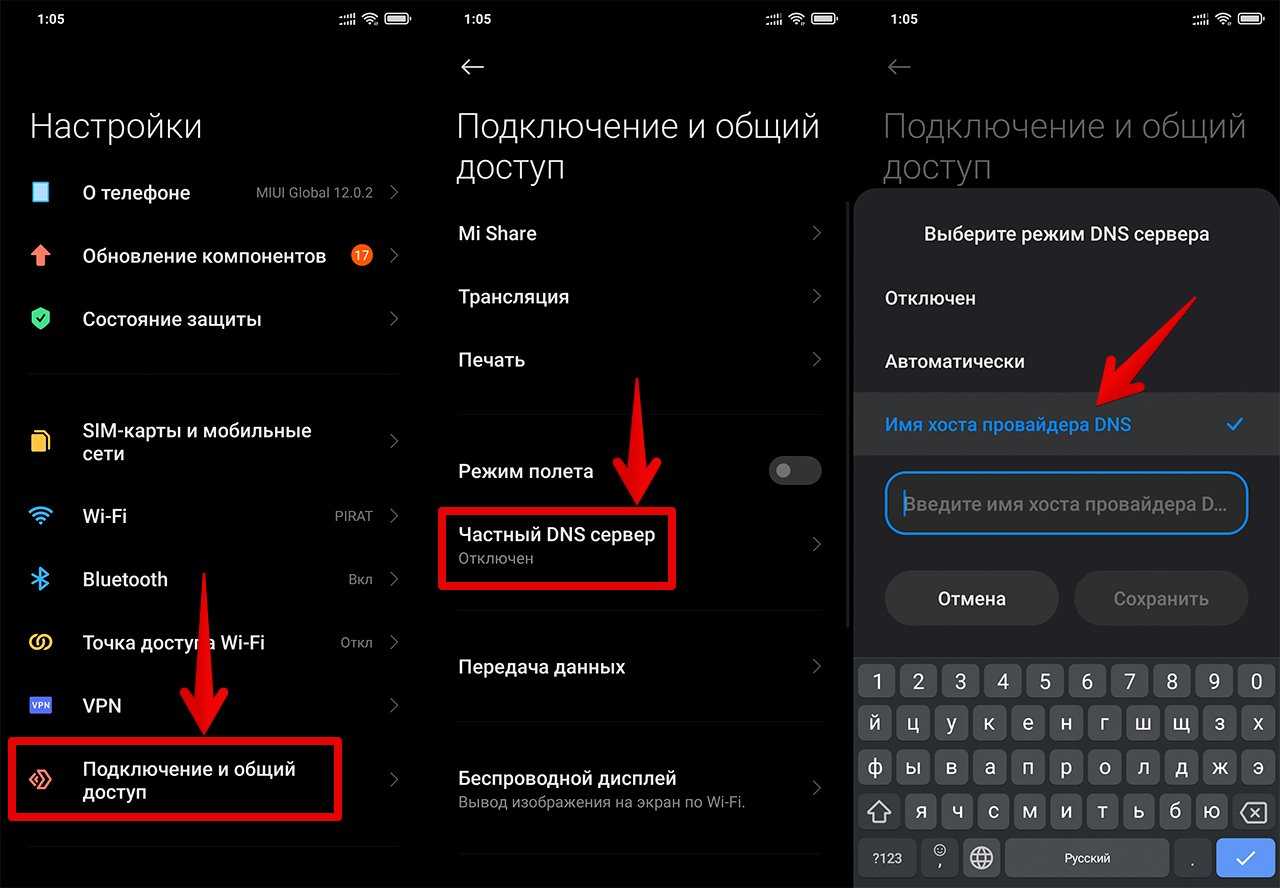
Как поменять настройки DNS на Android
Процесс изменения настроек DNS на Android может быть разным на разных устройствах. Для чистой Android 9.0 и новее нужно открыть Настройки > Сеть и интернет.
Нажмите на стрелку, чтобы раскрыть дополнительные настройки. По умолчанию в поле «Персональный DNS-сервер стоит значение «Автоматический режим». Нажмите «Имя хоста поставщика персонального DNS-сервера». Здесь нужно использовать имя хоста сервера DNS вместо IP-адреса, вроде следующих:
- Google DNS: dns.google.com
- Cloudflare: 1dot1dot1dot1.cloudflare-dns.com
What is DNS?
A DNS service translates between web addresses and internet addresses. DNS has a double meaning. It stands for the Domain Name System, which is the methodology that deals with mapping between address types, and it also stands for “domain name server,” the database that holds those mappings.
A domain is the core part of a URL (universal resource locator). A URL is the entire address that you see in the address bar of your browser. So, in the URL https://privacy.net/analyzer, the domain name is privacy.net.
Domains were invented in the early 1990s by Sir Tim Burners-Lee when he formulated the system that is now called the World Wide Web. The addressing system is meaningless on the internet. The internet uses an addressing system called an IP address. “IP” stands for the Internet Protocol, which defines the conventions for sending messages over interconnected networks. The addressing system is one of the key elements of the Internet Protocol. A typical IP address looks like 108.59.8.18. Routers understand these addresses and use them to pass messages on to their neighboring networks.
When you enter a URL in your browser, the first task the browser does is go to a DNS server and get the address of the server that is registered as hosting that website. There are many DNS servers in the world and the one that your browser uses is usually dictated by your internet service provider. However, it is possible to go into the settings of your browser and override the default DNS server selection.
Changing browser settings
The IP address of the Cloudflare DNS service is 1.1.1.1, which is very easy to remember. You just need to go into the network properties of your browser to get access to the service. You do not have to pay anything or create an account.
Cloudflare DNS on Windows
The browser type that you use doesn’t matter because the DNS setting is a property of your network, over which all browsers connect to the internet.
Step 1: Get to the network properties
- Open the Start menu and click on the cog symbol, just above the shutdown button. This will open the Windows Settings system.
- Click on Network and Internet to get to the Network Settings page. Click on Change adapter options. This will open a list of network connections.
- Right-click on the network you use to connect to the internet and select Properties from the context menu.
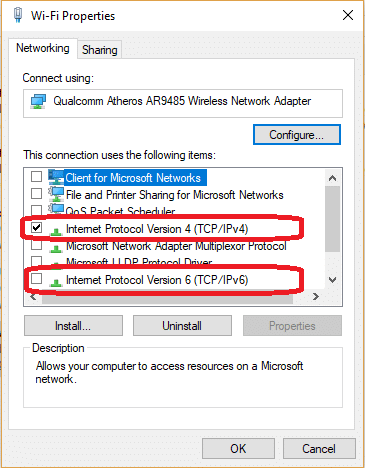
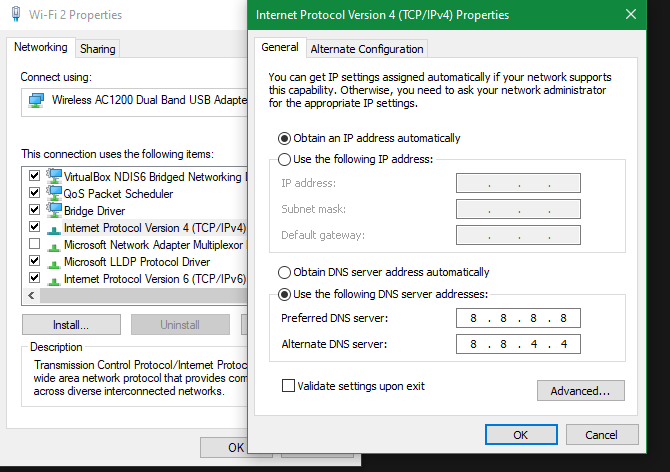
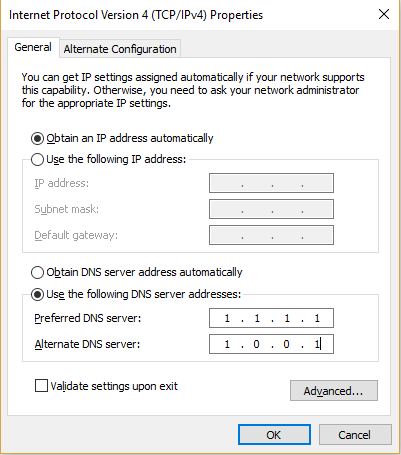
Step 2: Set up DNS for IPv4
- In the connection properties window, look to see if the line Internet Protocol Version 4 (TCP/IPv4) is checked. If so, click on that line once and then press the Properties button. This will open another window.
- If there are values in the DNS fields, write them down in case you need to rollback to your current settings.
- Click on the Use the following DNS server addresses radio button.
- Enter 1.1.1.1 in the Preferred DNS server field.
- Enter 1.0.0.1 in the Alternate DNS server field.
- Click on the OK button and then click on Close in the connection properties window.
- Restart your browser to get it to use the Cloudflare DNS service.
Step 3: Set up DNS for IPv6
- If the line Internet Protocol Version 6 (TCP/IPv6) is checked in the connection properties screen, click on the line and press the Properties button. This will open another window.
- Note down any current values in the DNS fields if there are any. You may need to return to these settings at a later date.
- Click on the Use the following DNS server addresses radio button.
- Enter 2606:4700:4700::1111 in the Preferred DNS server field.
- Enter 2606:4700:4700::1001 in the Alternate DNS server field.
- Click on OK to close the protocol properties window and then press the Close button in the connection properties window.
- Restart your browser to get it to use the Cloudflare DNS service.
Cloudflare DNS on macOS
Setting up the Cloudflare DNS on Macs is very straightforward.
- Open System Preferences
- Perform a search for DNS Servers. Click on that entry in the results list.
- Click on the + symbol to add a new DNS record. Enter 1.1.1.1
- Click on the + symbol again and enter 1.0.0.1 this time.
- Click on OK and then click Apply.
- Restart your browser to get the new DNS settings active.
Cloudflare DNS on Linux
These instructions are for Ubuntu. However the steps are almost identical for all flavors of Linux.

Step 1: Get to the network settings
- Look for the Applications icon in the left-hand menu. This symbol looks like a Rubik’s cube.
- Click on Settings and select Network.
- Look in the right-hand panel for your regular internet connection. Click on the cog icon.
Step 2: Set the DNS for IPv4
- In the connection settings screen, click on the IPv4 tab.
- In the DNS settings, move the Automatic slider to Off.
- Enter 1.1.1.1 and 1.0.0.1 in the two DNS address fields.
- Click on Apply.
- Restart your browser to get the changes to take effect.
Step 3: Set the DNS for IPv6
- In the connection settings screen, click on the IPv6 tab.
- In the DNS settings, set the Automatic slider to Off.
- Enter 2606:4700:4700::1111 and 2606:4700:4700::1001 in the two DNS address fields.
- Click on Apply.
- Restart your browser to get the changes to take effect.
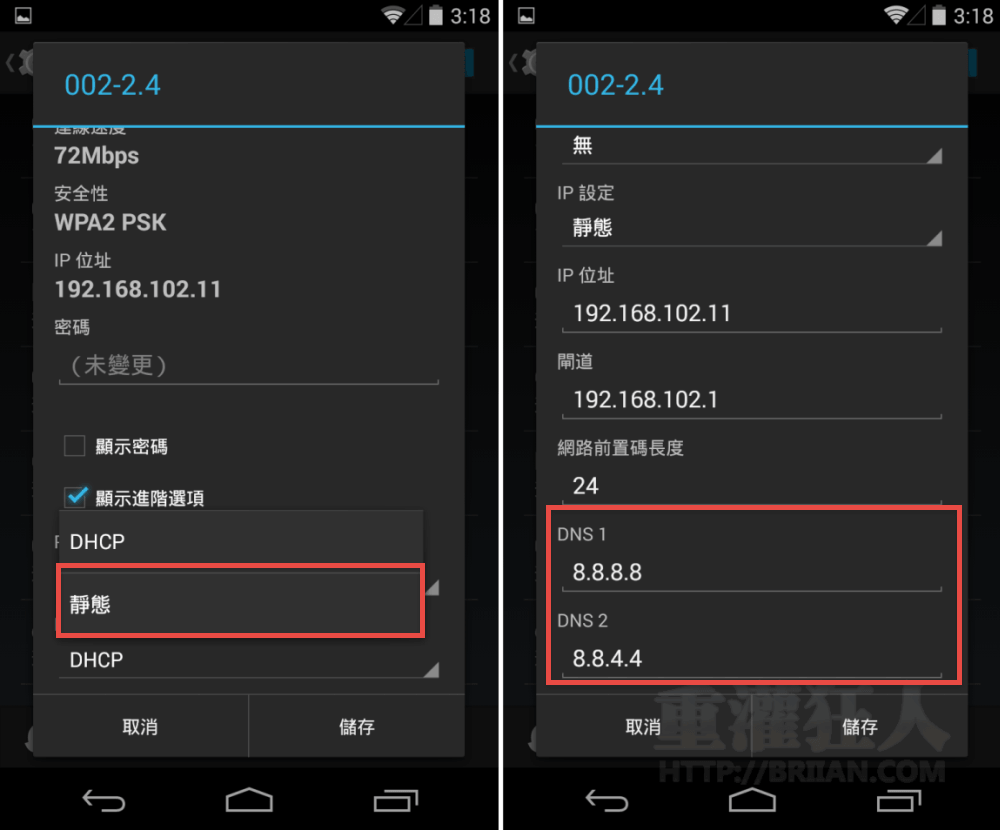
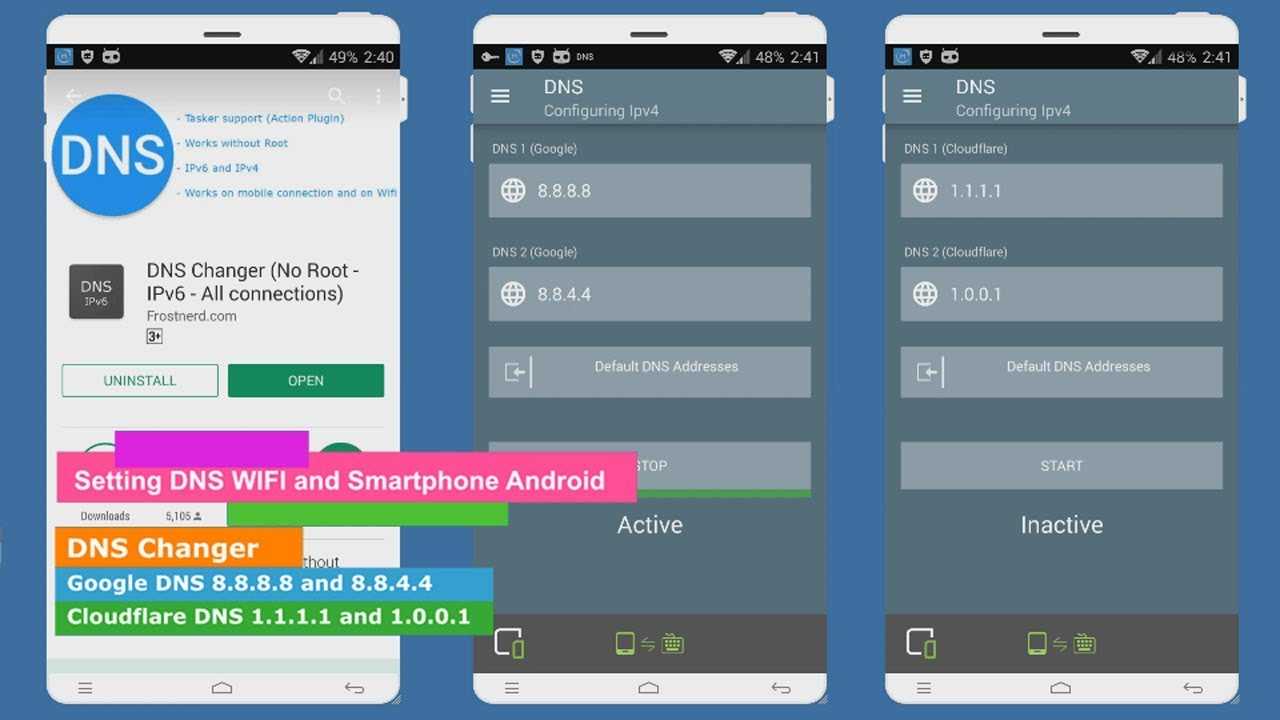
Cloudflare DNS on Android
At present, Android devices only use IPv4 addresses. You need to be connected to the network that you want to change the DNS settings for.
- From the top of the screen, swipe down to get the settings bar to expand. Tap on WiFi. Tap on More Settings at the bottom of the list of available networks.
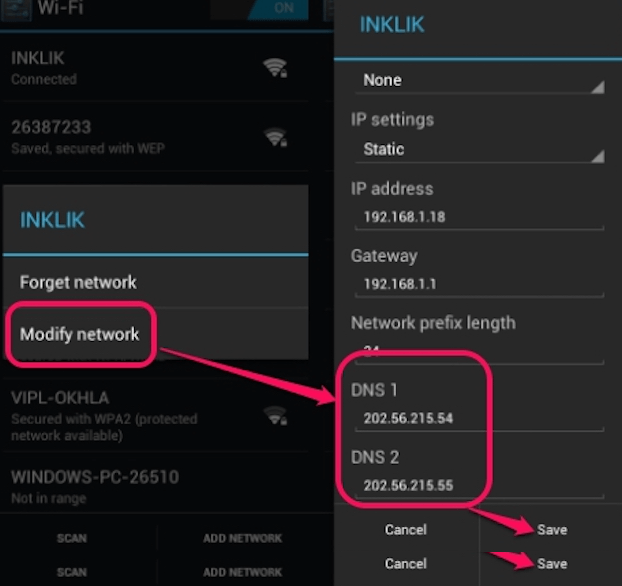
- Long-press on the name of your current network. Tap Modify Network in the popup that appears.
- Tap on Advanced options in the next screen and then tap on IP settings and select Static.
- Scroll down to the fields DNS1 and DNS2. If these fields have the values in them, note them down in case you want to return to your original settings.
- For DNS1 enter 1.1.1.1 and in DNS2 enter 1.0.0.1.
- Tap on Save.
Cloudflare DNS on iOS
Just like Android, iOS only uses IPv4 addresses.
- Tap on Settings in the Home screen. Select Wi-Fi from the Settings screen.
- In the Wi-Fi screen tap on the right-arrow next to the name of your internet connection.
- Tap Configure DNS and then Manual.
- If any DNS entries exist, note them down and then delete them.
- Tap on + Add Server. Enter 1.1.1.1 for the address value.
- Tap on + Add Server. Enter 1.0.0.1 for the address value.
- Tap on Save.