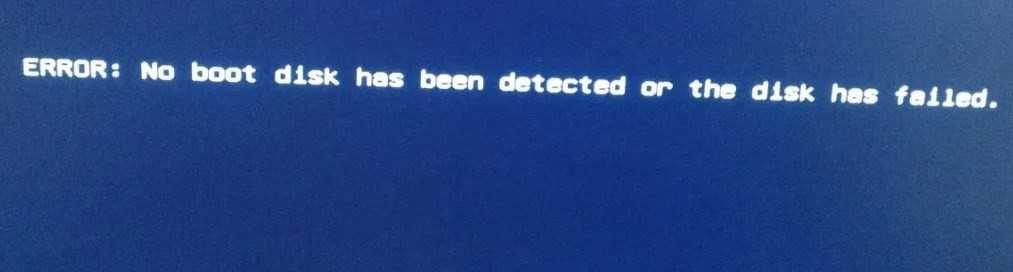
![[fixed] no boot disk has been detected or the disk has failed](http://jsk-oren.ru/wp-content/uploads/0/6/7/067cafbe79fb65459c26c53ea556d772.jpeg)
Использование инструментов для восстановления данных на жестком диске
Когда компьютер не определяет жесткий диск при загрузке, может возникнуть паника и ощущение потери всех важных данных. Однако, существуют инструменты для восстановления данных, которые можно использовать в подобной ситуации.
Ниже представлен список инструментов, которые могут помочь восстановить данные с неработающего жесткого диска:
- Live CD/USB: Это загрузочный носитель операционной системы, который позволяет вам запустить компьютер с помощью другого операционного окружения, не используя жесткий диск. Это может помочь восстановить данные и выполнить диагностику проблемы. Некоторые известные дистрибутивы операционной системы Linux, такие как Ubuntu или Fedora, предлагают Live CD-версии, которые легко загрузить с CD или USB-накопителя.
- Диагностические утилиты производителя: Многие производители компьютеров и жестких дисков предоставляют специальные утилиты для диагностики и восстановления данных. Программное обеспечение может быть загружено на другой компьютер и использовано для проверки состояния жесткого диска или восстановления данных.
- Ручное подключение к другому компьютеру: Если у вас есть доступ к другому компьютеру, который работает исправно, вы можете попробовать подключить неработающий жесткий диск к нему в качестве второго диска. Это может помочь определить, является ли проблема с самим жестким диском или с другими компонентами компьютера.
- Профессиональные услуги по восстановлению данных: В крайнем случае, когда другие методы не помогают, вы можете обратиться к профессиональным услугам по восстановлению данных. Компании, специализирующиеся на восстановлении данных, могут использовать специализированное оборудование и программное обеспечение для восстановления данных с поврежденного жесткого диска.
Не стоит паниковать, если ваш компьютер не обнаруживает жесткий диск при загрузке. Существует несколько методов восстановления данных, которые вы можете попробовать, прежде чем обращаться за профессиональной помощью
Помните, что важно не затирать данные на жестком диске до их успешного восстановления
В случае, если у вас нет опыта работы с жесткими дисками, будет разумно обратиться к специалистам. Не рекомендуется выполнять сложные операции самостоятельно, чтобы избежать возможного ухудшения ситуации.
Используйте эти инструменты с осторожностью и соблюдайте рекомендации производителей и экспертов в области компьютеров, чтобы минимизировать риск потери данных и повреждения жесткого диска
Method 7: Enable drive in BIOS
If your hard drive does not show in Disk Management, you should check if it can be detected in BIOS (Basic Input / Output System). BIOS is responsible for monitoring the communication between hardware devices connected to your PC and operating system. Thus, you can enter BIOS to check status for the hard drive that cannot be recognized by system. That’s because the hard drive might be turned OFF in System Setup, for some motherboard manufactures disable unused ports in BIOS by default.
Please note that the BIOS interface and settings, and how to enter BIOS differs from BIOS versions and motherboard brands. You can consult support team of your motherboard or computer for detailed steps to access BIOS. Besides, be careful when making changes in BIOS, as any improper operation may lead to serious problem. If you are new to these operations, please read manual carefully in advance or ask a computer expert to help you.
Step 1 Restart computer and keep pressing the function on your computer which allows you to enter BIOS.
The key might by F1, F2, F3 or Delete, and it will be prompted on the screen before operating system boots. Also, you can consult your PC’s manufacturer for user manual.
Step 2 Select Boot tab to check if your hard drive is listed there.
Step 3 If you cannot see your hard disk, you can try enabling the controller for the disk. Exact settings for this can be found in your motherboard or PC manuals. Once the disk is turned on, restart computer and check if it can be recognized in Disk Management.
No boot disk has been detected or the disk has failed — решаем сбой
В большинстве случаев, причину найти удается достаточно быстро, просто проверив жесткий диск на сбои или настроив BIOS. Но, нередки ситуации, когда приходится заменять винчестер или переустанавливать систему.
Решение всех возможных проблем:
- Убедитесь, что диск вставлен в разъем до конца.
- Проверьте HDD на целостность, просто вставив в другой компьютер или, если он у вас на гарантии, отнесите в магазин. Также, вытяните его из компьютера вместе со шлейфами и заново вставьте.
- Проверьте систему на наличие ошибок. При включении ПК нажимайте на F12 (или F2), зайдите в «Boot menu» — «Utility partition» или «Diagnostics». Жмите Run (enter) и начнется автопроверка на возможные неполадки. После этого вам укажут на них.
-
Зайдите в биос, при включении ПК нажав многократно F10, либо Delete, F12, F11, ESC, Fn+F1 и тд. (зависит от ноутбука, стационара и виндовса). Отыщите пункт “File” — выбираем «Apply Default and Exit» и подтверждаем. Эта команда сбрасывает все до заводских и чаще всего помогает.
-
Далее найдите «Boot Menu» — «Boot sequience» («Boot Priority») — поставьте, чтобы HDD (SATA) загружалось первым (если стоит Never — изменить на Always). Загрузка сети (LAN) должна стоять в выключенном режиме (Disabled).
- Если у вас имеется установочный диск, можете вставить его и при загрузке выбрать “Восстановление” — ”Устранение неполадок“ — ”Дополнительные параметры” — “Автоматическое восстановление”. Далее — перезагрузитесь.
Используем командную строку:
Зайдите в командную строку. Пуск — Выполнить — пишем cmd.exe и входим от имени администратора. Если ПК не включается, заходим в “Дополнительные параметры”, описанные в пункте выше, и там будет такая опция. В открытом окне выполняем поочередно: sfc /scannow c: /offbootdir=c: /offwindir=c:windows — пойдет проверка, после перезагрузитесь. Не помогло? — впишите следующее:
- bootrec.exe /FixMbr;
- bootrec.exe /FixBoot;
- bootrec.exe /RebuildBcd;
- Дождитесь выполнения и запустите перезапуск системы.
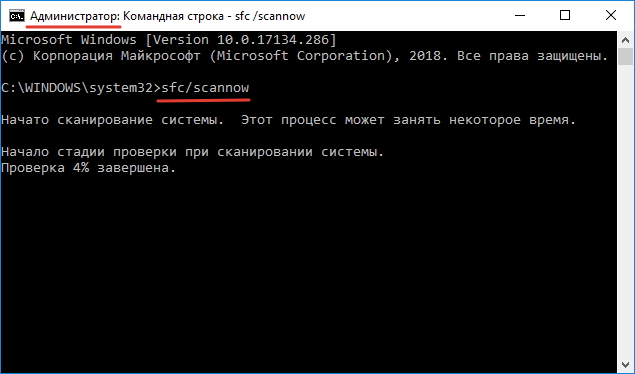 Выполнение команды sfc /scannow
Если убедились в том, что диск исправен, но все равно не заходит в Windows, переустановите его. В случае, когда проблема с батарейкой BIOS, просто купите новую и замените (она стоит не много). Это легче, чем разбирать ПК и проверять вольтметром.
Как решить проблему «No hard disk is detected» при загрузке компьютера
Проблема «No hard disk is detected» при загрузке компьютера может возникнуть по разным причинам, включая неисправности оборудования или проблемы с программным обеспечением. В этой статье мы предоставим несколько решений, которые могут помочь вам решить эту проблему.
1. Проверьте подключение жесткого диска
Сначала убедитесь, что жесткий диск правильно подключен к вашему компьютеру. Проверьте, что кабель SATA или IDE плотно прикреплен как к жесткому диску, так и к материнской плате. Также стоит проверить, что питание достаточно подается на жесткий диск.
2. Проверьте настройки BIOS
При загрузке компьютера нажмите указанную на экране клавишу (обычно это F2, F10, Del или Esc) для входа в BIOS. Проверьте, что в настройках BIOS ваш жесткий диск распознается. Если нет, попробуйте включить автоматическое обнаружение устройств или вручную настроить параметры жесткого диска.
3. Проверьте жесткий диск на наличие ошибок
Создайте загрузочный USB-накопитель или диск с программой для диагностики жесткого диска и запустите ее на вашем компьютере. Программы, такие как CrystalDiskInfo или HD Tune, могут помочь вам определить наличие ошибок и проблем на вашем жестком диске. Если у вас есть запасной жесткий диск, попробуйте подключить его и проверить, будет ли он распознаваться компьютером.
4. Обновите или переустановите драйверы
Если предыдущие шаги не помогли, попробуйте обновить или переустановить драйверы для вашего жесткого диска. Вы можете скачать последние версии драйверов с сайта производителя компьютера или материнской платы и установить их на вашем компьютере.
5. Свяжитесь с производителем
Если все вышеперечисленные шаги не решают проблему «No hard disk is detected», возможно, ваш жесткий диск нуждается в ремонте или замене. Рекомендуется связаться с производителем жесткого диска или обратиться в сервисный центр для получения дополнительной помощи.
Надеемся, что эти решения помогут вам решить проблему «No hard disk is detected» при загрузке компьютера. В случае неудачи всегда можно обратиться к профессионалам, которые смогут предложить более точные рекомендации и помощь в ремонте вашего компьютера.
Reasons for Hard drive not found in Dell computer
Actually, hard drive not found issue occurs not only in Dell, but HP, Kingston, Samsung, etc. When a computer starts up with a message like hard drive not detected, no boot device found, no boot partition found, missing operating system, hard disk drive failure, etc. It means the computer is unable to find the default hard drive it uses when it loads. There are several reasons why your Dell reports no hard drive detected or missing operating system error on start up:
Bad BIOS setting;
A loose cable;
A corrupted hard drive registry;
A bad Windows installation;
A boot sector virus;
A broken hard drive.
Проверьте соединение кабеля HDD/SSD к ПК
Одной из причин проблемы «No hard disk detected» при загрузке компьютера может быть неправильное соединение кабеля HDD/SSD с материнской платой. Если кабель не подключен должным образом, компьютер не сможет обнаружить жесткий диск и загрузить операционную систему.
Проверка соединения кабеля HDD/SSD
Для того чтобы убедиться, что соединение кабеля HDD/SSD с ПК выполнено верно, выполните следующие шаги:
- Перейдите в BIOS компьютера. Для этого при включении компьютера нажмите кнопку F2, F10 или Del (зависит от модели компьютера) на клавиатуре. Появится экран с настройками BIOS.
- В BIOS перейдите на вкладку Boot (загрузка) или Advanced (расширенные настройки). Найдите раздел, связанный с жестким диском, обычно он обозначается как «HDD/SSD» или «Hard Disk».
- Убедитесь, что в строке «HDD/SSD» или «Hard Disk» указано «Enabled» или «Master». Если там написано «Disabled» или «Slave», воспользуйтесь клавишами со стрелками для выбора этой строки и нажмите клавишу Enter. В открывшемся меню выберите вариант «Enabled» или «Master».
- Проверьте, что кабель HDD/SSD подключен к материнской плате надежно. Убедитесь, что он не отсоединился или не поврежден.
Проверка жесткого диска на работоспособность
Если после проверки соединения кабеля HDD/SSD проблема «No hard disk detected» при загрузке компьютера не исчезла, можно попробовать проверить работоспособность самого диска:
- Перейдите в BIOS, как описано выше.
- Найдите раздел «Advanced» или «CD-ROM/DVD-ROM Drive» и выберите его.
- Используя клавиши со стрелками, выберите пункт «Hard Disk Drive» или «HDD/SSD».
- Нажмите клавишу Enter, чтобы выполнить проверку жесткого диска. Возможно, BIOS предложит использовать команду Smart Self Test, которая позволит определить наличие ошибок на поверхности диска.
Если после проверки обнаружены ошибки или диск не проходит тестирование, возможно, требуется заменить жесткий диск.
В случае, если все настройки в BIOS корректны и соединение кабеля HDD/SSD с ПК выполнено правильно, а проблема «No hard disk detected» при загрузке Windows XP все еще не решена, можно попробовать восстановить загрузочный сектор (MBR) диска. Это можно сделать при помощи установочного диска Windows XP:
- Вставьте установочный диск Windows XP в CD/DVD привод и перезагрузите компьютер.
- При загрузке с диска нажмите любую клавишу, чтобы запустить установку.
- Выберите язык, клавиатуру и другие настройки, а затем нажмите кнопку «R» (Repair) для входа в режим восстановления.
- В командной строке введите команду fixmbr и нажмите клавишу Enter для выполнения восстановления загрузочного сектора.
- После завершения восстановления загрузочного сектора перезагрузите компьютер и проверьте, удалось ли исправить проблему «No hard disk detected» при загрузке Windows XP.
Если после всех этих действий проблема не исправлена, возможно, причина проблемы кроется в другой конфигурации компьютера или требуется обратиться к специалисту по ремонту компьютеров для дальнейшей диагностики и восстановления.
5. Check for Faulty or Unplugged SATA Cables
The BIOS will not detect a hard drive if the data cable is faulty. Make sure the SATA cables are in good condition, and you have connected them promptly. Also, inspect the motherboard for bent or misaligned pins.
Check your hard drive manufacturer’s documentation for the right type of cables. For example, some manufacturers recommend using UDMA cabling for ATA drives. These color-coded cables require proper orientation to establish a proper connection. You can find your drive’s supporting documentation on its manufacturer’s website.
Furthermore, try connecting an old DVD drive using the SATA cables to the motherboard and see if it works. If not, it is likely that your data cable is malfunctioning. Try replacing the cable and see if that helps.
Windows Detected a Hard Disk Problem Backup Your Files Immediately
We all know that when a hard disk problem occurred, the hard disk becomes inaccessible, thus, if you want to secure your data, you can always rely on Bitwar Data Recovery for Windows or Mac.
It’s professional data recovery software that helps you recover data from inaccessible hard disk, formatted partition or even can recover data from lost partition.
The software offers easy steps to recover lost data, firstly, select device or drive where you have lost data, secondary, select a recovery mode and choose your target recovering file types (e.g. document or photo). Thirdly, scan and preview the data, and then hit the recover button to save the data into different device or partition. That’s all.
After successfully recovered your data, it’s time to proceed in different fixing solutions to repair your Windows 10 hard disk failure. When below one fixing method will not work out, proceed to another and don’t forget to relax.
Solutions to Dell alerting hard drive not found
When there is no hard drive detected in Dell, you should work around to resolve the problem. Here are some ways for you to resolve it.
1. Press F1
When the Dell alert you hard drive not found, press F1 to continue, it is a BIOS error message. And you should press F1 to continue. Because pressing F1 is a contingency procedure that can work around an error, and the computer may load into Windows correctly after pressing F1.
2. Correct bad BIOS settings
BIOS handles the basic setup and boot process for the computer and prepares it to load the operating system. Hard drives are usually connected to onboard a SATA or IDE port. If the port that hard drive is connected is disabled, hard drive will not be detected by the computer and you will get a message “hard drive not found”. Thus, when you meet the problem, you need to check BIOS setup.
Another question you need pay attention to is the hard drive that contains Windows should appear first on the list. If it didn’t appear first on the list, you can enter the computer’s BIOS setup and change the boot device priority.
3. Check hard drive cable
Dell hard drive not found may also happen if the computer isn’t physically connected to the hard drive. So you can check the hard drive cable to ensure whether it has a loose cable connection or the SATA cable and power cable may have worn out. If it is, you can reconnect the cables from both the hard drive and the motherboard, or replace the cable with a new one.
4. Perform a hard drive reseat
A hard or forced reseat erases all information in the computer memory and might restore functionality. Reseatting your computer forces the system to clear and reestablish the software connections between the BIOS and the hardware. To perform a hard reseat, you should do as following steps:
1. Turn off the computer. Remove the computer from any port replicator or docking station.
2. Disconnect all external devices from your computer, unplug the AC adapter from the computer.
3. Remove the battery from the battery compartment.
4. Press and hold down the Power button for about 15 seconds to drain any residual electrical charge from the capacitors that protect the memory.
5. Insert the battery, and plug the AC adapter back into the computer, but do not connect any of the peripheral devices such as USB storage devices, external displays, printers, etc.
6. Turn on the computer. If a start menu opens, select Start Windows Normally with arrow keys and press Enter.
5. Test Hard Drive
If the ways above cannot settle your problem, then you need to test whether it is a physical damaged hard drive.
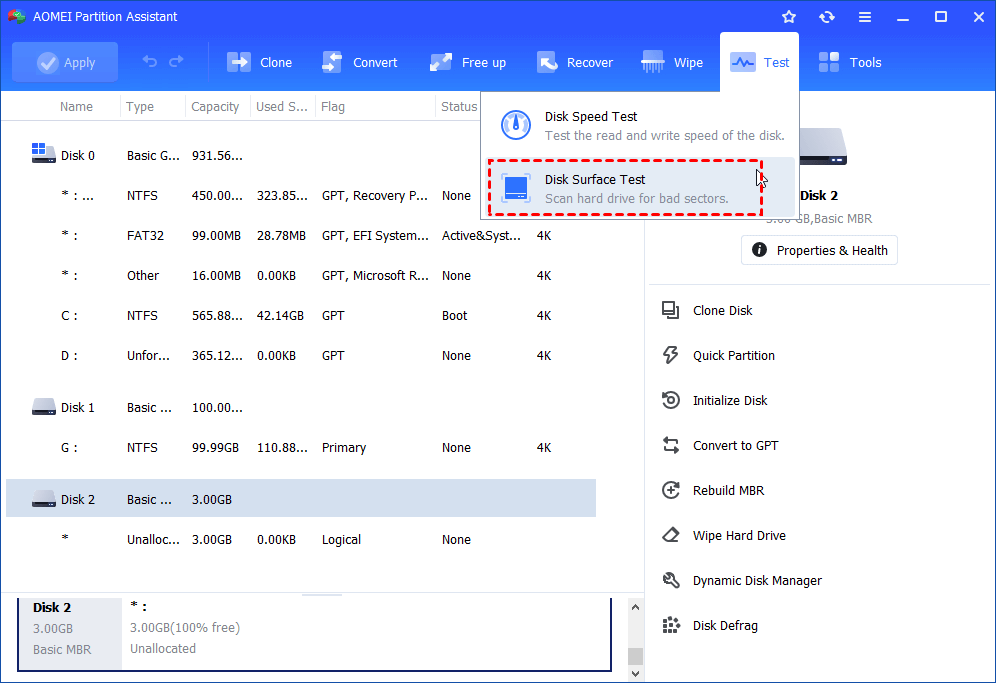
Remove the hard drive from the computer and connect it to another computer to see whether it still works. if it doesn’t, you should replace hard drive with a new one. If it does, you can test the hard drive to see if it has bad sectors. For this job, here we highly recommend you to use a third party software AOMEI Partition Assistant Standard, which can help you check your hard drive easily. It can work under Windows 11/10/8.1/8/7/XP/Vista.
Step 1. Connect your hard drive from Dell to a Windows PC.
Download FreewareWin 11/10/8.1/8/7/XP
Secure Download
Step 2. Free download AOMEI Partition Assistant, install, and launch it. You can see the hard drives on the main interface. To test hard drive, here you can select the hard drive. Then click the Test button on the top side and select Disk Surface Test.
Step 3. Then, tick the option of Quick Check, click Start, and it will test the hard drive immediately.
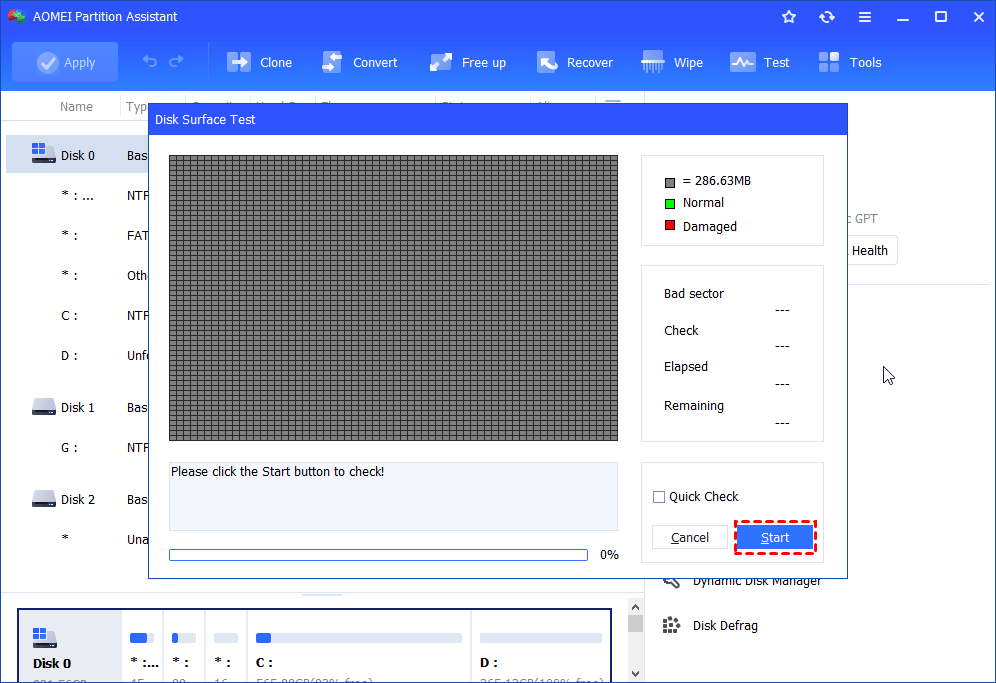
If there is any error on the hard drive, you can fix errors with AOMEI Partition Assistant in a few simple steps.
6. Windows Repair Install
A bad Windows installation may cause errors and prevent Windows from loading. Thus, the Dell may alert hard drive not found when booting. If Windows sees the hard drive when running a refresh or repair install, the drive is probably not broken. And you can running a repair or refresh installation to fix it. If it doesn’t work, the drive may be infected with a boot sector virus, which you need to fix by hard drive formatting.
Проблемы с подключением жесткого диска
Подключение жесткого диска к компьютеру может столкнуться со множеством проблем, которые могут вызывать сообщение «No hard disk is detected» при загрузке системы. Рассмотрим некоторые из этих проблем и возможные решения:
-
Плохое соединение SATA-кабеля: Проверьте, что SATA-кабель, подключенный к жесткому диску и материнской плате, надежно закреплен. При необходимости переподключите кабель.
-
Неправильное подключение питания: Убедитесь, что кабель питания подключен к жесткому диску правильно и надежно закреплен. Если возможно, попробуйте использовать другой кабель питания.
-
Режим работы в BIOS: Проверьте настройки режима работы жесткого диска в BIOS. Убедитесь, что режим работы (например, AHCI или IDE) соответствует типу жесткого диска.
-
Неисправность жесткого диска: Если все вышеперечисленные шаги не помогли, возможно, проблема связана с неисправностью самого жесткого диска. Попробуйте подключить другой жесткий диск или провести диагностику текущего диска.
Если проблема не устраняется после выполнения указанных решений, рекомендуется обратиться к специалисту или производителю компьютера или жесткого диска для получения дальнейшей помощи.
Важность жесткого диска в компьютере
Жесткий диск является одной из ключевых компонентов компьютера и играет важную роль в его работе. Он представляет собой устройство для хранения и организации данных, которые нужны для работы операционной системы, программ и файлов.
Хранение данных:
Жесткий диск позволяет хранить большие объемы информации, включая операционную систему, программное обеспечение, документы, фотографии, видео и другие файлы. Благодаря большой емкости и быстрой скорости чтения и записи, он предоставляет пользователю возможность эффективно организовывать и хранить свои данные.
Жесткий диск содержит операционную систему, которая загружается при включении компьютера. Он не только хранит программные файлы, но и предоставляет доступ к необходимым компонентам ОС для ее работы. В случае отсутствия или неполадок с жестким диском, компьютер не сможет загрузиться, что приведет к невозможности работы с ним.
Работа с программами и файлами:
Жесткий диск содержит программы и файлы, необходимые для работы на компьютере. Он позволяет запускать программы, сохранять и открывать файлы, а также выполнять различные операции с ними, такие как копирование, перемещение, удаление и редактирование. Без жесткого диска компьютер будет лишен возможности работы с программами и файлами.
Резервное копирование и восстановление данных:
Жесткий диск также используется для создания резервных копий данных, чтобы сохранить их в случае потери или повреждения основных данных. Это позволяет восстановить данные с помощью резервных копий в случае сбоя или ошибочного удаления. Отсутствие работающего жесткого диска может привести к потере всех данных и невозможности их восстановления.
В общем, жесткий диск является неотъемлемой частью компьютера и важным компонентом для его работы. Без него компьютер не сможет функционировать и выполнять задачи, связанные с хранением, обработкой и управлением данными.
Solutions for Hard Disk Not Showing During Windows Installation
1. Check Hardware Connections
You may be running into “hard drive not recognized” error if your hard drive is not properly connected. Make sure that the cables connecting the hard drive to the motherboard are securely connected:
- Power off the computer.
- Open the computer case and locate the cables connecting the hard drive.
- Verify that the SATA/power cables are firmly connected to both the hard drive and the motherboard.
- If necessary, disconnect and reconnect the cables to ensure a secure connection.
2. Update Hard Drive Drivers
Update or reinstall the hard drive drivers to ensure compatibility and proper detection:
- During Windows 10 installation, when prompted for a disk selection, click on the “Load Driver” option.
- Insert the disk or USB containing the updated hard drive drivers provided by the manufacturer.
- Follow the on-screen instructions to install or update the drivers.
- Once the drivers are installed, proceed with the Windows 10 installation.
Also Read: How to Update Device Drivers on a Windows 10 PC?
3. Adjust BIOS/UEFI Settings
Verify and adjust BIOS/UEFI settings to ensure proper hard drive detection:
Also Read: What is BIOS on a Computer: Everything You Need to Know
- Power on the computer and access the BIOS/UEFI settings by pressing the designated key (e.g., F2, Del) during startup.
- Navigate to the “Storage” or “SATA Configuration” section.
- Ensure that the SATA mode is set correctly (AHCI is recommended for most systems).
- Check for any other relevant settings, such as Legacy/UEFI boot options or secure boot settings, and adjust if necessary.
- Save the changes and exit the BIOS/UEFI settings.
4. Fix Disk Format or Partition Issues
Disk format or partition issues may be the cause of hdd not showing up:
- During Windows 10 installation, when prompted for a disk selection, click on the “Format” or “Delete” option.
- Follow the on-screen instructions to format the hard drive or delete existing partitions.
- Create a new partition or partitions as per your requirements.
- Proceed with the Windows 10 installation on the formatted or newly partitioned hard drive.
Also Read: A Beginner’s Guide to Disk Defragmentation
5. Check the Status of Your Hard Drive
Check the status of your hard drive, follow these steps:
If defragmenting a hard drive manually sounds time-consuming and complicated, you can use a tool like Auslogics Disk Defrag Ultimate to repair your hard drive automatically.
- Press the “Windows key + R,” and a “Run” window will appear.
- Type “devmgmt.msc” in the Run window and press Enter.
- The Device Manager window will open. Look for the “Disk Drives” category and click on it to expand the list.
- Right-click on your hard drive from the list and select “Properties” from the context menu.
- In the Properties window, navigate to the “General” or “Driver” tab.
- Check the status of your hard drive. If it shows “This device is working properly” or a similar message, it indicates that the hard drive is functioning correctly.
By following these steps, you can verify the status of your hard drive and determine if it is working properly or if there might be any issues affecting its functionality.
6. Boot from Windows 10 Install Media
If your drive is not showing up during Windows 10 installation, you can try booting from the Windows 10 Install Media using the following steps:
- During the Windows 10 installation process, select “Install Now”.
- Accept the License Agreement.
- Choose the installation type and click on “Custom (Advanced)”.
- Access Command Prompt (press Shift + F10 on your keyboard)
- In the Command Prompt window, type the following commands one by one and press Enter after each command:
DISKPART
list volume
select disk *
clean
convert mbr
create partition primary
active
format quick fs=ntfs
- Once you have executed the commands, close the Command Prompt window.
- Proceed with the Windows 10 installation process as usual.
Also Read: How to Get And Use Windows 10 Media Creation Tool
7. Replace a Faulty Hard Drive
If your hard drive is confirmed to be faulty, replacing it with a new one is necessary.
- Power off the computer and disconnect all cables.
- Open the computer case and locate the faulty hard drive.
- Disconnect the cables connected to the faulty hard drive.
- Install the new hard drive by connecting the cables securely.
- Close the computer case, reconnect all cables, and power on the computer.
- Proceed with the Windows 10 installation.
How to fix “Hard drive not detected” on Windows 10?
Fix it now!
To repair damaged system, you have to purchase the licensed version of Fortect Mac Washing Machine X9.
Keeping in mind how many bugs related to Windows 10 updates have caused issues to users these days, software capable of detecting and fixing drivers and similar components automatically would be a great solution.
If you have never tried PC repair software before, then you have to know that these programs are designed to clean up registries, fix startup problems, take care of the updates, delete malware, and so on. Our recommendation would be to try FortectMac Washing Machine X9, as you might avoid all the troubleshooting steps below.

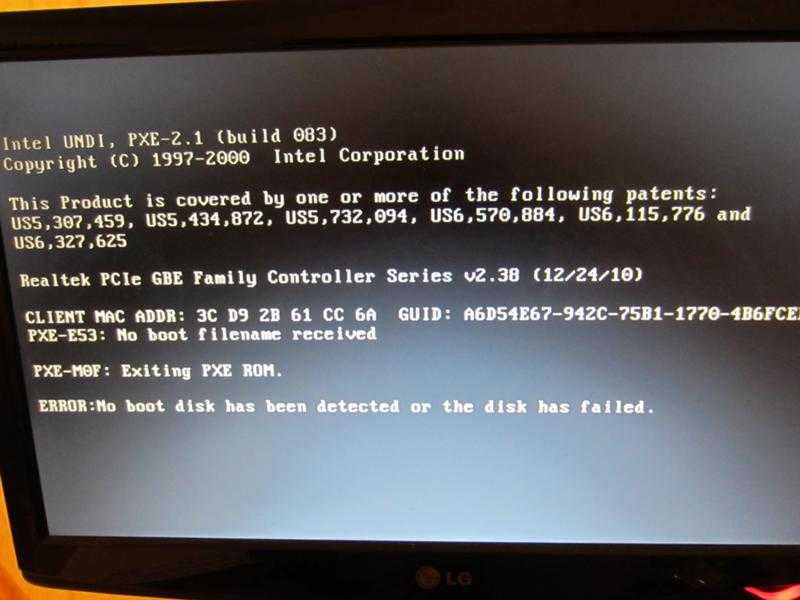
![No boot disk has been detected or the disk has failed [solved] – techcult](https://jsk-oren.ru/wp-content/uploads/6/a/2/6a20c795dc68f7134764967c2a164da8.webp)
BIOS не видит Хард
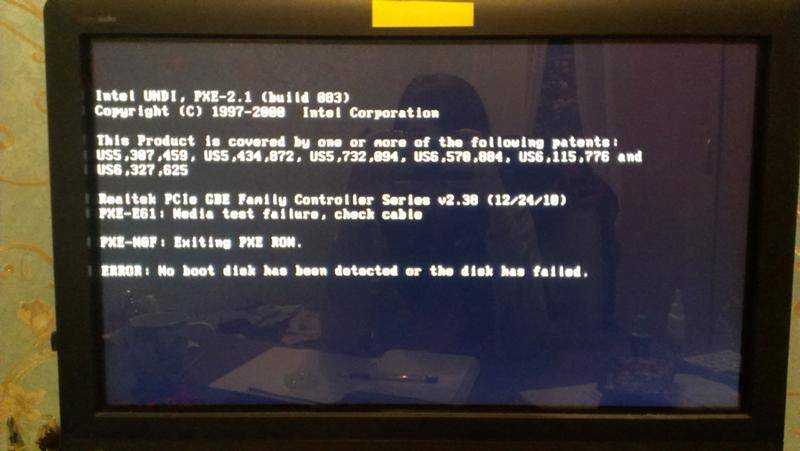
Здравствуйте. 30 марта я как обычно сидел компьютере, в 19:12 друзья гулять . В 20:30 прихожу домой, включаю компьютер и вижу вот такую вот картину: Появляется логотип Lenovo далее следует перезагрузка и опять логотип Lenovo и так по кругу. Как я понял ОС не может запуститься. Зашёл в BIOS и вижу вот такую вот картину: «Hard disk » . Как я понял ноутбук не видит хард. Компьютер никогда не падал, я обращаюсь с ним аккуратно, никогда не было никаких падений, встрясок и т.д. Помогите мне пожалуйста решить эту проблему.
Зашёл в BIOS и вижу вот такую вот картину: «Hard disk » . Как я понял ноутбук не видит хард. Компьютер никогда не падал, я обращаюсь с ним аккуратно, никогда не было никаких падений, встрясок и т.д. Помогите мне пожалуйста решить эту проблему.
Ваш HDD видимо сдох. Менять.
Denisoff, вы читать внимательно не умеете или просто знаний не хватает?
Поясните мне, как Виктория сможет обратится к порту жёсткого диска, если BIOS его не видит?
Она увидит. А знаний у вас не хватает и не только их. И не хамите, команда сайта, старшим.
Denisoff, а помимо необоснованного утверждения о хамстве что-то в доказательство своего утверждения можете привести? Или только «я так утверждаю» как аргумент лишь можете использовать?
Поясните как и каким образом у вас Виктория в обход BIOS (UEFI) стала работать. Конкретные примеры, пожалуйста, со ссылками на статьи. Не голословные утверждения.
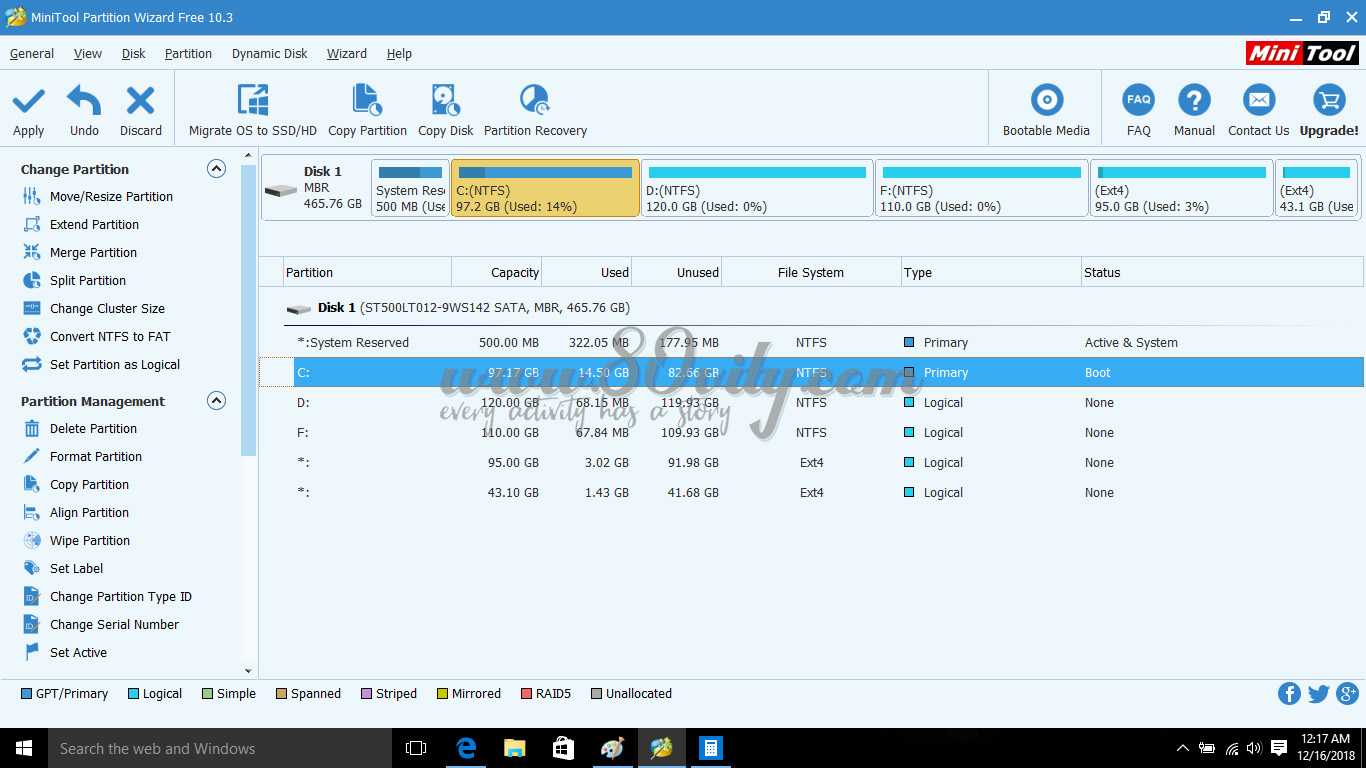
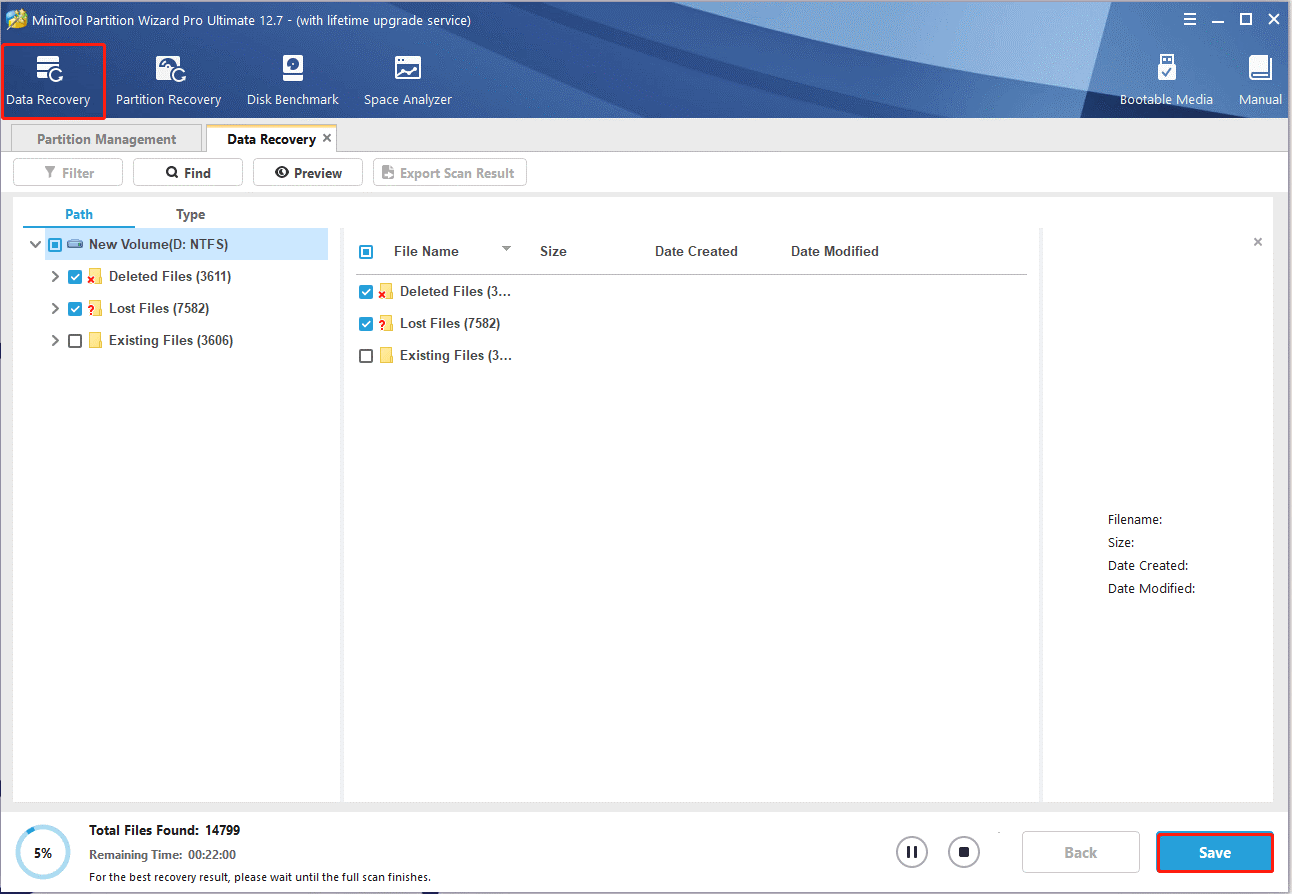
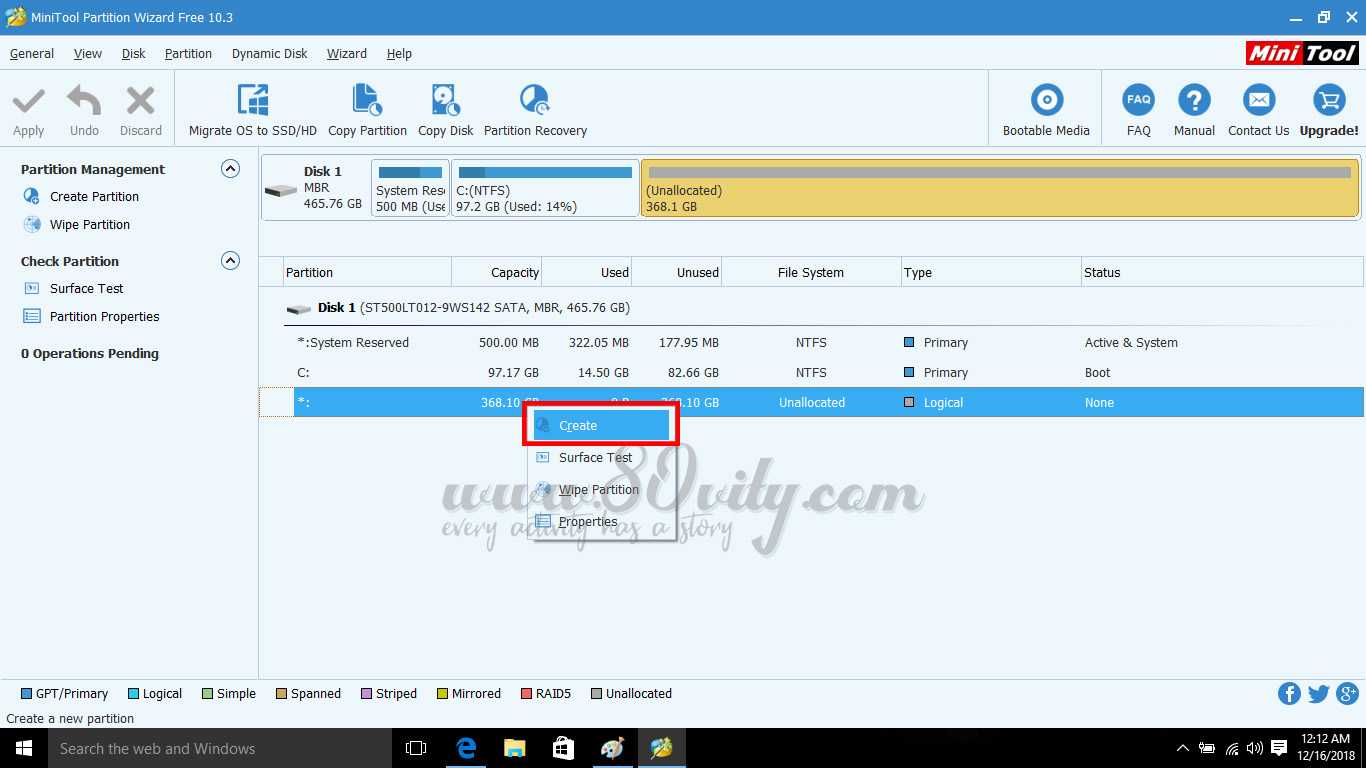
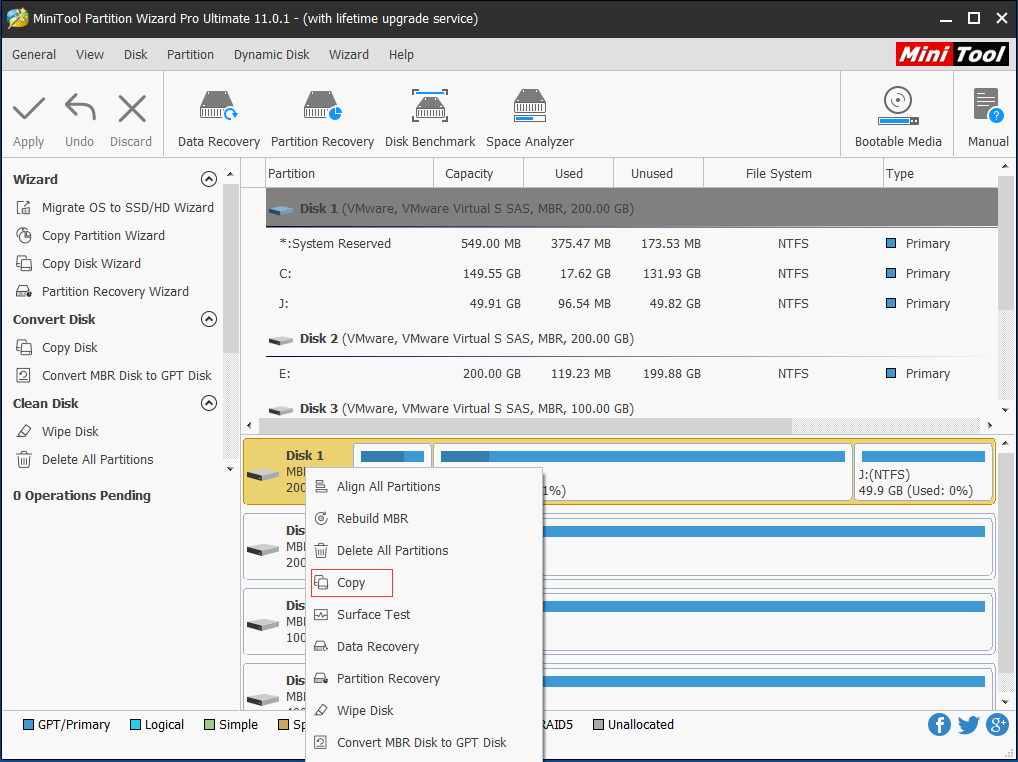
Solution 6: Rebuild the Boot Sector
In this way, you need to fix the “boot device has not been detected” error in Windows RE. And first of all, you are supposed to rebuild MBR (Master Boot Record).
MBR is a special type of boot sector at the very beginning of your bootable system hard drive. It helps your computer boot successfully. If the MBR is damaged, your system cannot recognize the boot information and will fail to start the computer. There are two available ways to fix MBR.
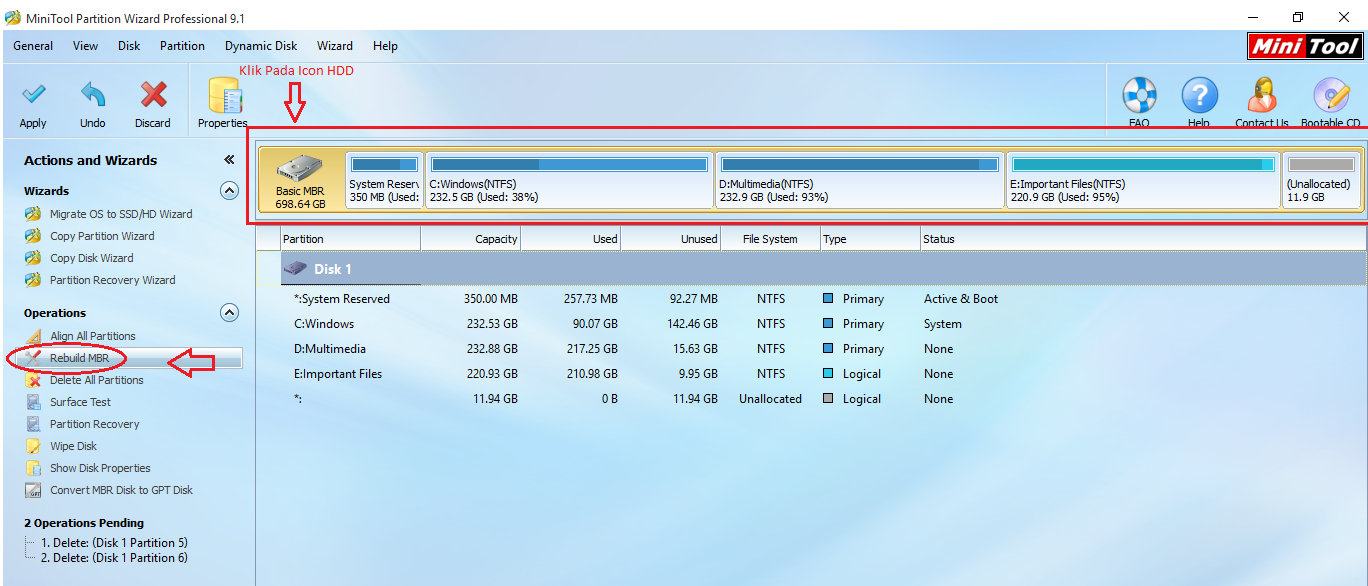
Rebuild MBR with MiniTool Partition Wizard
MiniTool Partition Wizard can help you to fix MBR when some issues appear in your boot disk.
Step 1: Boot your computer from the MiniTool bootable USB flash drive.
Step 2: After you enter the main interface of MiniTool Partition Wizard, right-click the boot disk containing damaged MBR and select the Rebuild MBR feature.
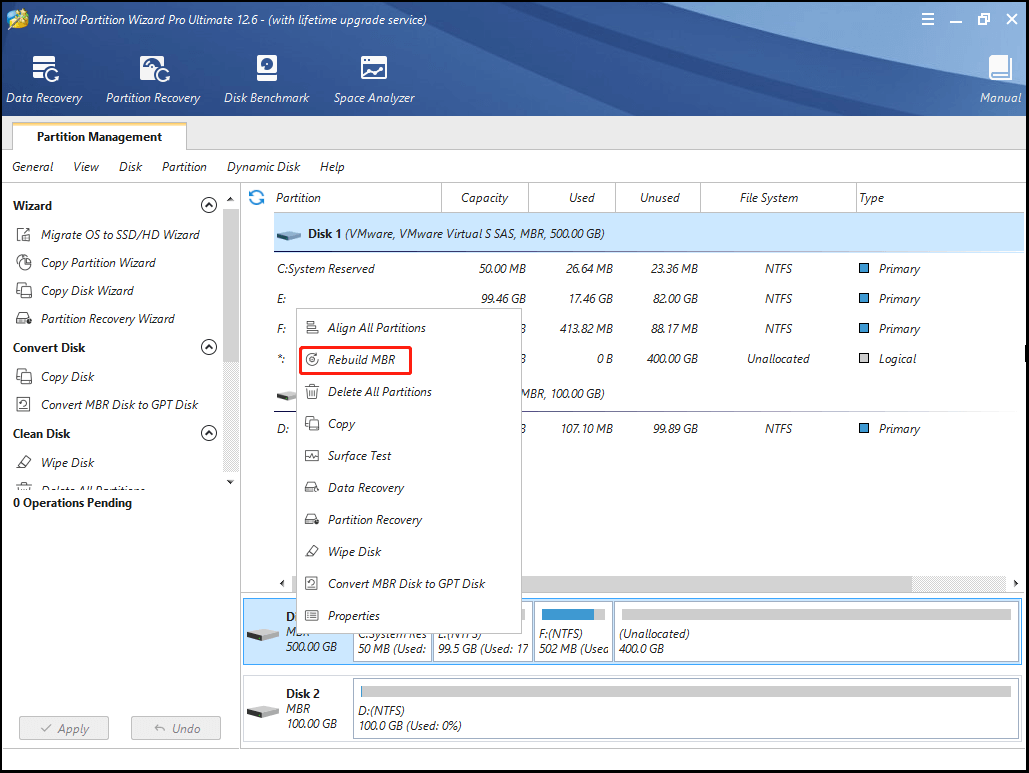
Step 3: Finally, don’t forget to click Apply to execute the operation.
Fix MBR with Command Prompt in Win-PE
You can also fix MBR by using Command Prompt in Windows 10 Recovery Environment.
Step 1: Enter Windows RE with Windows bootable installation CD or DVD.
Step 2: Go to Repair your computer > Troubleshoot > Advanced Options > Command Prompt.
Step 3: In the Command Prompt pane, type bootrec/ fixmbr in the panel and then press the Enter button to carry out this command.
Rebuild BCD
After managing to repair MBR, you can go on with the following steps to rebuild BCD.
Step 1: Enter Command Prompt in the Windows RE.
Tip: If you boot your computer from the MiniTool bootable media, then you should select Command Console on the MiniTool PE Loader screen.
Step 2: In the Command Prompt panel, type the following commands one by one and press Enter after each one to carry out all of them.
- bootrec/ fixboot
- bootrec/ scanos
- bootrec/ rebuildbcd
After these commands are executed, restart your computer to see if the “no boot disk has been detected or the disk has failed” error has been fixed.
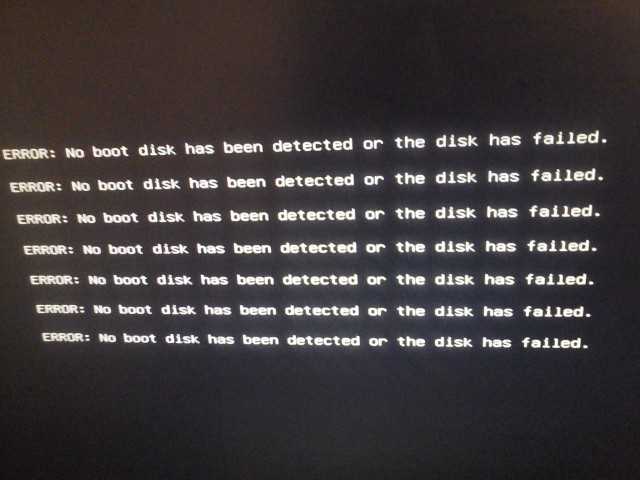
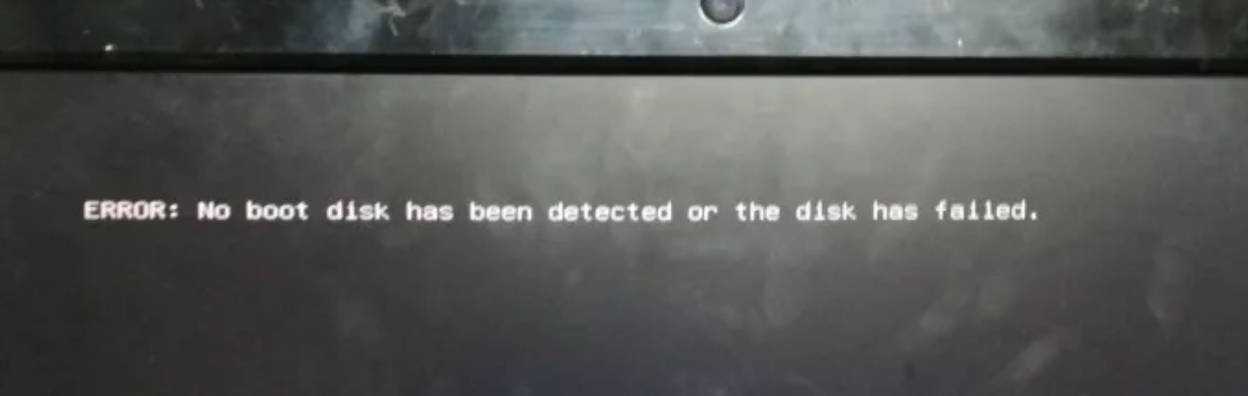
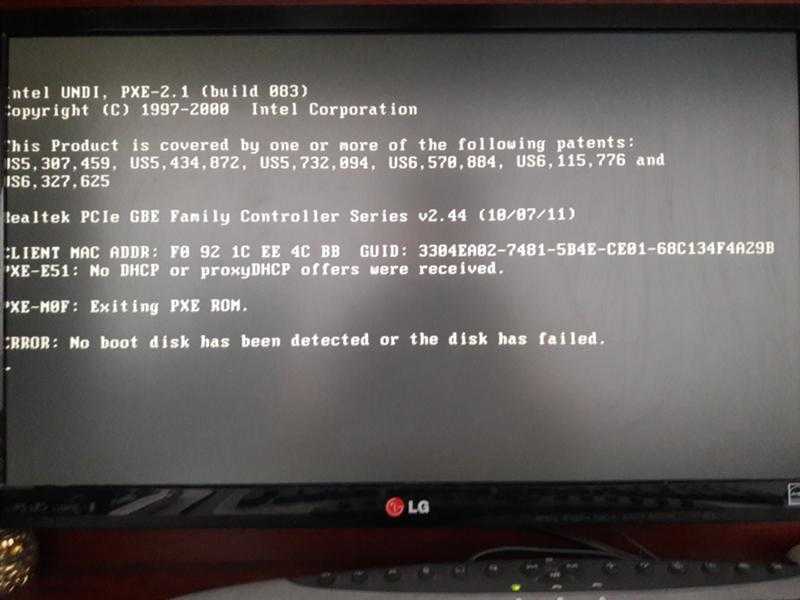
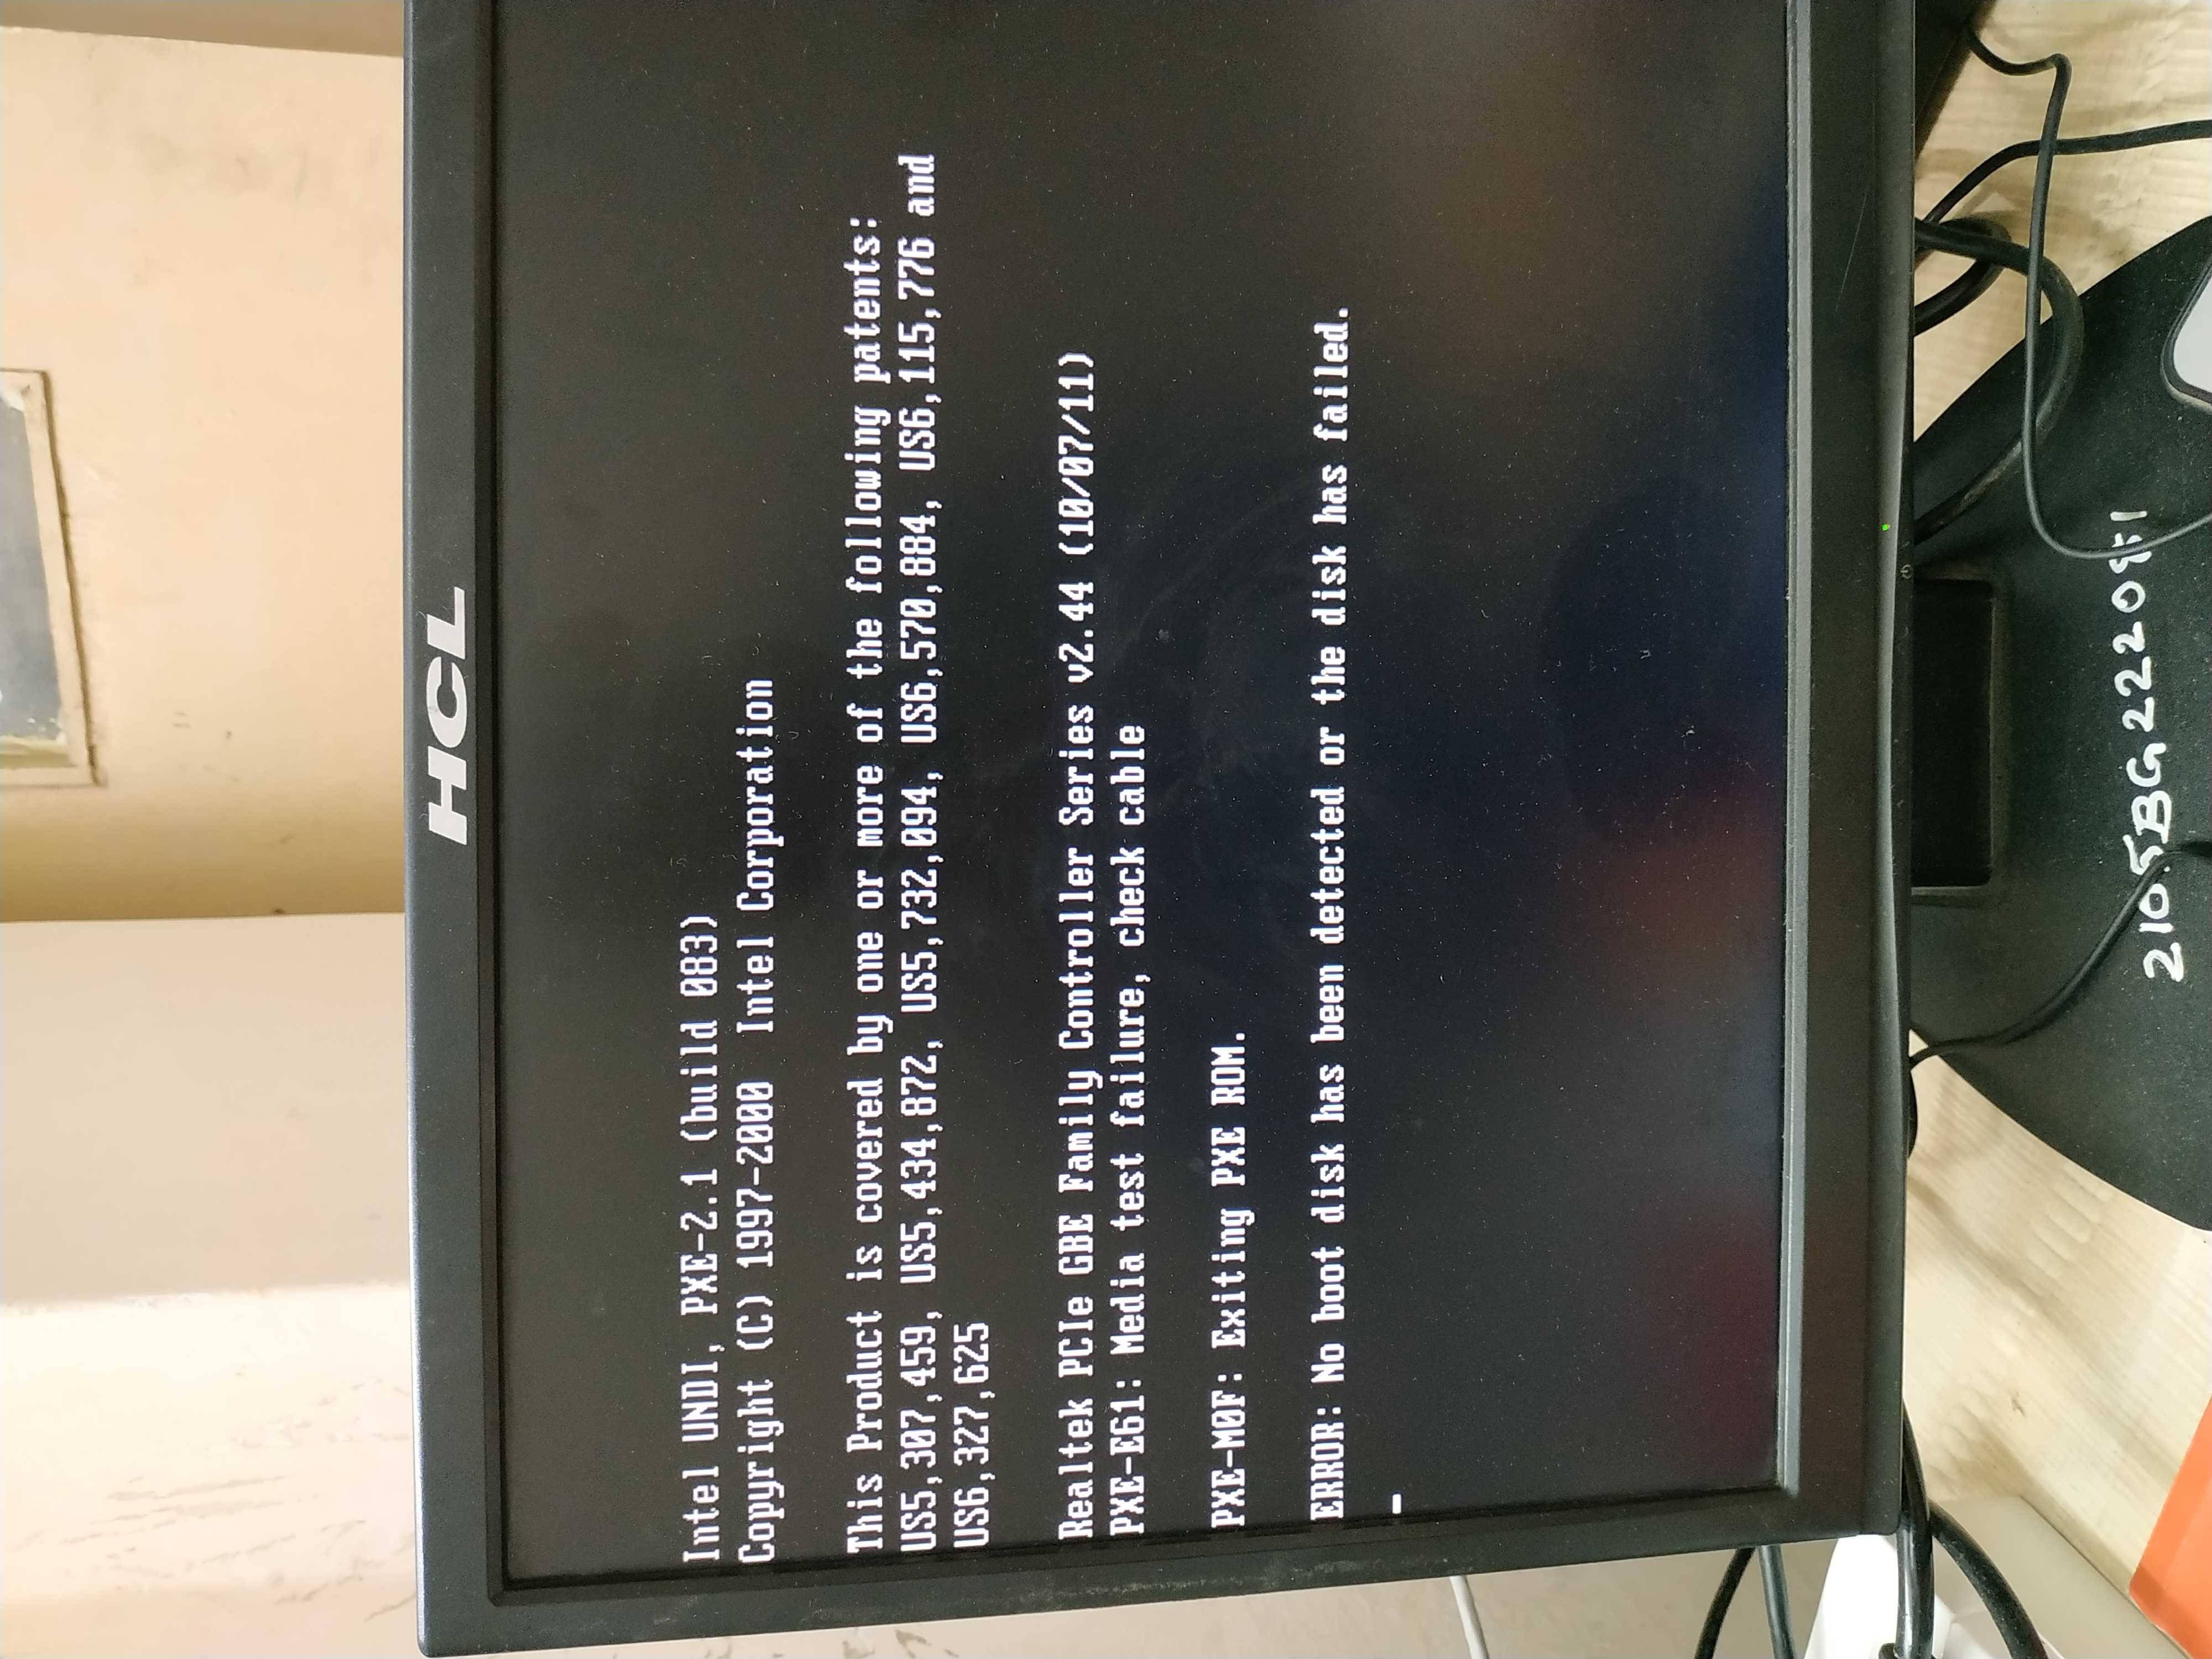
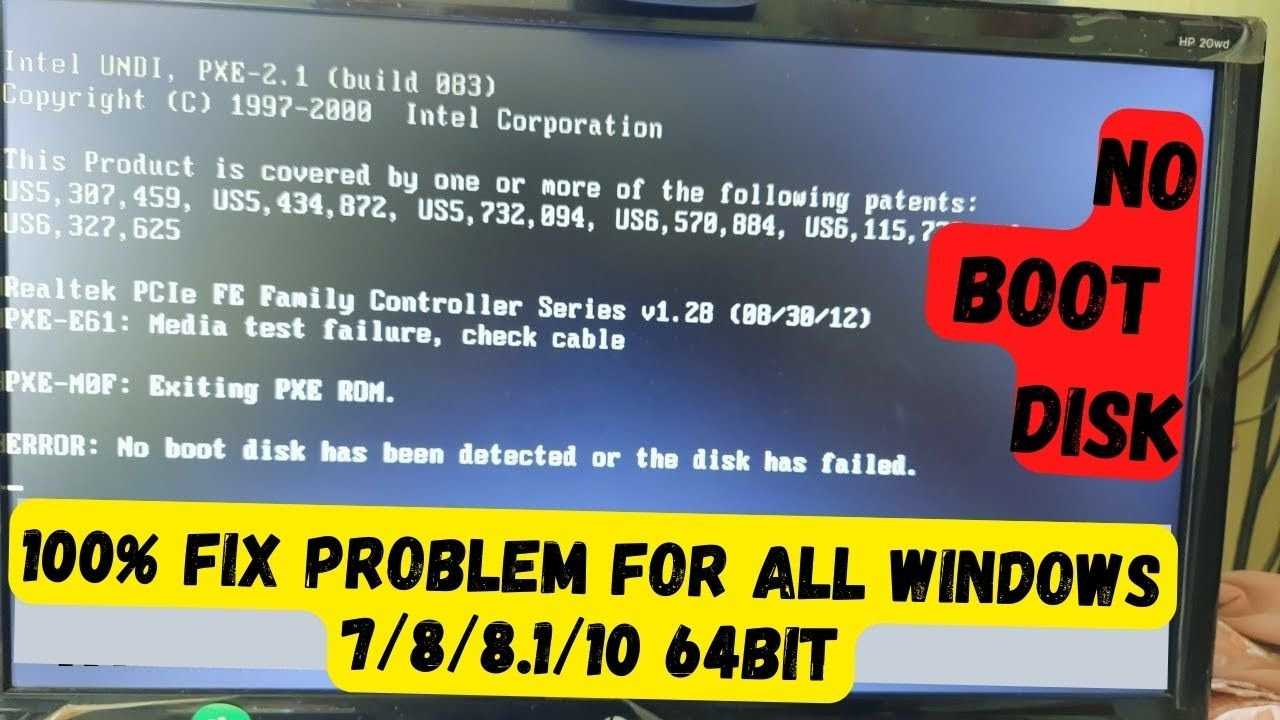
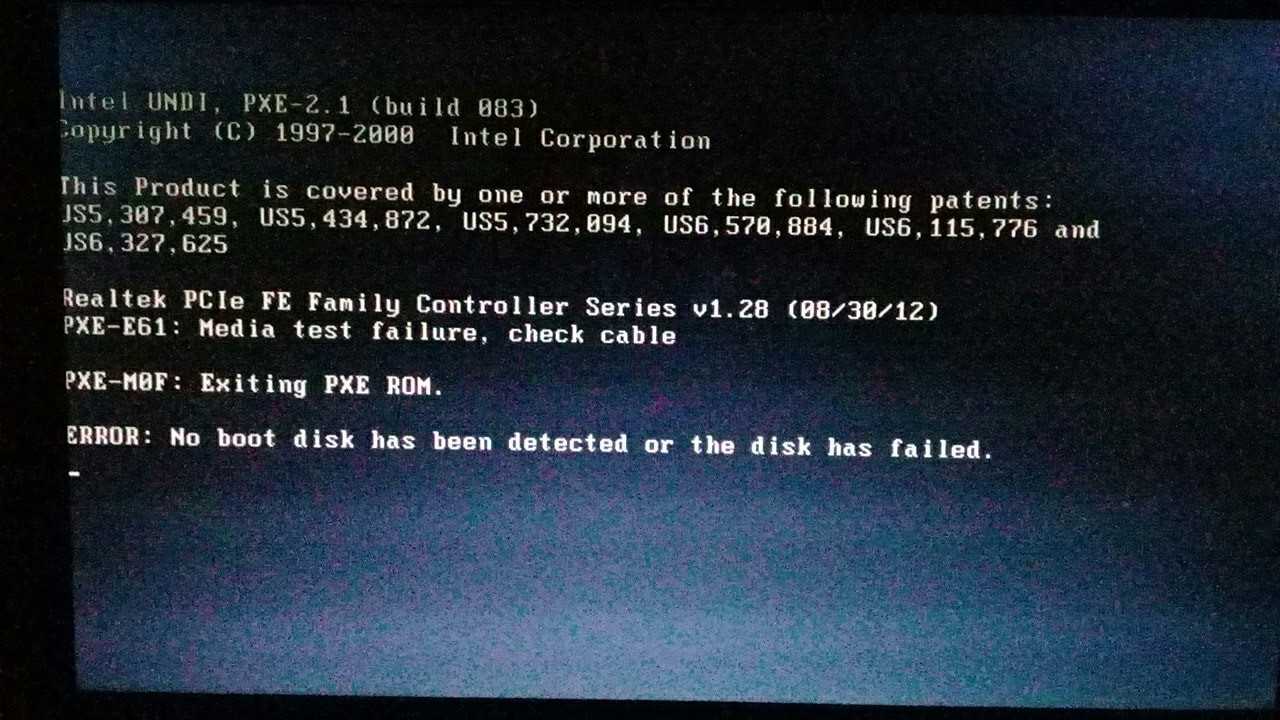
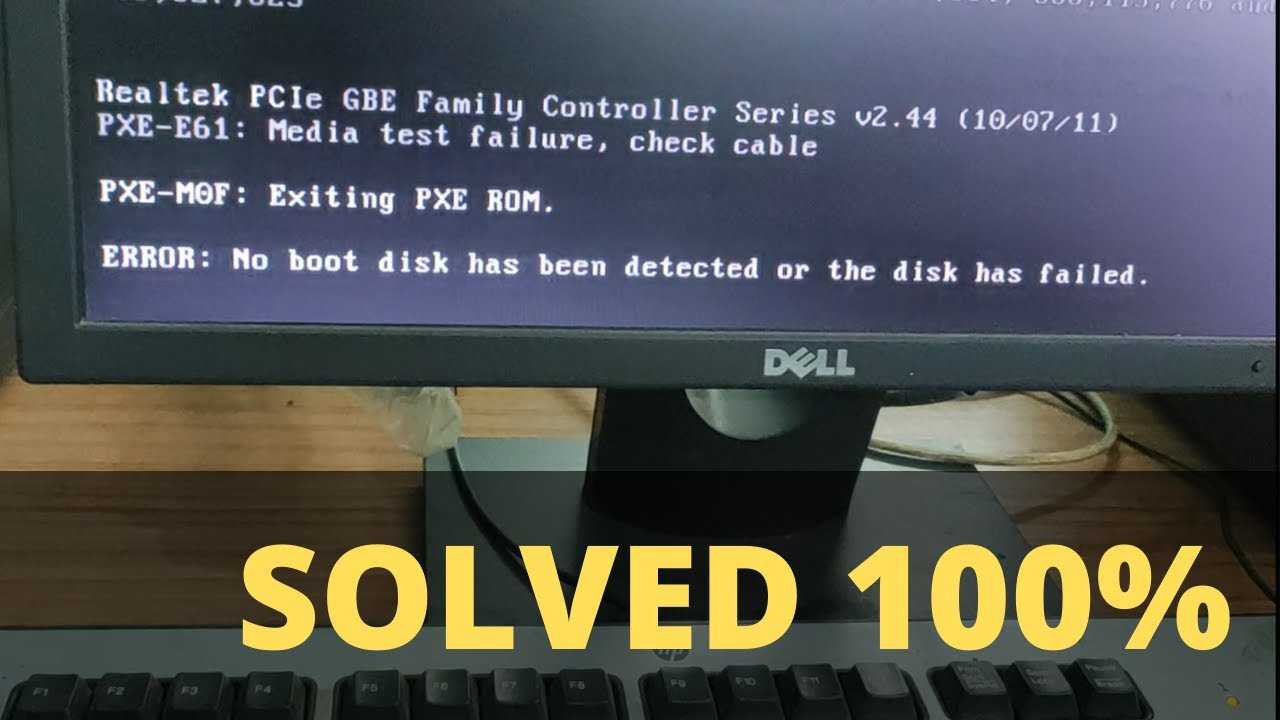
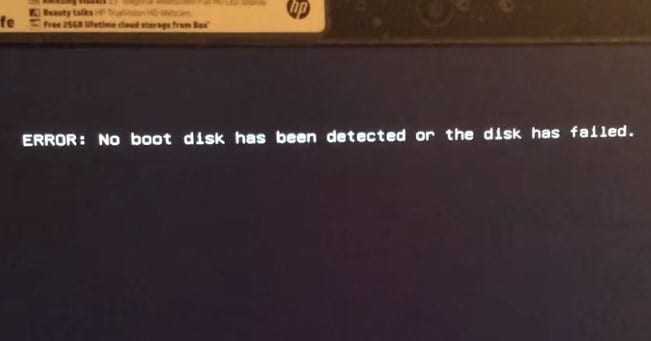
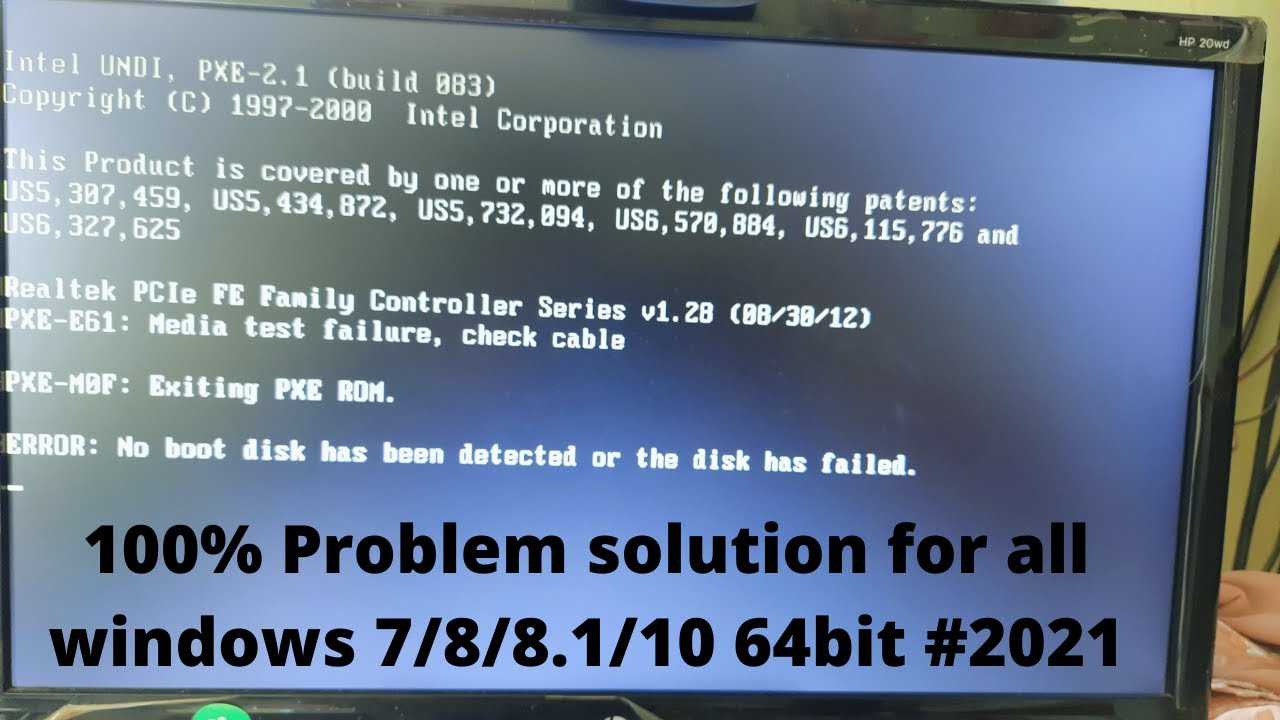
No boot disk has been detected or the disk has failed
If you’re faced with this No boot disk has been detected or the disk has failed issue, you can try our recommended solutions below in no particular order and see if that helps to resolve the issue.
- Check the PC-to-HDD/SSD cable connection
- Check the PC’s boot priority
- Check if the HDD/SSD is failing
- Run Automatic Repair
- Run CHKDSK and SFC
- Rebuild BCD & Repair MBR.
Let’s take a look at the description of the process involved in relation to each of the listed solutions.
1] Check the PC-to-HDD/SSD cable connection
The cables connecting the HDD/SSD to the computer and vice versa might have been unfastened which can give rise to the No boot disk has been detected or the disk has failed error message.
Follow these steps to check the connections and fix the problem:
Note: You may require the services of a computer hardware technician.
- Power off your computer and remove the battery.
- Open up your computer’s casing afterward.
- Detach the HDD from your computer.
- Clean all the ports and wirings linking the HDD to the computer and vice versa.
- Now, reconnect the HDD to the computer. (Ensure that all the connections are fastened tightly).
- Lastly, attach the battery and power up your computer.
Check to see if the issue persists. If so continue with the next solution.
2] Check the PC’s boot priority
You may be receiving the No boot disk has been detected or the disk has failed error message on boot because your computer is trying to boot from another source and failing to find any boot information instead of booting from the boot disk. If that’s the case, all you need to do in order to resolve this problem is to ensure that the boot disk is at the top of your computer’s boot order.
If this doesn’t resolve the issue, try the next solution.
3] Check if the HDD/SSD is failing
Another reason for the computer’s inability to boot up is because the HDD/SSD is in a failed state which triggers the No boot disk has been detected or the disk has failed error message.
You can detach the drive from your PC and connect it to another PC to access the files and folders on the PC so as to check if the drive is accessible. If you are unable to access the contents of the drive, you definitely need a replacement.
Alternatively, you can check the drive’s S.M.A.R.T. status.
Most modern drives have a feature called S.M.A.R.T. (Self-Monitoring, Analysis, and Reporting Technology) that monitors different drive attributes in an attempt to detect a failing disk. That way, your computer will automatically notify you before data loss occurs and the drive can be replaced while it still remains functional.
In Windows, you can manually check the S.M.A.R.T. status of your drives from the Command Prompt. Here’s how:
Press Windows key + R.
In the Run dialog box, type cmd and hit Enter to launch Command Prompt.
In the command prompt window, copy and paste the command below and hit Enter.
wmic diskdrive get model,status
It will return “Caution” or “Pred Fail” if your drive is failing or has already failed, or “OK” if the drive’s health is fine.
If the result shows the drive is failing, it’s recommended you back up your data and replace the drive.
4] Run Automatic Repair/Startup Repair
You can also fix the No boot disk has been detected or the disk has failed issue by performing Automatic Startup Repair on your system by using Windows bootable installation DVD.
Here’s how:
- Insert Windows bootable installation DVD and restart your PC afterward.
- Press any key to boot from CD or DVD when prompted to continue.
- Select your language preferences, and click Next.
- Click Repair your computer in the bottom-left.
- In the Choose an option screen, click Troubleshoot > Advanced option > Automatic Repair or Startup Repair.
- Wait for the Windows Automatic/Startup Repairs to be complete.
- Restart your PC.
If the issue is still not resolved, continue with the next solution.
5] Run CHKDSK and SFC
In this solution, utilizing CHKDSK and SFC to repair the disk could help resolve the issue.
Do the following:
Repeat the steps in Solution 4 above to enter the Advanced Startup Options list.
Then, choose Command Prompt option.
In the command prompt window, type the command below and hit Enter.
sfc /scannow /offbootdir=c:\ /offwindir=c:\windows
chkdsk c: /r
When the operation completes, exit command prompt and restart the PC.
If the issue is still not resolved, proceed with the next solution.
6] Rebuild BCD & Repair MBR
Provided that the boot sector is damaged or corrupted, the No boot disk has been detected or the disk has failed error will occur. In this case, you need to rebuild the Boot Configuration Data file and repair the Master Boot Record file and see if that resolves the issue. If not, you can move to the next solution.
![Что делать, если компьютер сообщает, что жесткий диск не установлен? (7 способов) [советы по minitool]](https://jsk-oren.ru/wp-content/uploads/4/3/c/43c664b013c78aaaf2eb491cad3e4c2f.png)
![[fixed] no boot disk has been detected or the disk has failed](https://jsk-oren.ru/wp-content/uploads/0/6/7/067cafbe79fb65459c26c53ea556d772.jpeg)
Hopefully one of these solutions will fix the issue for you!