
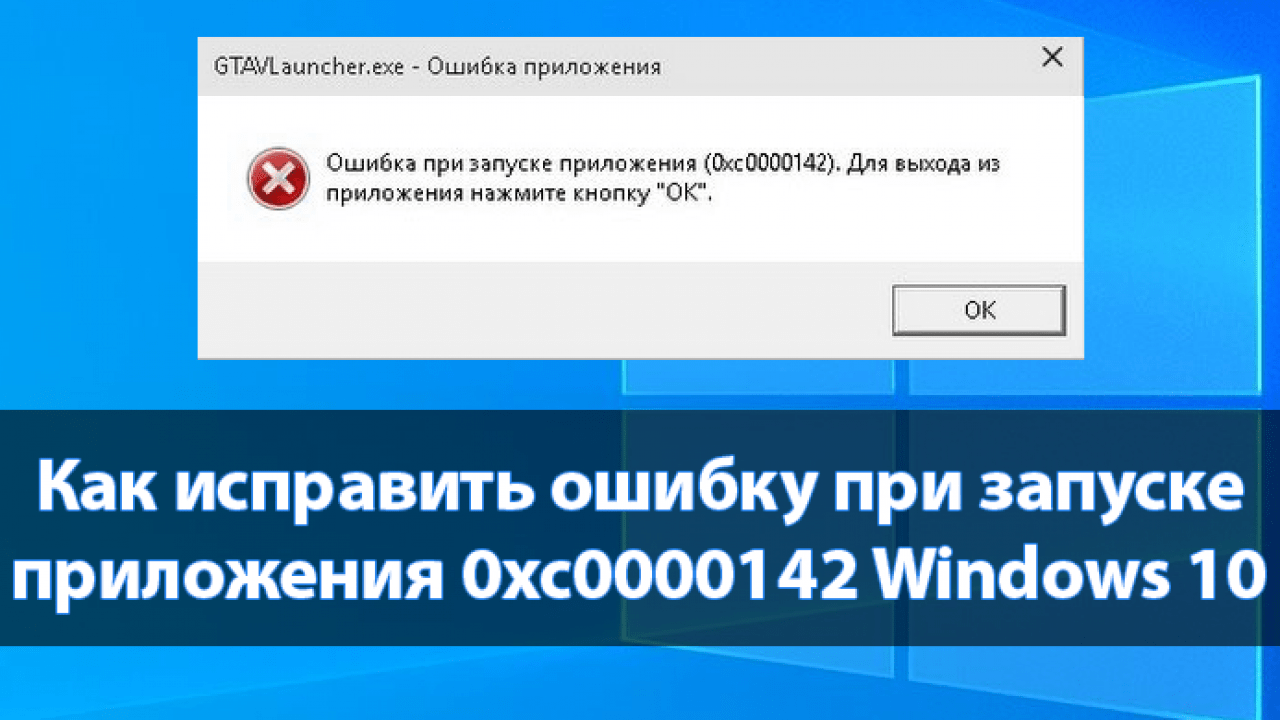
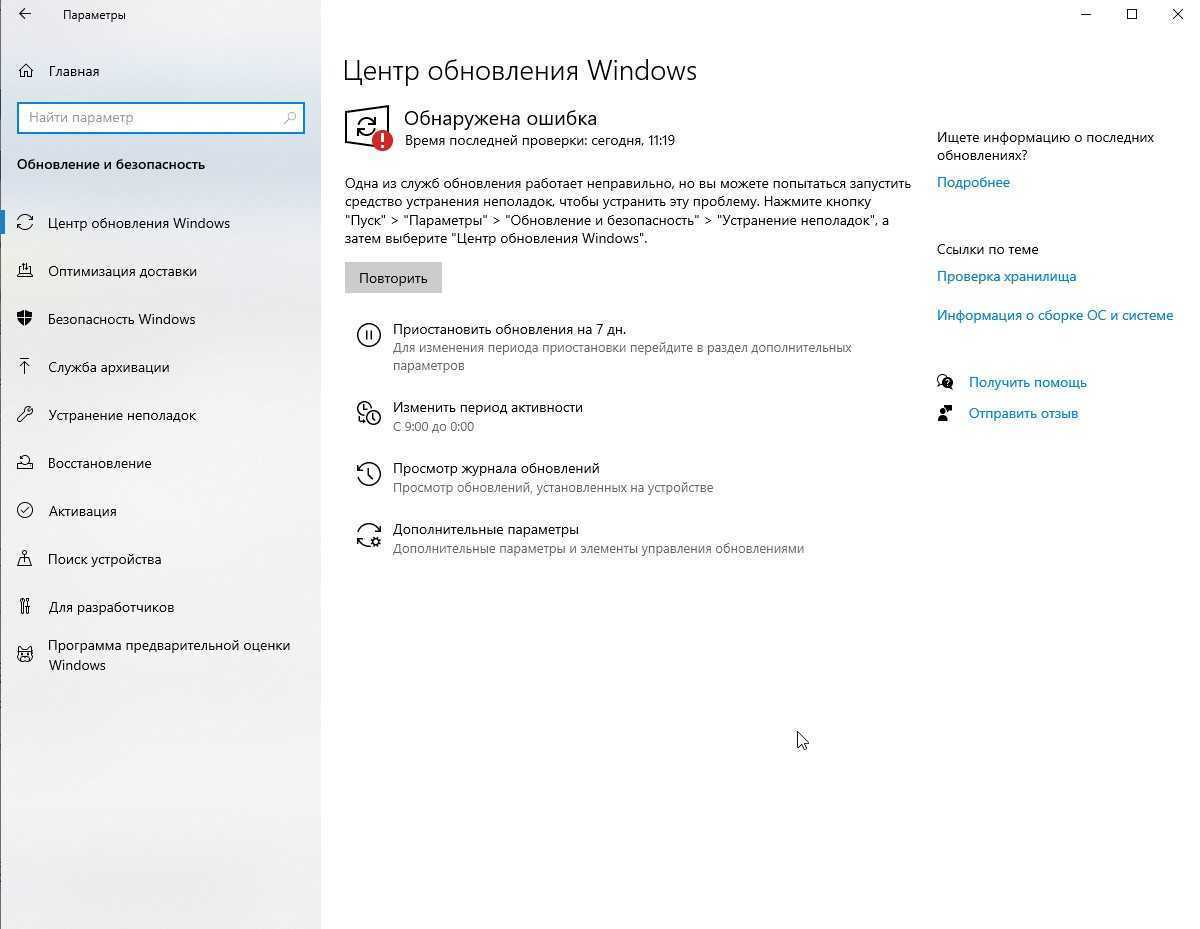
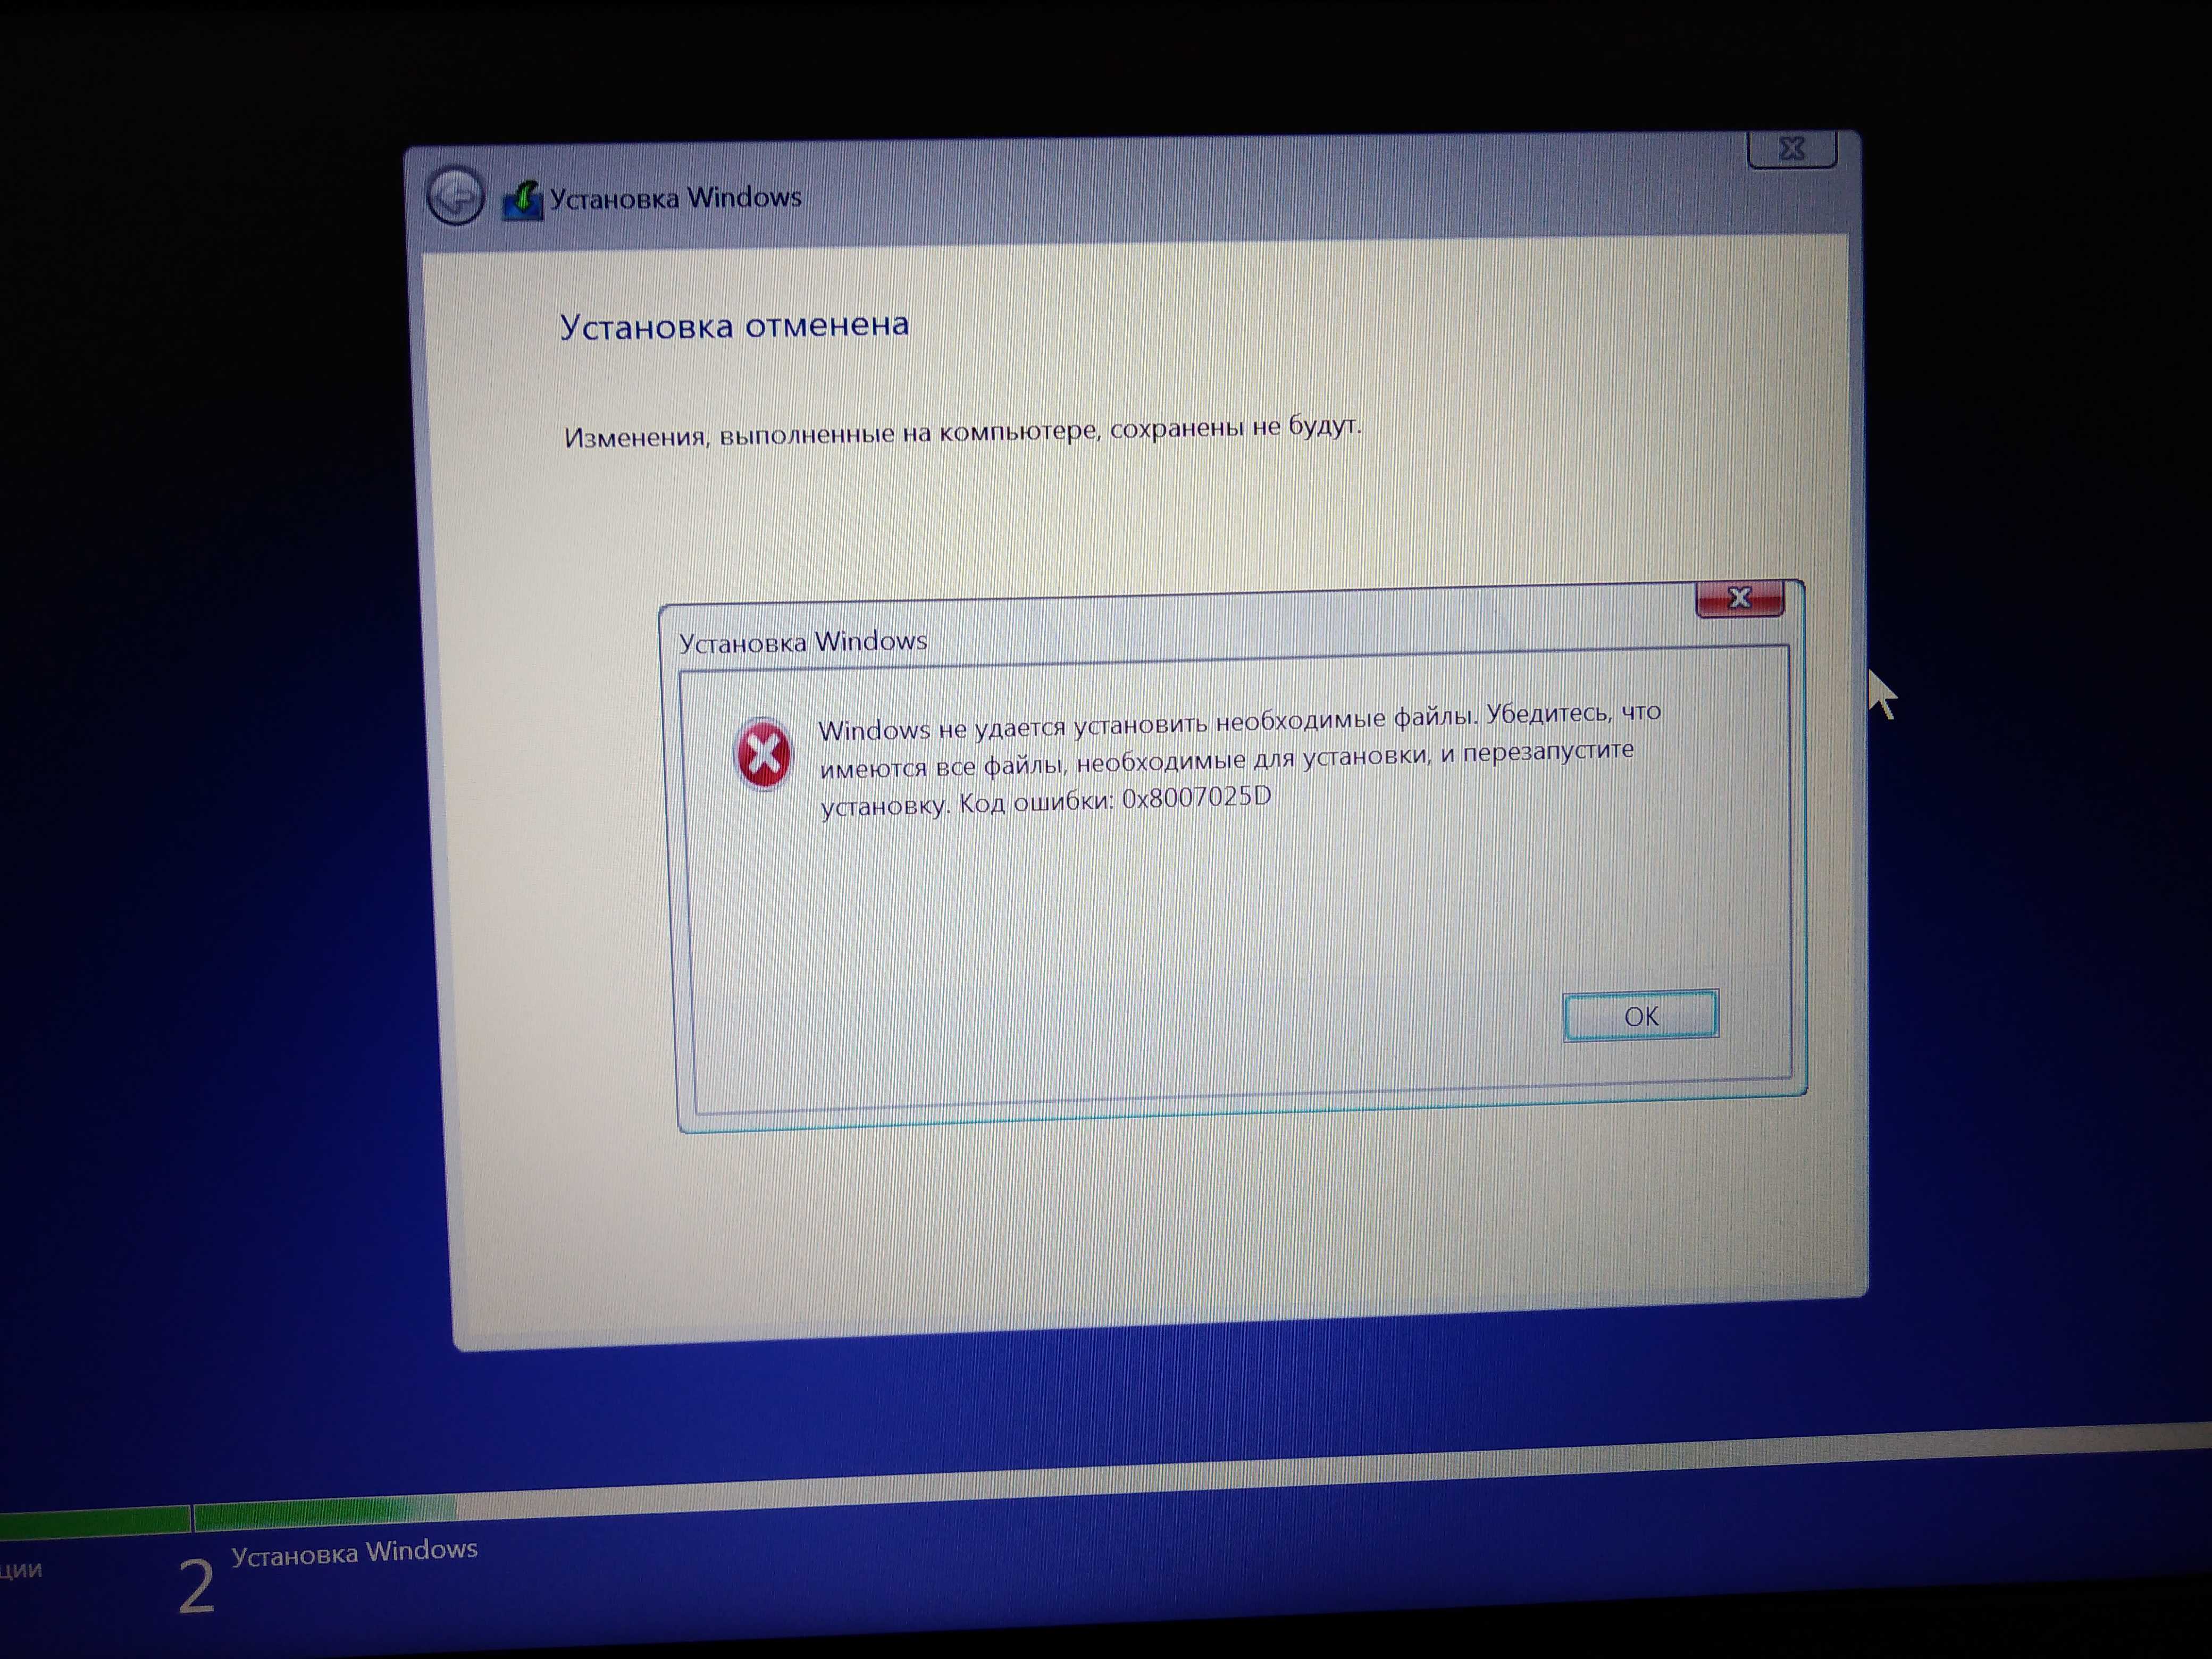
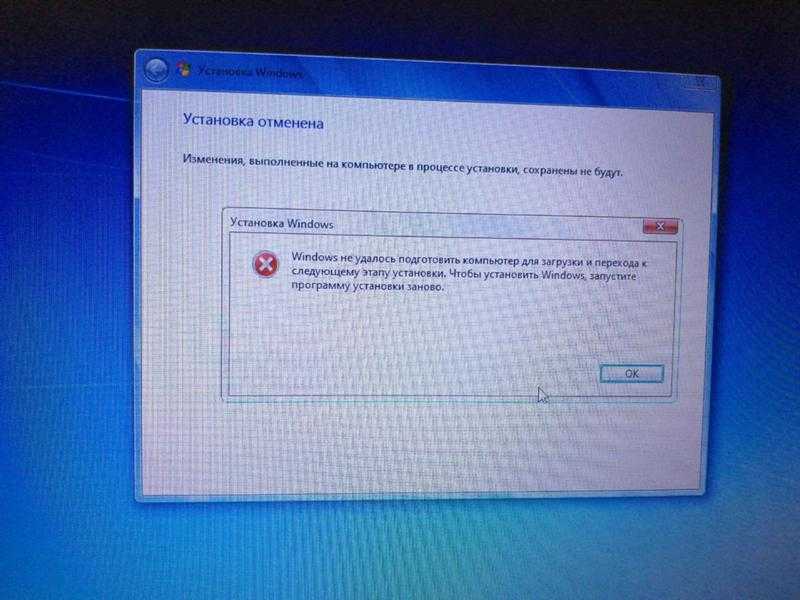
Как проявляется проблема
Ошибка 0x80248014 при обновлении до Windows 11 взаимосвязана с работой операционной системы. Появляется во время запуска обновления и способна прервать установку обновлений, что вызовет системный сбой.
Вызывать аналогичный сбой может отсутствие или повреждение файла. Наличие ошибки можно определить по:
- Невозможности загрузки, установки или запуска обновлений в ОС.
- Расплывчатому характеру оповещения, которое появляется при обнаружении системой ошибки.
- Неудачной попытке завершения приобретений в магазине поставщика программного обеспечения.
- Отсутствие возможности запуска проверки, предназначенной для определения целесообразности установки обновлений.
Расширения, к которым предоставляется доступ для кода ошибки, предполагают применение командной строки и применение глубоких настроек в ОС. Предполагается, что большая часть пользователей должна уметь свободно перемещаться по используемым расширениям, но не все владеют этим умением.
Если отсутствует возможность выполнения действий самостоятельно или недоступно полноценное устранение ошибки, используя предложенные методы, потребуется обращение к квалифицированному специалисту, которому известны проблемы обновлений ОС. И способы устранения сбоев.
Имеется немало причин, по которым возможно возникновение кода ошибки в устройстве. Наиболее распространенные:
- Наличие проблем с подключением.
- Помехи на сервере.
- Сбои в настройках магазина поставщика ПО, из которого осуществляется загрузка обновлений.
Есть несколько способов, используя которые есть возможность устранить ошибку. При использовании первого есть возможность сброса проблемы посредством командной строки, а второй предполагает снятие проблем, связанных с наличием сбоев в Магазине поставщика программного продукта.
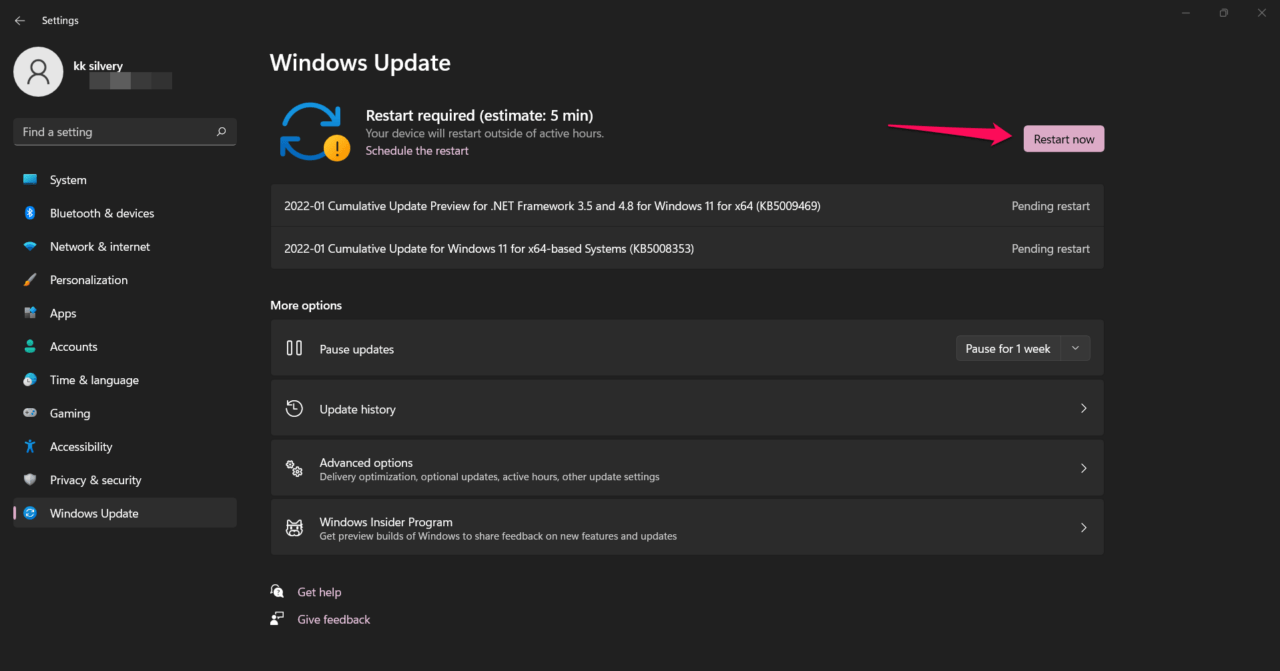
Fix 1. Reboot Windows PC
Millions leave the Windows laptop/desktop put the machine into sleep, and leave the premises. Your PC is in standby mode, and it is conserving the battery and hardware resources. However, I wouldn’t say the same for the software because it is running the files, programs, and background services. You should reboot the Windows 10/11 machine from time to time and shut it down once a week for optimal performance.
I want to inform you that putting the Windows machine into sleep mode improves the hardware components’ lifespan. The hardware components have to load the drivers, programs, files, and others every time you turn the machine on. The sleep mode doesn’t load anything and picks up from where you left earlier.
How can I fix error code 0x80248014 in Microsoft Store?
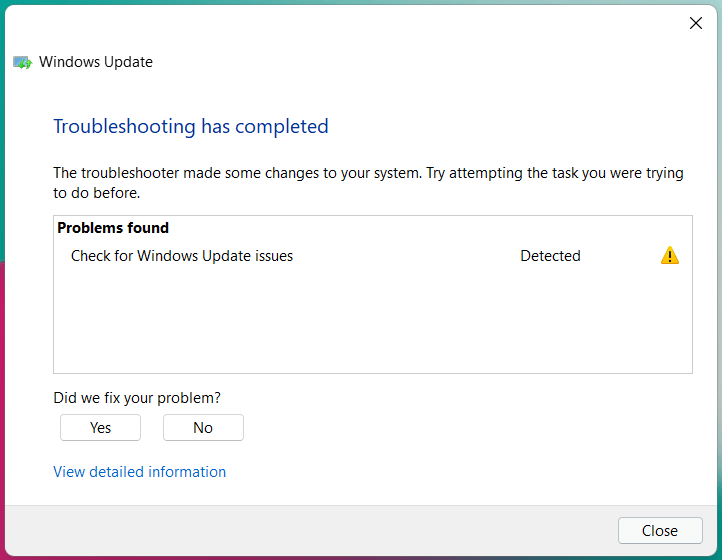
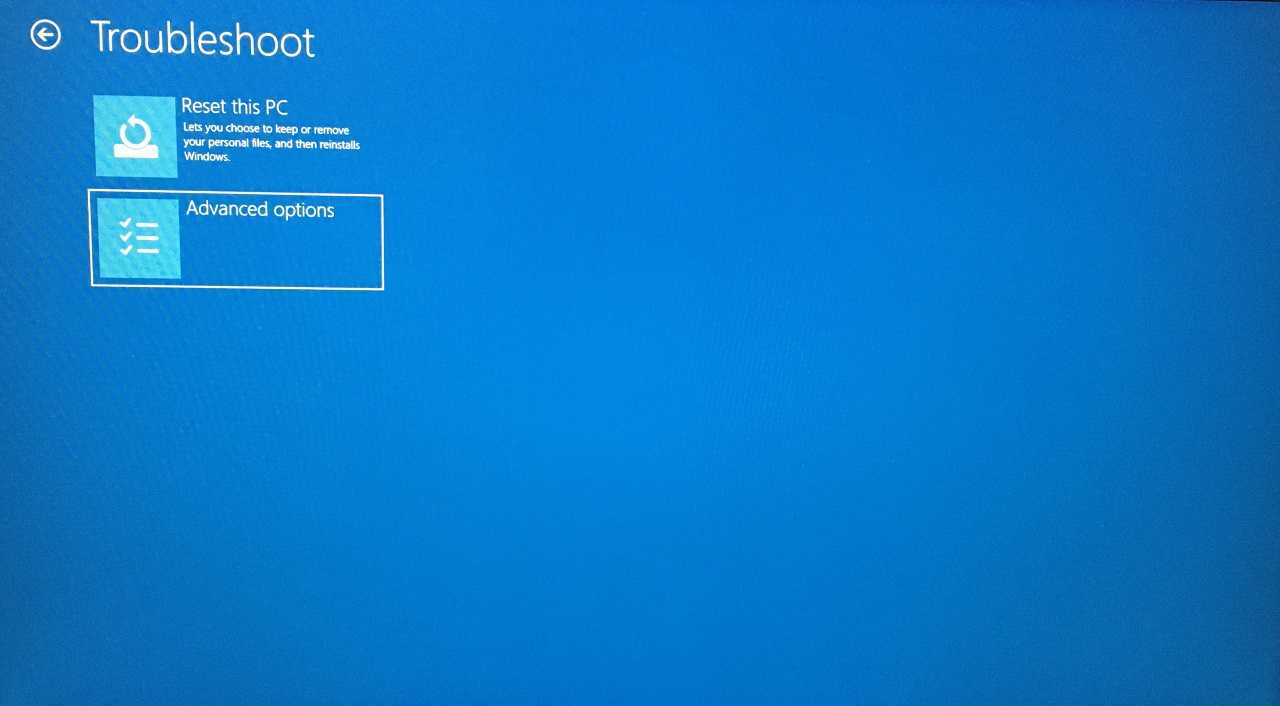
1. Run the Troubleshooter
We’re going to run the Troubleshooter once again, but this time, we’ll be checking the hardware:
- Go to Settings.
- Head over to Updates & Security > Troubleshoot.
- Now, click Hardware & devices, and choose Run the troubleshooter.
- Follow further on-screen instructions.
An error occurred while loading the troubleshooter? Don’t panic! Check out our guide to solve the problem!
2. Disable UAC
And finally, let’s try with disabling the User Account Control, as well:
- Go to Search and type user account. Choose User Account Control from the menu.
- User Account Control Settings window will appear. Move the slider all the way down to Never notify and click OK to save changes.
We hope you managed to fix the Windows Update error 0x80248014, as well as the error with the same name that appears on Microsoft Store.
Let us know how it went in the comments section below.
Изменение имени папки Software Distribution
Причина изменений имени папки, расположенной в диске C – некорректная работа программ, если имя папки разнится с именем пользователя.
В ОС не допускается переименование текущей папки, если пользователь имеет авторизацию. Чтобы снять ограничение, потребуется зайти под другим именем с наличием прав администратора, после чего допускается изменение имени в папке.
Если отсутствует учетная запись с правами администратора, требуется ее создать. Для этого используется комбинация горячих клавиш «Win+R», для того чтобы вызвать диалоговое окно. Далее, требуется кликнуть по «Выполнить», в открывшейся вкладке вводится команда: «lusrmgr.msc».
После того как действия подтверждены, откроется вкладка «Локальные пользователи и группы». Потребуется выполнить переход в папку «Пользователи», расположенную слева от окна. Нужно выполнить несколько щелчков правой клавишей мыши по чистому месту, чтобы вызвать меню. После, выбирается пункт «Новый пользователь…».
Придумываем имя, кликаем по кнопке «Создать».
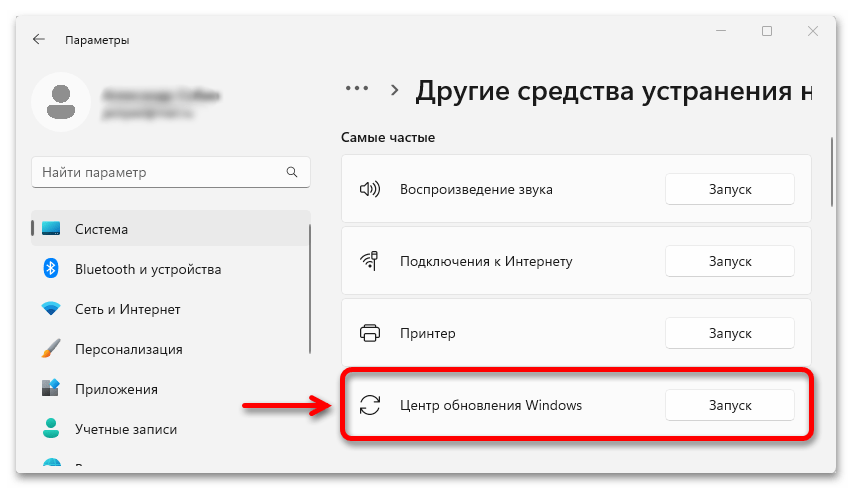
Fix 4. Troubleshoot Windows Update
Microsoft introduced an advanced troubleshooter in the earlier version, and they continued the feature in the latest Windows 11. You can allow the inbuilt troubleshooter to scan the Windows Update for problems, and it will resolve the minor issues automatically.
- Open “Settings” from the search bar.
- Click on “Troubleshoot” present in the “System” section.
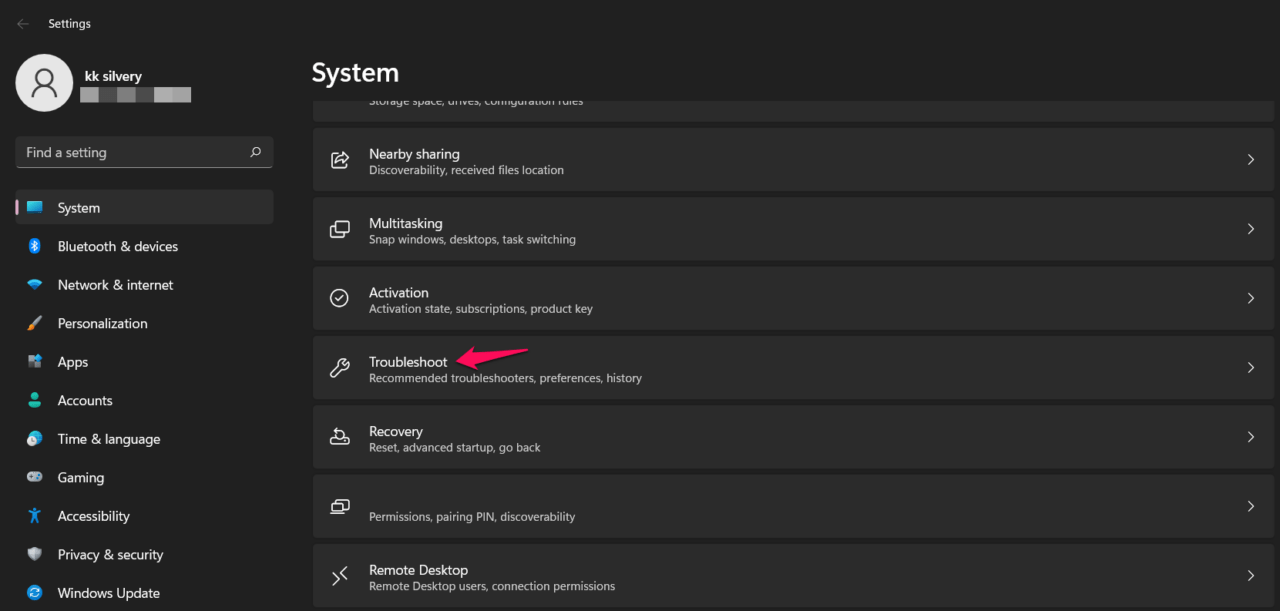
Select “Other troubleshooters” from the options.
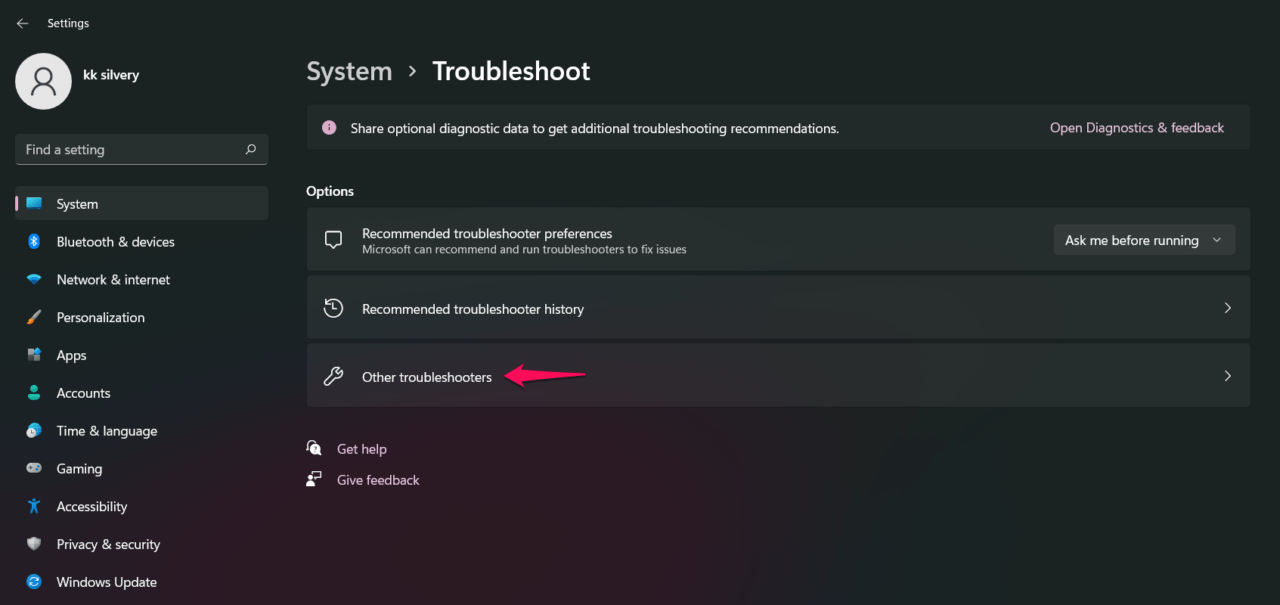
Click on “Run” beside the “Windows Update” option.
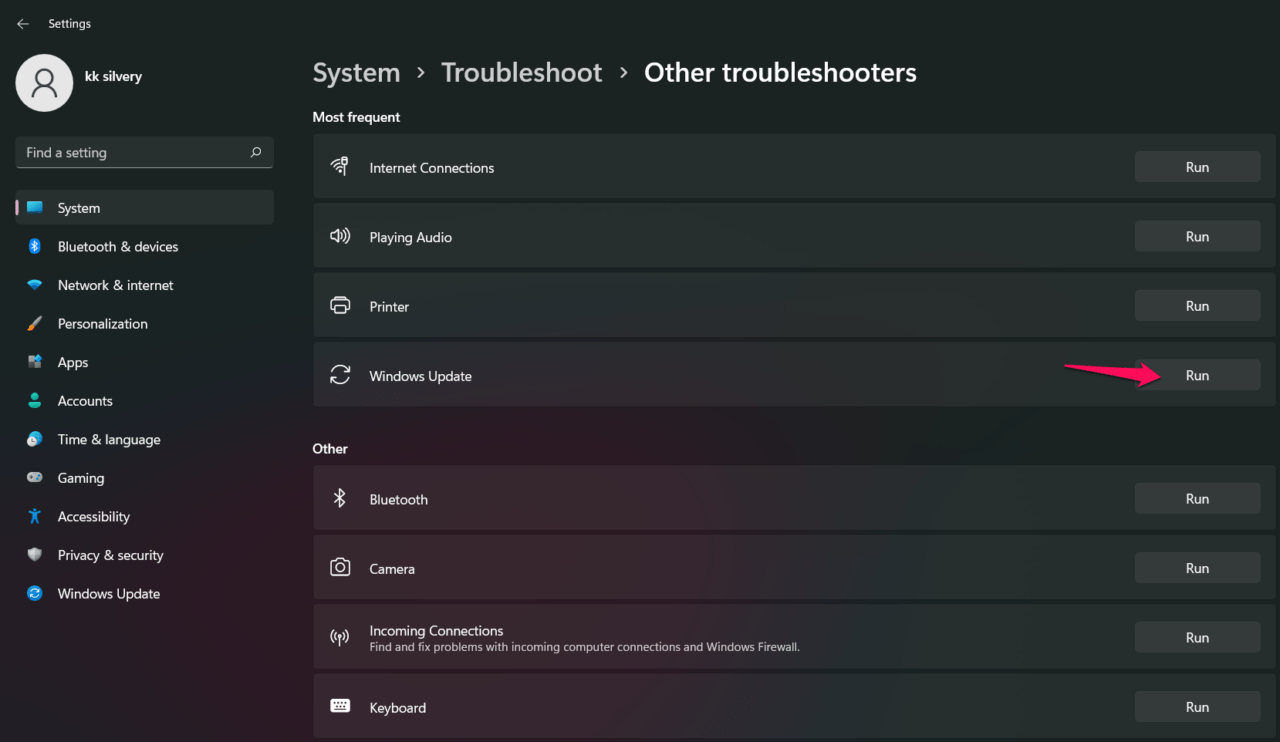
The troubleshooter resolved the issue.
Reboot the Windows machine and end the session with a good note. Go to Windows Update in the Settings and try to search for the updates again or click on “Download & Install”, if it is showing up on the screen.
Исправление настроек времени и даты
Обычно ОС автоматически настраивает время с момента, как только устройства будут подключены к интернету. Эта опция предусматривается по умолчанию. Но иногда требуется изменение системного времени для осуществления определенных действий. Для этого потребуется:
- Открыть настройки, перейти в закладки «Время и язык», «Дата и время».
- Есть возможность установки часового пояса автоматически.
При деактивации опции автоматической установки времени, у пользователя появляется возможность вручную корректировать дату и время. Кроме того, в настройках ОС можно синхронизировать время сейчас, чтобы система откорректировала параметры.
Способ 1: Диагностика подключения к сети
Ошибка 0x80248014 обычно возникает в «Центре обновления Windows», когда там не удается загрузить какой-то апдейт. Конкретную причину сбоя, как правило, не указывают, а значит, нужно учитывать разные варианты, например проблемы с интернетом. Проверьте, подключен ли компьютер к глобальной сети, и если да, то насколько стабильно это соединение.
Подробнее:
Проверка стабильности интернет-соединения
Решение проблемы с неработающим интернетом на ПК

Если доступ к интернету есть, но скорость передачи данных значительно ниже той, что предусматривает ваш тариф, ознакомьтесь со специальной статьей на нашем сайте, которая может помочь поднять пропускную способность до исходных значений.
Подробнее: Способы увеличения скорости интернета на ПК с Windows 11
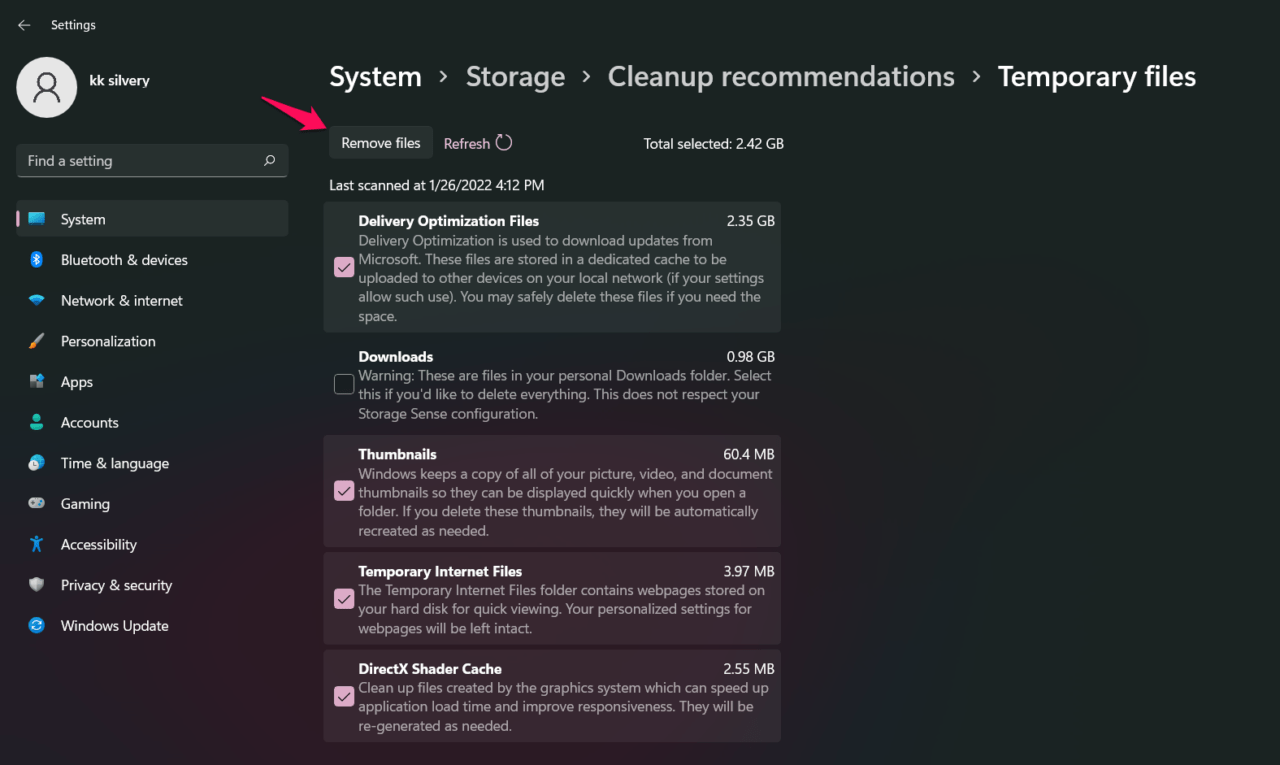
Fix 2. Delete Unnecessary Temp Files
Windows 10 has an inbuilt tool to remove the temp files, and Microsoft continued the feature in the latest Windows 11. Follow my lead to remove unnecessary temp files from the operating system installed partition.
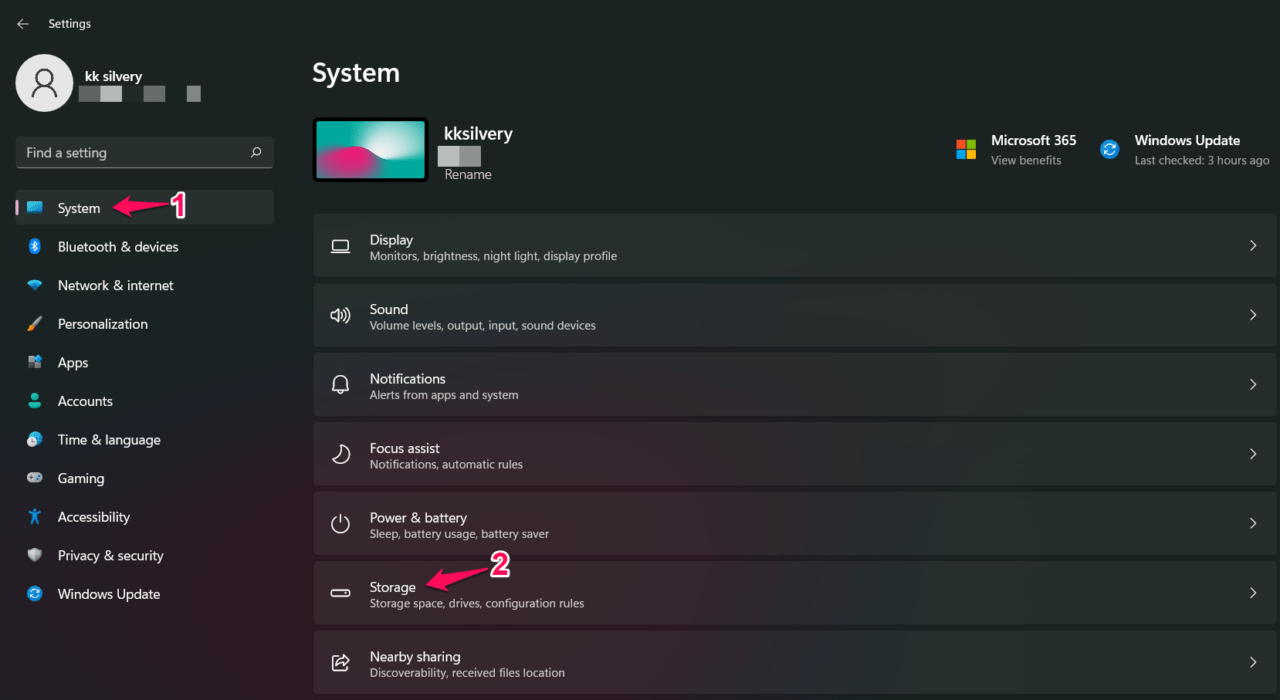
- Open “Settings” from the search bar.
- Click on “Storage” and it is present in the “System” section.
Click on the “Cleanup Recommendations” option.
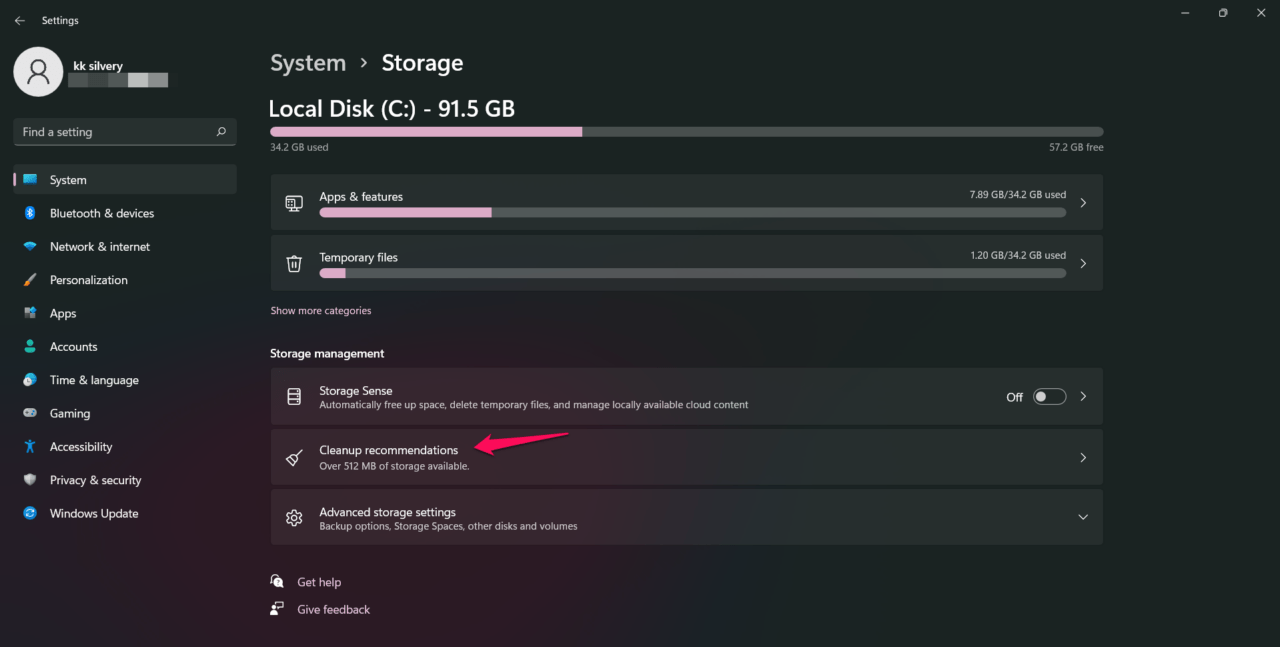
Click on the “See Advanced Options” option.

I selected every option in the storage feature except “Downloads”.
Click on the “Remove files” button.
Confirm the action and click on “Continue” to allow Windows to delete the temp files.
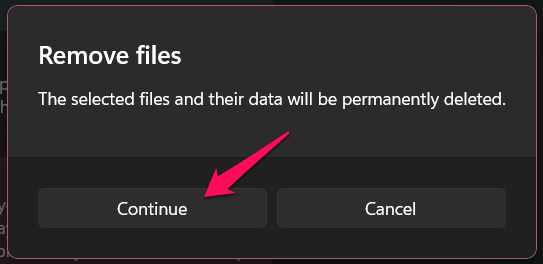
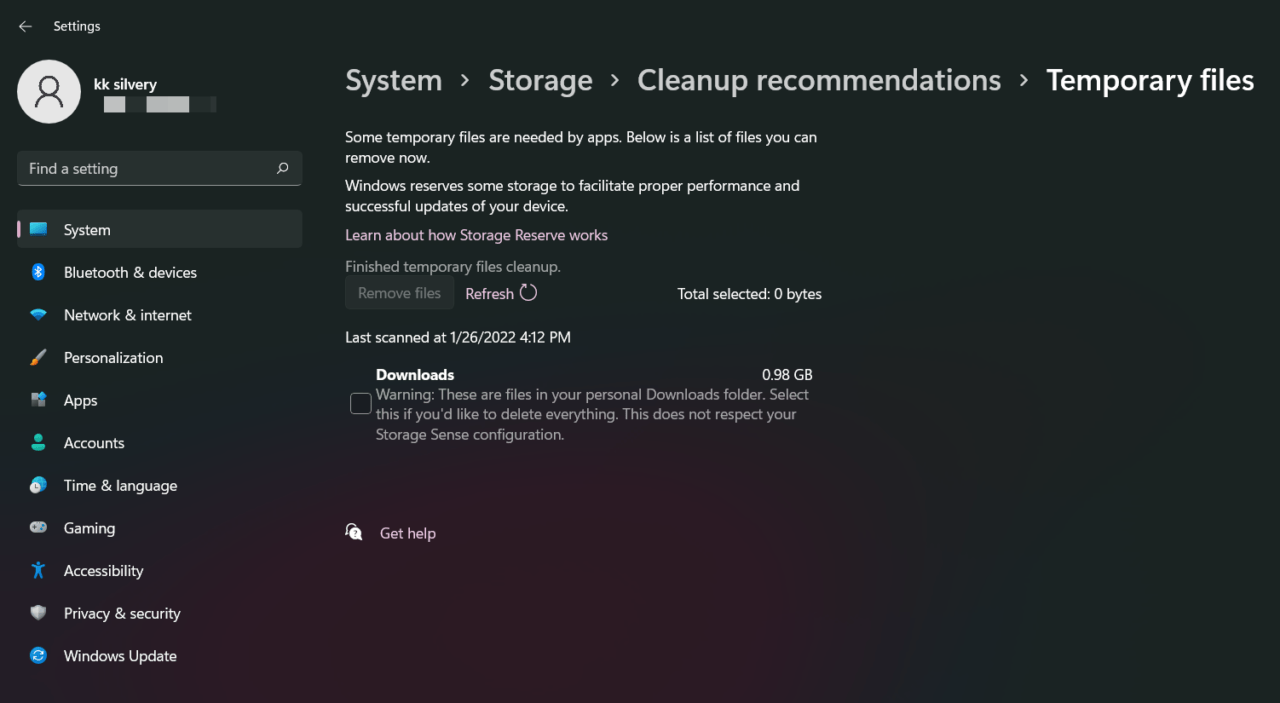
Allow Windows to remove the temp files from the system. There is a way to remove the files manually, but you can automate the process from here.
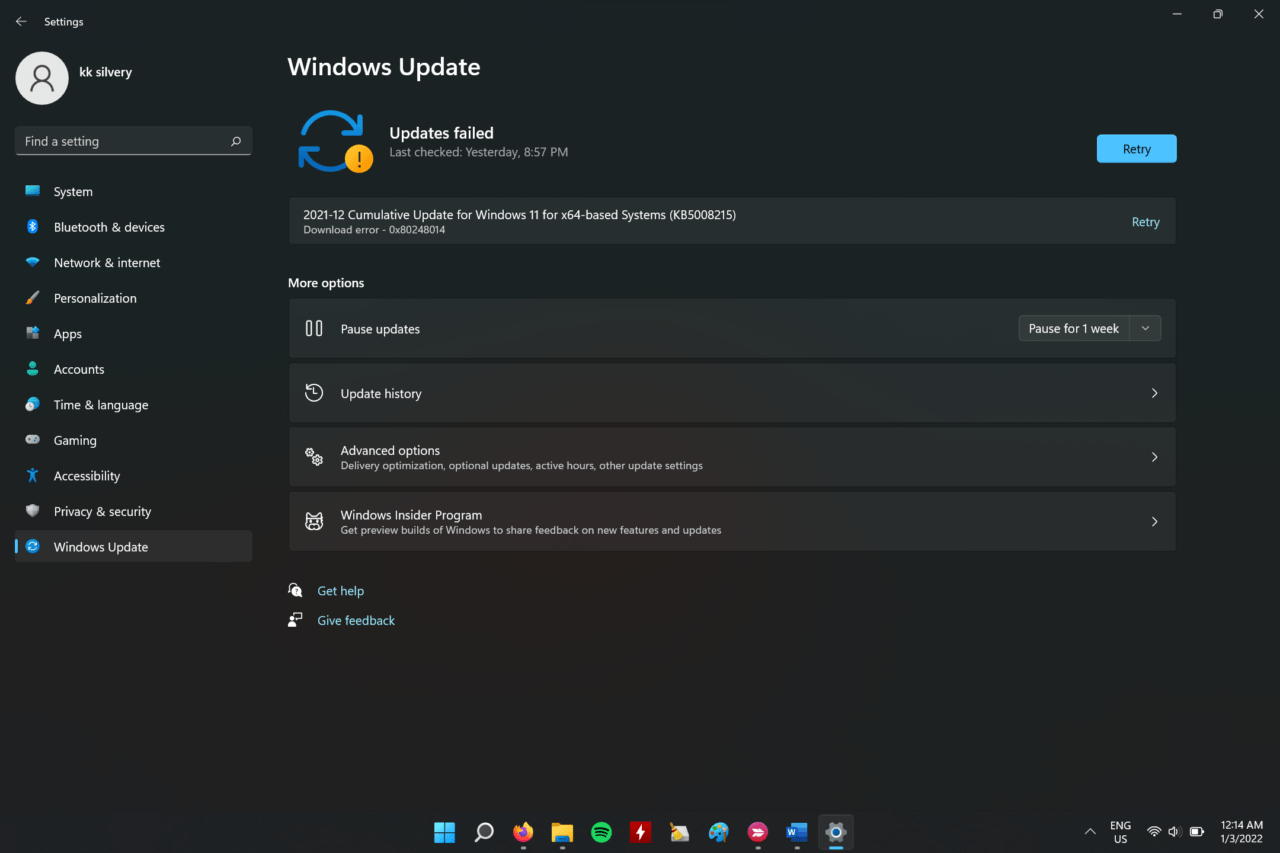
What Causes Windows Update Error 0x80248014?
Windows Update is a complex procedure when it comes to updating the packages and components. However, the operating system canceled the process and we have to learn about it, so you can resolve the issue faster. I have given you a few valid reasons on what triggers the 0x80248014 error since it’s appearing on almost every Intel & AMD machine.
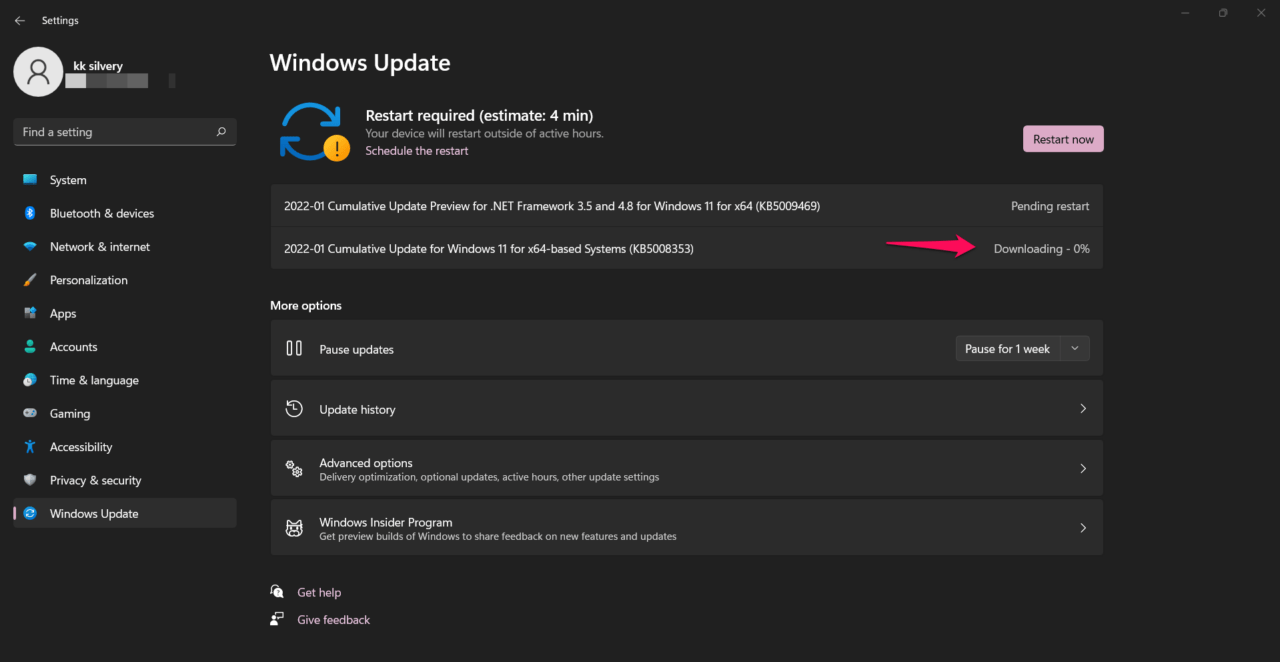
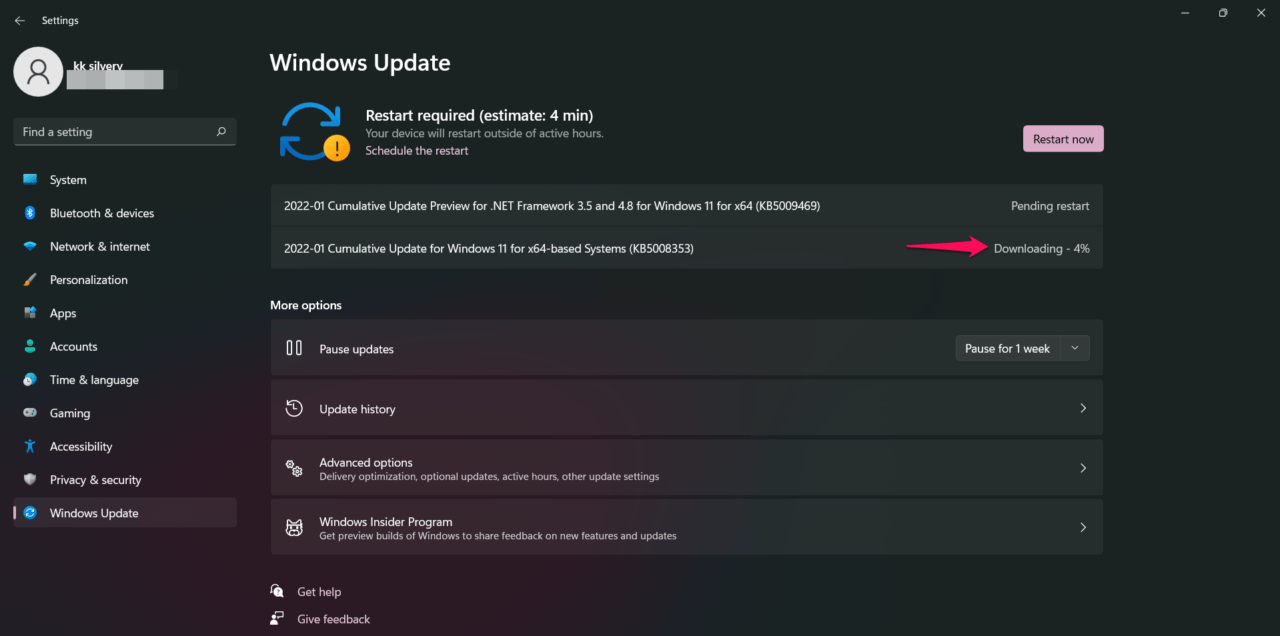
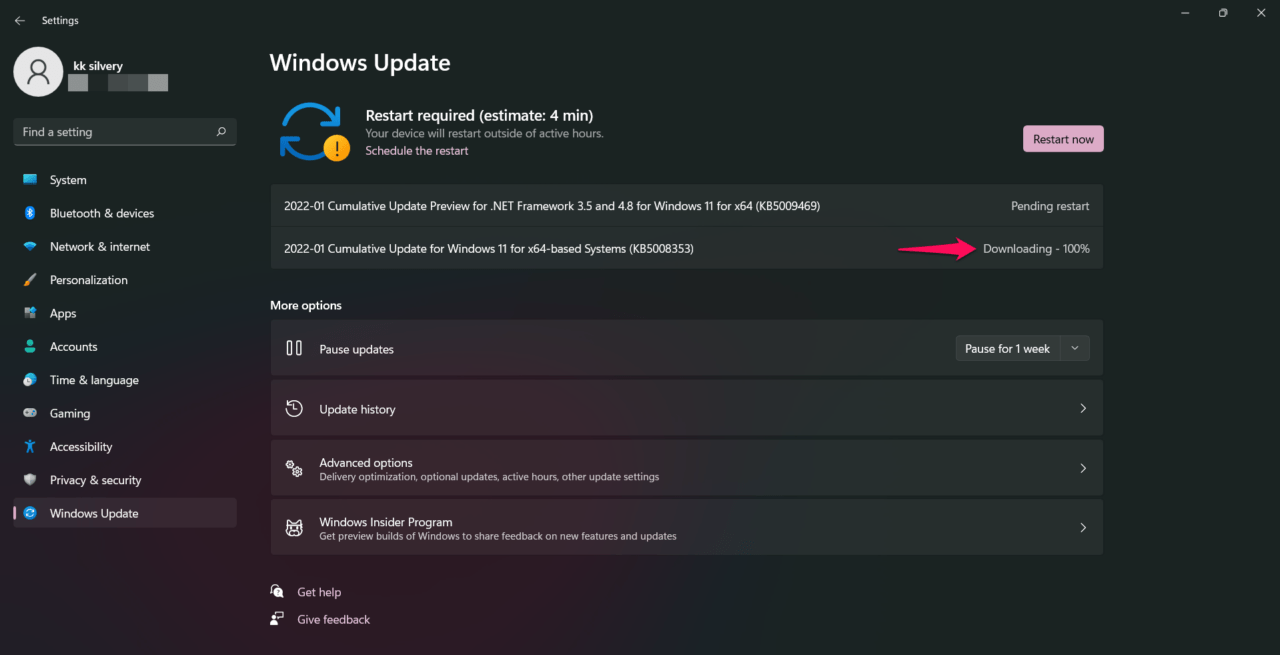
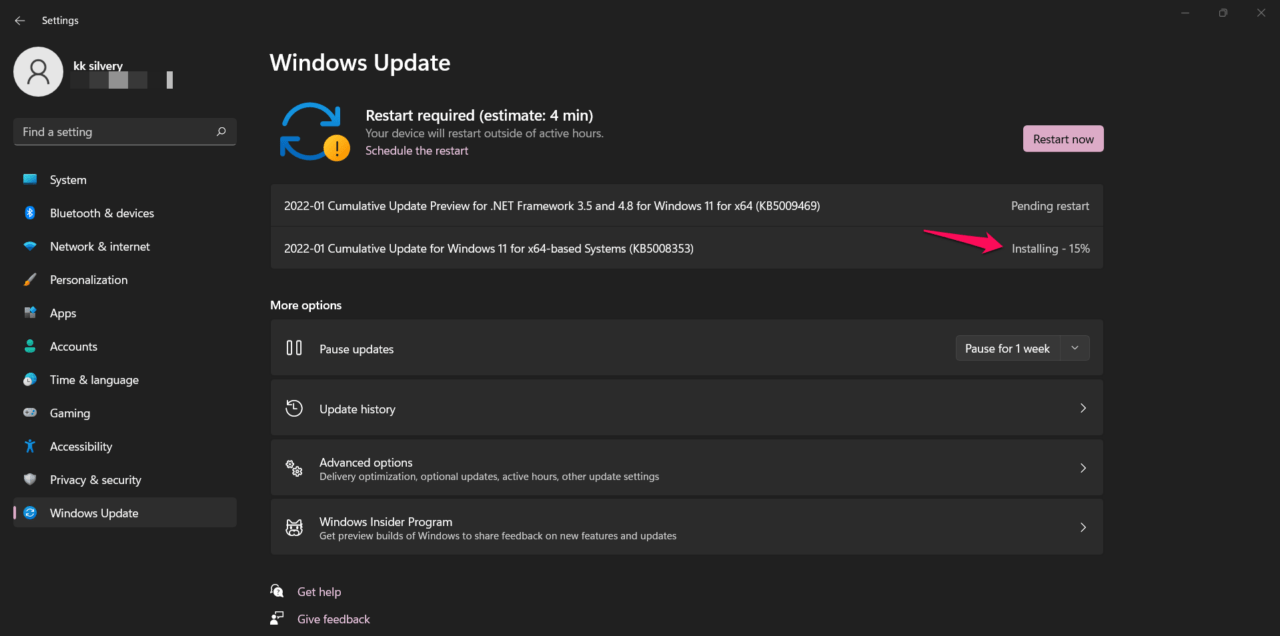
I opened the “Windows Update” in the Settings app.
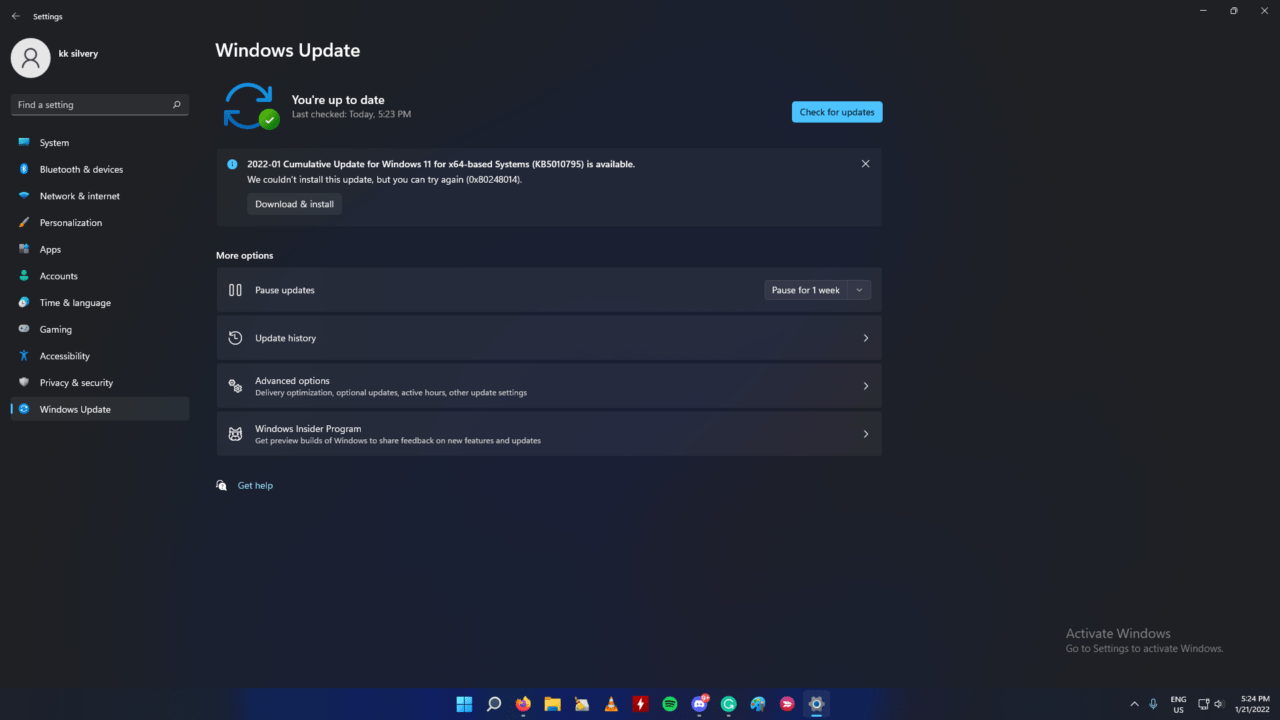
The Cumulative Update downloaded successfully.

But it failed to install successfully.
Windows Software Bugs: Windows 11 was released on Oct 2021, and Microsoft is working with the developers in the headquarters to make the software stable. You should expect bugs and glitches in the operating system since it was released not so long ago. Of course, it’s going to take a while for the manufacturers and brands to release stable drivers.
Windows Update Errors: I suspect Windows Update is facing some errors in the background that we might be aware of it. We will investigate the matter and put the inbuilt tools in use to identify the culprit.
Corrupted Update Components: It’s not uncommon for Windows to have corrupted update components, and it could be the primary reason why Windows is canceling the process. We will rectify the issue and follow a different approach to resolve it.
Temp Files: The computer operating system creates temporary files in the local storage, so you can open the files faster and load them quickly. The temp files accumulate with time and they tend to interrupt with the new packages. I will show you how to get rid of them using Microsoft’s inbuilt tools.
Insufficient Disk Space: Millions have installed Windows on 240GB or 120GB SSD drives, and that’s what is available in the budget laptop nowadays. My Core i3 laptop shipped with 240GB NVMe SSD, but I maintained 50GB free space in the C drive. Microsoft releases large update packages for the Windows OS, and the internal drive should have minimum free space to save the files.
Malware or Virus: My PC was infected with malware multiple times in the past, and it prevents Windows to install newer updates. Microsoft releases security updates, Windows Defender definitions, and other important components through the service. Malware protects itself then starts destroying the machine bit-by-bit. You should remove the lingering malware or virus from the storage drive, and it will keep the operating system healthy.
How can I fix the download error 0x80248014?
1. Reset Network components
There’s a simple solution for error code 0x80248014 which prevents you from checking for updates.
Just follow these steps to solve error code 0x80248014, so you can check for updates normally again:
- Right-click on the Start Menu button, and choose Command Prompt (Admin).
- Enter the following command and press Enter: net stop WuAuServ
- Now, past the following into Search and press Enter: %windir%
- In Windows folder, find SoftwareDistribution folder, and rename it to SDold.
- Open Command Prompt (Admin) again, and enter the following command: net start WuAuServ
- Try to check for updates again
This error probably occurred because of the corrupted update file, which we removed by renaming the SoftwareDistribution folder.
Most users have reported that removing the Software Distribution folder helped them to solve error code 0x80248014, and I hope it will help you, as well.
2. Delete the Software Distribution folder
Software Distribution folder is the most important Windows folder for updates. Namely, all updates files and data are stored in this folder.
So, if there’s some corruption inside it, you’ll likely have problems installing updates. So, we’re going to reset this folder, in order to resolve the problem.
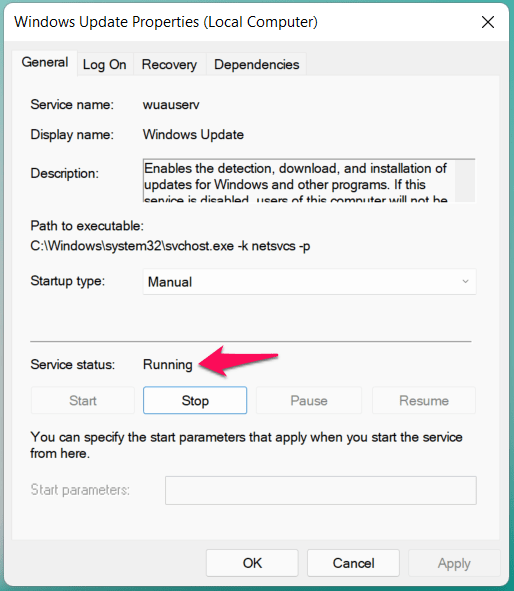
But before we reset the Software Distribution folder, we need to stop the Windows Update service:
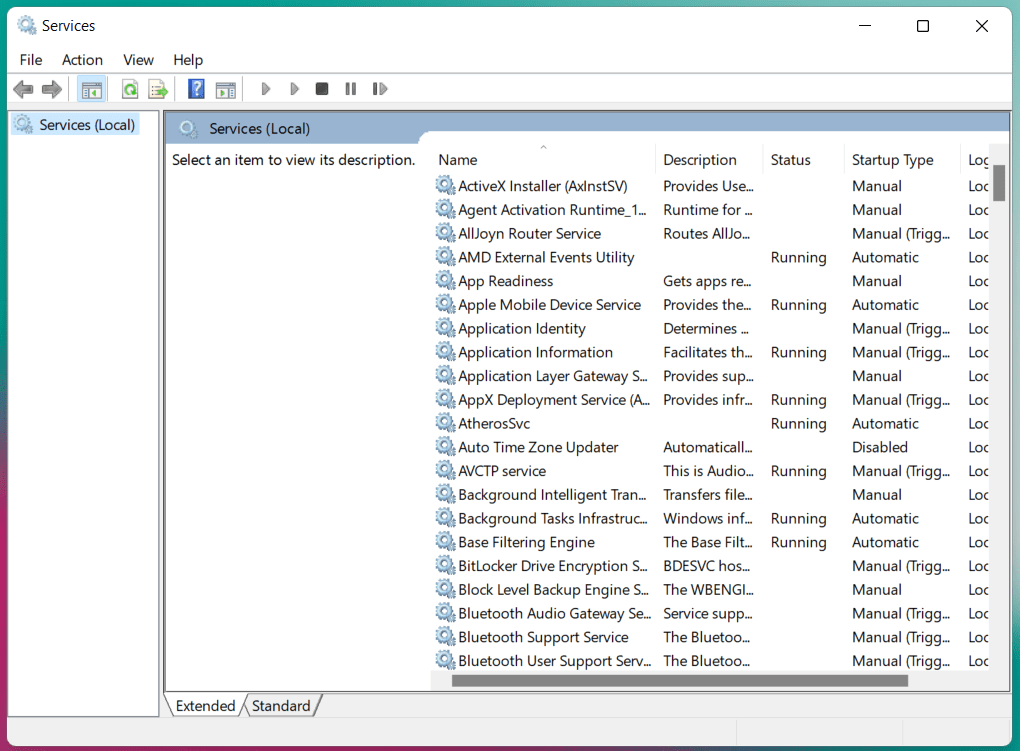
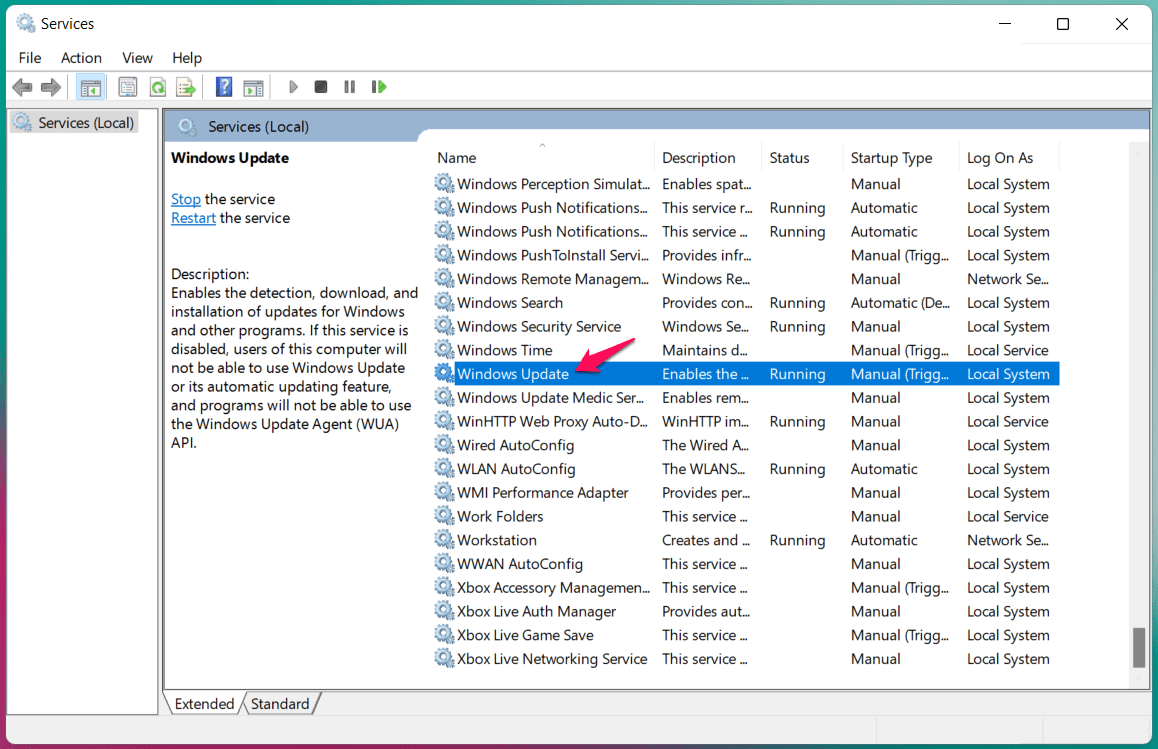
- Go to Search, type services.msc, and go to Services.
- In the Services list, search for Windows Update.
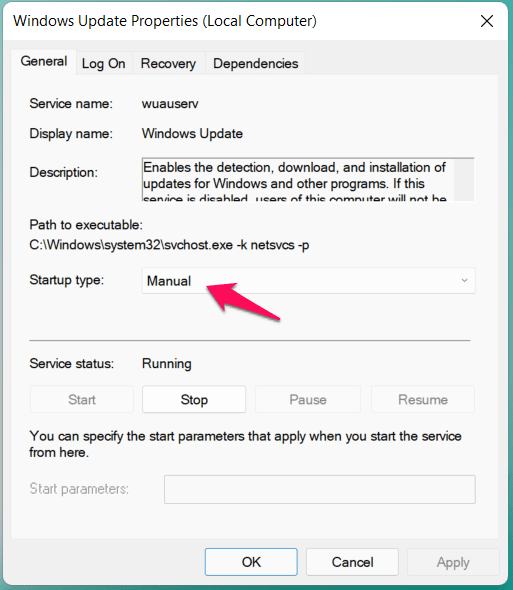
- Right-click and go to Properties, then choose Disable.
- Restart your computer.
Now that the Windows Update service is disabled, let’s go and delete (rename) the SoftwareDistribution folder:
- Navigate to C:Windows and find the SoftwareDistribution folder.
- Rename folder to SoftwareDistribution.OLD (you can delete it, but it’s safer if we just leave it there).
- Restart your computer.
Once you do that, go and re-enable the Windows Update service:
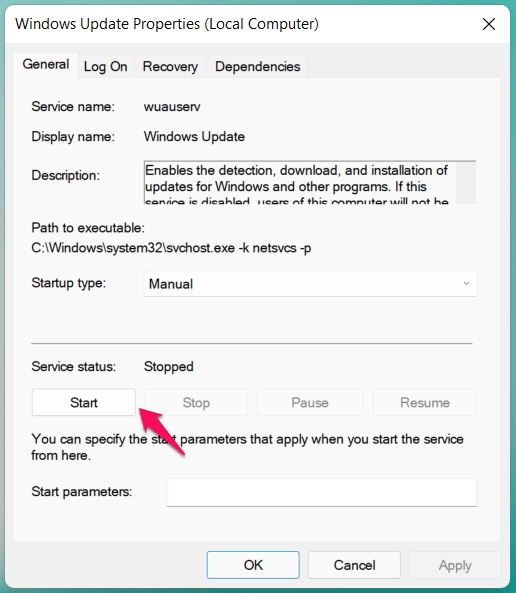
- Once again navigate to Services and find Windows Update and, in Properties, change from Disabled to Manual.
- Restart your computer once again.
- Check for updates.
3. Run the Troubleshooter
If you’re still experiencing this update error, you can also try the new Troubleshooter in Windows 10.
This troubleshooter deals with a wide range of system issues, including update errors. But it’s only available in Windows 10 Creators Update or later.
Here’s how to use the Windows 10 Troubleshooter:
- Go to Settings.
- Head over to Updates & Security > Troubleshoot.
- Now, click Windows Update, and choose Run the troubleshooter.
- Follow further on-screen instructions.
Alternatively, you can use a third-party troubleshooting tool. Choose one from our great list.
4. Run the SFC scan
Another troubleshooter you can try is the SFC scan. This is a universal tool that also deals with various system errors. Here’s how to run the SFC scan in Windows 10:
- Go to Search, type cmd in the Search box, and then right-click on Command Prompt.
- Click on Run as administrator. (If you are prompted for an administrator password or for a confirmation, type the password, or click Allow).
- At the Command Prompt, type the following command, and then press ENTER: sfc /scannow
5. Run the DISM
And finally, the last troubleshooter I’m going to mention in this article is also the most powerful one – Deployment Image Servicing and Management (DISM).
So, if the previous two troubleshooters failed to resolve the problem, you can as well try with this one.
Here’s how to run DISM in Windows 10:
- Open the Command Prompt as shown above.
- Enter the following command and press Enter: DISM.exe /Online /Cleanup-image /Restorehealth
- Wait for the process to finish.
- Restart your computer.
- In case the DISM can’t obtain files online, try using your installation USB or DVD. Insert media and type following command: DISM.exe /Online /Cleanup-Image /RestoreHealth /Source:C:RepairSourceWindows /LimitAccess
- Make sure to replace the C:RepairSourceWindows path of your DVD or USB.
- Follow further on-screen instructions.
Learn everything there is to know about DISM from our comprehensive guide!
6. Flush DNS
And finally, if none of the previous solutions worked the last thing we’re going to try is flushing the DNS. Here’s how to do that:
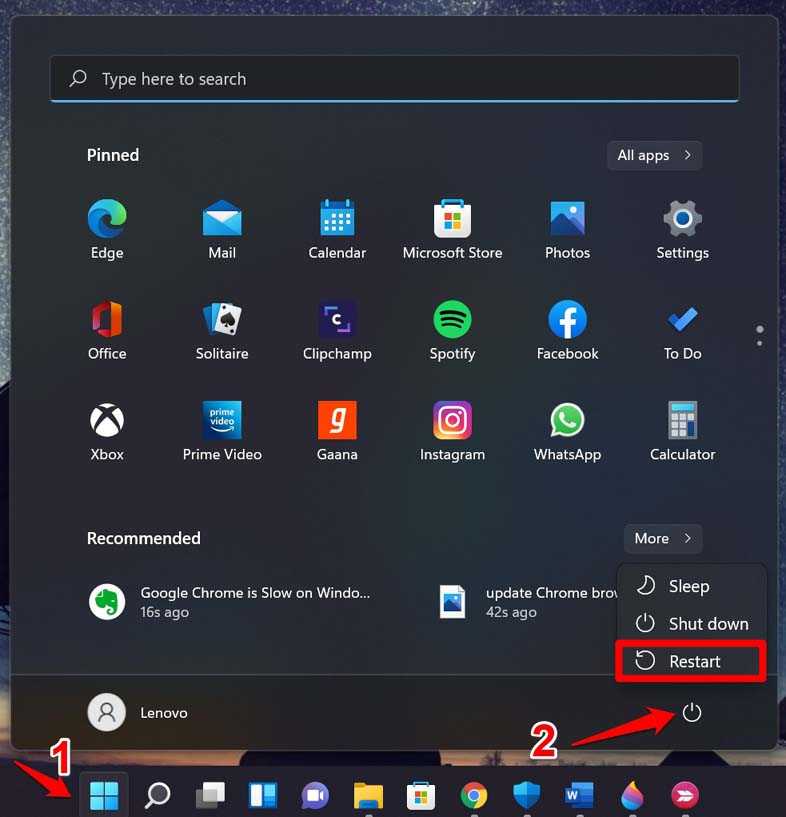
- Start Command Prompt as administrator. To do that press Windows Key + X and choose Command Prompt (Admin) from the menu.
- When Command Prompt opens, enter the following lines before closing Command Prompt and restarting your PC:
- ipconfig /release
- ipconfig /flushdns
- and ipconfig /renew
Причины появления ошибки
Есть несколько распространенных причин, провоцирующих появление ошибки с исходным кодом. Самые распространенные:
- Сбой в подключении.
- Наличие помех на сервере.
- Присутствие проблем в настройках Магазина ПО, из которого осуществляется загрузка обновлений.
Тут важно сразу определить, в чем причина ошибки и исходя из этого, определяются способы решения проблемы:
Если ошибка в Магазине программного обеспечения, то рекомендован к использованию способ 2.
Если ошибка имеет место, то это значит, что компоненты обновленной версии ПО повреждены. Для их корректировки следует остановить/ выполнить перезапуск служб, связанных с обновлением.
Для решения проблемы пользователю потребуется внести изменения в разрешение программного продукта. Есть возможность сброса изменений, но, рекомендуется создать резервную копию диска C.
В ОС предусматривается задание, применяемое приложением для совершения ручной и автоматической проверки обновлений посредством
Согласие на использование Центра обновлений вручную
Задание имеет несколько триггеров:
- запуск ежедневно,
- по событию 8202,
- пользовательский.
Для отключения проверки обновлений убираются разрешения файла UsoClient.exe после этого при проверке обновлений триггерами будут иметь место сбои.
Программное согласие
Для применения программного согласия потребуется выполнение следующих манипуляций:
Не должно возникнуть трудностей при выполнении этих действий, но, если не уверены или неудобно выполнять манипуляции, не будет лишним заручиться поддержкой человека, который в этом разбирается – знакомый программист, мастер сервисного центра по обслуживанию ПК.
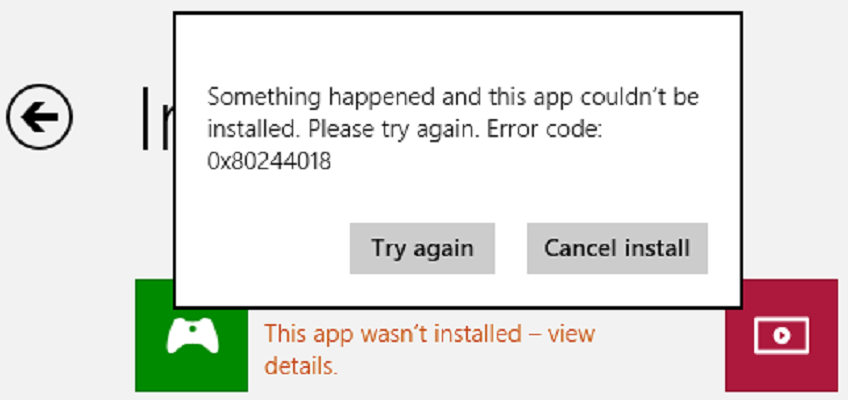
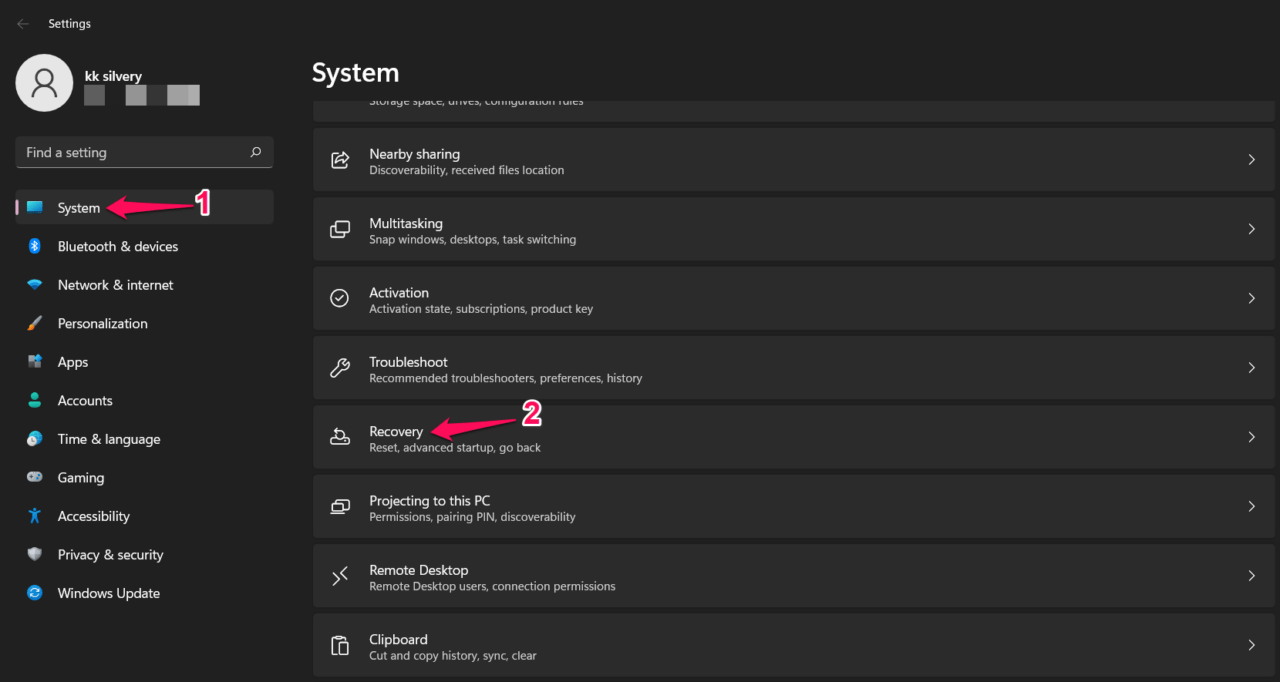
Fix 6. Full System Scan in Windows Safe Mode
You shouldn’t take the malware or virus attack out of the math. Millions of Windows PCs have been affected by different types of malware, and they break the system apart with time. You shouldn’t let the malware take over the machine and destroy the internal software components.

![6 решений для ошибки центра обновления windows 0x80244018 [новости minitool]](https://jsk-oren.ru/wp-content/uploads/2/7/4/274673c7c2c1dbc191d9ba289fa666e7.jpeg)


- Open “Settings” from the search bar.
- Select “Recovery” under the “System” menu.

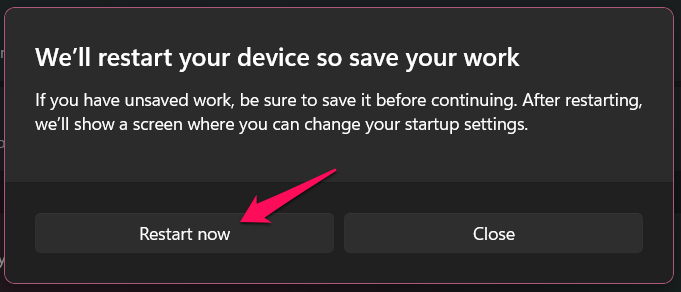
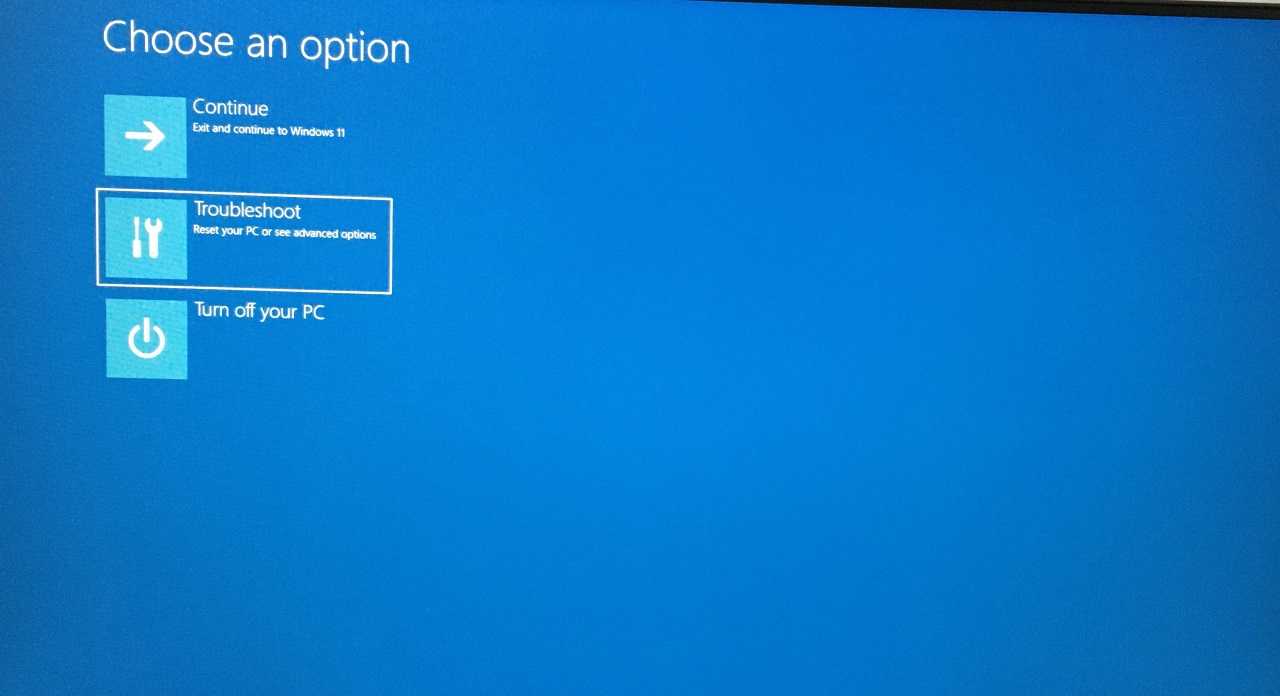


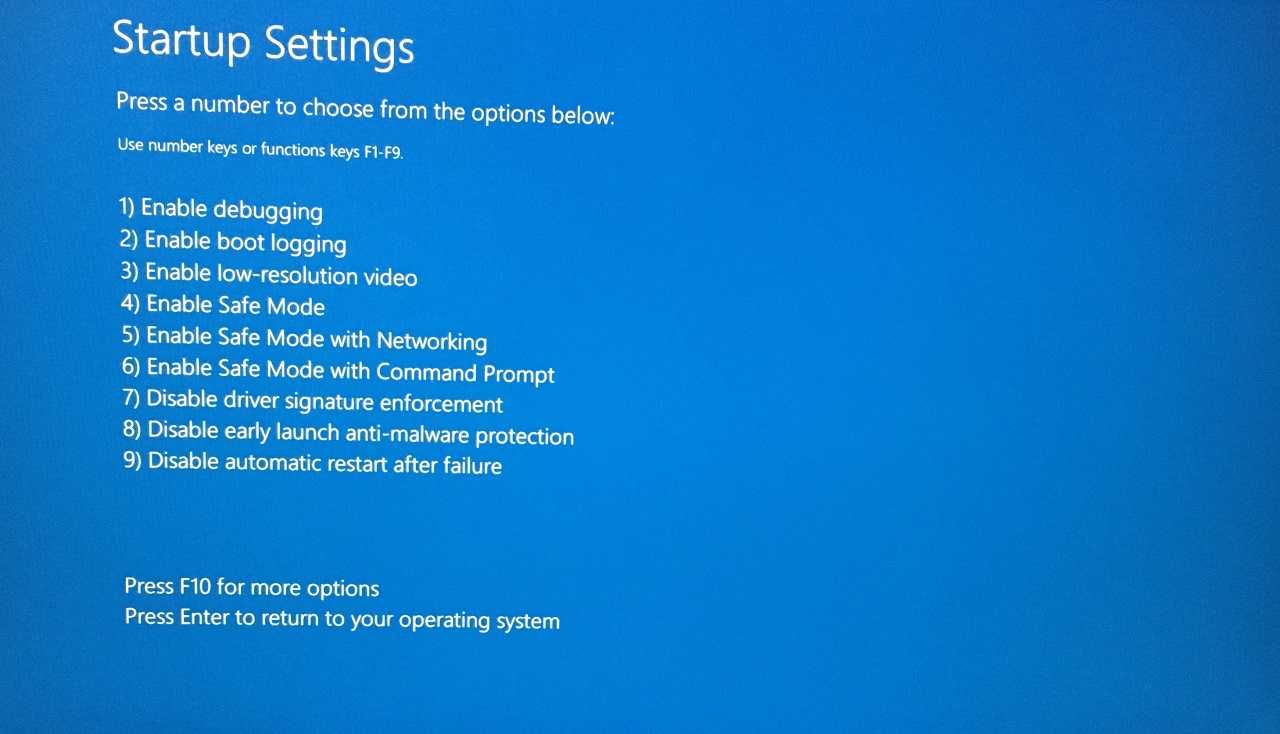
Do not choose any other option, such as the “Enable Safe Mode with Networking” option.
Launch the antivirus system and run a full system scan.
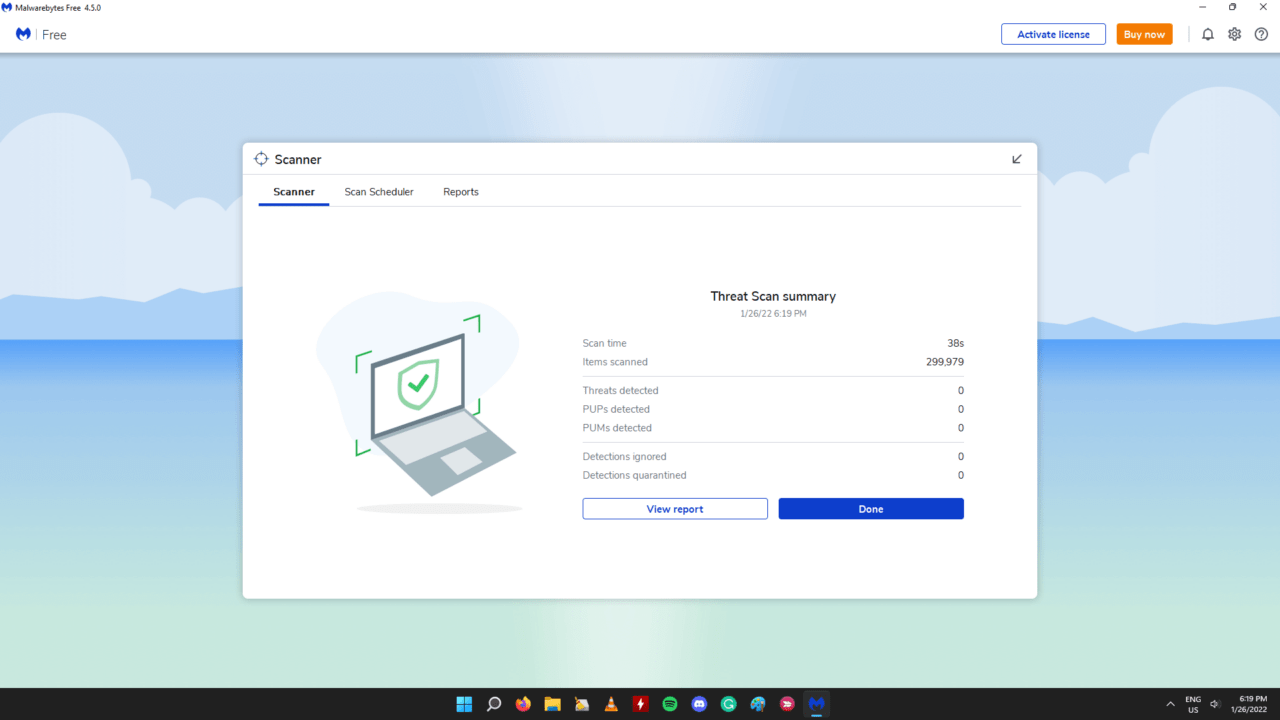
My Windows PC is not infected with malware as per the scan results. Pirated Windows or programs have accessed your machine and gained administrator permissions so they won’t show up as threats. Remove pirated programs and install fresh Windows software in the system.
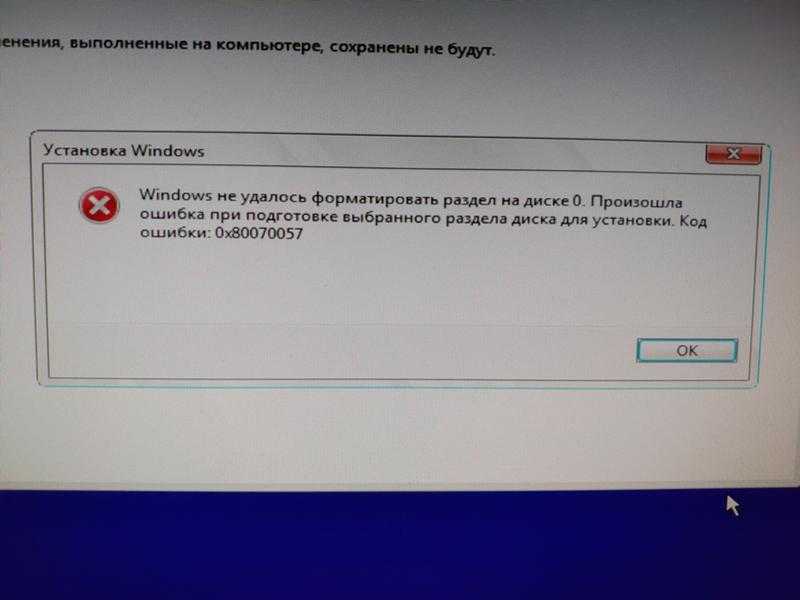
Error Code 0x80248014 in Windows 11
I applied the solutions that I have suggested above, and you can try to resolve the error code 0x80248014 in Windows 11/10 machines.
- Go to Windows Update in the Settings app.
- Click on “Download & Install” after searching for the updates.
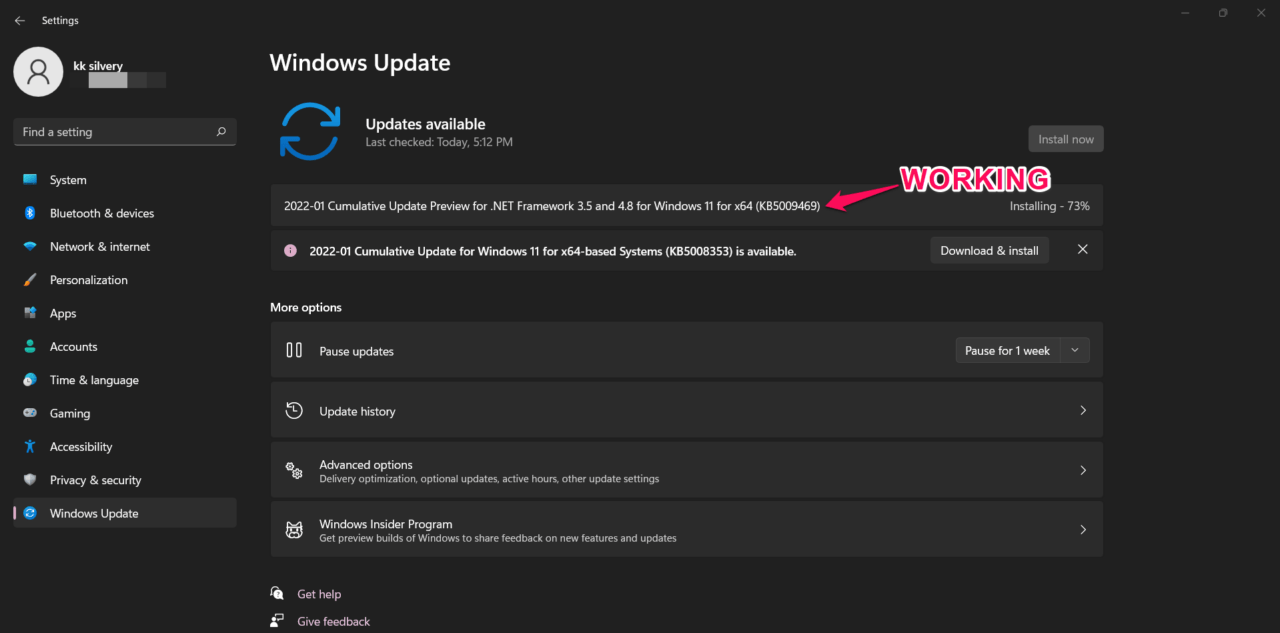

You can resolve the error code 0x80248014 in Windows 11/10 machine.
Bottom Line
Create a bootable Windows 11/10 USB flash drive and reinstall the operating system from scratch. You have to find the product key from the command prompt or PowerShell, and there are many dedicated tutorials out there. Let us know which solution helped you to resolve the 0x80248014 error code in Windows 11/10 machine
If you’ve any thoughts on How to Fix Windows 11 Update Error 0x80248014?, then feel free to drop in below . Also, please subscribe to our DigitBin YouTube channel for videos tutorials. Cheers!
Выполнение Чистой загрузки
На первый взгляд, действия, описанные выше, могут вызвать трудности. Но, если следовать ниже описанному алгоритму, сложностей возникнуть не должно.
- Выполнить вход в ПК в качестве Администратора. Если учетная запись отсутствует, ее можно создать.
- В поле поиска на панели задач вводится msconfig, делается выбор конфигурации системы, показанной в результатах поиска.
- Активировать «Скрыть все службы» – «Отключение».
- Во вкладке «Загрузка» в «Конфигурации системы» потребуется выбрать «Открытие диспетчера задач».
- В разделе «Запуск», находящемся в «Диспетчере» для каждого действия выбирается элемент и «Отключение».
Другие решения
Если ошибку выдает какой-то один апдейт, а все остальные скачиваются без проблем, можно попробовать загрузить его отдельно из каталога Microsoft и установить вручную.

Для устранения неполадок в работе «Центра обновления» операционная система поддерживает специальное средство, которое, если повезет, сделает все за вас.
Не исключено, что сначала нужно восстановить поврежденные системные файлы или обновить/установить отсутствующие драйверы устройств. В общем, если выше описанные действия не помогли, то есть и другие способы устранения ошибки, о которых подробно написано в отдельной статье на нашем сайте.
Подробнее: Восстановление работы Центра обновления в Windows 11
Выполнение Чистой загрузки
В выполнении чистой загрузки нет ничего сложного, если следовать приведённому ниже алгоритму:
- Потребуется выполнить вход в качестве Администратора. Если таковая запись отсутствует, рекомендуется ее сделать.
- В поле поиска ввести msconfig, и выбрать соответствующую конфигурацию системы в поисковой выдаче.
- Потребуется зайти во вкладку «Службы» и активировать опцию «Скрыть», а после – «Отключить».
- Во вкладке «Загрузка» активировать раздел «Открыть диспетчер задач».
- В области «Запуска» для каждого компонента раздела выбрать «Отключение».
- Закрыть раздел.
- Подтвердить действия нажатием «Ок».
Fix 5. Start Windows Update Service Manually
The account administrator can start the Windows Update service manually. The user should have administrator privileges, and the service won’t launch without administrator access. I recommend the users restart the Windows machine before starting the update service.
Press the Start key and open “Services” from the search bar.
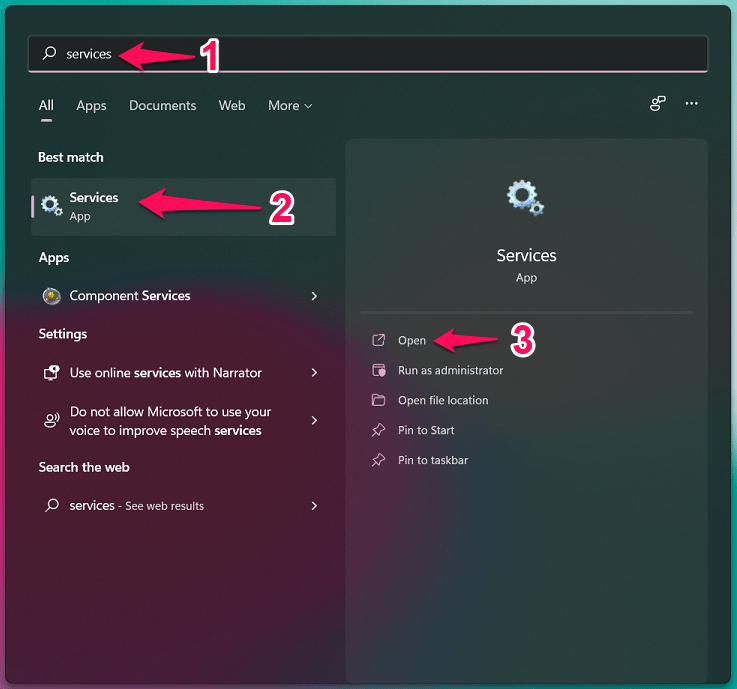
Scroll down and find “Windows Update” from the list. The services are in alphabetical order, so it shouldn’t be difficult to find them.
You have to wait patiently for the operating system and let it search for updates. Windows goes through the components and starts the updating process, do not shut down the machine for a few minutes.
How can I fix error code 0x80248014 in Microsoft Store?
1. Run the Troubleshooter
We’re going to run the Troubleshooter once again, but this time, we’ll be checking the hardware:
- Go to Settings.
- Head over to Updates & Security > Troubleshoot.
- Now, click Hardware & devices, and choose Run the troubleshooter.
- Follow further on-screen instructions.
An error occurred while loading the troubleshooter? Don’t panic! Check out our guide to solve the problem!
2. Disable UAC
And finally, let’s try with disabling the User Account Control, as well:
- Go to Search and type user account. Choose User Account Control from the menu.
- User Account Control Settings window will appear. Move the slider all the way down to Never notify and click OK to save changes.
We hope you managed to fix the Windows Update error 0x80248014, as well as the error with the same name that appears on Microsoft Store.
Let us know how it went in the comments section below.
Методы решения ошибки 0x80248014

Метод №1 Запуск Диагностики и предотвращения неполадок Windows
Первым делом, что можно попробовать во время возникновения проблем с обновлением Windows, это запуск встроенной в систему диагностики неполадок. Она может справить с большинства самыми распространенными проблемами в автоматическом режиме. Для запуска диагностики, вам нужно выполнить следующее:
- Нажмите клавиши Win+I и выберите «Панель управления».
- Найдите пункт «Система и безопасность»(не забудьте выставить «Просмотр: Категория») и выберите подпункт «Поиск и исправление проблем».
- Снова найдите пункт «Система и безопасность» и нажмите на «Устранение неполадок с помощью Центра обновления Windows».
- Затем нажмите на кнопку «Далее» в появившемся окне и следуйте инструкциям на вашем экране.
В теории, этот системный инструмент должен исправить проблему с ошибкой 0x80248014.
Метод №2 Отключение защитного ПО
Некоторые антивирусы имеют не самую лучшую репутацию по защите операционной системы. Напротив, многие из них, такое чувство, нарочно пытаются саботировать ее.
Итак, попробуйте просто отключить антивирусное программное обеспечение на вашем компьютере. Затем снова попытайтесь установить обновление через Центр обновления Windows. Возможно, что проблема заключалась именно в антивирусе.
Метод №3 Корректировка временных и региональных настроек
Некорректная дата и время — это еще одна причина, которая может стоять за появлением ошибки 0x80248014. Так что если вы столкнулись с этой ошибкой, попробуйте выполнить коррекцию этих параметров. Сделать это очень просто:
- Нажмите на часы и выберите «Изменение настроек даты и времени…»
- Затем воспользуйтесь кнопками «Изменить дату и время…» и «Изменить часовой пояс…» для коррекции настроек.
Как только вы удостоверитесь, что эти настройки выставлены правильно, снова попробуйте установить нужное вам обновление.
Метод №4 Переименование папки «Software Distribution»
Вот этот способ является одним из самых лучших, так как именно в большинстве случаев помогает исправлять такие ошибки, как 0x80248014. Для переименования «Software Distribution», вам понадобится сделать следующее:
- Откройте Проводник Windows.
- Перейдите в директорию C:\Windows\SoftwareDistribution
- Переименуйте папку SoftwareDistribution в SoftwareDistribution.old
Также вы можете попробовать удалить папку «Software Distribution». После выполненных действий, снова попробуйте обновить Windows. Во время этого должна будет создаться новая папка «Software Distribution», что исправит проблему.
Метод №5 Чистый запуск
Если ничего из вышеуказанного не помогло исправить проблему, что довольно тревожно, то можно прибегнуть к такому методу решения, как Чистый запуск. В этой статье описывать выполнение Чистого запуска мы не станем, так как это довольно обширная тема, но вы легко сможете найти в сети нужные сведения на нее.
Чистый запуск позволит вашей системе произвести запуск с минимальным набором программного обеспечение, что позволит свести к минимуму возникновение различных конфликтов, а в нашем случае это ошибка 0x80248014.