
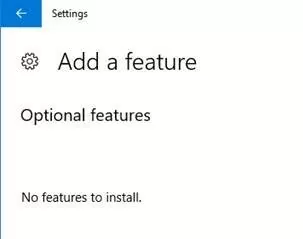
How to Fix RSAT Installation Error Code 0x80244022?
Here is the error. You can view the history of optional feature installation/uninstallation notifications.
Usually, these features get downloaded from Windows update catalog server. I assumed it was related to Windows update issues. Tried to solve it by checking the Internet connectivity, in-built Windows update troubleshooter and even resetting update content folders and services, but those did not help me.
Since my computer is connected to domain network and we have WSUS (Windows Service Update Server) which pushes approved updates across the company. It could be an issue here. My computer could be trying to download these RSAT tools from the WSUS server where these tools are not available to download.
The solution is to disable the WSUS on the local computer. Then the PC will search and download updates/other components directly from Microsoft update servers. Disabling WSUS can be done by modifying the registry on Windows 10. Read this simple guide about how to disable WSUS on Windows 10.
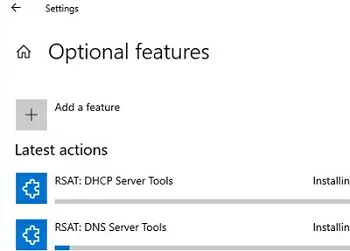
d) After clicking “install”, press the back button to view the status. Successfully installed features will appear in the home page of manage optional features as shown below.
e) The installed Admin tools can be accessed under ‘Administrative Tools’ in Windows 10 or 8.1.
f) To uninstall certain admin tools from Windows 10, you can visit the Manage Optional features home page, select the tool and press uninstall.
How to Turn on/off RSAT
After installing it, I will introduce how to turn on/off RSAT on your Windows.
Turn on RSAT
Here is how to turn on RSAT.
Step 1: On the Start menu, click All Apps, and then click Administrative Tools.
Step 2: In the Administrative Tools folder, click Server Manager.
Turn off RSAT
Here is how to turn off RSAT.
Step 1: On the desktop, click Start, click All Apps, click Windows System, and then click Control Panel.
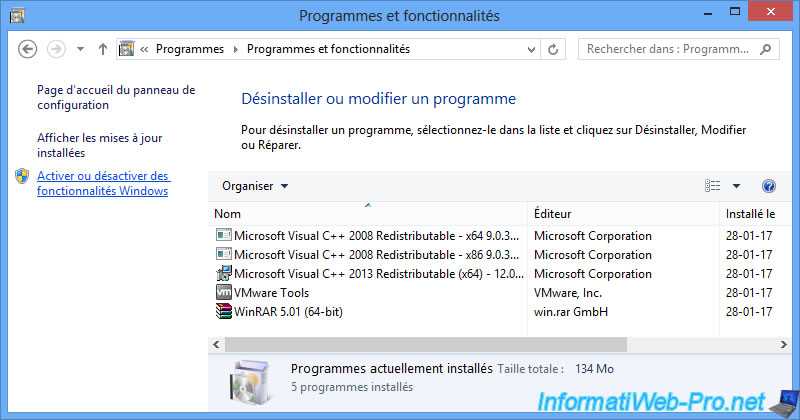
Step 2: Under Programs, click Uninstall a program. Click View installed updates.
Step 3: Right-click Update for Microsoft Windows (KB2693643), and then click Uninstall.
Step 4: When you are asked if you are sure you want to uninstall the update, click Yes.
Step 5: On the desktop, click Start, click All Apps, click Windows System, and then click Control Panel.
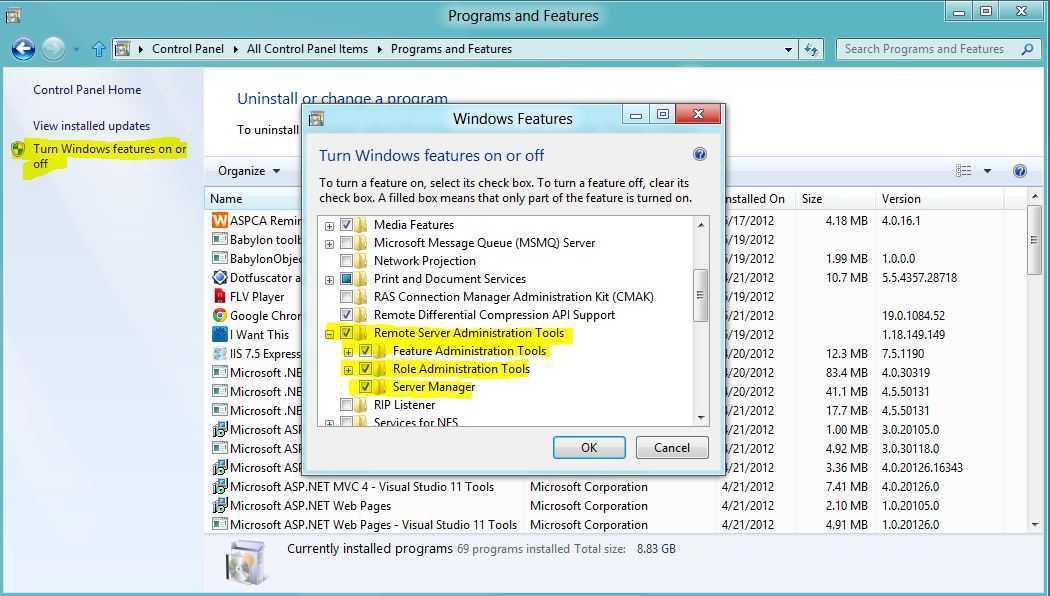
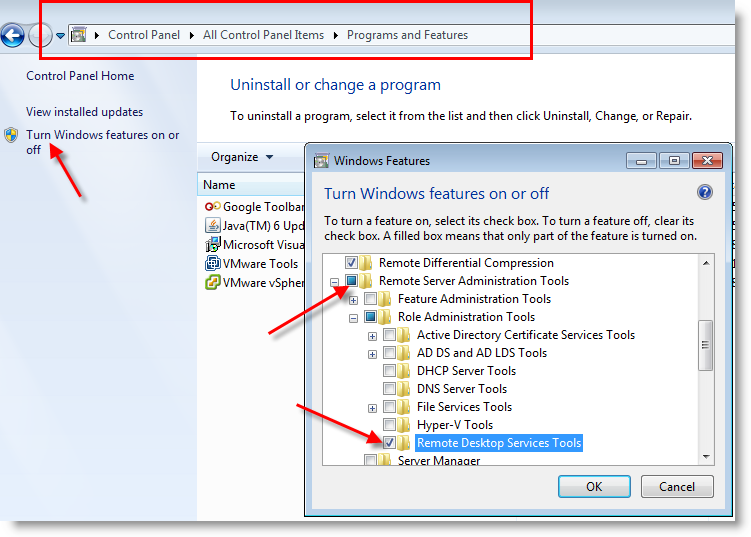
Step 6: Click Programs, and then in Programs and Features click Turn Windows features on or off.
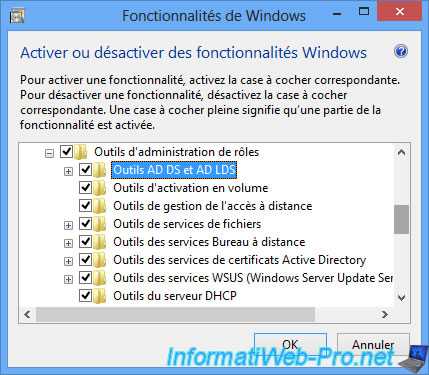
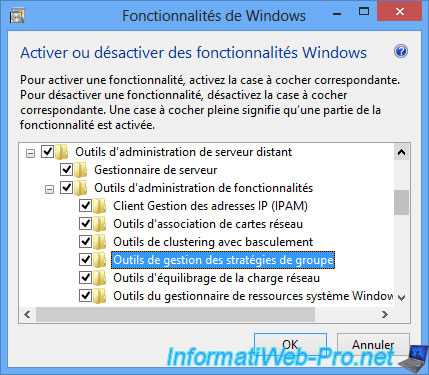
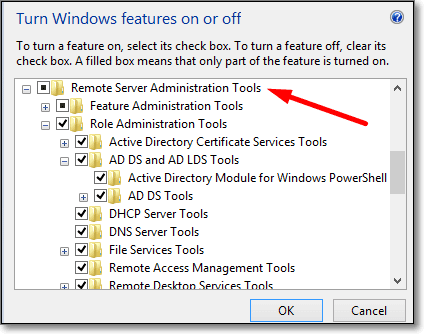
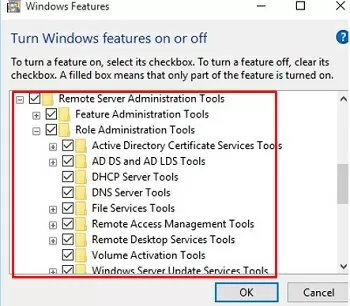
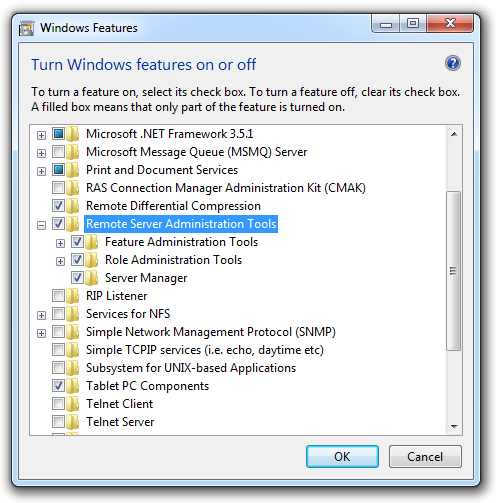
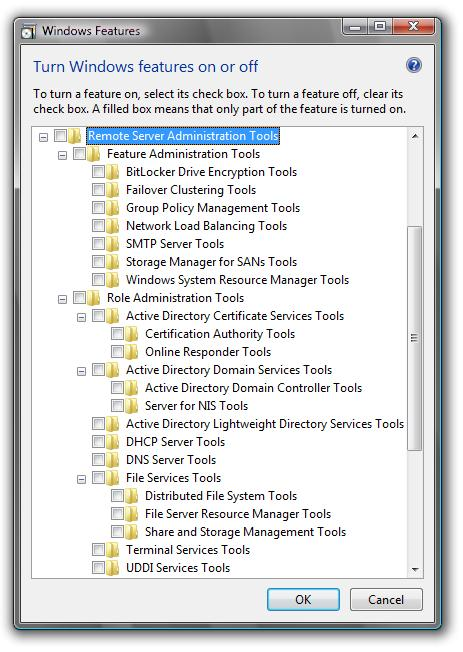
Step 7: In the Windows Features dialog box, expand Remote Server Administration Tools, and then expand either Role Administration Tools or Feature Administration Tools.
Step 8: Uncheck the boxes for any tools that you want to turn off.
Availability of RSAT For Windows
Since 2018, RSAT has been included as a set of Features on Demand (FODs) in the Windows 7 and 10 operating systems (OSes). It applies to all editions of Windows 10 and Windows 7 SP1, as well as Windows Server 2012, 2012 R2, 2016, 2019 and 2022. RSAT is also available in Windows 11, which released in October 2021.
Admins should note that RSAT can only be installed on the Professional or Enterprise editions of the Windows client OS (Windows 11/10/7). It cannot be installed on computers that are running the Home or Standard editions of these OSes. RSAT runs on both x86-based and x64-based editions of Windows 10.
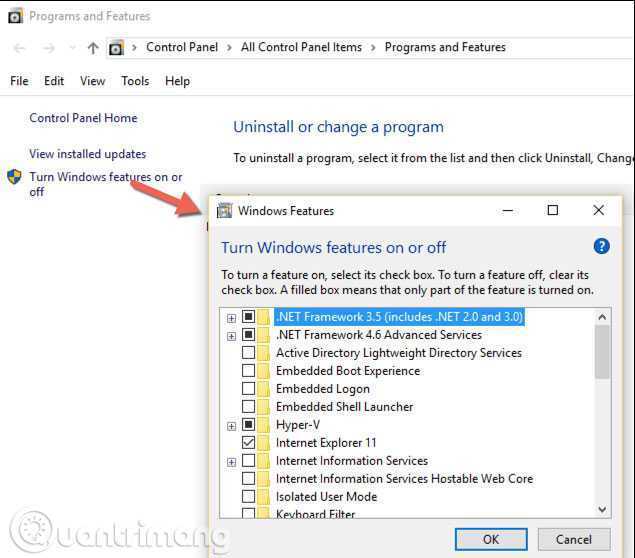
In Windows 7, RSAT tools are not automatically available after RSAT has been downloaded and installed. Admins must enable the tools they need from Control Panel. Under Control Panel, clicking on Programs and Features and then on Turn Windows features on or off enables admins to manage Windows Server systems after running the downloaded installation package.
No Option for “Remote Server Administration Tools” on Windows 10
Steps if no options for, “Remote Server Administration Tools”, on Windows 10:
Follow these steps if Windows Features does not have the “Remote Server Administration Tools”.
Step 1: Follow Steps 1 through 9, as explained above.
Step 2: From “Turn Windows Features On or Off”, select “Active Directory Lightweight Directory Services” and click “OK”.
Step 3: Windows will now get updated for the new changes.
Step 4: Then, go to Start Menu for “Active Directory” and check “Active Directory Users and Computers.” It will show there which means the package has been successfully installed and switched ON.
Active Directory Users and Computers Conclusion:
The above steps will be helpful for installing or switching ON the Active Directory Tool. It is clear that ADUC is helpful in administering most of the responsibilities. It lets you manage and reset passwords, FSMO server roles, unlock users, change group memberships, etc.
AD is a directory tool that authorizes and authenticates all users and computers in a Windows domain type network.
Examples of RSAT tools and snap-ins
The most popular RSAT tools for Windows 10 and Windows 11 include the following:
- Windows PowerShell cmdlet modules and command-line tools — admins can use these modules to remotely manage roles and features on Windows Server.
- Active Directory (AD) Certificate Services tools, including the Certification Authority, Certificate Templates, Enterprise PKI and Online Responder Management snap-ins.
- AD Domain Services tools and AD Lightweight Directory Services tools, such as AD Service Interfaces Edit, DCPromo.exe, LDP.exe and W32tm.exe.
- Best Practices Analyzer cmdlets for Windows PowerShell.
- BitLocker Drive Encryption administration utilities, such as BitLocker Recovery Password Viewer for AD.
- DirectAccess, Routing and Remote Access tools, including a routing and remote access management console, connection manager administration kit console and web application proxy.
Tools for key Active Directory services are examples of RSAT snap-ins.
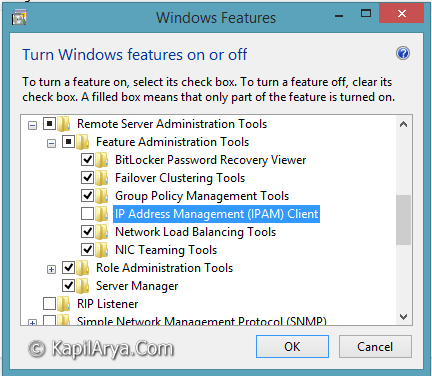
The RSAT set in Windows 10 and 11 also includes Dynamic Host Configuration Protocol server tools, such as the DHCP management console and the Network Shell command-line tool, as well as domain name system server tools, including the DNS Manager snap-in and the DNS module for Windows PowerShell. There is also thednscmd.exe command-line utility; file services tools, such as share and storage management tools; and distributed file system tools, as well as tools for failover clustering, group policy management, IP address management and network load balancing.
How Do I Install Remote Admin Tools?
To install the Remote Admin Tools, go to the Control Panel > Programs and Features and then click the ‘R’ button. Select the ‘Remote Server Administration Tools’ item. You can then check if you have administrative privileges by clicking the ‘Turn Windows features on or off’ button. Once you have selected this option, run the command prompt as an administrator. The tools are now installed.
To install the Remote Server Administration Tools, you need to be logged on as an Administrator. To do this, you must be a member of the Administrators group or log on using the built-in Administrator account. To remove the Remote Admin Tools, run the Command Prompt utility as an administrator. Click ‘Uninstall’ to remove the complete Administration Tools package from Windows. To remove the Remote Server Administration Tools, go to Control Panel > Programs and Features.
Once you’ve installed the Remote Server Administration Tools, you need to enable the appropriate Windows features. You can do this in the Control Panel > Programs and Features menu. To enable them, select ‘RSAT’ and then ‘Administrator’. After that, click ‘Administrative Tools’ and then ‘Administrative Control’. The RSAT tools are enabled by default in Windows 10, 8.1, and 8.
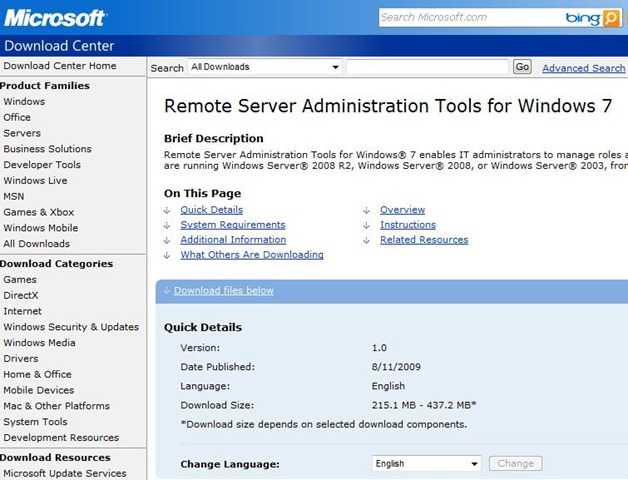
Instructions for Installing and Enabling Remote Server Administration Tools (RSAT) on Windows 7 and Windows Vista
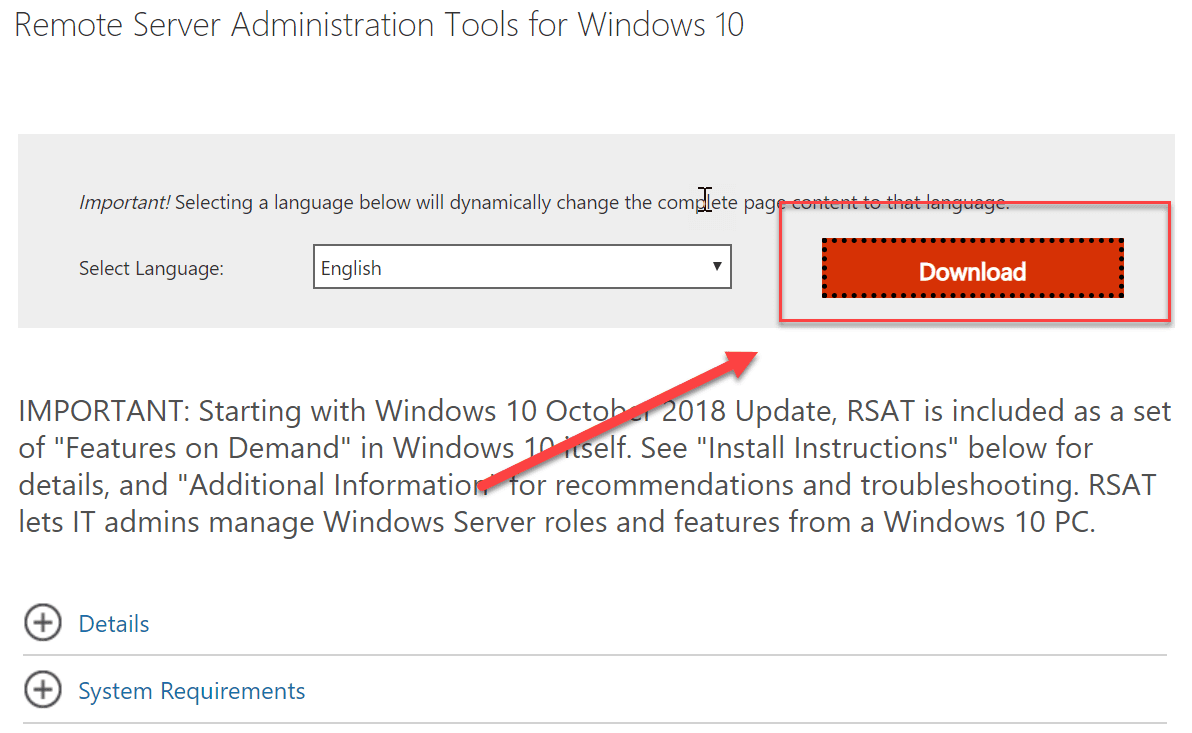
On operating systems before Windows 10 version 1709 the Remote Server Administration Tools (RSAT) must to be downloaded from the Microsoft website and installed.
Download locations for Remote Server Administration Tools
- Remote Server Administration Tools (RSAT) for Windows 7
- Remote Server Administration Tools (RSAT) for Windows Vista 32-bit (x86)
- Remote Server Administration Tools (RSAT) for Windows Vista 64-bit (x64)
Enabling Remote Server Administration Tools (RSAT) on Windows Vista and Windows 7
Once Remote Server Administration Tools (RSAT) have been downloaded and installed on Windows Vista or Windows 7 you need to enable the tools by following the instructions below.
- Press the “Windows + R” keys, Type “control panel” in the “Open” field and press “Enter” or click the OK button.
- In Control Panel click on “Programs”.
- In Programs click on “Turn Windows features on or off”.
- In Turn Windows Features on or off click on check all boxes under “Remote Server Administration Tool”.
- The Remote Server Administration Tools (RSAT) will now be enabled.
- To use the installed tool create a new Microsoft Management Console (MMC), press the “Windows + R” keys, Type “mmc” in the “Open” field and press “Enter” or click the OK button.
- In the new MMC click “File” and choose “Add/Remove Snap-in…”; a list of available snap-ins will be displayed.
- The selected management tools will now be available in the MMC.
What is RSAT used for?
What is RSAT? RSAT, short for Remote Server Administration Tools, is an essential tool introduced since Windows Server 2008 R2. It helps Windows administrators manage and maintain servers from remote location, or simply put, handle Windows Server roles and features from desktop computers such as Windows 11 and Windows 10.
Then how to access Remote Server Administration Tools on client OS? Do you need to download and install it?
This means if you’ve upgraded to later versions, like Windows 10 20H2 or Windows 11, you will no longer see a RSAT download link from the official page, because the option is already built in the system.
In this article, I will cover 3 methods to install and enable RSAT in Windows 11. Keep reading to get what you need to know.
Installing and using RSAT tools
To have the right to manage your server remotely, you will need to be logged on to your machine with an account that has server administration rights.
The easiest way to do this is to use a machine that is linked to the Active Directory.
Be sure to log in with an Active Directory account that has the right to manage your server remotely.

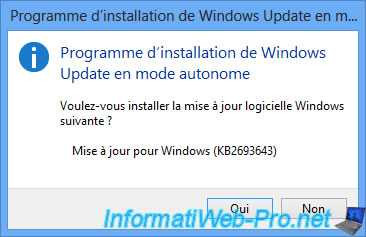
Once you have downloaded these tools, launch the downloaded file.
As you can see, these tools are provided as a Windows update (KB2693643).

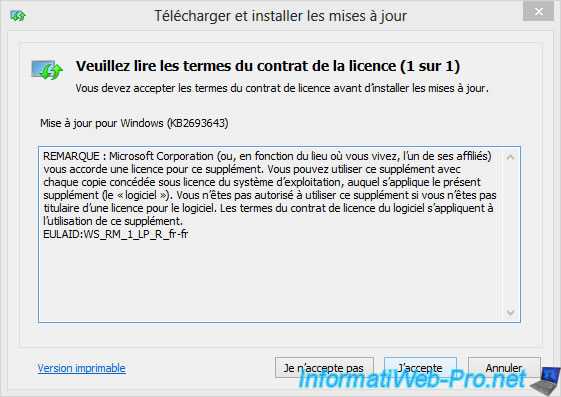
Accept the terms of the license agreement.
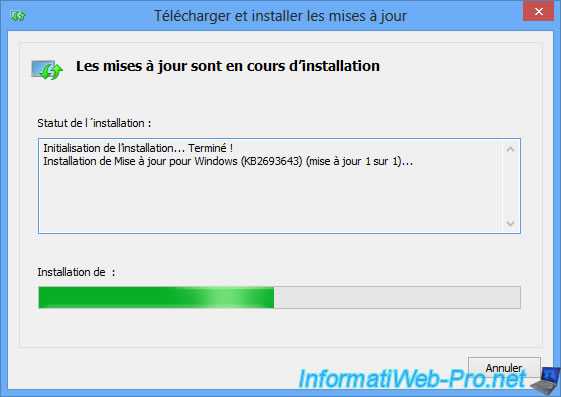
Wait while installing the update.
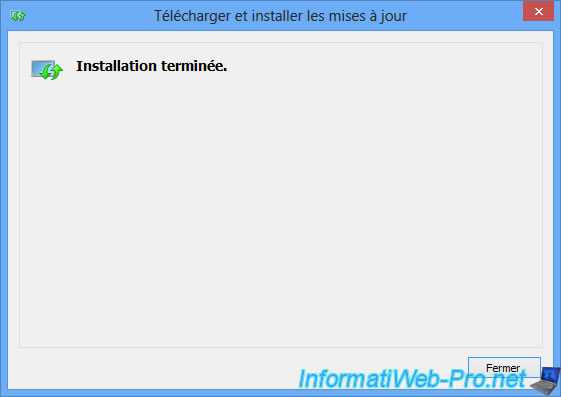
Click Close.
Now, enable and/or disable the RSAT tools you want through the Windows features.
To do this, open the Control Panel and go to «Programs : Uninstall a program -> Turn Windows features on or off».
In this list of Windows features, you will find the remote server administration tools (which correspond to the RSAT tools).
On Windows Vista and Windows 7, all these tools are installed by installing the previously downloaded update, but these tools are not enabled by default. You will need to activate the ones you want to use.
On Windows 8, 8.1 and 10, all these tools will automatically be activated after they are installed.
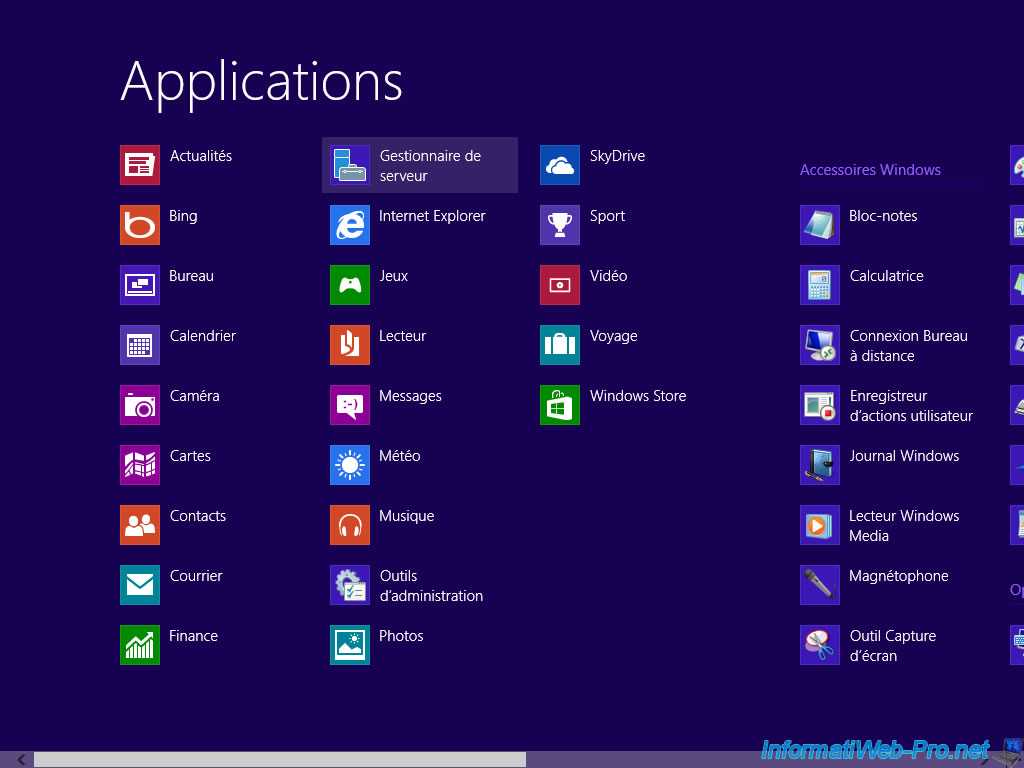
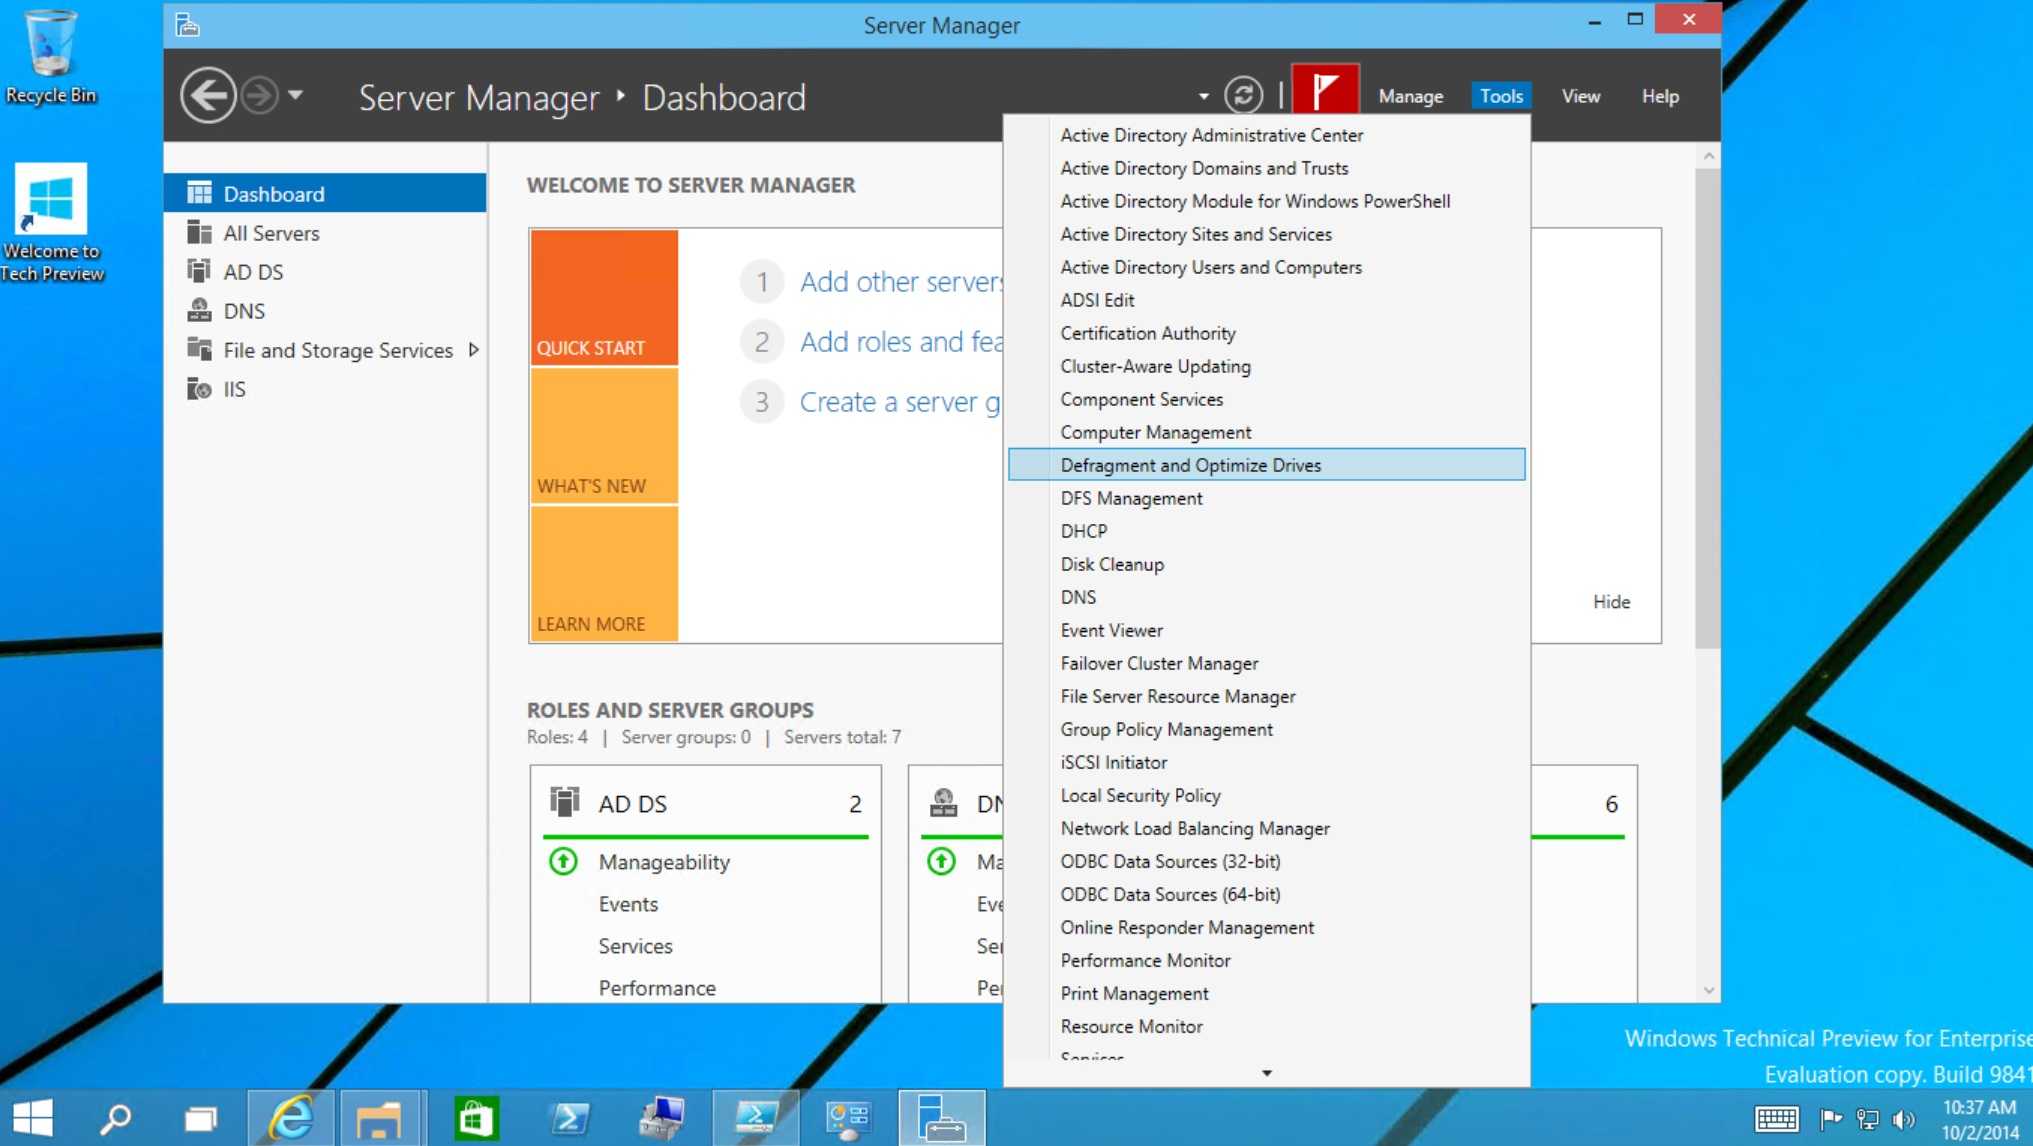
As you can see, you will find the server manager.
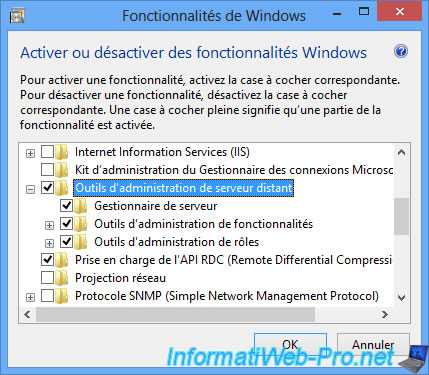
The tools to manage an Active Directory server, a certification authority (Active Directory Certificate Services Tools), a DHCP server, …
But also the management of group policies, and many other features of Windows Server.
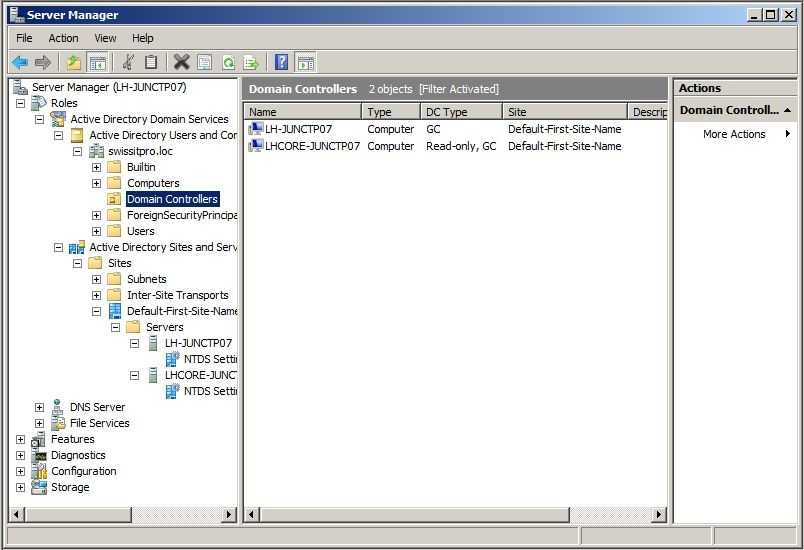
If you go to the Windows Home screen, you will see that a new shortcut has been automatically created for the server manager.
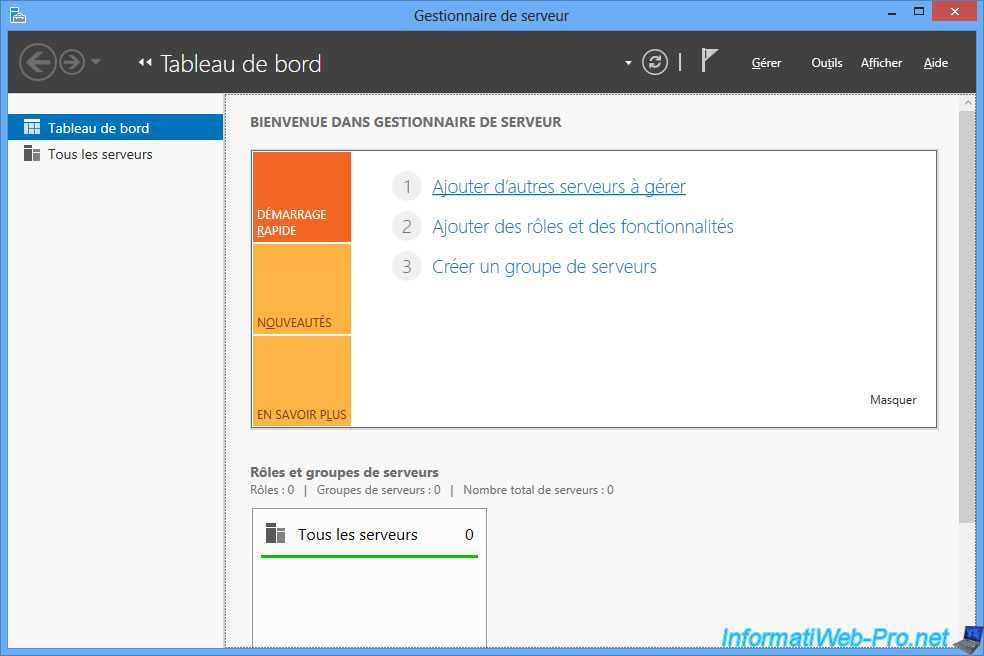
In the Server Manager, click on the «Add other servers to manage» link.
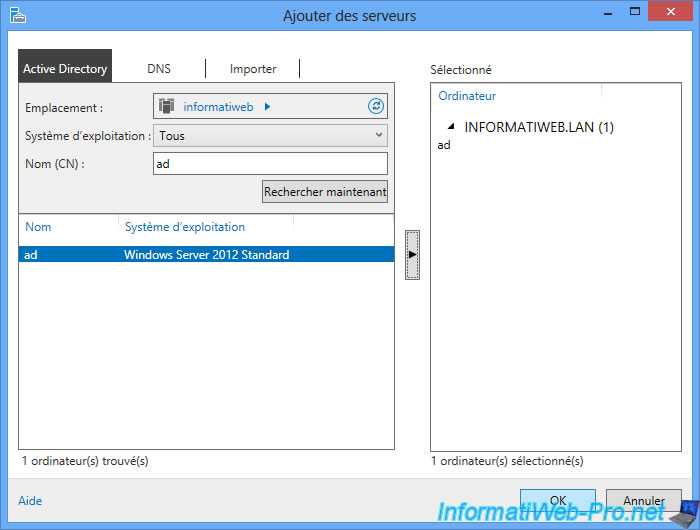
In the «Active Directory» tab, verify that your domain is indicated for the location and specify the name of your server.
Then, click «Find Now».
If all goes well, your server will appear in the list on the left.
If so, select it and click the middle arrow to add this server to the list on the right.
Then, click OK.
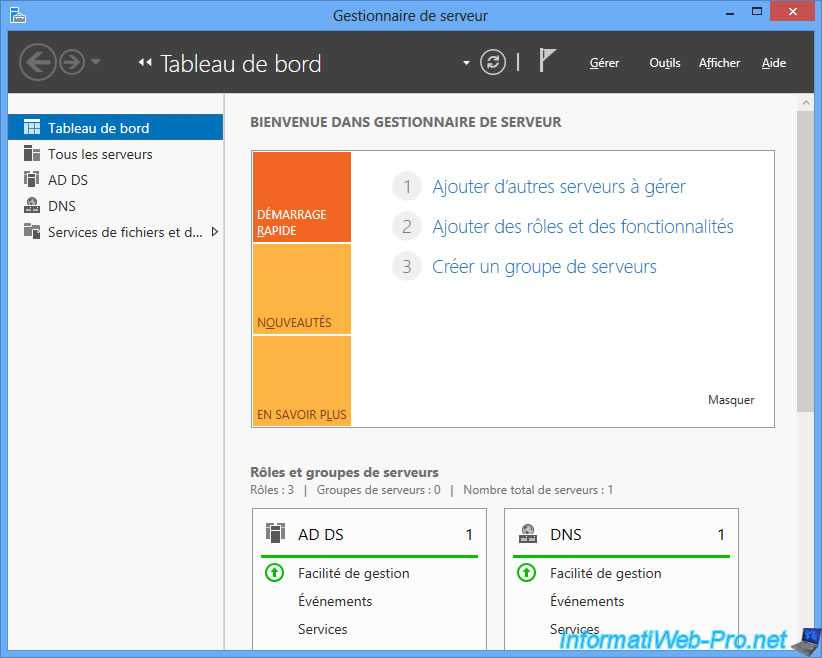
The server manager will retrieve information about your server, and the list of roles installed on this server will appear on the left.
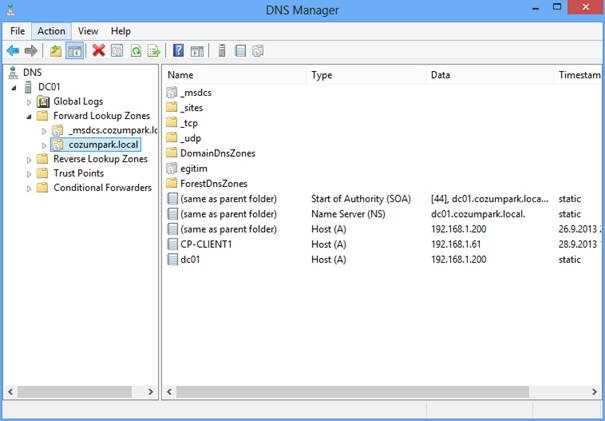
As you can see in the image below, our server has these roles : AD DS (Active Directory), DNS and file server.
Finally, if you go into the Windows administration tools, you will see that several consoles have also made their appearances.
And especially :
- the new Active Directory administration center
- the management console for DHCP servers
- the management console for DNS servers
- and more.
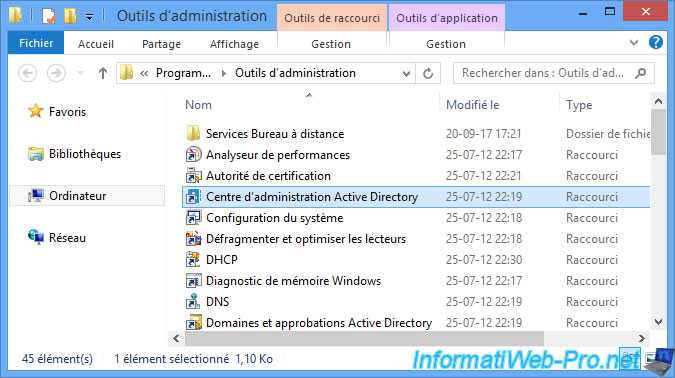
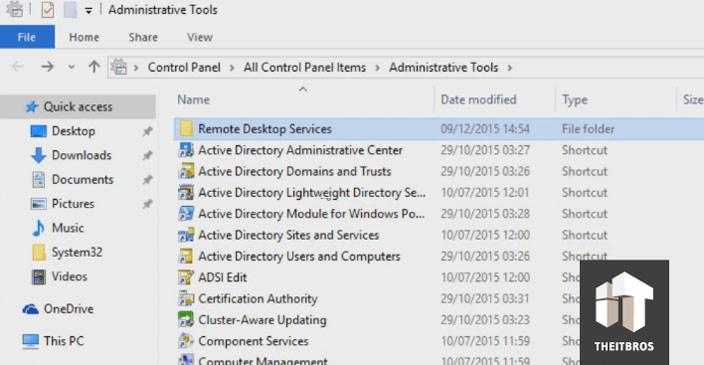
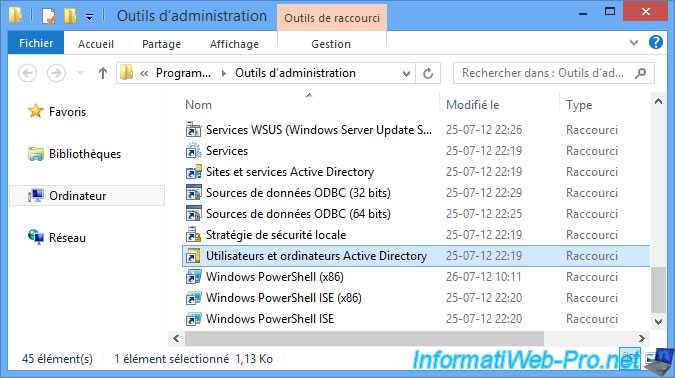
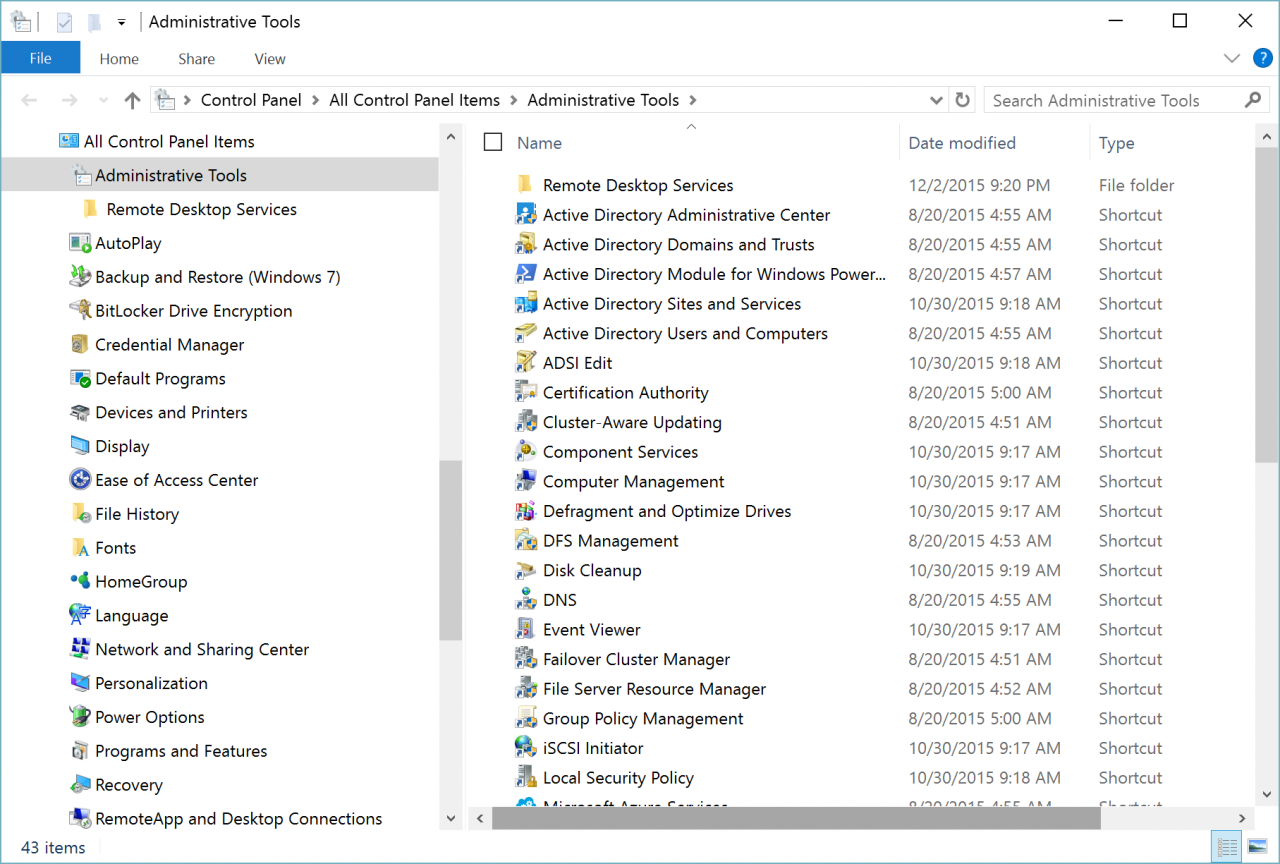
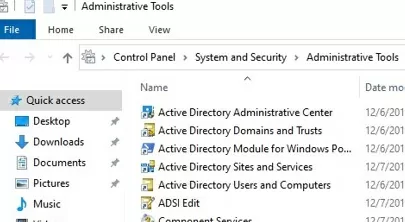
Note : administration tools are accessible from the Control Panel -> System and Security -> Administrative Tools.

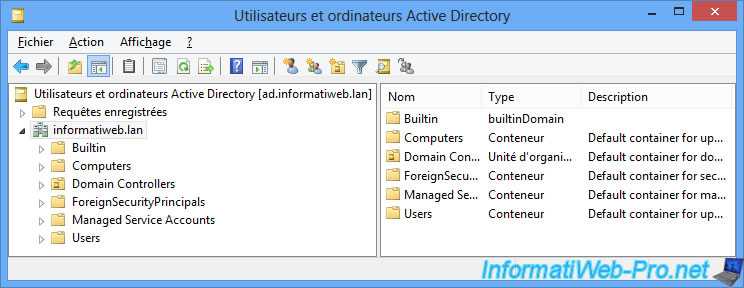
Among the available consoles, you will find the «Active Directory Users and Computers» console to manage the users and computers of an Active Directory server.
If you have the right to manage the Active Directory server, the Active Directory server information will be displayed.
Otherwise, a warning will be displayed when you start the console to ask you to log on with a user with administrative privileges.
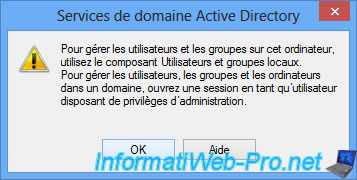
Additionally, the console will be empty because you don’t have permission to manage the Active Directory server.
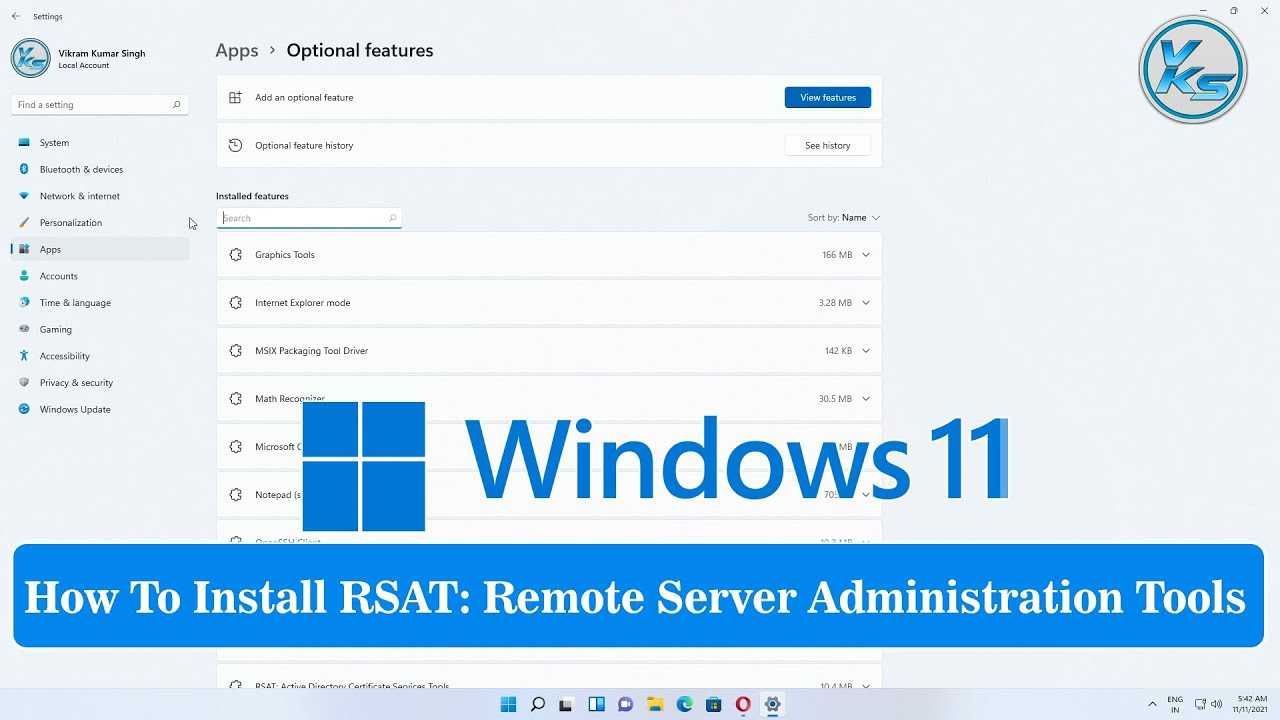
Installing RSAT Tools on Windows 10 and 11
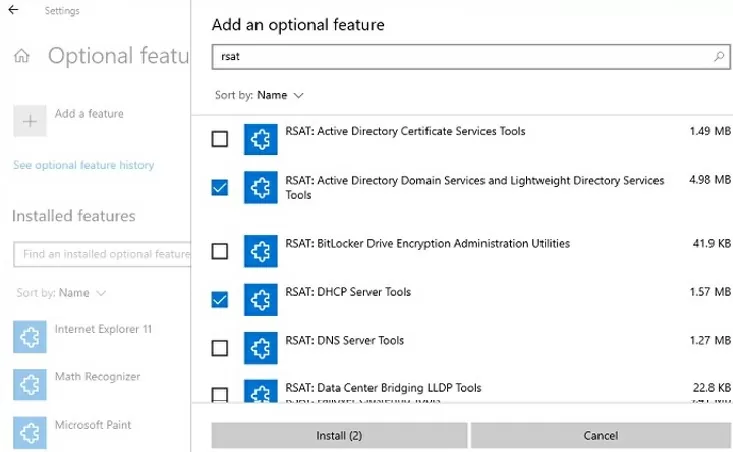
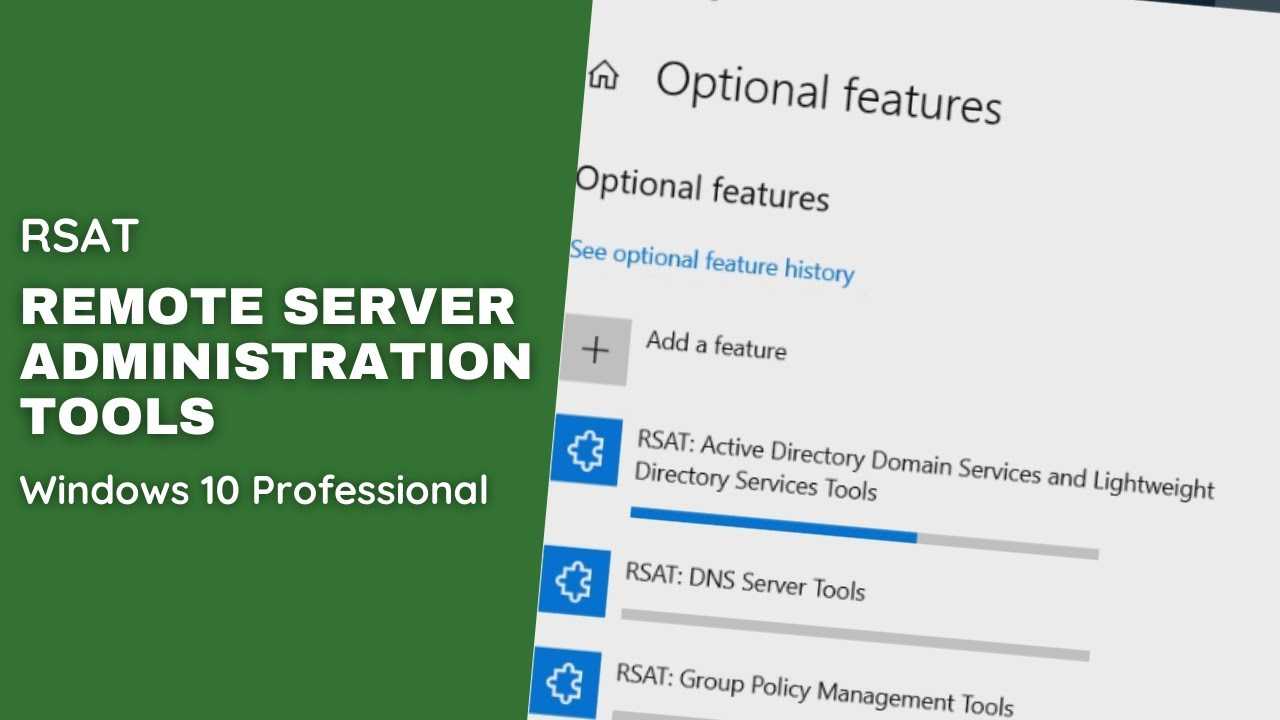
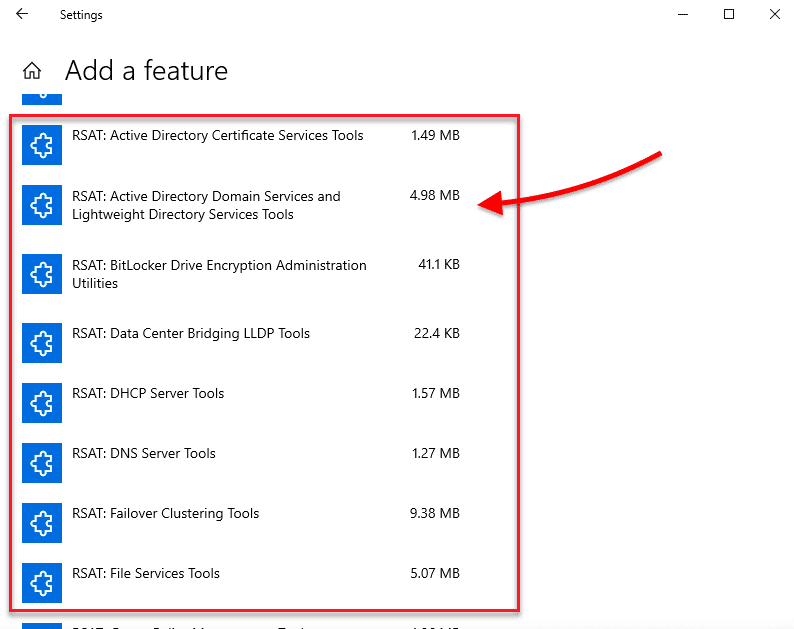
On Windows 10 and 11, RSAT is installed via the graphical panel Settings -> Apps -> Optional Features -> Add an optional feature.
The Windows optional features list includes components such as OpenSSH server for Windows, built-in SSH client, SNMP service, etc.
Type in the search bar to view available features. The following RSAT administration tools can be installed on Windows 10/11:
- RSAT: Active Directory Domain Services and Lightweight Directory Services Tools
- RSAT: BitLocker Drive Encryption Administration Tools for AD
- RSAT: Active Directory Certificate Services Tools
- RSAT: DHCP Server Tools (used to configure and manage DHCP service on Windows Server)
- RSAT: DNS Server Tools
- RSAT: Failover Clustering Tools
- RSAT: File Services Tools
- RSAT: Group Policy Management Tools – GPO management console and the Group Policy module for PowerShell
- RSAT: IP Address Management (IPAM) Client
- RSAT: Data Center Bridging LLDP Tools
- RSAT: Network Controller Management Tools
- RSAT: Network Load Balancing Tools
- RSAT: Remote Access Management Tools
- RSAT: Remote Desktop Services Tools
- RSAT: Server Manager
- RSAT: Shielded VM Tools
- RSAT: Storage Migration Service Management Tools
- RSAT: Storage Replica Module for Windows PowerShell
- RSAT: System Insights Module for Windows PowerShell
- RSAT: Volume Activation Tools (KMS server console)
- RSAT: Windows Server Update Services Tools.
Select the required RSAT components and click Install.
You can only install RSAT on Windows 10/11 Professional and Enterprise, not on Windows Home editions.
Some RSAT components may require a reboot after installation.
RSAT components are not part of the Windows image and are available as Features on Demand. This means that your computer must be connected to the Internet in order to install RSAT. Windows downloads and installs RSAT binary files from Microsoft Update servers.
The RSAT package was installed as a separate update (MSU file) in previous versions of Windows (before build Windows 10 1809). The KB2693643 update must be downloaded from the Microsoft website and installed manually (https://www.microsoft.com/en-us/download/details.aspx?id=45520).
After installing the KB2693643 update, you can enable the required RSAT components from Control Panel -> Programs and Features -> Turn Windows features on or off (). Expand the Remote Server Administration Tools and select the admin tools that you want to install.
If you try to install KB2693643 on a newer build of Windows 10 or Windows 11, you will receive an error:
Windows Update Standalone Installer encountered and error: 0x8024001d
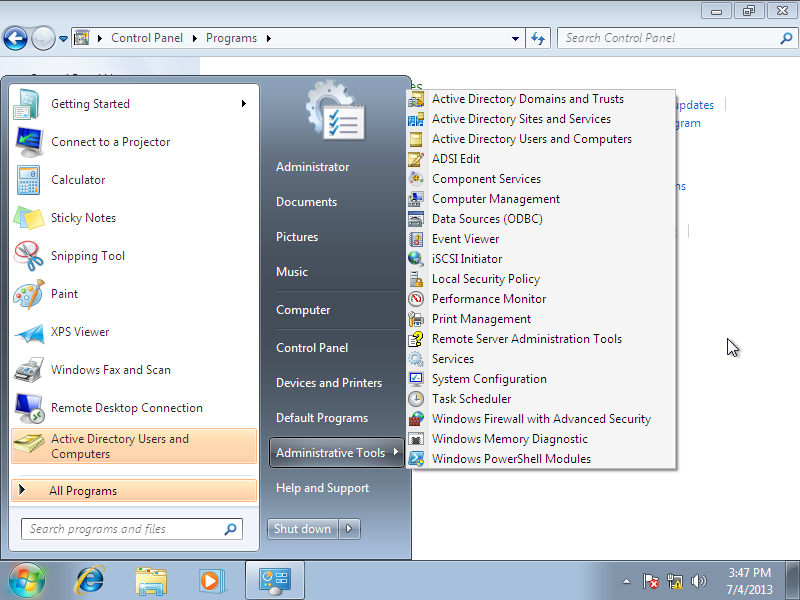
After installation, the RSAT graphical MMC snap-ins will be available in the Administrative Tools section of the Control Panel () or under the folder.
Install RSAT Admin Pack on Windows 10 (Prior to Oct 2018 Update) and Windows 8.1/7
Installing on older Windows Operating Systems (than the Windows 10 Oct 2018 update and later) are identical. There is a separate RSAT tool for each Operating Systems, you need to download and install them.
Microsoft has a clear system requirement and installation steps for each version. Make sure your Windows is meeting the OS and version requirements.
1) Download appropriate Admin pack from the official site here.
2) Depending on the OS type, you may get different installation screens. Fundamentally the installations steps are the same. Start the installation and press yes to Install the update.
This is the KB number on Windows 7.
Windows 8 to 10 have the same KB number for RSAT tools as below. These KB numbers are required to uninstall them later if you need.
3) Once successfully installed, the next screen will show how to install each feature of the admin pack tool. Without doing this step you can’t find any of the administration tools in programs or control panel.
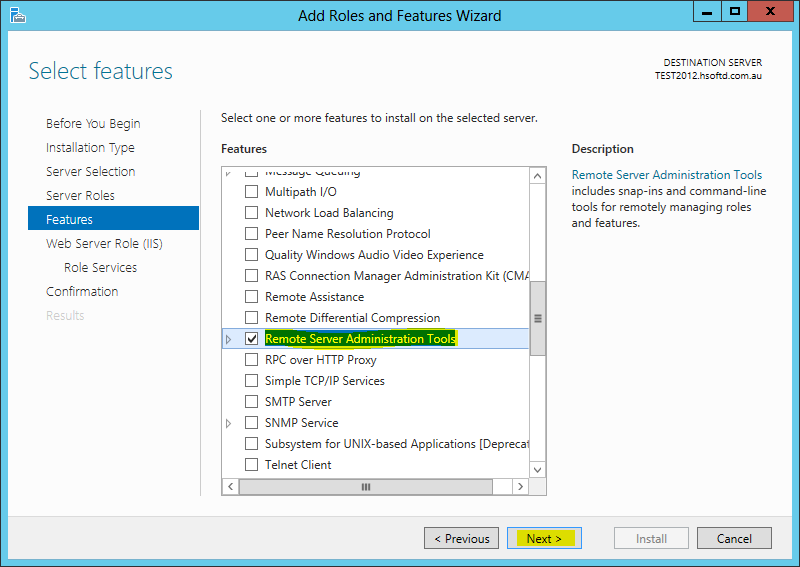
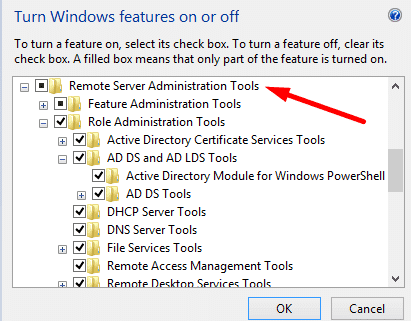
4) Go to Programs and features. Select Turn Windows features on or off then select Remote Server Administration Tools (or any other tool you required) as shown below.
5) You must have administrative access on the remote Windows servers to connect and manage them from your client computer.
6) Newly added admin pack tool features can be found under Administrative Tools in Windows 10/8.1/7.
Remote Server Administration Tools (RSAT) Background
The Remote Server Administration Tools (RSAT) have been with Windows since Windows 2000. On various versions of Windows the tools are sometimes included and sometimes they need to be downloaded from the Microsoft website and installed. Before Windows 10 version 1709 the tools need to be downloaded from the Microsoft website and installed. With Windows 10 version 1709 and later the tools are included with the operating system installation but they need to be enabled. With Windows 7 and Windows Vista the tools need to be downloaded, installed and enabled.
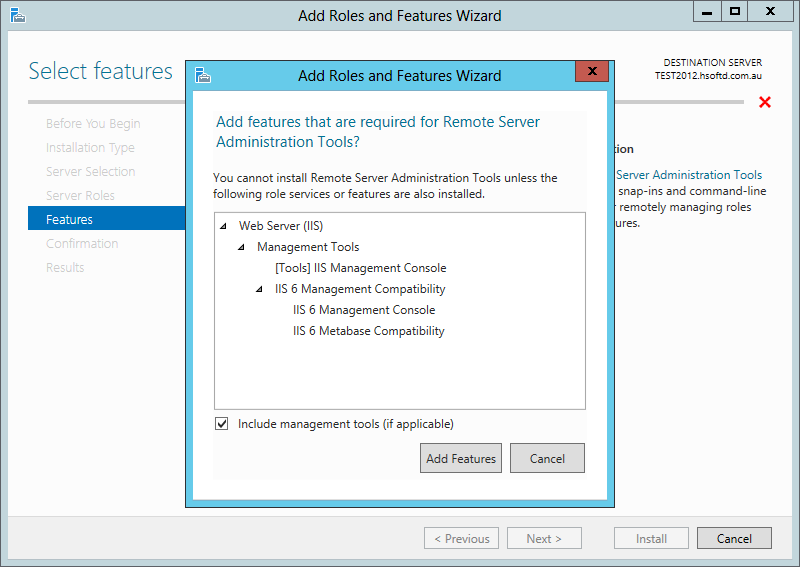
The Following Tools are Included with Remote Server Administration Tools (RSAT):
- SMTP Server Tools
- Hyper-V Management Tools
- Hyper-V Module for Windows PowerShell
- Hyper-V GUI Management Tools
- Windows Server Update Services Tools
- API and PowerShell cmdlets
- User Interface Management Console
- Active Directory Users and Computers Snap-in
- Active Directory Sites and Services Snap-in
- Active Directory Domains and Trusts Snap-in
- Active Directory Administrative Center Snap-in
- ADSI Edit Snap-in
- Active Directory Schema Snap-in (Not Registered)
- Active Directory Command Line Tools
- Active Directory Module for Windows PowerShell
- IIS Management Tools
- IIS Management Console
- IIS Management Compatibility
- Feature Tools
- Remote Desktop Services Tools
- Role Tools
- Update Services Tools
- Group Policy Tools
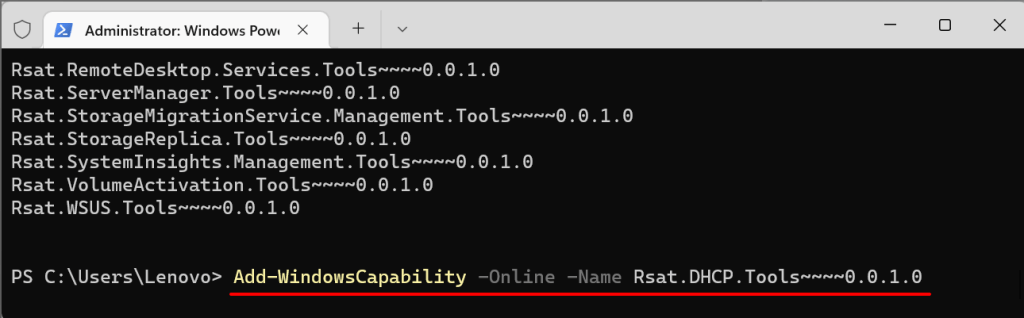
Install other RSAT Components using PowerShell Command
I am sharing few other PowerShell command line which can be used to for installation of other RSAT Tools:
To install all default components under Remote Server Administration Tools:
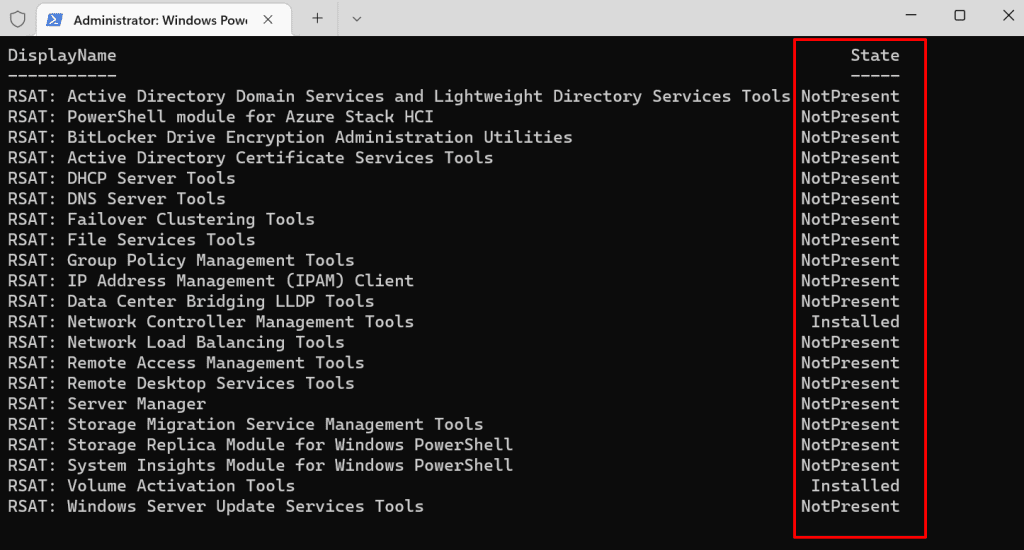
Get-WindowsFeature | Where-Object {$_.Name -like "RSAT*"} | Install-WindowsFeature
To install all other components under selected component, use:
get-WindowsFeature | Where-Object {$_.Name -like "RSAT*"} -IncludeAllSubFeature | Install-WindowsFeature | Install-WindowsFeature -WhatIf
For Rest other Windows Server components to install using PowerShell:
For complete list of RSAT tools that can be installed, use following PowerShell Command: get-WindowsFeature | Where-Object {$_.Name -like "RSAT*"} | select name,displayname
What is RSAT (Remote Server Administration Tools)?
RSAT (Remote Server Administration Tools) refers to a set of tools from Microsoft that enable IT administrators to remotely manage roles and features in Windows Server from a computer that is running Windows 11, Windows 10 or Windows 7 Service Pack 1 (SP1). For these computers, RSAT includes many tools to manage the various roles and features that run on Windows Server, such as Server Manager, Microsoft Management Console (MMC) snap-ins, consoles and PowerShell cmdlets.
RSAT enables system admins to run snap-ins and tools from a Windows 11/10/7 SP1 PC to remotely manage Windows Server features, roles and role services. Previously, they had to individually log in to the specific server they wanted to manage. But, with RSAT’s graphical user interface-based tools and snap-ins, any admin can easily manage multiple servers remotely. Since it simplifies the administration of Windows Server, they can save both time and effort in server management, maintenance and optimization.
File Services Tools
The File Services Tools folder inside the Remote Server Administration Tools (RSAT) contains a lot of interesting tools. When you add the Distributed File System Tools and Share and Storage Management Tools you receive the following new shortcuts in your Administrative Tools folder:
- DFS Management (dfsmgmt.msc)
- Share and Storage Manager (storagemgmt.msc)
The third tool that’s listed in the Remote Server Administration Tools (RSAT) regarding File Services is the File Server Resource Manager. Since you can’t install the File Server Resource Manager on a Server Core box, this tool cannot be pointed towards a Server Core file server and is therefor useless for managing Server Core boxes.
Share and storage management
The Share and Storage Management MMC Snap-In (storagemgmt.msc) is tool that is only supported to remotely manage Windows Server 2008 and above (can’t be used to manage Vista though) and it provides an overview of all the shares and volumes on the server. The Share and Storage Management MMC Snap-In (storagemgmt.msc) provides much more information than the Shared Folders MMC Snap-In inside Computer Management (compmgmt.msc) does and can be seen as its successor.
It’s almost a shame this tool is much harder to get working than the Shared Folders Snap-In. This is because of the Volume Management features which requires the Virtual Disk Service (VDS) to be properly configured and some firewall exceptions to be enabled on both the server and your Windows Vista workstation as pointed out here. To accomplish this, type the following command at both boxes:
sc \\localhost config vds start= auto
sc start vds
netsh advfirewall firewall set rule group=»Remote Volume Management» new enable=yes
Concluding
The Remote Server Administration Tools (RSAT) for Windows Vista add remote Server Core administration functionality to Windows Vista and can be used in that manner, when you know your way around them.
The Tools have some rough edges, some missing functionality (by default mostly) and most of them can’t even be used with Server Core installations of Windows Server 2008, but they fulfill my remote administration wishes. When used in conjunction with the tools from Computer Management (compmgmt.msc) as shown here, you too can enjoy the bountiful joys of remote management from the comfort of anywhere you’d like. (in my case: my sunny backyard)
Active Directory Domain Services Tools
The Active Directory Domain Services tools in the Role Administration Tools folder apply to the Active Directory Domain Services Role. It consist of two tools. Only the Active Directory Domain Controller Tools are of interest for a Server Core Domain Controller. Once installed you should find these tools in the Administrative Tools folder of your Windows Vista box:
- Active Directory Domains and Trusts (domain.msc)
- Active Directory Sites and Services (dssite.msc)
- Active Directory Users and Computers (dsa.msc)
- ADSI Edit (adsiedit.msc)
These tools work largely as you would expect them to on Windows XP to administer a Windows Server 2003 environment. (You can even use the tools to administer a Windows Server 2003 Active Directory environment!) There are a few exceptions though:
- No Exchange Server Management integration
- Exchange Server 2003:
- Exchange Server 2007: install the Exchange Management Console
- No Terminal Services integration
(by default, workaround available) - No Windows Deployment Services integration
(by default, workaround available) - No Attribute Editor when managing Windows Server 2003 environment
(by default, workaround available)
Additional Active Directory Setup
Below are two critical additional Active Directory setups.
Adding a new Domain Controller to an Existing Root Domain
- Make sure both domains have connectivity.
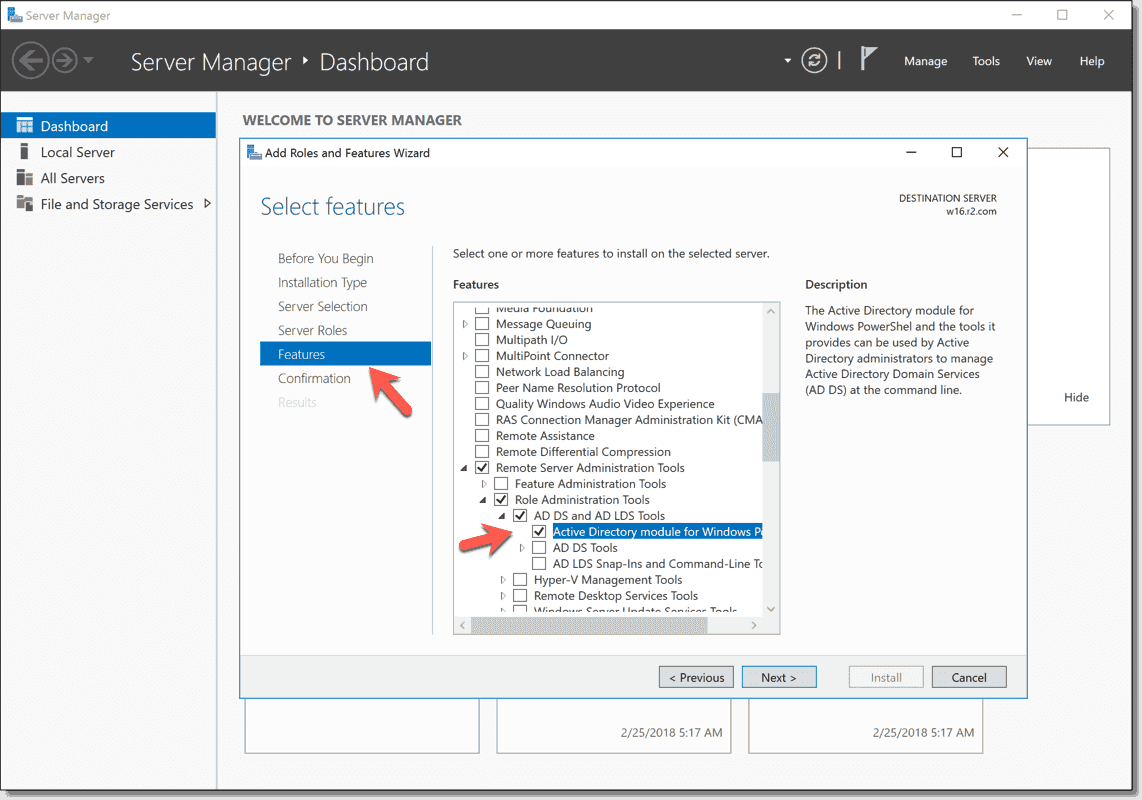
- Create a new domain. Go to Add Roles and Features, select role-based or feature-based installation, and select the local server. On server roles, pick the Active Directory Domain Services.
- Before closing installation, choose “promote this server to a domain controller”. In the next screen: “Deployment configuration,” select “Add a domain controller to an existing domain”. Select your domain through name or credentials.
- On additional options, select “Replicate from” and “your root domain controller”. Then, go ahead and install it.
- Change the DNS server of the new domain controller to the core DNS server.
Create a new Active Directory Users, Computers, or Groups
- Go to Server Manager > Local Server > Tools > Active Directory Users and Computers.
- Right-click on your domain name (or within any OU) > “New” > Users, Computer, or Group.
- If you are creating a new user, you’ll need to add the first and last name, the login name, and the password. If you make a new Group, give it a new name.
- To add the new user or computer to the new group, right-click on the new user, “Add to a group” > Go ahead and find and select the group.
Setup Active Directory with RSAT
To set up Active Directory, you’ll need to have Microsoft Remote Server Administration Tools (RSAT) running on a Windows machine. RSAT allows IT admins to remotely manage the roles and features in Windows Server 2012 and 2016. RSAT includes the Server Manager, Microsoft Management Console (MMC) snap-ins, PowerShell cmdlets, consoles, and additional command-line tools to administer Windows Server’s roles and features.
- RSAT is compatible with Windows servers running Windows 10, Windows 8.1, Windows 8, Windows 7, or Windows Vista.
- You can install RSAT 10 only in the full edition of Windows Professional, Windows Enterprise, or Windows Education versions.
- You cannot install RSAT in Windows Home, Standard edition, or on computers running Windows RT 8.1
How to install RSAT?
If you have the Windows 10 Oct 2018 update (1809) or later, RSAT is already included as a set of Features on Demand.
- Go to Settings > Click on “Apps” > Apps & Features > Manage Optional Features > Add Feature.
- Scroll down, find, and select RSAT: Active Directory Domain Services and Lightweight Directory Tools. Click on Install.
Prior to the October 10 update (1809) – Windows 8 or Windows 10 (1803)
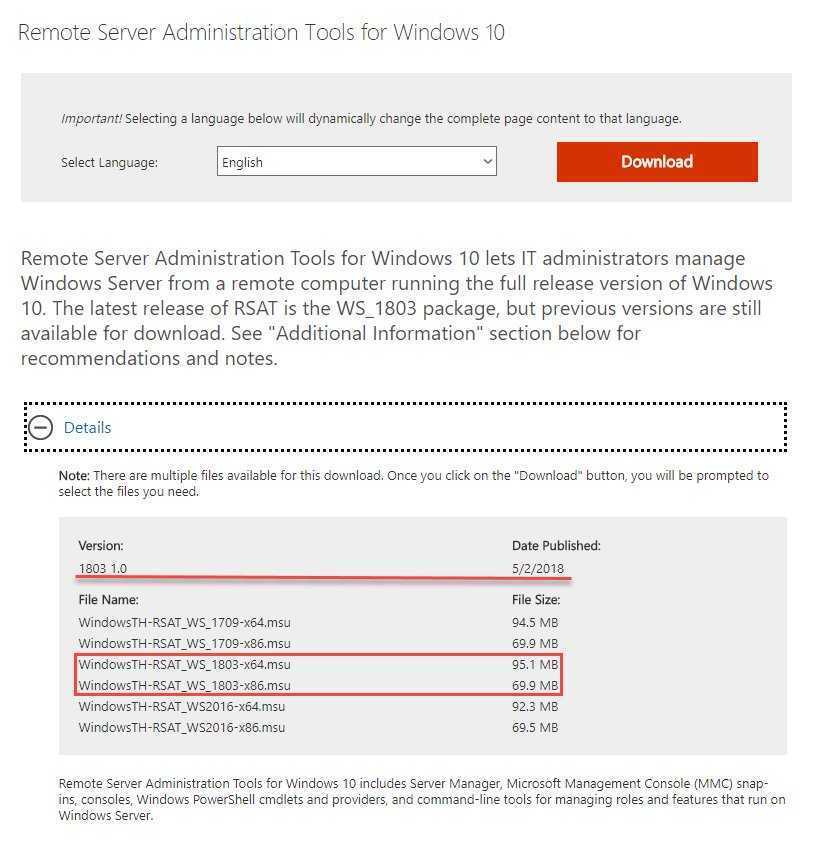
- Download RSAT for Windows 10 from Microsoft’s official site.
- Double-click on the installer (.msu) and click on “Install”. Go on and accept the license terms and wait for the installation to finish.
- Go to Control Panel > Programs > Programs and Features > Turn Windows features on or off.
- Scroll down, find, and expand the “Remote Server Administration Tools”.
- Click on Role Administration Tools. Ensure that “AD DS and AD LDS Tools” are selected. Click on “AD DS and AD LDS Tools” to verify that Active Directory Module for Windows PowerShell and AD DS Tools are checked.
Offline Install RSAT on Windows Using the FoD ISO Image
If you cannot access the Microsoft Update servers directly from your workstation, you can use the offline installation of RSAT (recommended for disconnected networks without Internet access).
You must download the ISO image containing the FoD components for your version of Windows from the Microsoft website (or from the Volume Licensing Service Center, VLSC) in order to install RSAT offline.
- For Windows 10 2004 and newer — https://learn.microsoft.com/en-us/azure/virtual-desktop/language-packs (FOD Disk 1 ISO)
- For Windows 11 21H2/22H2– https://learn.microsoft.com/en-us/azure/virtual-desktop/windows-11-language-packs (Language and Optional Features ISO)
For example, for Windows 10 22H2 x64 you need to download the image file 19041.1.191206-1406.vb_release_amd64fre_FOD-PACKAGES_OEM_PT1_amd64fre_MULTI.iso (about 5 GB). Extract the contents of the ISO image to the shared network folder. You will get a set of files, including RSAT components.
Now, to install RSAT components on a Windows workstation, specify the path to this shared network directory with FoD in the -Source parameter:

You can also use the above Group Policy option to specify the path to the directory containing the FoD image components. Specify the UNC path to the directory containing the FoD files in the Alternative source file path parameter.
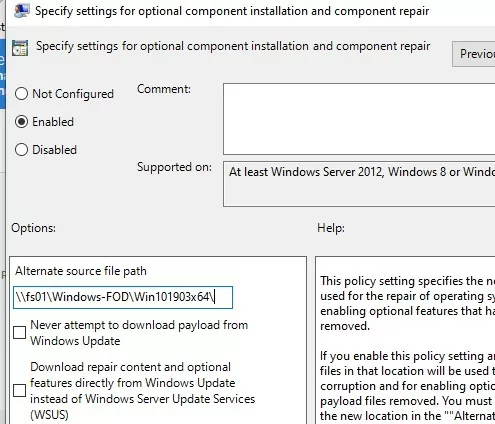
Or, you can set this parameter in the registry with a GPP by specifying the path to the FoD directory in the LocalSourcePath parameter (REG_Expand_SZ) under the registry key HKLM\SOFTWARE\Microsoft\Windows\CurrentVersion\Policies\Servicing. Users will now be able to install the RSAT components in Windows on their own using the graphical interface of Manage Optional Features.
Common Remote Server Administration Tools Installation Errors on Windows:
- 0x8024402c, 0x80072f8f – Windows cannot access the Microsoft Update servers to download RSAT files. Check that you have Internet access or install the components from a local FoD image:
- 0x800f081f – check the path to the directory containing the RSAT components specified in the parameter;
- 0x800f0950 – the error is similar to 0x800f0954;
- 0x80070490 – check and repair your Windows image using DISM:
How to use RSAT in pre-2018 versions of Windows 10
Admins using client computers with pre-2018 versions of Windows 10 — October 2018 Update # 1809 — cannot use FODs to use RSAT. They need to download and install the RSAT package in one of three ways:
- Install RSAT FODs from Windows 10 for managing Windows Server 2019 or previous versions.
- Download and install the WS_1803 RSAT package for managing Windows Server, versions 1803 or 1709.
- Download and install the WS2016 RSAT package for managing Windows Server 2016 or previous versions.
See how to get a grip on your infrastructure with a custom MMC. Compare the features in the Windows Server 2022 editions. Learn more about AD and how to troubleshoot common issues, and find out how to handle AD replication problems.
Where is Administrative Tools in Windows 7?
If you are unfamiliar with Administrative Tools, the folder located in the Control Panel contains shortcuts to programs and parts of Windows that are related to the operating system. Double-clicking or double-tapping the Administrative Tools shortcut starts the tool. The folder is not used directly by Windows; instead, it stores shortcuts to programs and parts of the operating system. Most of the programs in the Administrative Tools folder are snap-ins to the Microsoft Management Console. One example of an MMC snap-in is Component Services. This snap-in allows you to configure COM components and COM+ applications.
The Remote Server Administration Tools are installed by Windows administrators and can be uninstalled from the Control Panel as well. They can be managed by matching required roles to enabled features. These tools simplify the management of server infrastructure by enabling administrators to manage the roles of servers from a central location. They make the management of servers easier and faster. You can download the Remote Administrative Tools for Windows 7 here. These tools are required if you are planning to manage a large network of computers.
Can you use RSAT to remotely manage WSB in Windows 11?
Any ideas how I can use the Server Backup console from a windows 8 machine? other RSAT tools are available for things like Hyper-V and AD etc. but I can’t find one for server backup.
We see this kind of topics in forums from time to time, namely trying to manage or monitor Windows Server Backup (WSB) from Window Client OS (Windows 11/10/8/7/etc.) by installing RSAT. But as the user said in this case, WSB does not have an RSAT module.
WSB isn’t a component in Windows client, so there‘s no WSB MMC (Microsoft Management Console), which enables remote management of other WSB-capable servers. Frankly speaking, remote WSB is only possible server to server.
Then how can you create and monitor remote server backup from client OS such as Windows 11? Don’t worry, there are still available ways.
Alternative to remotely backup servers from Windows 11/10/8/7
One thing you can try is an agent-based centralized backup solution. It enables you to use any Windows PC or Server as a central console, and register any computer in the network as client, thus you can easily backup and monitor servers from a desktop PC.
The example I use here is AOMEI Cyber Backup, it could be installed on any computer running Windows 11/10/8/7 or Windows Server 2022/2019/2016/2012(R2)/2008(R2)/etc. as the central console, from where you can gain control over client PCs or servers in the LAN for backup and monitor.
With it, you can create Disk Backup, System Backup, Partition Backup, VM backup and SQL backup.
Uses an intuitive console for execution and view. You can centrally backup all added Windows servers and PCs, and view, restore, manage backups on the console.
Support auto backup and management. set up backup schedule to backup data daily, weekly, or monthly. And you can setan auto cleanup retention to automatically remove outdated backup versions to free up storage.
You can download and install the 30-day free trial of AOMEI Cyber Backupper to experience all the features. And we will guide you how to use this tool.
Download Free Trial Win PCs & Servers
Secure Download
Step 1. Please download and install AOMEI Cyber Backup Agent on the remote server. You can click «Source Device» > «Agents» > «Download Agent» to download the installation file to local computer and copy it to the corresponding device for installation.
Step 2. Access to «Source Device» > «Windows» > «Add Windows Device». Input the IP address and user information. Click Confirm to add the device.
Step 3. Click «Backup Task» > «Create New Task» > Choose a backup type. If you want to backup the whole server, select «Disk Backup». Then specify the backup details, such as: Task Name, Device Name, Target, and Schedule as you want.
Step 4. Click «Start Backup» to start the process, you can select Add the schedule and start backup now, or Add the schedule only.
Contents
- Installing the Remote Server Administration Tools (RSAT)
- Fulfilling system requirements
- Downloading the standalone setup package
- Installing the package
- Selecting RSAT features
- Selecting applicable tools
- Displaying Administrative Tools
- Using the Remote Server Administration Tools (RSAT)
- Active Directory Domain Services Tools
- Group Policy Management Tools
- DNS Server Tools
- DHCP Server Tools
- File Services Tools
- Concluding
Installing RSAT
In order to use the Remote Server Administration Tools (RSAT) you need to download the standalone setup package from the Microsoft Download servers, install the update package and after installation use the Programs and Feature control panel applet to actually install the parts of the Remote Server Administration Tools (RSAT) you’d wish to use.